





WebGL-powered Features to Build Next-generation Mapping Experience

3456
Of your peers have already read this article.
3:00 Minutes
The most insightful time you'll spend today!
At Google I/O 2021, we announced the beta release of Tilt and Rotation, and Webgl Overlay View, which give you a fundamentally new way to build mapping experiences. You may be familiar with the existing Overlay View feature of the Maps JavaScript API that lets you render in a transparent layer that sits on top of the map. For years, developers have been using Overlay View to draw in two dimensions over the top of the map, but for as much as you can do with Overlay View, it only allows you to render on a transparent layer that effectively floats above the map.
In contrast, WebGL Overlay View gives you direct hooks into the lifecycle of the exact same WebGL rendering context we use to render the vector basemap. This means that for the first time ever, you can performantly render two and three dimensional objects directly on the map, enabling you to build experiences that were previously impossible with the Maps JavaScript API.https://www.youtube.com/embed/9eycQLef6iU?enablejsapi=1&
Today, we’re going to give you a quick overview of the new WebGL-powered features of the Maps JavaScript API, so that you have all the knowledge you need to get started creating next generation mapping experiences.
What is WebGL?
WebGL is a low-level browser API, originally authored by the Mozilla Foundation, that gives you access to the rendering and processing power of the graphics processing unit (GPU) on client devices, such as mobile phones and computers, in your web apps. On its own, the browser is not able to handle the heavy computation needed to render objects in 3D space, but using WebGL it is able to pass those processes off to be handled by the GPU, which is purpose built to handle such computations.
To learn more about WebGL, check out the documentation from the Khronos Group, the designers and maintainers of WebGL.
Requirements
To use WebGL Overlay View, you’ll need a Map ID with the vector map enabled. It’s also strongly recommended that you enable Tilt and Rotation when you create your Map ID, otherwise your map will be constrained to the default top-down view – in short, you won’t be able to move your map in three-dimensions.
To learn more about using Map IDs and the vector map, see the documentation.
Setting Tilt and Rotation
To load your map with a set tilt and rotation, you can provide a value for the `tilt` and `heading` properties when you create the map:
const mapOptions = {mapId: "15431d2b469f209e",tilt: 0,heading: 0,zoom: 17,center: {lat: -33.86957547870852,lng: 151.20832318199652}}const mapDiv = document.getElementById("map");const map = new google.maps.Map(mapDiv, mapOptions);
Tilt is specified as a number or float in degrees between 0 and 67.5, with 0 degrees being the default straight down view and 67.5 being the maximum tilt. The available maximum tilt also varies by zoom level.
The rotation is set in the heading property as a number or float between 0 and 360 degrees, where 0 is true north.
You can also change the tilt and rotation programmatically at runtime whenever you want by calling `setTilt` and `setHeading` directly on the map object. This is useful if you want to change the orientation of the map in response to events like user interactions.
map.setTilt(45);map.setHeading(180);
In addition, your users can manually control the tilt and rotation of the map by holding the <shift> key and dragging with the mouse or using the arrow keys.
For more information on Tilt and Rotation, see the documentation.
Adding WebGL Overlay View to the Map
WebGL Overlay View is made available in the Maps JavaScript API by creating an instance of `google.maps.WebglOverlayView`. Once an instance of the overlay is created, you simply need to call `setMap` on the instance to apply it to the map.
const webglOverlayView = new google.maps.WebglOverlayView;webglOverlayView.setMap(map);
To give you access to the WebGL rendering context of the map and handle any objects you want to render there, WebGL Overlay View exposes a set of five hooks into the lifecycle of the WebGL rendering context of the vector basemap.
Here’s a quick rundown:
- `onAdd` is where most of your pre-processing should be done, like fetching and creating intermediate data structures to eventually pass to the overlay. The reason to do all of that here is to ensure you don’t bog down the rendering of the map.
- `onRemove` is where you’ll want to destroy all intermediate objects, though it would be nice if you did it sooner.
- `onContextRestored` is called before the map is rendered and is where you should initialize, bind, reinitialize or rebind any WebGL state, such as shaders, GL buffer objects, etc.
- `onDraw` is where we actually render the map, as well as anything that you specify in this hook. You should try to execute the minimal set of draw calls to render your scene. If you try to do too much here you’ll bog down both the rendering of the basemap and anything you’re trying to do with WebGL, and trust me, no one wants that.
- `onContextLost` is where you’ll want to clean up any state associated with pre-existing GL state, since at this point the WebGL context will have been destroyed, so it’ll be garbage.
To implement these hooks, set them to a function, which the Maps JavaScript API will execute at the appropriate time in the WebGL rendering context lifecycle. For example:
webglOverlayView.onDraw = (gl,coordinateTransformer) => { //do somerendering }
For more information on using WebGL Overlay View and its lifecycle hooks, check out the documentation.
Creating Camera Animations
As part of the beta release of WebGL Overlay View, we’re also introducing `moveCamera`, a new integrated camera control that you can use to set the position, tilt, rotation, and zoom of the camera position simultaneously. Like `setTilt` and `setHeading`, `moveCamera` is called directly on the `Map` object.
By making successive calls to `moveCamera` in an animation loop you can also create smooth animations between camera positions. For example, here we are using the browser’s `requestAnimationFrame` API to change the tilt and rotation each frame:
const cameraOptions = {tilt: 0,heading: 0}function animateCamera () {cameraOptions.tilt += 1;cameraOptions.heading += 1;map.moveCamera(cameraOptions);}requestAnimationFrame(animateCamera);
Plus, all of these adjustments, including zoom, support floats, which means not only can you control the camera like never before, you can also do it with a high degree of precision.
For more information on `moveCamera`, see the documentation.
Give it a tryYou can try the new WebGL-powered features of the Maps JavaScript API right now by loading the API from the beta channel. We’ve got a new codelab, and documentation with all the details, as well as sample code and end-to-end example apps to help you get started. Also, be sure to check out our feature tour and travel demos to learn more and play with a real implementation of these features.
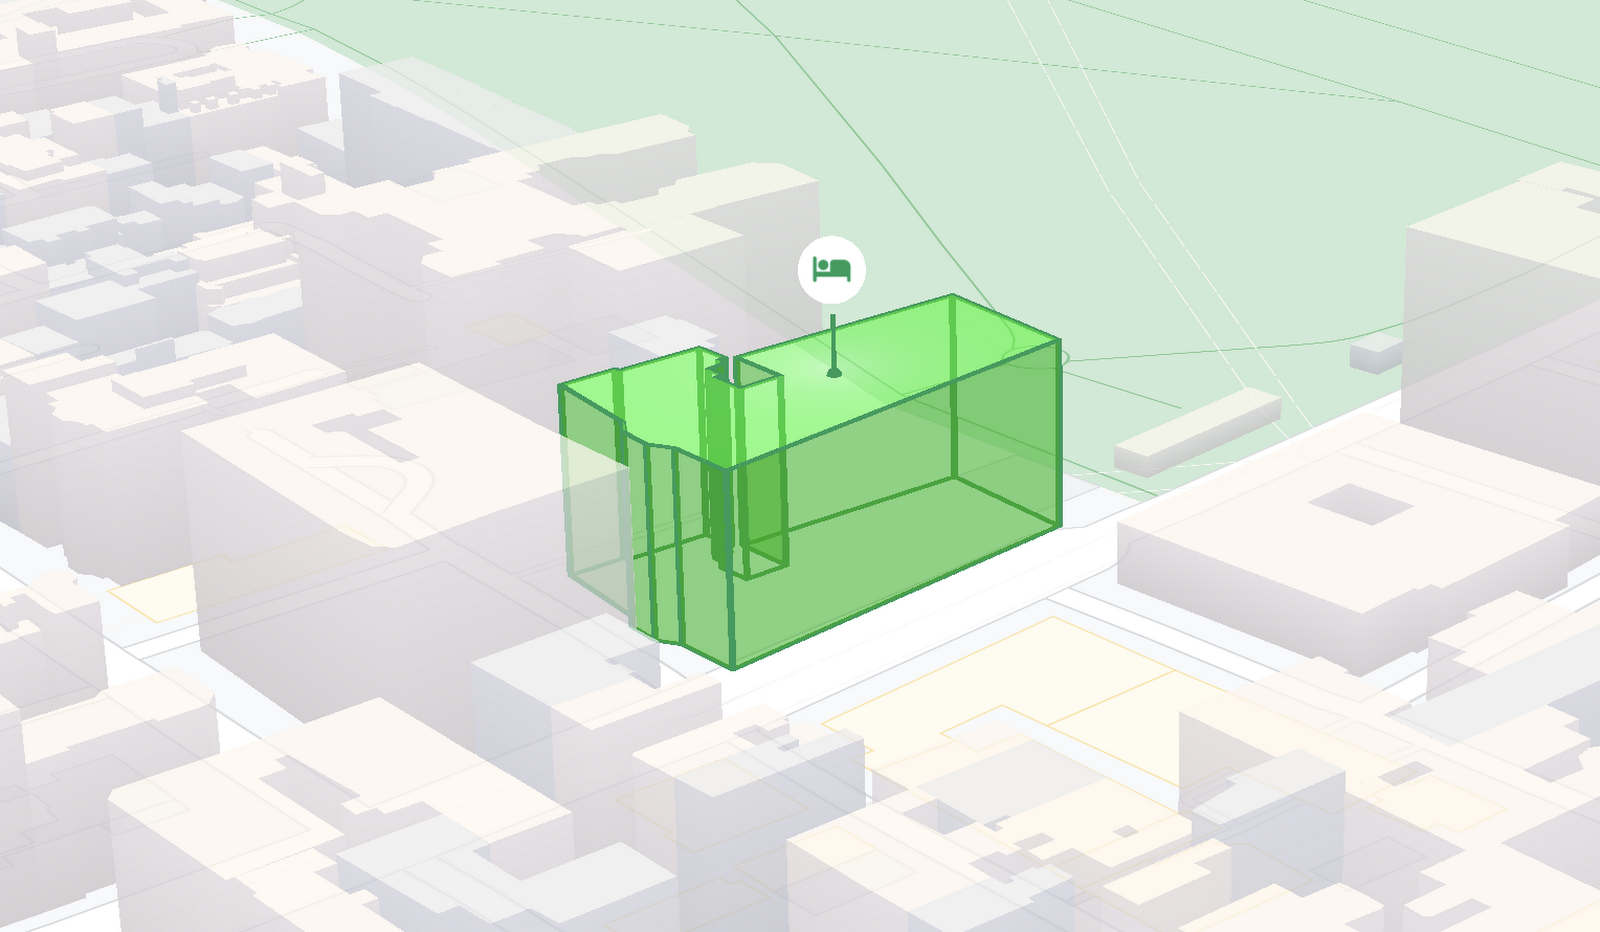
And let us know what you think by reporting through our issue tracker. We need your bug reports, your feature requests, and your feedback to help us test and improve the new WebGL-based map features.
Have fun building with the map in 3D—we can’t wait to see the amazing things you’ll build.
For more information on Google Maps Platform, visit our website.
Contact Center AI (CCAI) with Agent Assist can Lower Opex and Handle 28% More Chats

4803
Of your peers have already read this article.
1:30 Minutes
The most insightful time you'll spend today!
Contact Center AI (CCAI) brings Google’s innovation in conversational AI to solve the most challenging customer service needs while lowering operational costs. More than a thousand customers have deployed CCAI and are steadily turning it on to power their production contact centers.
Today, we’re excited to announce that we’ve made CCAI even stronger with Agent Assist for Chat, now in public preview.
Agent Assist provides your human agents with continuous support during their calls and now chats by identifying the customers’ intent and providing them with real-time recommendations such as articles and FAQs as well as responses to customer messages to more effectively resolve the conversation.
Customers using Agent Assist for Chat have been able to manage up to 28% more conversations concurrently, while also driving up customer satisfaction by 10%. Additionally, we’ve seen them respond up to 15% faster to chats, reducing chat abandonment rates and solving more customer problems.
Agent Assist provides two key components to help agents manage conversations better:
- Smart Reply provides response suggestions to agents so they can quickly and appropriately respond to customer messages. These suggestions can be taken from your top performing agents as well as modified even further to ensure suggestions properly reflect the tone and voice of your brand. Agent Assist learns when and what recommendations to make by building a custom model that’s trained on your (and only your) data.
- Knowledge Assist unlocks the power of your knowledge base to provide articles and FAQ suggestions to agents in real-time as the conversation progresses. When using Knowledge Assist, agents no longer need to make the customer wait while they navigate multiple applications and data to find the resolution to the customer’s issue — the answer is delivered right to them.
“We’ve been very impressed by the chat capabilities of Agent Assist,” said Chris Smith, Vice President of Digital Service at Optus, one of the largest telecommunications companies in Australia
Optus has been using CCAI Dialogflow CX to send queries to virtual agents and sees great potential to use Agent Assist to provide recommendations to their customer support representatives. They expect Agent Assist to help minimize repetitive tasks by providing response and typeahead suggestions, helping improve the efficiency of their agents and the quality and consistency of service they provide.
Another customer, LoveHolidays, is using Agent Assist to support their agents and customers in the travel industry.
“Agent Assist has been a beneficial aid to agents and our customers alike… It gives us the power to flex our contact center staff levels in hours not weeks,” said Eugene Neale, Director of CX Engineering & Business IT at LoveHolidays
Analysts say online chat is becoming one of the most popular ways to reach out to businesses for customer support. IDC research finds that single-function contact centers worldwide are increasingly rare — in 2020, although phone/voice is still responsible for most interactions (at around 18%); email is responsible for around 13% of interactions, and live chat (without automation) is responsible for around 8% of interactions, according to IDC, Toward the AI-Powered Contact Center, Doc # EUR147017320, December 2020.
Deploying CCAI with Agent Assist for Chat
As part of Google’s Contact Center AI suite, Agent Assist provides a seamless handoff from chats managed by your Dialogflow CX virtual agents. If a conversation or customer requires a live agent, Agent Assist will help your team pick it up quickly and drive it to a satisfying resolution.
Historically, when managers saw contact center volumes increase they had two choices: allow customers to wait longer to speak to someone (lowering customer satisfaction) or bring on more agents (increasing cost to serve). Deploying CCAI provides contact center leaders with a third choice: equip agents with tools like, Agent Assist for Chat, to efficiently manage customer interactions while maintaining high quality service.
Global CCAI partners support Agent Assist for Chat
Agent Assist for Chat is a set of public APIs that your engineering team can integrate directly into an agent desktop to control the agent experience from end-to-end. For a more out-of-the-box solution, we have partnered with LivePerson and 247.ai to build Agent Assist directly into their agent desktops.
“Integrating our Conversational Cloud directly with Agent Assist means agents can leverage cutting-edge productivity AI to build even further on the massive ROI of conversational commerce, from reduced agent effort and time-to-respond to increased customer satisfaction and revenue,” said Alex Spinelli, CTO of LivePerson.
More Agent Assist resources
To learn more, check out the Agent Assist webpage. Give Agent Assist a try by training a model and then testing it using the Agent Assist simulator.
6881
Of your peers have already watched this video.
14:21 Minutes
The most insightful time you'll spend today!
How Anthos Helps Organizations Implement Multi and Hybrid Cloud Strategy
Organizations have become increasingly focused on using modernization solutions to build competitive advantage, for faster time to market, serve customers better and seamlessly operate in hybrid and multi-cloud environments. Anthos by Google Cloud, a managed application platform plays an important role in application modernization and also in empowering customers to deploy a hybrid or multi-cloud strategy with opensource technologies and platforms like Kubernetes.
Watch the video to refer to the real use-cases of Anthos for application modernization and hybrid/multi cloud deployment across retail, digital natives, banking and manufacturing space.
Also, explore the latest tool, Migrate for Anthos if you are a traditional enterprise looking to skip rewriting of applications and lift-and-shift process!
3224
Of your peers have already watched this video.
2:00 Minutes
The most insightful time you'll spend today!
Simplified Document Processing with AppSheet Automation
Move over legacy, time-consuming systems and processes to update data from documents and invoices into disparate data systems. AppSheet integrates no-code development with Google Cloud’s state-of-the-art Document AI to automate the data extraction and validation from invoices, documents, receipts, etc.
You can end all ‘guesstimates’ and rely on the accuracy of the intelligent document processing feature, and set custom triggers for automation events or the way data is displayed from its unstructured source. Watch the video to understand how your business can save time and resources with automation and seamlessly manage high-volume, unstructured data.
Develop for Compute Engine in your IDE with Cloud Code

2815
Of your peers have already read this article.
2:30 Minutes
The most insightful time you'll spend today!
When developing services with Compute Engine, our customizable compute service that lets you create and run virtual machines on Google’s infrastructure, you’ll likely find yourself frequently switching between your code editor, terminal, and the Google Cloud Console.
Cloud Code is a set of IDE plugins for popular IDEs like VS Code and IntelliJ that make it easier to develop applications that use Google Cloud services. And now, Cloud Code makes it easy to develop with Compute Engine by incorporating common workflows with your favorite IDE’s user interface.
Specifically, this new integration between Compute Engine and Cloud Code makes it easier to manage your commonly used virtual machines in the IDE, view details about them, connect to them over SSH, upload your application files to them, and view their logs.
Before you begin
Let’s demonstrate how the new integration works in Cloud Code for VS Code. Install Cloud Code for VS Code, and once installed, open its icon on the activity bar on the left and find “Compute Engine”:
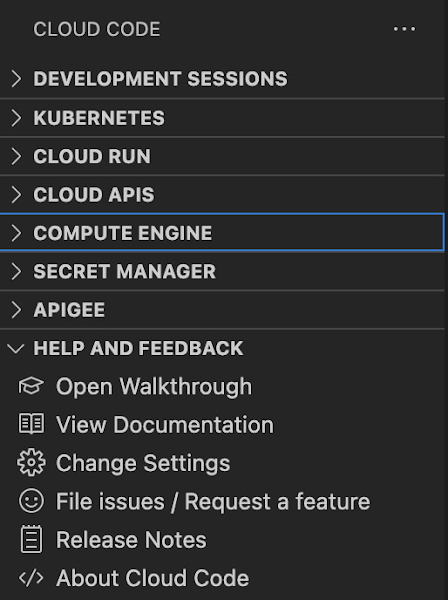
Cloud Code for Jetbrains IDEs (such as IntelliJ) could be installed similarly, and you will find Compute Engine in the list of your IDE tool windows.
View your VMs
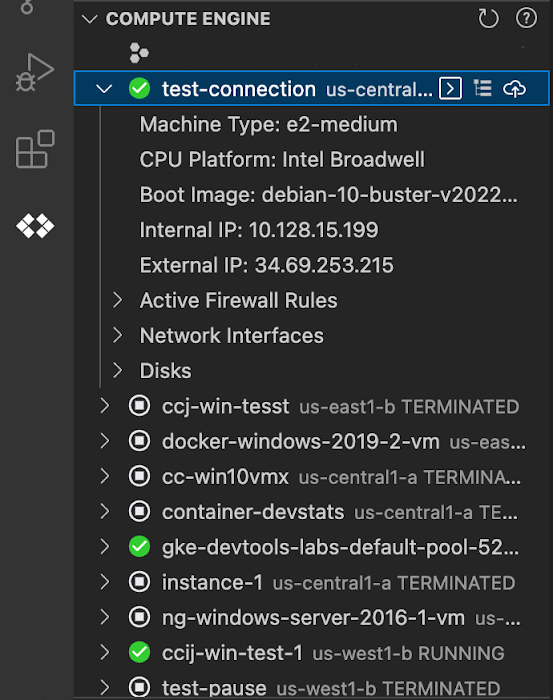
Cloud Code makes it easy to see all relevant VMs in your GCP project and view details needed to effectively work with the VM from the IDE. To start working with a Compute Engine VM in the IDE, navigate to Cloud Code’s new Compute Engine explorer. From there, you can see all the VMs in your current Cloud project. Clicking on a VM will display details such as machine type, boot image, IP address and more. You can also right click on a VM for a quick link to the Google Cloud Console where you can take additional action.
Connect to your VMs over SSH
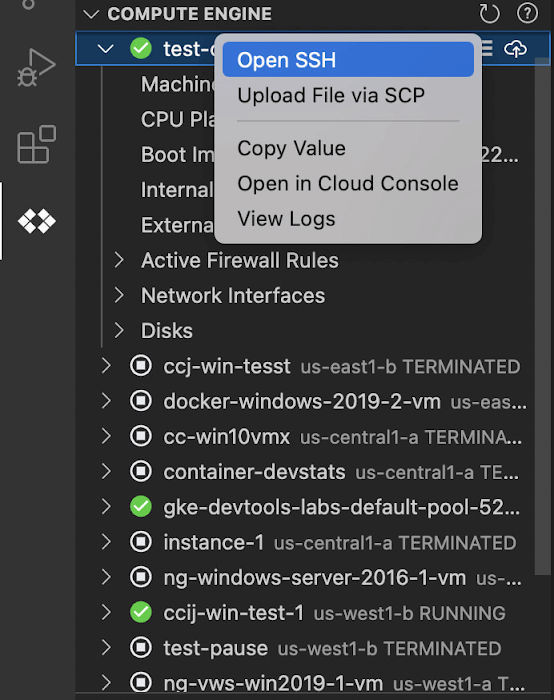
Once you’ve found the VM you want to work with, Cloud Code makes it easy to connect to that VM over SSH. Again, find the VM you want to connect to in Cloud Code’s Compute Engine explorer, right click it, and select “Open SSH”. Cloud Code will then establish an SSH connection from your IDEs terminal into the VM. If there’s any difficulty establishing a connection, Cloud Code can run a troubleshooting diagnostic to help resolve the issue.
Many organizations maintain VMs that don’t have a public IP address, making it difficult to establish an SSH connection to them. For those VMs that use Identity-Aware Proxy, Cloud Code can still securely connect to them over SSH, even without a public IP address.
Upload files to your VMs
You might want to try a debug version of your application, run a script, or try a new code in an environment identical to production, in this case on a development VM instance which might not have access to full source code or is not a part of your CI/CD pipeline. Cloud Code provides an easy way to upload your code files into a VM instance.
Find the VM you want to connect to in Cloud Code’s Compute Engine explorer, right click it, and select “Upload File via SCP”. Choose a file from your local system and Cloud Code will upload it to a VM instance using SCP. Once upload completes, Cloud Code offers to open a new SSH connection to access the files and work with them on a remote VM instance. Again, if there’s any difficulty establishing a connection, Cloud Code can run a troubleshooting diagnostic to help resolve the issue.
View your VM logs
As you’re working with your VM, you can right click it and select to view the VM instance logs. From Visual Studio Code this will open a logs viewer in the IDE. From IntelliJ, the logs viewer in the Cloud Console will be opened. If you’ve configured application logs to be collected with Cloud Logging, you can also view those in these logs viewers as well.
Get Started
We invite you to try out Compute Engine with Cloud Code to better streamline your development workflow. To learn more, check out the Compute Engine documentation for Visual Studio Code and JetBrains IDEs. If you’re new to development with IDEs, you can take the first step by installing Visual Studio Code or IntelliJ.
Latest News: Secure Digital Infrastructure Services with Apigee Advanced API Security for Google Cloud

4469
Of your peers have already read this article.
3:30 Minutes
The most insightful time you'll spend today!
Organizations in every region and industry are developing APIs to enable easier and more standardized delivery of services and data for digital experiences. This increasing shift to digital experiences has grown API usage and traffic volumes. However, as malicious API attacks also have grown, API security has become an important battleground over business risk.
To help customers more easily address their growing API security needs, Google Cloud is announcing today the Preview of Advanced API Security, a comprehensive set of API security capabilities built on Apigee, our API management platform. Advanced API Security enables organizations to more easily detect security threats. Here’s a closer look at the two key functionality included in this launch: identifying API misconfigurations and detecting bots.
Identify API misconfigurations
Misconfigured APIs are one of the leading reasons for API security incidents. In 2017, Gartner® predicted that by 2022 API abuses will be the most frequent attack vector resulting in data breaches for enterprise web applications. Today, our customers tell us application API security is one of their top concerns, which is supported by an independent study from 2021 by Fugue and Sonatype. The report found that misconfigurations are the number one cause of data breaches, and that “too many cloud APIs and interfaces to adequately govern” are frequently the main point of attack in cyberattacks.
While identifying and resolving API misconfigurations is a top priority for many organizations, the configuration management process can be time consuming and require considerable resources.
Advanced API Security can make it easier for API teams to identify API proxies that do not conform to security standards. To help identify APIs that are misconfigured or experiencing abuse, Advanced API Security regularly assesses managed APIs and provides API teams with a recommended action when configuration issues are detected.
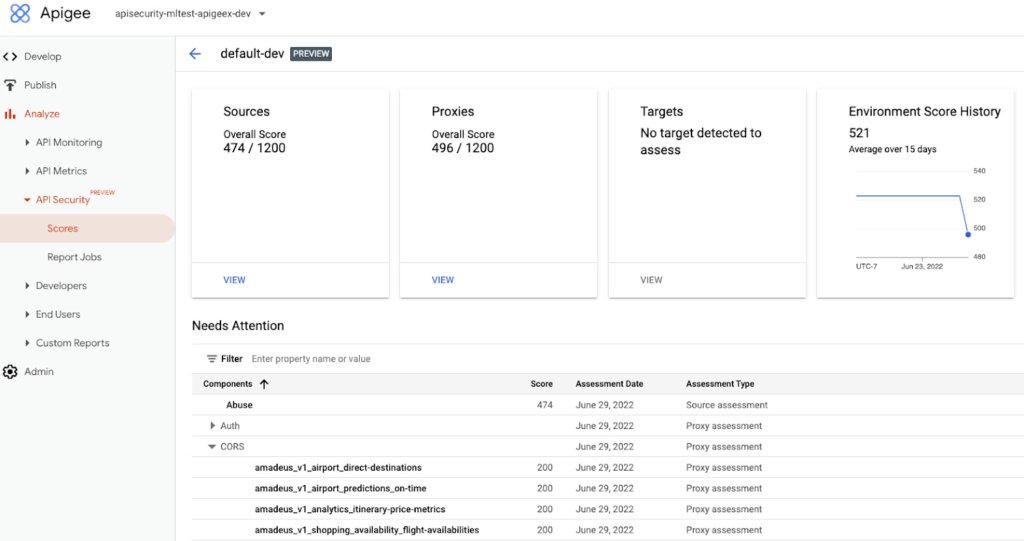
Advanced API Security identifies misconfigured API proxies, including the missing CORS policy.
APIs form an integral part of the digital connective tissue that make modern medicine run smoothly for patients and healthcare staff. One common healthcare API use case occurs when a healthcare organization inputs a patient’s medical coverage information into a system that works with insurance companies. Almost instantly, that system determines the patient’s coverage for a specific medication or procedure, a process which is enabled by APIs. Because of the often-sensitive personal healthcare data being transmitted, it is important that the required authentication and authorization policies are implemented so that only authorized users, such as an insurance company, can access the API.
Advanced API Security can detect if those required policies have not been applied, an alert which can help reduce the surface area of API security risks. By leveraging Advanced API Security, API teams at healthcare organizations can more easily detect misconfiguration issues and can reduce security risks to sensitive information.
Detect Bots
Because of the increasing volume of API traffic, there is also an increase in cybercrime in the form of API bot attacks—the automated software programs deployed over the Internet for malicious purposes like identity theft.
Advanced API Security uses pre-configured rules to help provide API teams an easier way to identify malicious bots within API traffic. Each rule represents a different type of unusual traffic from a single IP address. If an API traffic pattern meets any of the rules, Advanced API Security reports it as a bot.
Additionally, Advanced API Security can speed up the process of identifying data breaches by identifying bots that successfully resulted in the HTTP 200 OK success status response code.
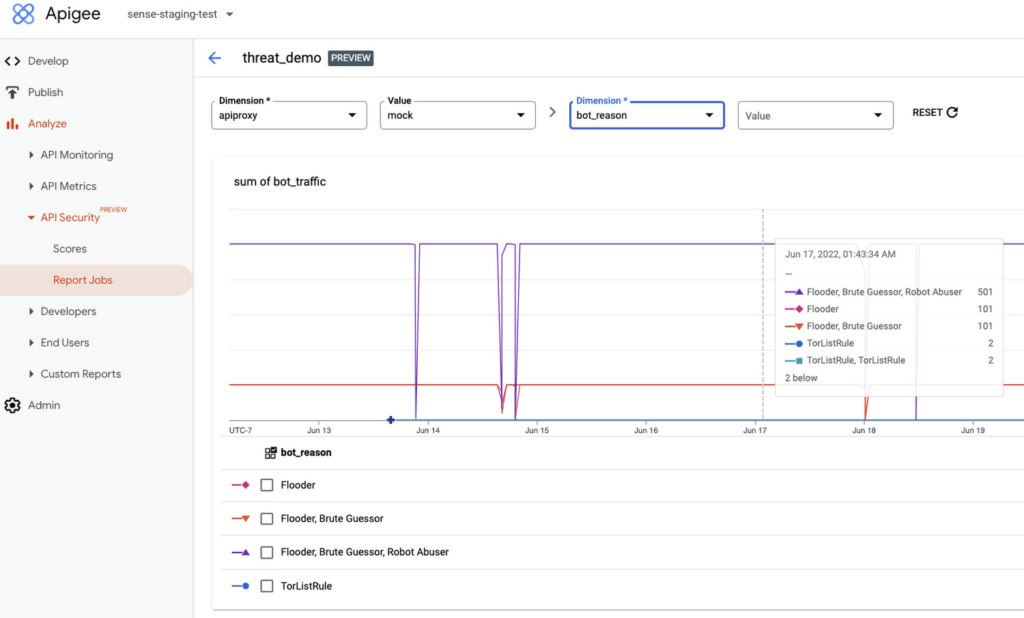
Financial services APIs are frequently the target of malicious bot attacks due to the high-value data that is processed. A bank that has adopted open banking standards by making APIs accessible to customers and partners can use Advanced API Security to make it easier to analyze traffic patterns and identify the sources of malicious traffic. You may experience this when your bank allows you to access your data with a third-party application. While a malicious hacker could try to use a bot to access this information, Advanced API Security can help the bank’s API team to identify and stop malicious bot activity in API traffic.
API Security at Equinix
Equinix powers the world’s digital leaders, bringing together and interconnecting infrastructure to fast-track digital advantage. Operating a global network of more than 240 data centers with a 99.999% or greater uptime, Equinix simplifies global interconnections for organizations, saving customers time and effort with the Apigee API management platform.
“A key enabler of our success is Google’s Apigee, delivering digital infrastructure services securely and quickly to our customers and partners,” said Yun Freund, senior vice president of Platform at Equinix. “Security is a key pillar to our API-first strategy and Apigee has been instrumental in enabling our customers to securely bridge the connections they need for their businesses to easily identify potential security risks and mitigate threats in a timely fashion. As our API traffic has grown, so has the amount of time and effort required to secure our APIs. Having a bundled solution in one managed platform gives us a differentiated high-performing solution.”
Getting started
To learn more, check out the documentation or contact us to request access to get started with Advanced API Security.
To learn more about API security best practices, please register to attend our Cloud OnAir webcast on Thursday, July 28th, 2:00 pm PT.
More Relevant Stories for Your Company

New Map Customization Features for Enhanced User Experiences
A customized map can be key to delivering a frictionless experience that engages users and sets you apart in users’ minds–whether you’re a real estate company fine-tuning points of interest (POIs) on a map to help buyers decide where to live, or a regional pharmacy styling a map to ensure

Maximizing Reliability, Minimizing Costs: Right-Sizing Kubernetes Workloads
Do you know how much money you could save by adjusting workload requests to better represent their actual usage? If you're not rightsizing your workloads, you might be overpaying for resources that your workloads aren't even using or worse, putting your workloads at risk for reliability issues due to under

Apigee Helps Bank BRI Rewrite its Digital Future and Achieve Financial Inclusion
About Bank BRI Bank Rakyat Indonesia is one of the largest banks in Indonesia and is committed to increasing financial inclusions among un-banked Indonesians. Bank BRI specializes in using modern digital banking to facilitate microfinance lending across its network of over 10,000 branches and thousands of branchless agents. Google Cloud

BURGER KING Germany: Serving Up Marketing Insights and Supply Chain Visibility Easily
Do hamburgers really come from Hamburg? This may still be a matter of debate, but the popularity of American-style burger joints not just in Hamburg but all over Germany, is clear. Germany’s top two fast food companies are both burger chains. One of them is BURGER KING®, a global brand that welcomes more
