





Download the Forrester Study to Explore the Benefits of AI for IT Operations in Cloud Environment

7092
Of your peers have already read this article.
1:30 Minutes
The most insightful time you'll spend today!
Organizations are currently modernizing their businesses in order to meet the increasing complexity of today’s business landscape. In effect, business leaders must evaluate the best way to mitigate the challenges which plague their cloud operations, all while meeting customers’ growing expectations around digital experience (DX) through agility, automation, and proactive incident avoidance.
In this commissioned study, “Modernize With AIOps To Maximize Your Impact”, Forrester Consulting surveyed organizations worldwide to better understand how they’re approaching artificial intelligence for IT operations (AIOps) in their cloud environments, and what kind of benefits they’re seeing.
Within this July 2021 study, you’ll see that AIOps systems and principles are here to help. It covers how AIOps increases efficiency and productivity across day-to-day operations, and how businesses are taking note. In fact, 91% of respondents have implemented AIOps to address at least one cloud operations issue, and expansion is set to skyrocket. Those that wait to act, risk losing out on the efficacy of their cloud investment and falling behind their more efficient competitors.
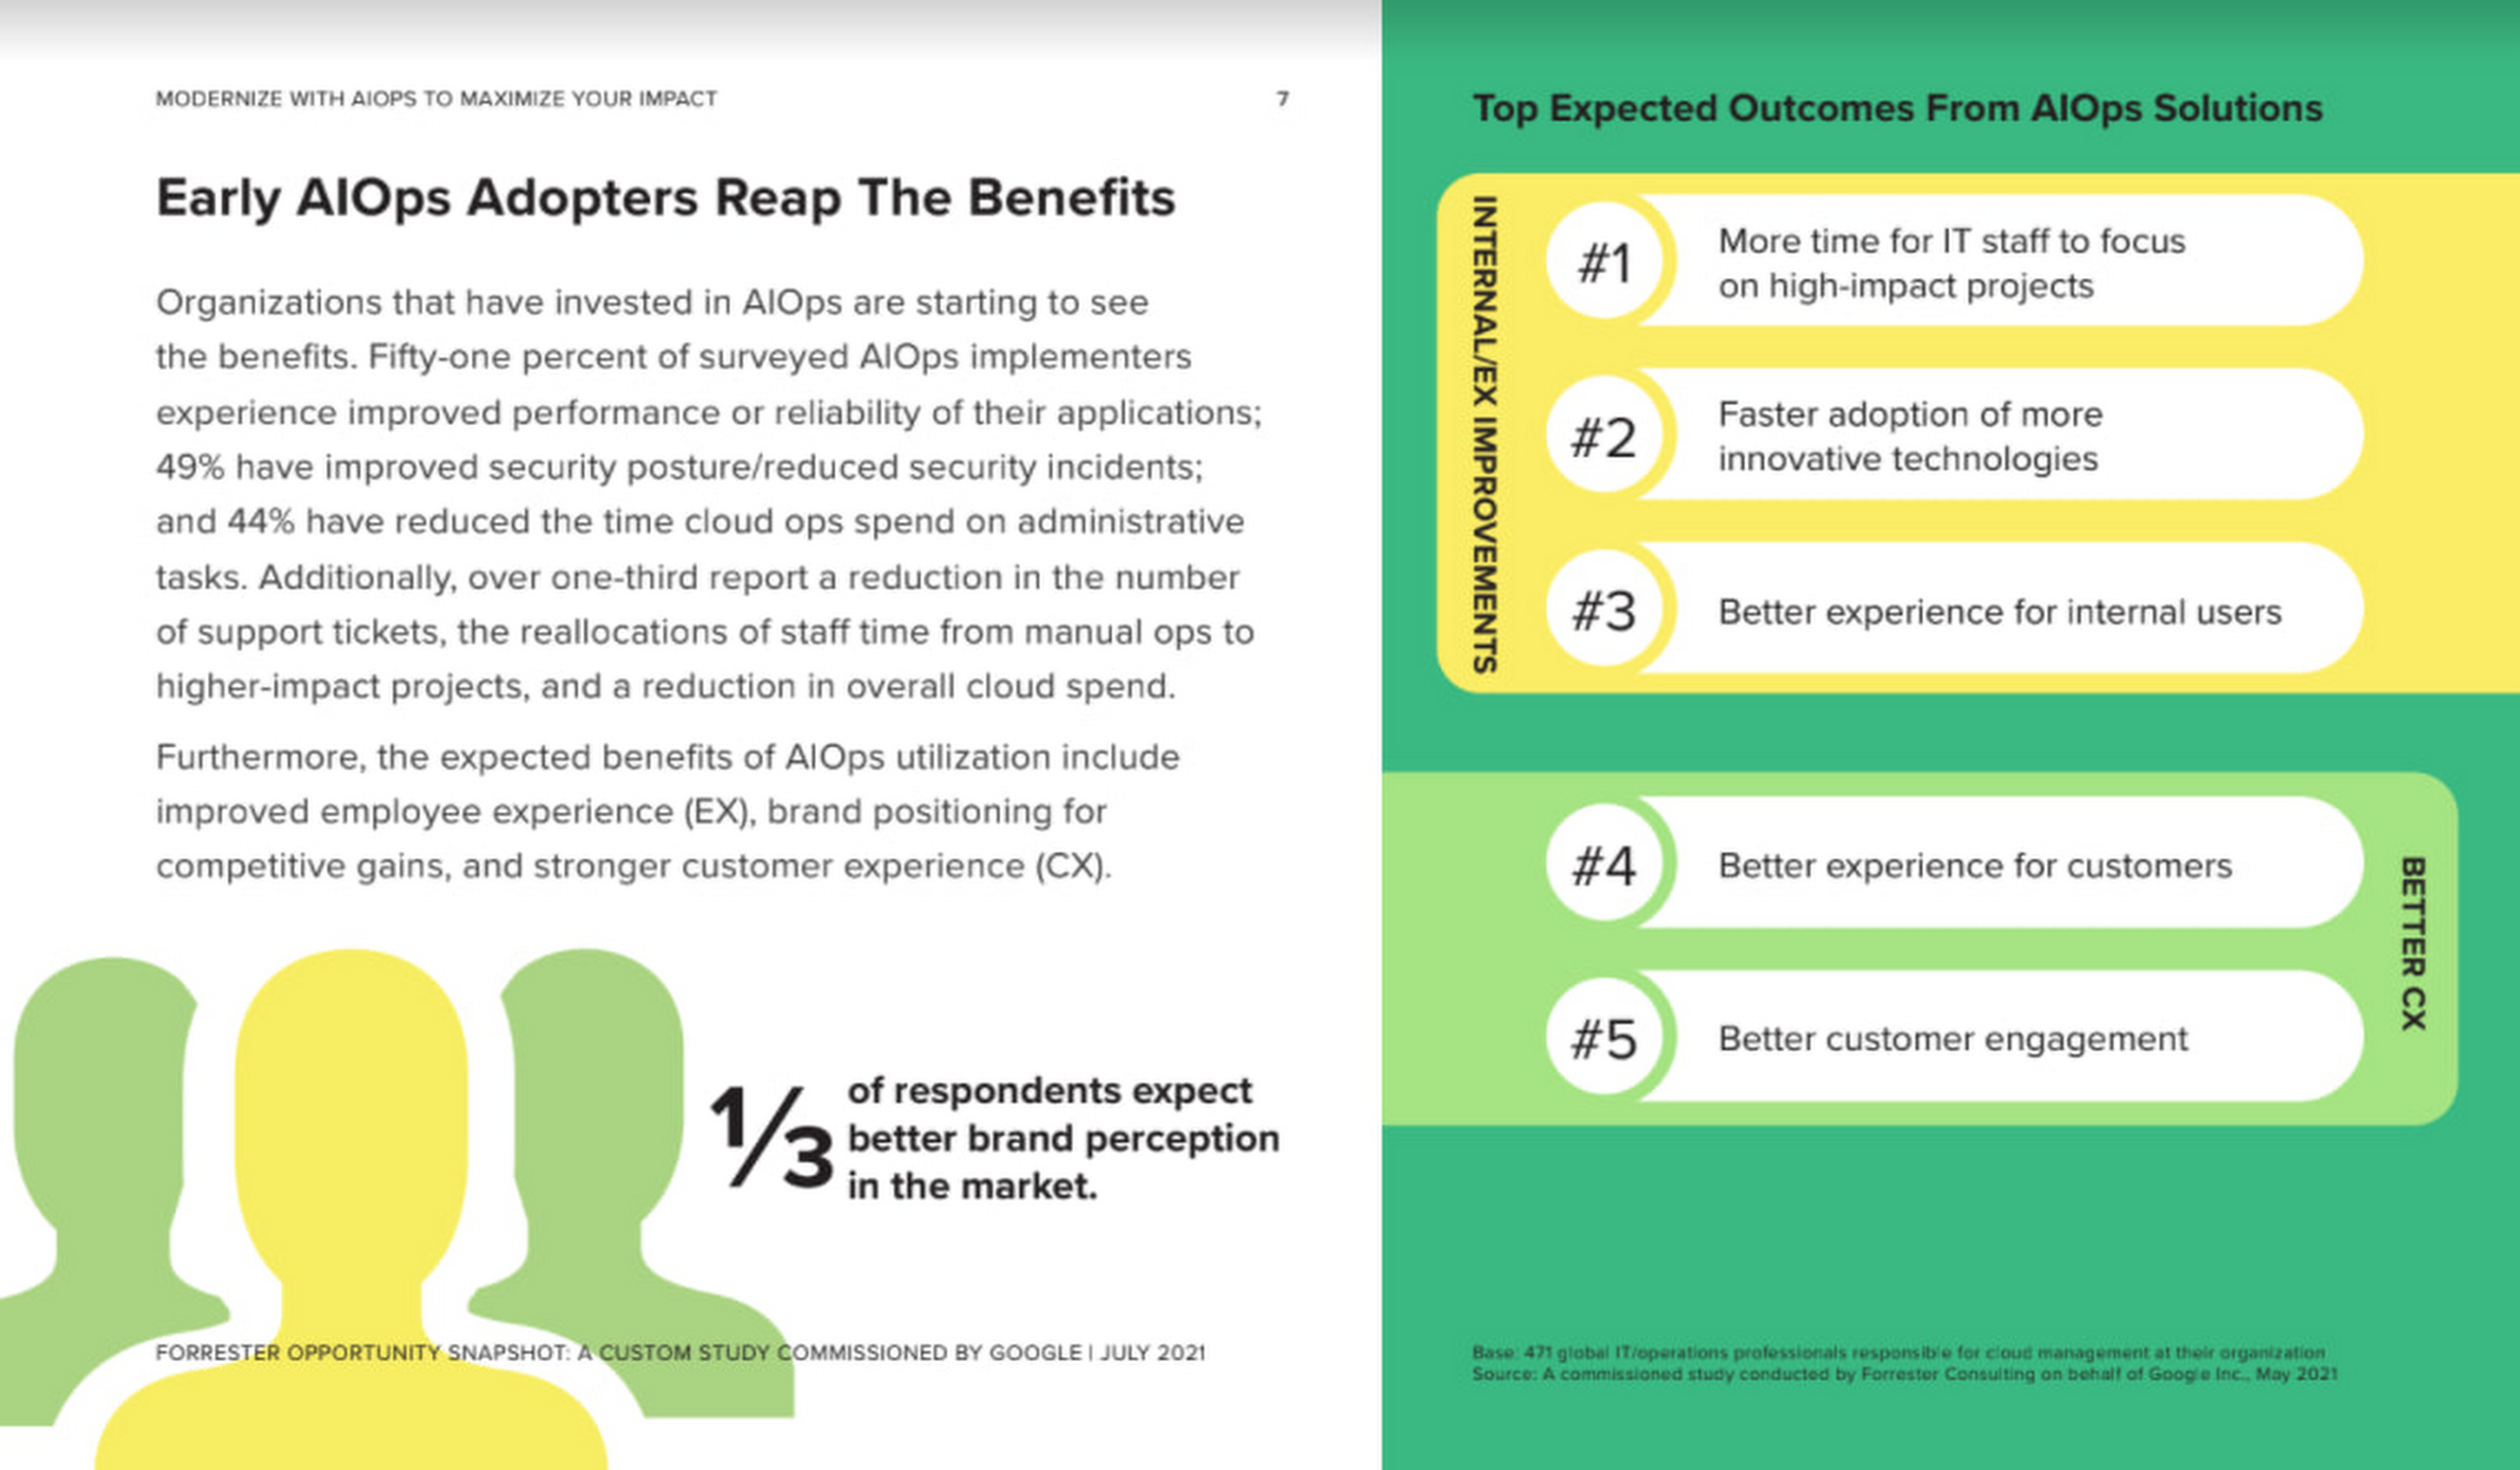
As you can see in the image above, there is a plethora of great information in this complimentary study. So, if you’re looking to enhance your cloud operations and/or adopt AIOps within your organization, be sure to download this free study today.
Google Cloud’s Med-PaLM 2: Pioneering Ethical AI Solutions for the Medical Domain

908
Of your peers have already read this article.
3:30 Minutes
The most insightful time you'll spend today!
Healthcare breakthroughs change the world and bring hope to humanity through scientific rigor, human insight, and compassion. We believe AI can contribute to this, with thoughtful collaboration between researchers, healthcare organizations and the broader ecosystem.
Today, we’re sharing exciting progress on these initiatives, with the announcement of limited access to Google’s medical large language model, or LLM, called Med-PaLM 2. It will be available in coming weeks to a select group of Google Cloud customers for limited testing, to explore use cases and share feedback as we investigate safe, responsible, and meaningful ways to use this technology.
Med-PaLM 2 harnesses the power of Google’s LLMs, aligned to the medical domain to more accurately and safely answer medical questions. As a result, Med-PaLM 2 was the first LLM to perform at an “expert” test-taker level performance on the MedQA dataset of US Medical Licensing Examination (USMLE)-style questions, reaching 85%+ accuracy, and it was the first AI system to reach a passing score on the MedMCQA dataset comprising Indian AIIMS and NEET medical examination questions, scoring 72.3%.
Industry-tailored LLMs like Med-PaLM 2 are part of a burgeoning family of generative AI technologies that have the potential to significantly enhance healthcare experiences. We’re looking forward to working with our customers to understand how Med-PaLM 2 might be used to facilitate rich, informative discussions, answer complex medical questions, and find insights in complicated and unstructured medical texts. They might also explore its utility to help draft short- and long-form responses and summarize documentation and insights from internal data sets and bodies of scientific knowledge.
Innovating responsibly with AI
Since last year, we’ve been researching and evaluating Med-PaLM and Med-PaLM 2, assessing it against multiple criteria — including scientific consensus, medical reasoning, knowledge recall, bias, and likelihood of possible harm — which were evaluated by clinicians and non-clinicians from a range of backgrounds and countries.
Med-PaLM 2’s impressive performance on medical exam-style questions is a promising development, but we need to learn how this can be harnessed to benefit healthcare workers, researchers, administrators, and patients. In building Med-PaLM 2, we’ve been focused on safety, equity, and evaluations of unfair bias. Our limited access for select Google Cloud customers will be an important step in furthering these efforts, bringing in additional expertise across the healthcare and life sciences ecosystem.
What’s more, when Google Cloud brings new AI advances to our products, our commitment is two-fold: to not only deliver transformative capabilities, but also ensure our technologies include proper protections for our organizations, their users, and society. To this end, our AI Principles, established in 2017, form a living constitution that guides our approach to building advanced technologies, conducting research, and drafting our product development policies.
From AI to generative AI
Google’s deep history in AI informs our work in generative AI technologies, which can find complex relationships in large sets of training data, then generalize from what they learn to create new data. Breakthroughs such as the Transformer have enabled LLMs and other large models to scale to billions of parameters, letting generative AI move beyond the limited pattern-spotting of earlier AIs and into the creation of novel expressions of content, from speech to scientific modeling.
Google Cloud is committed to bringing to market products that are informed by our research efforts across Alphabet. In 2022, we introduced a deep integration between Google Cloud and Alphabet’s AI research organizations, which allows Vertex AI to run DeepMind’s groundbreaking protein structure prediction system, AlphaFold.
Much more is on the way. In one sense, generative AI is revolutionary. In another, it’s the familiar technology story of more and better computing creating new industries, from desktop publishing to the internet, social networks, mobile apps, and now, generative AI.
Building on AI leadership
Additionally, today we’re announcing a new AI-enabled Claims Acceleration Suite, designed to streamline processes for health insurance prior authorization and claims processing. The Claims Acceleration Suite helps both providers of insurance plans and healthcare to create operational efficiencies and reduce administrative burdens and costs by converting unstructured data into structured data that help experts make faster decisions and improve access to timely patient care.
On the clinical side, last year we announced Medical Imaging Suite, an AI-assisted diagnosis technology being used by Hologic to improve cervical cancer diagnoses and Hackensack Meridian Health to predict metastasis in patients with prostate cancer. Elsewhere, Mayo Clinic and Google have collaborated on an AI algorithm to improve the care of head and neck cancers, and Google Health recently partnered with iCAD to improve breast cancer screening with AI.
From these examples and more, it’s clear that the healthcare industry has moved from testing AI to deploying it to improve workflows, solve business problems, and speed healing. With this in mind, we expect rapid interest in and uptake of generative AI technologies. Healthcare organizations are eager to learn about generative AI and how they can use it to make a real difference.
Looking ahead
The power of AI has reinforced Google Cloud’s commitment to privacy, security, and transparency. Our platforms are designed to be flexible, including data and model lineage capabilities, integrated security and identity management services, support for third-party models, choice and transparency on models and costs, integrated billing and entitlement support, and support across many languages.
While we’ll have some innovations like Med-PaLM 2 that are tuned for healthcare, we also have products that are relevant across industries. Last month, we announced several generative AI capabilities coming to Google Cloud, including Generative AI support in Vertex AI and Generative AI App Builder, which are already being tested by a number of customers. Developers and businesses already use Vertex AI to build and deploy machine learning models and AI applications at scale, and we recently added Generative AI support in Vertex AI. This gives customers foundation models they can fine-tune with their own data, and the ability to deploy applications with this powerful new technology. We also launched Generative AI App Builder to help organizations build their own AI-powered chat interfaces and digital assistants in minutes or hours by connecting conversational AI flows with out-of-the-box search experiences and foundation models.
As AI proves its value, it’s likely there will be increased focus on high-quality data collection and curation in healthcare and life sciences. Improving the flow and unification of data across health care systems, referred to as data interoperability, is one of the most important building blocks to leveraging AI, and it helps organizations run more effectively, improve patient care, and helps people live healthier lives. We expect to continue our investments in technology, infrastructure, and data governance.
We’re committed to realizing the potential of this technology in healthcare. By working with a handful of trusted healthcare organizations early on, we’ll learn more about what can be achieved, and how this technology can safely advance. For all of us, the prospects are inspiring, humbling, and exciting.
If you’re interested in exploring generative AI on Cloud, you can sign-up for our Trusted Tester program or reach out to your Google Cloud sales representative.
Discover Latest Resources on Google Cloud’s Datasets Solution

6323
Of your peers have already read this article.
3:00 Minutes
The most insightful time you'll spend today!
Editor’s note: With Google Cloud’s datasets solution, you can access an ever-expanding resource of the newest datasets to support and empower your analyses and ML models, as well as frequently updated best practices on how to get the most out of any of our datasets. We will be regularly updating this blog with new datasets and announcements, so be sure to bookmark this link and check back often.
August 2021
New dataset: Google Cloud Release Notes
- Looking for a new way to access Google Cloud Release Notes besides the docs, the XML feed, and Cloud Console? Check out the Google Cloud Release Notes dataset. With up-to-date release notes for all generally available Google Cloud products, this dataset allows you to use BigQuery to programmatically analyze release notes across all products, exploring security bulletin updates, fixes, changes, and the latest feature releases.
- Access the dataset

July 2021
Best practice: Use Google Trends data for common business needs
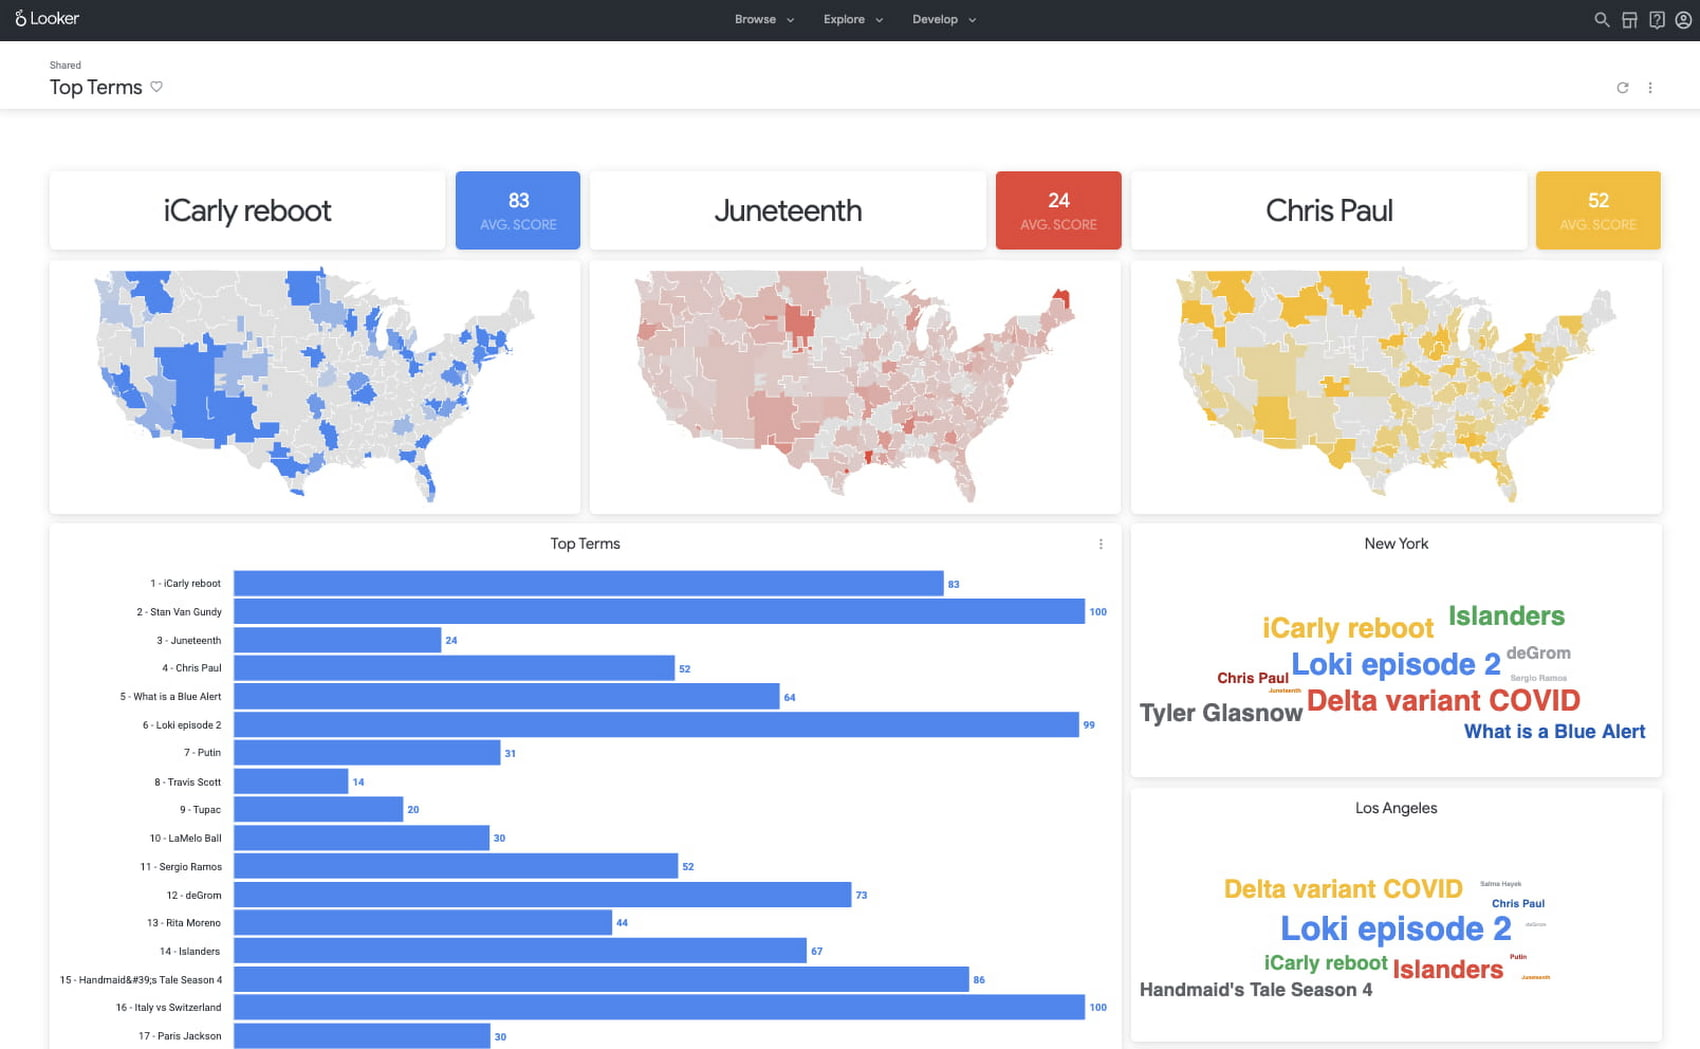
- The Google Trends dataset represents the first time we’re adding Google-owned Search data into Datasets for Google Cloud. The Trends data allows users to measure interest in a particular topic or search term across Google Search, from around the United States, down to the city-level. You can learn more about the dataset here, and check out the Looker dashboard here! These tables are super valuable in their own right, but when you blend them with other actionable data you can unlock whole new areas of opportunity for your team. To learn how to make informed decisions with Google Trends data, keep reading.
- Access the dataset
New dataset: COVID-19 Vaccination Search Insights
- With COVID-19 vaccinations being a topic of interest around the United States, this dataset shows aggregated, anonymized trends in searches related to COVID-19 vaccination and is intended to help public health officials design, target, and evaluate public education campaigns. Check out this interactive dashboard to explore searches for COVID-19 vaccination topics by region.
- Access the dataset

June 2021
New dataset: Google Diversity Annual Report 2021
- Since 2014, Google has disclosed data on the diversity of its workforce in an effort to bring candid transparency to the challenges technology companies like Google face in recruitment and retention of underrepresented communities. In an effort to make this data more accessible and useful, we’ve loaded it into BigQuery for the first time ever. To view Google’s Diversity Annual Report and learn more, check it out.
- Access the dataset
New dataset: Google Trends Top 25 Search terms
- The most popular and surging Google Search terms are now available in BigQuery as a public dataset. View the Top 25 and Top 25 rising queries from Google Trends from the past 30-days, including 5 years of historical data across the 210 Designated Market Areas (DMAs) in the US. Keep reading.
- Access the dataset
New dataset: COVID-19 Vaccination Access
- With metrics quantifying travel times to COVID-19 vaccination sites, this dataset is intended to help Public Health officials, researchers, and Healthcare Providers to identify areas with insufficient access, deploy interventions, and research these issues. Check out how this data is being used in a number of new tools.
- Access the dataset
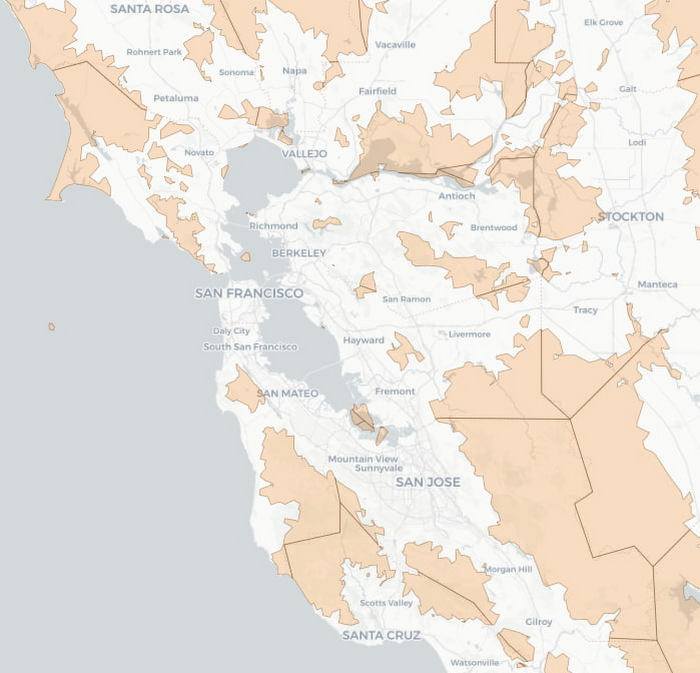

Best practice: Leveraging BigQuery Public Boundaries datasets for geospatial analytics
- Geospatial data is a critical component for a comprehensive analytics strategy. Whether you are trying to visualize data using geospatial parameters or do deeper analysis or modeling on customer distribution or proximity, most organizations have some type of geospatial data they would like to use – whether it be customer zipcodes, store locations, or shipping addresses. However, converting geographic data into the correct format for analysis and aggregation at different levels can be difficult. In this post, we’ll walk through some examples of how you can leverage the Google Cloud platform alongside Google Cloud Public Datasets to perform robust analytics on geographic data. Keep reading.
- Access the dataset

Get the metadata and try BigQuery sandbox
When you’ve learned about many of our datasets and pre-built solutions from across Google, you may be ready to start querying them. Check out the full dataset directory and read all the metadata at g.co/cloud/marketplace-datasets, then dig into the data with our free-to-use BigQuery sandbox account, or $300 in credits with our Google Cloud free trial.
How to Build A Basic Image Search Utility for Natural Language Queries

4687
Of your peers have already read this article.
6:00 Minutes
The most insightful time you'll spend today!
This post shows how to build an image search utility using natural language queries. Our aim is to use different GCP services to demonstrate this. At the core of our project is OpenAI’s CLIP model. It makes use of two encoders – one for images and one for texts. Each encoder is trained to learn representations such that similar images and text embeddings are projected as close as possible.
We will first create a Flask-based REST API capable of handling natural language queries and matching them against relevant images. We will then demonstrate the use of the API through a Flutter-based web and mobile application. Figure 1 shows how our final application would look like:
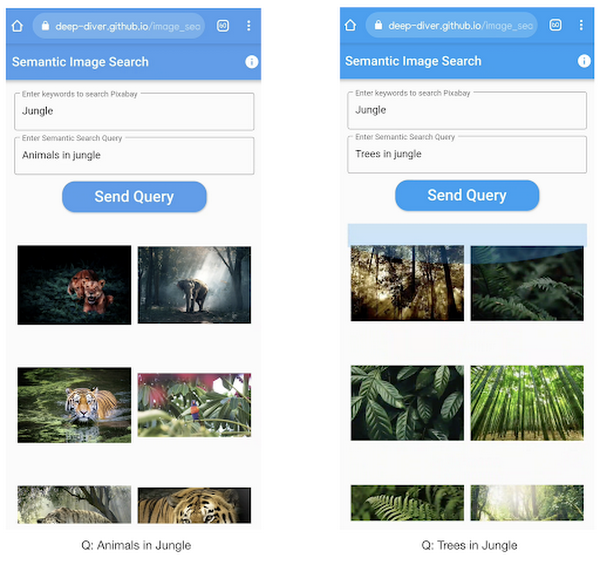
All the code shown in this post is available as a GitHub repository. Let’s dive in.
Application at a high-level
Our application will take two queries from the user:
- Tag or keyword query. This is needed in order to pull a set of images of interest from Pixabay. You can use any other image repositories for this purpose. But we found Pixabay’s API to be easier to work with. We will cache these images to optimize the user experience. Suppose we wanted to find images that are similar to this query: “horses amidst flowers”. For this, we’d first pull in a few “horse” images and then run another utility to find out the images that best match our query.
- Longer or semantic query that we will use to retrieve the images from the pool created in the step above. These images should be semantically similar to this query.
Note: Instead of two queries, we could have only taken a single long query and run named-entity extraction to determine the most likely important keywords to run the initial search with. For this post, we won’t be using this approach.
Figure 2 below depicts the architecture design of our application and the technical stack used for each of the components.
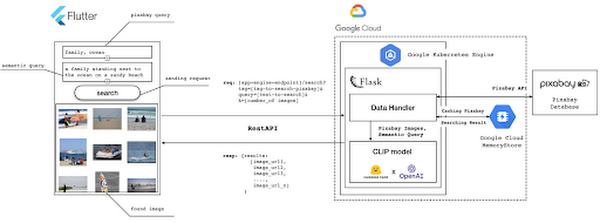
Figure 2 also presents the core logic of the API we will develop in bits and pieces in this post. We will deploy this API on a Kubernetes cluster using the Google Kubernetes Engine (GKE). The following presents a brief directory structure of our application code-base:
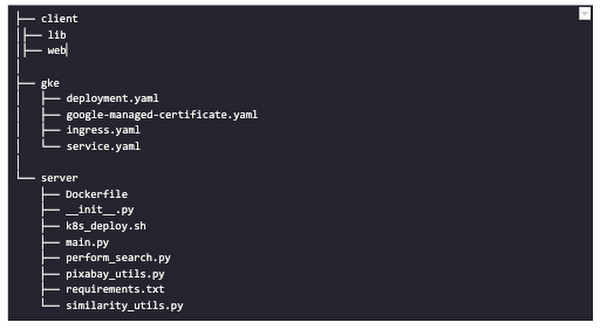
Next, we will walk through the code and other related components for building our image search API. For various machine learning-related utilities, we will be using PyTorch.
Building the backend API with Flask
First, we’d need to fetch a set of images with respect to user-provided tags/keywords before performing the natural language image search. The utility below from the pixabay_utils.py script can do this for us:
def fetch_images_tag(pixabay_search_keyword, num_images):"""Fetches images from Pixabay w.r.t a keyword.:param pixabay_search_keyword: Keyword to perform the search on Pixabay.:param num_images: Number of images to retrieve.:return: List of PIL images.:return: List of image URLs."""query = (PIXABAY_API+ "&q="+ pixabay_search_keyword.lower()+ "&image_type=photo&safesearch=true&per_page="+ str(num_images))response = requests.get(query)output = response.json()all_images = []all_image_urls = []for each in output["hits"]:imageurl = each["webformatURL"]response = requests.get(imageurl)image = Image.open(BytesIO(response.content)).convert("RGB")all_images.append(image)all_image_urls.append(imageurl)return (all_images, all_image_urls)
Note that all the API utilities are logging relevant information. But for brevity, we have omitted the lines of code responsible for that. Next, we will see how to invoke the CLIP model and select the images that would best match a given query semantically. For this, we’ll be using Hugging Face, an easy-to-use Python library offering state-of-the-art NLP capabilities. We’ll collate all the logic related to this search inside a SimilarityUtil class:
class SimilarityUtil:def __init__(self):self.model = CLIPModel.from_pretrained(CLIP_MODEL)self.processor = CLIPProcessor.from_pretrained(CLIP_PREPROCESSOR)self.device = "cuda" if torch.cuda.is_available() else "cpu"def perform_sim_search(self, images, query_phrase, top_k=3):"""Performs similarity search between the images and query.:param images: A list of PIL images initially retrieved withrespect to some entity e.g. Tiger.:param query_phrase: A list containing a single text query,e.g. "Tiger drinking water".:param top_k: Number of top images to return from `images`.:return: Top-k indices matching the query semantically andtheir similarity scores."""model = self.model.to(self.device)# Obtain the text-image similarity scoreswith torch.no_grad():inputs = self.processor(text=[query_phrase], images=images, return_tensors="pt", padding=True)inputs = inputs.to(self.device)outputs = model(**inputs)# Image-text similarity scoreslogits_per_image = outputs.logits_per_image.cpu()(top_indices, top_scores) = self.sort_scores(logits_per_image, top_k)return (top_indices, top_scores)def sort_scores(self, scores, top_k):"""Sorts the scores in a descending manner.:param scores: Scores to sort through.:param top_k: Number of top scores to return.:return: Top-k scores and their indices."""values, indices = scores.squeeze().topk(top_k)top_indices, top_scores = [], []for score, index in zip(values, indices):top_indices.append(int(index.numpy()))score = score.numpy().tolist()top_scores.append(round(score, 3))return (top_indices, top_scores)
CLIP_MODEL uses a ViT-base model to encode the images for generating meaningful embeddings with respect to the provided query. The text-based query is also encoded using A Transformers-based model for generating the embeddings. These two embeddings are matched with one another during inference. To know more about the particular methods we are using for the CLIP model please refer to this documentation from Hugging Face.
In the code above, we are first invoking the CLIP model with images and the natural language query. This gives us a vector (logits_per_image) that contains the similarity scores between each of the images and the query. We then sort the vector in a descending manner. Note that we are initializing the CLIP model while instantiating the SimilarityUtil to save us the model loading time. This is the meat of our application and we have tackled it already. If you want to interact with this utility in a live manner you can check out this Colab Notebook.
Now, we need to collate our utilities for fetching images from Pixabay and for performing the natural language image search inside a single script – perform_search.py. Following is the main class of that script:
class Searcher:def __init__(self):self.similarity_model = SimilarityUtil()def get_similar_images(self, keyword, semantic_query, pixabay_max, top_k):"""Finds semantically similar images.:param keyword: Keyword to search with on Pixabay.:param semantic_query: Query to find semantically similar images retrieved from Pixabay.:param pixabay_max: Number of maximum images to retrieve from Pixabay.:param top_k: Top-k images to return.:return: Tuple of top_k URLs and the similarity scores of the images present inside the URLs."""images_redis_key = keyword + "_images"urls_redis_key = keyword + "_urls"if redis_client.exists(images_redis_key) and redis_client.exists(urls_redis_key):keyword_images = redis_client.get(images_redis_key)keyword_image_urls = redis_client.get(urls_redis_key)else:(keyword_images, keyword_image_urls) = fetch_images_tag(keyword, pixabay_max)redis_client.set(images_redis_key, keyword_images)redis_client.set(urls_redis_key, keyword_image_urls)(top_indices, top_scores) = self.similarity_model.perform_sim_search(keyword_images, semantic_query, top_k)top_urls = [keyword_image_urls[index] for index in top_indices]return (top_urls, top_scores)
Here, we are just calling the utilities we had previously developed to return the URLs of the most similar images and their scores. What is even more important here is the caching capability. For that, we combined GCP’s MemoryStore and a Python library called direct-redis. More on setting up MemoryStore later.
MemoryStore provides a fully managed and low-cost platform for hosting Redis instances. Redis databases are in memory and light-weight making them an ideal candidate for caching. In the code above, we are caching the images fetched from Pixabay and their URLs. So, in the event of a cache hit, we won’t need to call the CLIP model and this will tremendously improve the response time of our API.
Other options for caching
We can cache other elements of our application. For example, the natural language query. When searching through the cached entries to determine if it’s a cache hit, we can compare two queries for semantic similarity and return results accordingly.
Consider that a user had entered the following natural language query: “mountains with dark skies”. After performing the search, we’d cache the embeddings of this query. Now, consider that another user entered another query: “mountains with gloomy ambiance”. We’d compute its embeddings and run a similarity search with the cached embeddings. We’d then compare the similarity scores with respect to a threshold and parse the most similar queries and their corresponding results. In case of a cache miss, we’d just call the image search utilities we developed above.
When working on real-time applications we often need to consider these different aspects and decide what enhances the user experience and maximizes business at the same time.
All that’s left now for the backend is our Flask application – main.py:
@app.route("/search", methods=["GET"])def get_images():tag = request.args.get("t").lower()query = request.args.get("s_query").lower()top_k = request.args.get("k")(top_urls, top_scores) = searcher.get_similar_images(tag, query, MAX_PIXABAY_SEARCH, int(top_k))return jsonify({"top_urls": top_urls, "top_scores": top_scores})
Here we are first parsing the query parameters from the request payload of our search API. We are then just calling the appropriate function from perform_search.py to handle the request. This Flask application is also capable of handling CORS. We do this via the flask_cors library:
cors = CORS(app,resources={r"/search/*": {"origin": "*"},r"/test/*": {"origin": "*"},},)
And this is it! Our API is now ready for deployment.
Deployment with Compute Engine and GKE
The reason why we wanted to deploy our API on Kubernetes is because of the flexibility Kubernetes offers for managing deployments. When operating at scale, auto scalability and load balancing are very important. With the comes the requirement of security — we’d not want to expose the utilities for interacting with any internal services such as databases. With Kubernetes, we can achieve all these easily and efficiently.
GKE provides secured and fully managed functionalities for operationalizing Kubernetes clusters. Here are the steps to deploy the API on GKE at a glance:
- We first build a Docker image for our API and then push it to the Google Container Registry (GCR).
- We then create a Kubernetes cluster on GKE and initialize a deployment.
- We then add scalability options.
- If any public exposure is needed for the API, we then tackle it.
We can assimilate all the above into a shell script – k8s_deploy.sh:
## Docker build and push ### We are inside the `server` directorydocker build -t gcr.io/${PROJECT_ID}/search_service .docker push gcr.io/${PROJECT_ID}/search_service## Deploy on a GKE cluster ### Configure the Docker command-line tool to authenticate to Container Registrygcloud auth configure-docker# Create a Kubernetes clustergcloud container clusters create image-search-nlp# Create a deploymentkubectl create deployment clip-search --image=gcr.io/${PROJECT_ID}/search_service# Number of worker replicaskubectl scale deployment clip-search --replicas=3# HorizontalPodAutoscaler resourcekubectl autoscale deployment clip-search --cpu-percent=80 --min=1 --max=5# Expose deploymentkubectl expose deployment clip-search --name=clip-search-service --type=LoadBalancer --port 80 --target-port 8080
These steps are well explained in this tutorial that you might want to refer to for more details. We can configure all the dependencies on our local machine and execute the shell script above. We can also use the GCP Console to execute it since a terminal on the GCP Console is pre-configured with the system-level dependencies we’d need. In reality, the Kubernetes cluster should only be created once and different deployment versions should be created under it.
After the above shell script is run successfully, we can run kubectl get service to know the external IP address of the service we just deployed:
NAME CLUSTER-IP EXTERNAL-IP PORT(S) AGEclip-search-service 10.3.251.122 203.0.113.0 80:30877/TCP 10s
We can now consume this API with the following base URI: http://203.0.113.0/. If we wanted to deal with only http-based API requests, then we are done here. But secured communication is often a requirement in order for applications to operate reliably. In the following section, we are to discuss how to configure the additional items to allow our Kubernetes cluster to allow https requests.
Configurations for handling https requests with GKE
A secure connection is almost often a must-have requirement in modern client/server applications. The front-end Flutter application would be hosted on GitHub Pages for this project, and it requires https-based connection as well. Even if configuring https connection particularly for a GKE-based cluster can be considered a chore, its setup might seem daunting at first.
There are six steps to configure https connection in the GKE environment:
- You need to have a domain name, and there are a lot of inexpensive options that you can buy. For instance, mlgde.com domain for this project is acquired via Gabia which is a Korean service provider.
- A reserved (static) external IP address has to be acquired via gcloud command or GCP console.
- You need to bind the domain name with the acquired external IP address. This is a platform-specific configuration that issued the domain name to you.
- There is a special ManagedCertificate resource which is specific to the GKE environment. ManagedCertificate resource specifies the domain that the SSL certificate will be created for, so you need this.
- An Ingress resource should be created by listing the static external IP address, ManagedCertificate resource, and the service name and port which the incoming traffic will be routed to. The Service resource could remain the same as in the above section with only changes from LoadBalancer to ClusterIP.
- Last but not least, you need to modify the existing Flask application and Deployment resource to support liveness and readiness probes which are used to check the health status of the Deployment. The Flask application side can be simply modified with the flask-healthz Python package, and you only need to add
livenessProbeandreadinessProbesections in the Deployment resource. In the code example below, thelivenessProbeandreadinessProbeare checked via/aliveand/readyendpoints respectively.
from flask_healthz import healthzfrom flask_healthz import HealthErrorapp = Flask(__name__)app.register_blueprint(healthz, url_prefix="/")def printok():print("Everything is fine")def liveness():try:printok()except Exception:raise HealthError("Can't connect to the file")def readiness():try:printok()except Exception:raise HealthError("Can't connect to the file")app.config.update(HEALTHZ = {"alive": "main.liveness","ready": "main.readiness",})
One thing to be careful of is the initialDelaySeconds attribute of the probes. It is uncommon to configure this attribute with a big number, but it could be bigger than 90 – 120 seconds depending on the size of the model to be used. For this project, it is configured in 90 seconds in order to wait until the CLIP model is fully loaded into memory (full YAML script here).
livenessProbe:httpGet:path: /aliveport: 8080initialDelaySeconds: 90periodSeconds: 10readinessProbe:httpGet:path: /readyport: 8080initialDelaySeconds: 90periodSeconds: 10
Again, these steps may seem daunting at first, but it will become clear when you have done it once. Here is the official document for Using Google-managed SSL certificates You can find all the GKE-related resources used in this project here.
Once every step is completed you should be able to see your server application running on the GKE environment. Please make sure to run kubectl apply command whenever you create Kubernetes resources such as Deployment, Service, Ingress, and ManagedCertificate, and it is important to wait for more than 10 minutes until the ManagedCertifcate provisioning is done.
You can run gcloud compute addresses list command to find out the static external IP address that you have configured.
NAME ADDRESS/RANGE TYPE PURPOSE NETWORK REGION SUBNET STATUSgde 34.149.231.34 EXTERNAL IN_USE
Then, the IP address has to be mapped to the domain. Figure 3 is a screenshot of a dashboard from where we got the mlgde.com domain. It clearly shows mlgde.com is mapped to the static external IP address configured in GCP.
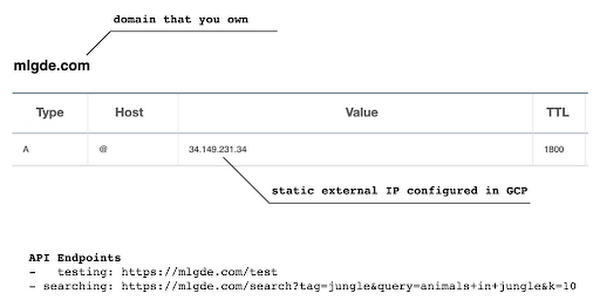
In case you’re wondering why we didn’t deploy this application on App Engine, well that is because of the compute needed to execute the CLIP model. App Engine instance won’t fit in that regime. We could have also incorporated compute-heavy capabilities via a VPC Connector. That is a design choice that you and your team would need to consider. In our experiments, we found the GKE deployment to be easier and suitable for our needs.
Infrastructure for the CLIP model
As mentioned earlier, at the core of our application is the CLIP model. It is computationally a bit more expensive than the regular deep learning models. This is why it makes sense to have the hardware infrastructure set up accordingly to execute it. We ran a small benchmark in order to see how a GPU-based environment could be beneficial here.
We ran the CLIP on a Tesla P100-based machine and also on a standard CPU-only machine 1000 times. The code snippet below is the meat of what we executed:
DEVICE = "cuda" if torch.cuda.is_available() else "cpu"start_time = time.time()for _ in range(1000):with torch.no_grad():model = model.to(DEVICE)inputs = processor(text=[semantic_search_phrase],images=all_images, return_tensors="pt", padding=True)inputs = inputs.to(DEVICE)outputs = model(**inputs)end_time = time.time() - start_timeprint(f"Total time: {end_time:.3f} seconds.")
As somewhat expected, with the GPU, the code took 13 minutes to complete execution. With no GPU, it took about 157 minutes.
It is uncommon to leverage GPUs for model prediction because of cost restrictions, but sometimes we have to access GPUs for deploying a big model like CLIP. We configured a GPU-based cluster on GKE and compared the performance differences with and without it. It took about 1 second to handle a request with GPU and MemoryStore cache while it took more than 4 seconds with MemoryStore only (without the GPUs).
For the purposes of this post, we used a CPU-based cluster on Kubernetes. But It is easy to configure GPU usage in a GKE cluster. This document shows you how to do so. For a short summary, there are two steps. First, a node should be configured with GPUs when creating a GKE cluster. Second, GPU drivers should be installed in GKE nodes. You don’t need to visit and manually install GPU drivers for each node by yourself. Rather you can simply apply the DaemonSet resource to GKE as described here.
Setting up MemoryStore
In this project, we first query the general concept of images to Pixabay, then we filter the images with a semantic query using CLIP. It means we can cache the initially retrieved images from Pixabay for the next specific semantic query. For instance, you may want to search with “gentleman wearing tie” at first, then you may want to retry searching for “gentleman wearing glass”. In this case, the base images remain all the same, so they could be stored in a cache server like Redis.
MemoryStore is a GCP service wrapping the Redis which is an in-memory data store, so you can simply use a standard Redis Python package for accessing it. The only thing to be careful about when provisioning a MemoryStore Redis instance is to make sure it is in the same region where your GKE cluster or Compute Engine instance is.
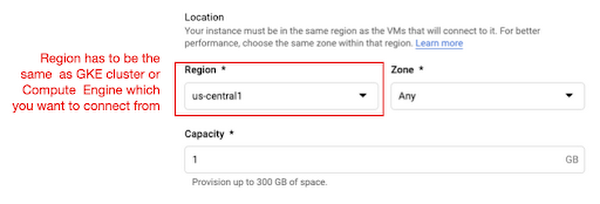
The code snippet below shows how to make a connection to the Redis instance in Python. Nothing specific to GCP, but you only need to be aware of the usage of the standard redis-py package.
# REDISHOST is the IP address to the MemoryStore instanceredis_host = os.environ.get("REDISHOST", "localhost")redis_port = int(os.environ.get("REDISPORT", 6379))redis_client = redis.StrictRedis(host=redis_host, port=redis_port)
After creating a connection, you can store and retrieve data from MemoryStore. There are more advanced use cases of Redis, but we only used exists, get, and set methods for the demonstration purpose. These methods should be very familiar if you know maps, dictionaries, or other similar data structures. For the code portion that uses Redis-related utilities, please refer to the Searcher Python class we discussed in an earlier section.
In the URLs below, you can find side-by-side comparisons of using MemoryStore:
- Without MemoryStore: https://youtu.be/7B88Eyrd-4s
- With MemoryStore (1st try): https://youtu.be/LE6xeEIRuMM
- With MemoryStore (2nd try): https://youtu.be/rRfK17sdk84
Putting everything together
All that’s left now is to collate the different components we developed in the sections above and deploy our application with a frontend. All the frontend-related code is present here.
- The front-end application is written in the Flutter development kit. The main screen contains two text fields for queries to Pixabay and CLIP model respectively. When you click the “Send Query” button, it will send out a RestAPI request to the server. After receiving the result back from the server, the retrieved images from the semantic query will be displayed at the bottom section of the screen.
- Please note that a Flutter application can be deployed to various environments including desktop, web, iOS, and Android. In order to keep as simple as possible, we chose to deploy the application to the GitHub Pages. Whenever there is any change to a client-side source directory, the GitHub Action will be triggered to build a web page and deploy the latest version to the GitHub Pages.
Our final application is deployed here and it looks like so:
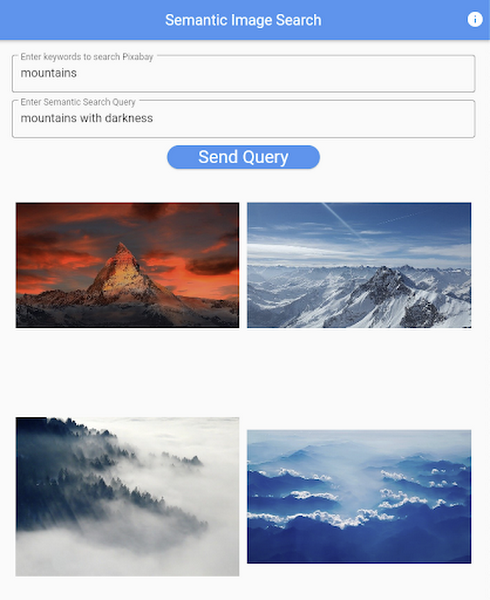
Note that due to constraints, the above-mentioned URL will only be live for one or two months.
It is also possible to redeploy the back-end application with a GitHub Action.
- The very first step is to craft a Dockerfile like below. Since Python is a scripting language, and there are lots of heavy packages that the application is dependent on, it is important to cache the steps. For instance, installing the dependencies should be separated from other commands.
FROM pytorch/pytorch:latestWORKDIR /app# install the dependenciesCOPY requirements.txt requirements.txtRUN pip install -r requirements.txtCOPY . .# set up environment variablesENV PIXABAY_API_KEY="..."ENV REDIS_IN_USE="true"ENV REDISHOST="..."# expose port that Flask app is listening onEXPOSE 8080# run the Flask appCMD [ "python3", "main.py" ]
- With the Dockerfile defined, we can use a GitHub Action like this for automatic deployment.
Edge cases
Since the CLIP model is pre-trained on a large corpus of image and text pairs it’s likely that it may not generalize well to every natural language query we throw at it. Also, because we are limiting the number of images on which the CLIP model can operate, this somehow restricts the expressivity of the model.
We may be able to improve the performance for the second situation by increasing the number of images to be pre-fetched and by indexing them into a low-cost and high-performance database like Datastore.
Costs
In this section, we wanted to provide the readers a breakdown of the costs they might incur in order to consume the various services used throughout the application.
- Frontend hosting
- The front-end application is hosted on GitHub Pages, so there is no expenditure for this.
- Compute Engine
- With an e2-standard-2 instance type without GPUs, the cost is around $48.92 per month. In case you want to add a GPU (NVIDIA K80), the cost goes up to $229.95 per month.
- MemoryStore
- The cost for MemoryStore depends on the size. With 1GB of space, the cost is around $35.77 per month, and whenever you add more GBs the cost will be doubled.
- Google Kubernetes Engine
- The monthly cost for a 3 node GKE cluster with n2-standard-2 (vCPUs: 2, RAM: 8GB without GPUs) is about $170.19. If you add one GPU (NVIDIA K80) to the cluster, the cost goes up to $835.48.
While you may think that is a lot cost-wise, it is good to know that Google gives away free $300 credits when you create a new GCP account. It is still not enough for leveraging GPUs, but it is enough to learn and experiment with GKE and MemoryStore usage.
Conclusion
In this post, we walked through the components needed to build a basic image search utility for natural language queries. We discussed how these different components are connected to each other. Our image search API is able to utilize caching and was deployed on a Kubernetes cluster using GKE. These elements are essential when building a similar service to cater to a much bigger workload. We hope this post will serve as a good starting point for that purpose. Below are some references on similar areas of work that you can explore:
- Building a real-time embeddings similarity matching system
- Detecting image similarity using Spark, LSH and TensorFlow
Acknowledgments: We are grateful to the Google Developers Experts program for supporting us with GCP credits. Thanks to Karl Weinmeister and Soonson Kwon of Google for reviewing the initial draft of this post.
3112
Of your peers have already watched this video.
23:30 Minutes
The most insightful time you'll spend today!
Pytorch at Scale on Cloud TPUs
Cloud TPU Pods are machine learning supercomputers that enable enterprises to train large machine learning models at a scale otherwise difficult or sometimes impossible.
They deliver business value through solving many machine learning problems including image search, neural architecture search and large-scale language models both for Google and Google Cloud customers.
However, until a few months ago TPU devices and pods were limited to Tensorflow models. Much awaited support for Pytorch was announced in Pytorch conference 2019.
In this session, Vaibhav Singh, ML Specialist, Cloud Customer Engineer, Google Cloud and Taylan Bilal, Software Engineer, Google Cloud demystify the art and science of training your Pytorch models on TPUs. They take you through a step-by-step walkthrough using an example, then explain how it works, and finally how to scale up Pytorch training with Cloud TPU Pods.
3121
Of your peers have already watched this video.
21:30 Minutes
The most insightful time you'll spend today!
Interpreting ML Models with Explainable AI
We often trust our high-accuracy ML models to make decisions for our users, but it’s hard to know exactly why or how these models came to specific conclusions.
Explainable AI provides a suite of tools to help you interpret your ML model’s predictions.
Listen to this discussion regarding how to use Explainable AI to ensure our ML models are treating all users fairly and how to analyze image, text, and tabular models from a fairness perspective, using Explanations on AI Platform.
Sara Robinson, Developer Advocate, Google Cloud defines explainability, and what it looks like for different data types. She also demonstrates the different Explainable AI offerings on Google Cloud, runs a demo, and shows how to use the What-if Tool, an open source visualization tool for optimizing your ML model’s performance and fairness.
More Relevant Stories for Your Company


How Apna is using data and AI to drive the gig economy in India
In this episode, Theo speaks to Ronak Shah, Head of Data at apna.co. As one of the largest gig economies in the world, India is seeing rising numbers among younger people joining the ecosystem. Driven by digital adoption and new ways of working, Apna saw an opportunity to help bridge

Unified, Flexible and Accessible: How Companies’ Data Help Them Achieve More on Google Cloud
As the volume of data that people and businesses produce continues to grow exponentially, it goes without saying that data-driven approaches are critical for tech companies and startups across all industries. But our conversations with customers, as well as numerous industry commentaries, reiterate that managing data and extracting value from




Baking Gets Sweeter: Build ML Models that Help Predict the Best Recipe!
Baking recipes and ML models have one thing in common—they follow a pattern. Machine Learning is all about finding pattern in data sets, you can predict what you are baking based on the core ingredients and their respective amounts! Bread, cake or cookies, watch the video to make you make

Trend 2: Google Research on Machine Learning Themes for 2022 and Beyond!
Trend 2: Continued Efficiency Improvements for MLImprovements in efficiency — arising from advances in computer hardware design as well as ML algorithms and meta-learning research — are driving greater capabilities in ML models. Many aspects of the ML pipeline, from the hardware on which a model is trained and executed
