






Forrester Report on Indian Healthcare: Why this Sector’s Seeing Greater Cloud Investments than BFSI or Retail
READ FULL INTRODOWNLOAD AGAIN4180
Of your peers have already downloaded this article
11:45 Minutes
The most insightful time you'll spend today!
3 Important Factors to Consider for Moving Large-scale On-prem Data to Cloud with Storage Transfer Service

3518
Of your peers have already read this article.
1:30 Minutes
The most insightful time you'll spend today!
Organizations have been moving their on-premises data and applications to the cloud for the past several years, driven by reasons as varied as application modernization and content delivery to archival. In particular, we have seen migration momentum pick up in sectors like media and entertainment, where customers are rethinking how they monetize and store their valuable historical content, often while exploring Google Cloud’s many analytical and AI solutions.
Many of these customers are interested in moving their unstructured data from on-premises appliances to Google’s Cloud Storage. Over the past year, we’ve noticed an uptick in larger migrations, where customers move tens of petabytes or more of on-premises file data to Google’s flexible, secure object storage.
For customers like Telecom Italia/TIM Brasil, Google’s fully managed Storage Transfer Service played a key role in making this transformation possible by moving data from on-premises filesystems to extensible, low-cost Cloud Storage over the network.
“Storage Transfer Service helped us move petabyte-scale data from on-premises filesystem to Google Cloud in a highly performant and fully-managed way,” said Auana Mattar, CIO at Telecom Italia/TIM Brasil. “Setting up the transfer pipeline required performing some tests to figure out the ideal number of agents and networking settings in our on-prem environment. Once the initial setup was done, transferring data was seamless, and the service was able to saturate a 20 Gbps Partner Interconnect link.”
While large-scale cloud migrations can be intimidating, there are a number of actions that customers can take to ensure that a multi-petabyte data transfer goes as smoothly as possible. In the past, we’ve shared general architectural guidance for customers new to their cloud journey. And for customers looking for options, Google has multiple paths to move on-premises file data to the cloud, including our fully offline Transfer Appliance.
In this blog post, we’ll provide an updated perspective focused on how to use Storage Transfer Service to move data from on-prem to the cloud. Specifically, we’ll look at three different factors to consider prior to moving large amounts of data from your on-premises filesystem to Cloud Storage with our Storage Transfer Service.
Understanding the source files and filesystem
If you are moving data from an on-premises filesystem, you should be aware of how your source files, and your source filesystem, can impact transfer performance.
Each copy you make to Cloud Storage incurs some overhead from associated operations like metadata transfer, checksumming, and encryption. This means that, for a given amount of storage, transferring large numbers of very small files will take longer. As a rule of thumb, Storage Transfer Service will be most performant when moving files that are 16 MB or larger.
If you have a large number of smaller files, you may choose to batch them using tools like tar and upload as a single object. This will improve transfer performance but will limit how you can use those files in Cloud Storage. It’s an option best considered for use cases like archival storage, where the data transferred to Google Cloud may not be managed or accessed regularly. Our Nearline, Coldline, and Archive archival tiers offer excellent performance should you ever need to retrieve the archived data.
The source filesystem may also slow down transfer performance, particularly if the filesystem has limited read throughput. Tools like Fio can be used to test read throughput. We’ve included a command below to run a series of 1MB sequential read operations in Fio and to generate a report:
#Install fio> sudo apt install -y fio#Create a new directory fiotest> TEST_DIR=/mnt/mnt_dir/fiotest> sudo mkdir -p $TEST_DIR#Test read throughput> sudo fio --directory=$TEST_DIR --direct=1 --rw=randread --randrepeat=0 --ioengine=libaio --bs=1M --iodepth=8 --time_based=1 --runtime=180 --name=read_test --size=1G
Fio will then generate a report. The final line labeled ‘bw’ represents the total aggregate bandwidth of all threads, and it can be used as a proxy for read throughput. In general, you should strive for read throughput (‘bw’) that is 1.5x of your desired upload throughput or speed. (And one easy way to increase read throughput is to ensure that the filesystem itself is not imposing any limits on maximum throughput.)
Optimizing Storage Transfer Service resources
Within the Storage Transfer Service, there are a few settings that we can adjust ahead of time to ensure optimal performance for a larger workload.
First, we should ensure that we have the right number of transfer agents for our source data. We would advise that, for any transfer job larger than 1 GB, you start with at least three agents in separate VMs, with each agent assigned at least 4 vCPU and 8 GB of RAM. In addition to providing a foundation for performant data transfer, this architecture also ensures that the transfer is fault tolerant should one agent machine become unavailable.
Google Cloud supports up to 100 concurrent agents for a given Google Cloud project. To help you identify the right number of agents to support your workload, you should start your larger transfer first, then wait three minutes after adding each agent to ensure that throughput has stabilized.
In general, each agent can facilitate roughly 1 Gbps of throughput for up to 10 agents, at which point it may be necessary to add more agents for a very large amount of network bandwidth. For example, in one larger migration, a customer with 20 Gbps of dedicated network capacity ran ~30 agents at once. These numbers illustrate what was required at one enterprise data center. Across all of your environments, it is important to test and monitor your throughput via Cloud Monitoring to ensure you have the right configuration for your transfer goals.
Another area to optimize is where and how you install your agents. As we mentioned earlier, agents should be installed in separate VMs, and each host machine should dedicate at least 4 vCPUs and 8 GB of memory per agent. This is a starting off point, and larger, long-running transfers may require additional CPU or memory. For those longer jobs, we advise that you monitor CPU utilization and unused memory closely to ensure optimal performance. You should provision more CPUs when utilization exceeds 70%. Similarly, you should be ready to provision additional memory when the agent has less than 1GB of unused memory.
Preparing your network for large-scale data transfer
The third and final area to consider is your network connectivity. While it can be easy to reduce this to the bandwidth between the source filesystem and the Google Cloud bucket, the network includes two other components that can be easier to configure: first, the network interface from the on-premises agents to the WAN; and second, the agents’ connection to the on-premises filesystem.
For the first component, the network interface from the on-premises agents to the WAN, the general guidance is to not let this become a bottleneck. Specifically, you should ensure that this interface is greater than or equal to the bandwidth you require to read from the filesystem, plus the upload bandwidth to write to Google Cloud. In other words, if you plan on moving 10 Gbps of data from on-premises to Google Cloud, you will need 20 Gbps of bandwidth between the on-premises agents to the WAN: 10 Gbps to read from the networked filesystem, and 10 Gbps to transfer and write to Google Cloud.
On-premises filesystems, and on-premises networks, come in many flavors. For the second component, how the agents connect to an on-premises filesystem, our general rule is to be mindful of latency and to test regularly. It is essential to ensure that agents run on machines that can access a networked filesystem with very low latency.
Finally, if you are trying to maximize transfer performance, make sure you’ve configured your network to avoid bandwidth restrictions between on-premises filesystem and Google Cloud that might impact transfer speed. Storage Transfer Service will allow you to cap the bandwidth used by transfer, making it easy to minimize any impact on other production applications. Consider using tools like lperf3, tcpdump, and gsutil to measure the network bandwidth available to upload to Cloud Storage.
In particular, gsutil is worth some additional detail. Gsutil is a Python tool that can help you perform a number of object storage management tasks in Google Cloud, including checking your agent’s connection to the Cloud Storage APIs. It can be installed via the Google Cloud SDK, or separately. In this case, you should also ensure that gsutil is available in the same on-premises VM as the Storage Transfer Service agent.
If you’d like to use gsutil to test connectivity to Google Cloud, here’s the command:
gsutil cp test.txt gs://my-bucketReplace:my-bucket with the name of your Cloud Storage bucket.
CP is a copy command that lets you copy data from on-premises to the cloud. In this case, gsutil is copying a test document, test.txt, to ensure that you have a connection with the Google Cloud APIs. You will need to create a test document before running this command.
Test twice, transfer once
One overarching theme across all factors is that testing can help you understand performance. For many customers, a large-scale data transfer from an on-premises filesystem to Google Cloud is an unusual event. And as with any unusual event in enterprise IT, it is a great idea to make sure that each party – from network administrators to filesystem and storage experts to cloud architects – is able to test their domain multiple times, to ensure the event will proceed seamlessly.
As you fine tune your testing in advance of a data transfer, you may want to learn more about your options for obtaining more network bandwidth, orchestrating transfer from SMB filesystems, or even how to make the right choices to save money on object storage. And we plan to share more in our blog about how customers have used our transfer offerings in the months ahead. Advanced agent setup | Cloud Storage Transfer Service Documentation
For more information about Storage Transfer Service and how to get started, please take a look at our documentation or get started via the Google Cloud console.
Making Weather Predictions Easy with Weather Research and Forecasting (WRF) Models on Google Cloud!

3578
Of your peers have already read this article.
6:00 Minutes
The most insightful time you'll spend today!
Weather forecasting and climate modeling are two of the world’s most computationally complex and demanding tasks. Further, they’re extremely time-sensitive and in high demand — everyone from weekend travelers to large-scale industrial farming operators wants up-to-date weather predictions. To provide timely and meaningful predictions, weather forecasters usually rely on high performance computing (HPC) clusters hosted in an on-premises data center. These on-prem HPC systems require significant capital investment and have high long-term operational costs. They consume a lot of electricity, have largely fixed configurations, and the underlying computer hardware is replaced infrequently.
Using the cloud instead offers increased flexibility, constantly refreshed hardware, high reliability, geo-distributed compute and networking, and a “pay for what you use” pricing model. Ultimately, cloud computing allows forecasters and climate modelers to provide timely and accurate results on a flexible platform using the latest hardware and software systems, in a cost effective manner. This is a big shift compared with traditional approaches to weather forecasting, and can appear challenging. To help, weather forecasters can now run the Weather Research and Forecasting (WRF) modeling system easily on Google Cloud using the new WRF VM image from Fluid Numerics, and achieve the performance of an on-premises supercomputer for a fraction of the price. With this solution, weather forecasters can get a WRF simulation up and running on Google Cloud in less than an hour!
A closer look at WRF
Weather Research and Forecasting (WRF) is a popular open-source numerical weather prediction modeling system used by both researchers and operational organizations. While WRF is primarily used for weather and climate simulation, teams have extended it to support interactions with chemistry, forest fire modeling, and other use cases. WRF development began in the late 1990s through a collaboration between the National Center for Atmospheric Research (NCAR), National Oceanic and Atmospheric Administration (NOAA), U.S. Air Force, Naval Research Laboratory, University of Oklahoma, and the Federal Aviation Administration. The WRF community comprises more than 48,000 users spanning over 160 countries, with the shared goal of supporting atmospheric research and operational forecasting.
The Google Cloud WRF image is built using Google’s MPI best practices for HPC, with the exception that hyperthreading is not disabled by default, and is easily integrated with other HPC solutions on Google Cloud, including SchedMD’s Slurm-GCP. Normally, installing WRF and its dependencies is a time consuming process. With these new WRF VM images, deploying a scalable HPC cluster with WRF v4.2 pre-installed is quick and easy with our Codelab. OpenMPI 4.0.2 was used throughout this work. Google has had good success with Intel MPI, and we intend to study whether further performance gains can be achieved in this context.
Optimizing WRF
Determining the optimal architecture and build settings for performance and cost was a key part of the process in developing the WRF images. We evaluated how to select the ideal compiler, right CPU platform, and the best file system for handling file IO, so you don’t have to. As a test case for assessing performance, we used the CONUS 2.5km benchmark.
Below, the CONUS 2.5km runtime and cost figure shows the run time required for simulating WRF over a two-hour forecast using 480 MPI ranks (a way of numbering processes) for different machine types available on Google Cloud. For each machine type, we’re showing the lowest measured run time from a suite of tests that varied compiler, compiler optimizations, and task affinity.
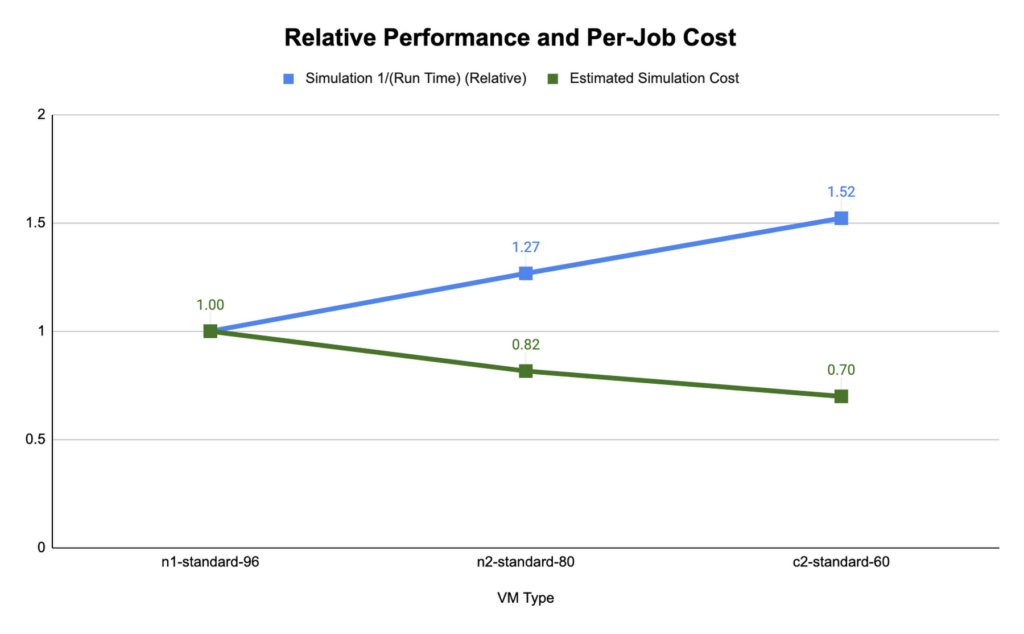
We found that compute-optimized c2 instances provided the shortest run time. The Slurm job scheduler allows you to map the MPI tasks to compute hardware using task affinity flags. When optimizing the runtime and cost for each machine type, we compared using srun –map-by core –bind-to core to launch WRF, which maps each MPI process to a physical core (two vCPU per MPI rank), and srun –map-by thread –bind-to thread, which maps each MPI process to a single vCPU. Mapping by core and binding MPI ranks to cores is akin to disabling hyperthreading.
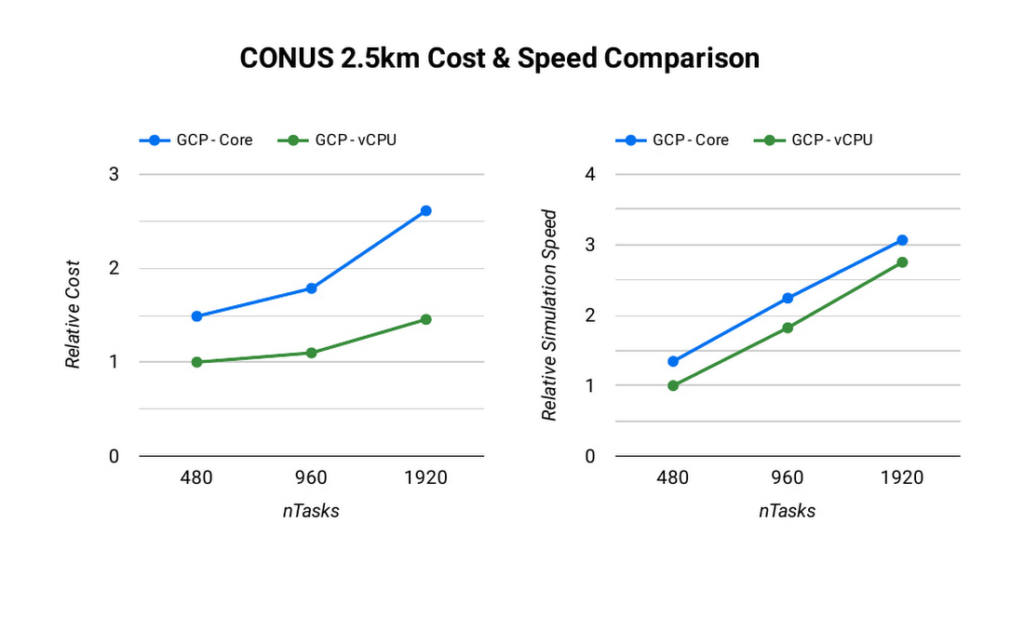
The ideal simulation cost and runtime for CONUS 2.5km for each platform is found when each MPI rank is subscribed to each vCPU. When binding to vCPUs, half as many compute resources are needed when compared to binding to physical cores lowering the per-second cost for the simulation. For CONUS 2.5km, we also found that although mapping MPI ranks to cores results in reduced runtime for the same number of MPI ranks, the performance gains are not significant enough to outweigh the cost savings. For this reason, the WRF-GCP solution does not disable hyperthreading by default.
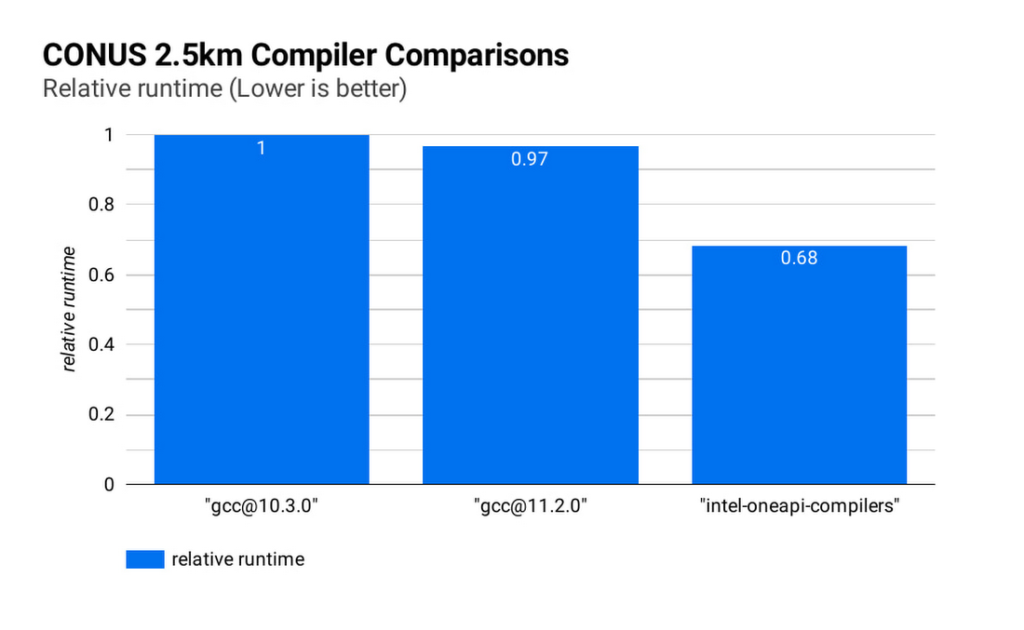
Runtime and simulation cost can be further reduced by selecting an ideal compiler: the figure below (CONUS 2.5km Compiler Comparisons) shows the simulation runtime for the WRF CONUS 2.5km benchmark on eight c2-standard-60 instances, using GCC 10.30, GCC 11.2.0 and the Intel® OneAPI® compilers (v2021.2.0). In all cases, WRF is built using level 3 compiler optimizations and Cascade Lake target architecture flags. By compiling WRF with the Intel® OneAPI® compilers, the WRF simulation runs about 47% faster than the GCC builds, and at about 68% of the cost, on the same hardware. We’ve used OpenMPI 4.0.2 with each of the compilers as the MPI implementation in this work. With other applications, Google has seen good performance with Intel MPI 2018, and we intend to investigate performance comparisons with this and other MPI implementations.
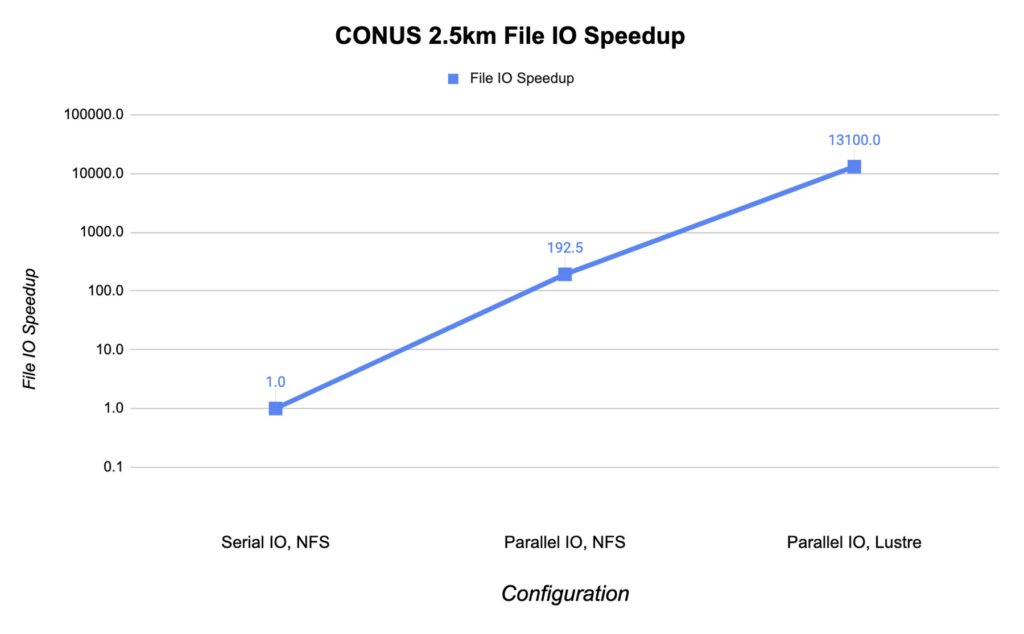
File IO in WRF can become a significant bottleneck as the number of MPI ranks increases. Obtaining the optimal file IO performance requires using parallel file IO in WRF and leveraging a parallel file system such as Lustre.
Below, we show the speedup in file IO activities relative to serial IO on an NFS file system. For this example, we are running the CONUS 2.5km benchmark on c2-standard-60 instances with 960 MPI ranks. By changing WRF’s file IO strategy to parallel IO, we accelerate file IO time by a factor of 60.
We further speed up IO and reduce simulation costs by using a Lustre parallel file system deployed from open-source Lustre Terraform infrastructure-as-code from Fluid Numerics. Lustre is also available with support from DDN’s EXAScaler solution in the Google Cloud Marketplace. In this case, we use four n2-standard-16 instances for the Lustre Object Storage Server (OSS) instances, each with 3TB of Local SSD. The Lustre Metadata Server (MDS) is an n2-standard-16 instance with a 1TB PD-SSD disk. After mounting the Lustre file system to the cluster, we set the Lustre stripe count to 4 so that file IO can be distributed across the four OSS instances. By switching to the Lustre file system for IO, we speed up file IO by an additional factor of 193, which is orders of magnitude faster than a single NFS server with serial IO.
Adding compute resources and increasing the number of MPI ranks reduces the simulation run time. Ideally, with perfect linear scaling, doubling the number of MPI ranks would cut the simulation time in half. However, adding MPI ranks also increases communication overhead, which can increase the cost per simulation. The communication overhead is due to the increased amount of communication necessitated by splitting the problem more finely across more machines.
To assess the scalability of WRF for the CONUS 2.5km benchmark, we can execute a series of model forecasts where we successively double the number of MPI ranks. Below, we show two- hour forecasts on the c2-standard-60 instances with the Lustre file system, varying the number of MPI ranks from 480 to 1920. In all of these runs, MPI ranks are bound to vCPUs so that the number of vCPUs dedicated to each simulation increases with the increase in MPI ranks. While many HPC workloads run best with simultaneous multithreading (SMT) disabled, we find the best performance for CONUS 2.5km with SMT enabled. Thus, the number of MPI ranks in our runs equals the total number of vCPUs.
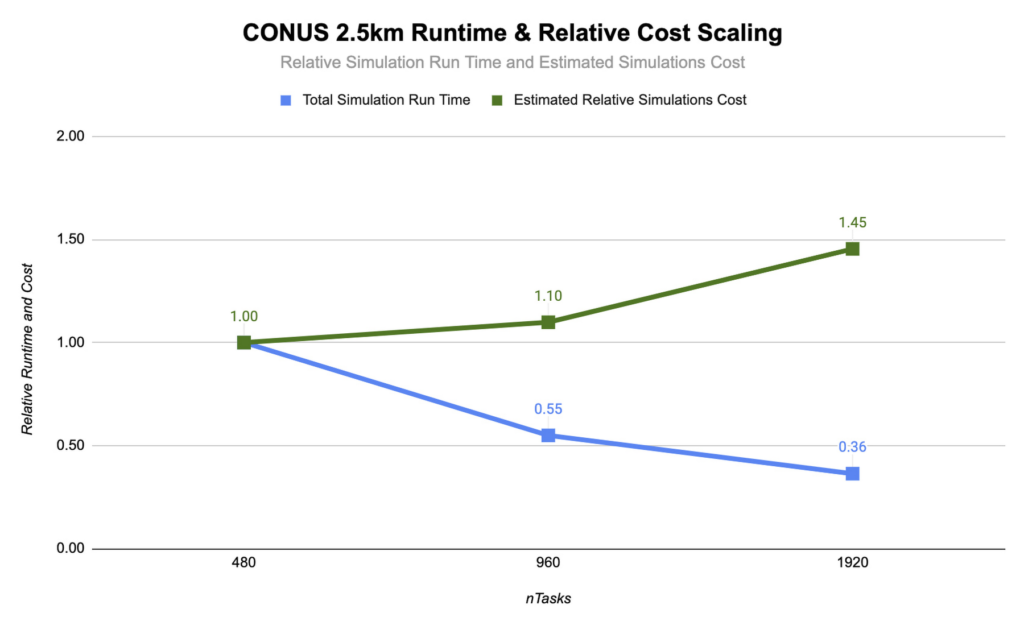
As you can see, the CONUS 2.5km Runtime & Cost Scaling figure shows that the run time (blue bars) decreases as the number of MPI ranks and the amount of compute resources increases, at least up to 1920 ranks. When transitioning from 480 to 960 MPI ranks, the run time drops, yielding a speedup of about 1.8x. Doubling again to 1920 MPI ranks, though, we obtained an additional speedup of just 1.5x. This declining trend in the speedup with increasing MPI ranks is a signature of MPI overhead, which increases with more MPI ranks.
Determining your best fit
Most tightly-coupled MPI applications such as WRF exhibit this kind of scaling behavior, where scaling efficiency decreases with increasing MPI ranks. This makes assessing cost-scaling alongside performance-scaling critical when considering Total Cost of Ownership (TCO). Thankfully, per-second billing on Google Cloud makes this kind of analysis a little bit easier. As shown above, a second doubling of the count from 960 cores to 1920 cores can provide an additional 1.5x speedup, but at a 32% higher cost. In some circumstances, this faster turnaround may be needed and worth the extra cost.
If you want to get started with WRF quickly and experiment with the CONUS 2.5km benchmark, we’ve encapsulated this deployment in Terraform scripts and prepared an accompanying codelab.
You can learn more about Google Cloud’s high performance computing offerings at https://cloud.google.com/hpc, and you can find out more about Google’s partner Fluid Numerics at https://www.fluidnumerics.com.
Google Cloud is Every Retailer’s Most Trusted Cloud

6603
Of your peers have already read this article.
3:00 Minutes
The most insightful time you'll spend today!
Whether they were ready for it or not, the COVID-19 pandemic transformed many retailers into digital businesses. Retailers made huge investments into commerce technologies, customer experience tools, sales and fulfillment technology, and improving digital experiences to continue providing their goods and services to their customers. Now, more than a year into the COVID-19 pandemic, digital retail is the new normal. In fact, many retailers are planning on expanding their digital investments. However, as their digital footprint expands, so do their threats and security concerns.
As a digital-focused retailer, your website is the most visible part of your attack surface. Your website is where your customers search for goods or services, make payments, or learn more about your brand. However, your website does not operate in isolation. There is an underlying infrastructure as well as the services that run on top of it that need protection from a wide array of attacks that may seek to compromise your data, internal employees, business, and customers. During this week’s Google Cloud Retail Summit, we’ve shared why Google Cloud is built to be the most trusted cloud for retailers. From providing you with control over your data as you move from your own data centers to the public cloud to giving you built-in technology to protect your applications all the way to your end users, Google Cloud helps you safely migrate to and operate in our Trusted Cloud.
Trusted Cloud Gives You Control, Transparency, and Sovereignty
- Access Transparency: We offer the ability to monitor and approve access to your data or configurations by Google Cloud support and engineering based on specific justifications and context, so you have visibility and control over insider access.
- Certificate Authority Service (CAS): CAS is a highly scalable and available service that simplifies and automates the management and deployment of private CAs while meeting the needs of modern developers and applications. With CAS, you can offload to the cloud time-consuming tasks associated with operating a private CA, like hardware provisioning, infrastructure security, software deployment, high-availability configuration, disaster recovery, backups, and more, allowing you to stand up a private CA in minutes, rather than the months it might normally take to deploy.
- Confidential Computing: We already encrypt data at-rest and in-transit, but customer data needs to be decrypted for processing. Confidential Computing is a breakthrough technology which encrypts data in-use—while it’s being processed. Confidential VMs take this technology to the next level by offering memory encryption so that you can further isolate your workloads in the cloud. With the beta launch of Confidential VMs, we’re the first major cloud provider to offer this level of security and isolation while giving you a simple, easy-to-use option for your newly built and “lift and shift” applications.
- Cloud Key Management: We allow you to configure the locations where your data is stored, where your encryption keys are stored, and where your data can be accessed from. We give you the ability to manage your own encryption keys, even storing them outside Google’s infrastructure. Using our External Key Management service, you have the ability to deny any request by Google to access encryption keys necessary to decrypt customer data at rest for any reason.
Trusted cloud Helps You Prevent, Detect, and Respond to Threats
- BeyondCorp Enterprise is Google’s comprehensive zero trust product offering. Google has over a decade of experience managing and securing cloud applications at a global scale, and this offering was developed based on learnings from our experience managing our own enterprise, feedback from customers and partners, as well as informed by leading engineering and security research. We understand that most customers host resources across different cloud providers. With this in mind, BeyondCorp Enterprise was purpose-built as a multicloud solution, enabling customers to securely access resources hosted not only on Google Cloud or on-premises, but also across other clouds such as Azure and Amazon Web Services (AWS).
- Cloud Armor: We’re simplifying how you can use Cloud Armor to help protect your websites and applications from exploit attempts, as well as Distributed Denial of Service (DDoS) attacks. With Cloud Armor Managed Protection Plus, you will get access to DDoS and WAF services, curated rule sets, and other services for a predictable monthly price.
- Chronicle: Chronicle is a threat detection solution that identifies threats, including ransomware, at unparalleled speed and scale. Google Cloud Threat Intelligence for Chronicle surfaces highly actionable threats based on Google’s collective insight and research into Internet-based threats. Threat Intel for Chronicle allows you to focus on real threats in the environment and accelerate your response time.
- Google Workspace Security: Used by more than five million organizations worldwide, from large banks and retailers with hundreds of thousands of people to fast-growing startups, Google Workspace and Google Workspace for Education include the collaboration and productivity tools found here. Google Workspace and Google Workspace for Education are designed to help teams work together securely in new, more efficient ways, no matter where members are located or what device they use. For instance, Gmail scans over 300 billion attachments for malware every week and prevents more than 99.9% of spam, phishing, and malware from reaching users. We’re committed to protecting against security 1 threats of all kinds, innovating new security tools for users and admins, and providing our customers with a secure cloud service.
- Identity & Access Management IAM: Identity and Access Management (IAM) lets administrators authorize who can take action on specific resources, giving you full control and visibility to manage Google Cloud resources centrally. For enterprises with complex organizational structures, hundreds of workgroups, and many projects, IAM provides a unified view into security policy across your entire organization, with built-in auditing to ease compliance processes.
- reCAPTCHA Enterprise: reCAPTCHA has over a decade of experience defending the internet and data for its network of more than 5 million sites. reCAPTCHA Enterprise builds on this technology with capabilities, such as two-factor authentication and mobile application support, designed specifically for enterprise security concerns. With reCAPTCHA Enterprise, you can defend your website against common web-based attacks like credential stuffing, account takeovers, and scraping and help prevent costly exploits from malicious human and automated actors. And, just like reCAPTCHA v3, reCAPTCHA Enterprise will never interrupt your users with a challenge, so you can run it on all webpages where your customers interact with your services.
- Security Command Center: With Security Command Center (SCC), our native posture management platform, you can prevent and detect abuse of your cloud resources, centralize security findings from Google Cloud services and partner products, and detect common misconfigurations, all in one easy-to-use platform. We have Premium tier for Security Command Center to provide even more tools to protect your cloud resources. It adds new capabilities that let you spot threats using Google intelligence for events in Google Cloud Platform (GCP) logs and containers, surface large sets of misconfigurations, perform automated compliance scanning and reporting. These features help you understand your risks on Google Cloud, verify that you’ve configured your resources properly and safely, and document it for anyone who asks.
- VirusTotal: VirusTotal inspects items with over 70 antivirus scanners and URL/domain blocklisting services, in addition to a myriad of tools to extract signals from the studied content. Any user can select a file from their computer using their browser and send it to VirusTotal.
- Web Risk API: With Web Risk, you can quickly identify known bad sites, warn users before they click infected links, and prevent users from posting links to known infected pages from your site. Web Risk includes data on more than a million unsafe URLs and stays up to date by examining billions of URLs each day.
Trusted cloud Plays an Active Role in Our Shared Fate
Our trusted cloud provides a shared-fate model for risk management. We stand with retailers from day one, helping them implement best practices for safely migrating to and operating in our trusted cloud.
We hope you enjoy the sessions we’ve created for you with Google Cloud Retail Summit and that they help you understand the ways our trusted cloud can help secure retailers all over the world.
Google Cloud Announces General Availability of BigQuery Row-level Security

6599
Of your peers have already read this article.
3:00 Minutes
The most insightful time you'll spend today!
Data security is an ongoing concern for anyone managing a data warehouse. Organizations need to control access to data, down to the granular level, for secure access to data both internally and externally. With the complexity of data platforms increasing day by day, it’s become even more critical to identify and monitor access to sensitive data. In many cases, sensitive data is co-mingled with non-sensitive data, and access restrictions to sensitive data need to be enabled based on factors like data location or presence of financial information. There may also be nuances where data is sensitive for some groups of users, while for others, it is not.
Today, we’re pleased to announce the general availability of BigQuery row-level security, which gives customers a way to control access to subsets of data in the same table for different groups of users. Row-level security (RLS) extends the principle of least privilege access and enables fine-grained access control policies in BigQuery tables. BigQuery currently supports access controls at the project-, dataset-, table- and column-level. Adding RLS to the portfolio of access controls now enables customers to filter and define access to specific rows in a table based on qualifying user conditions—providing much needed peace of mind for data professionals.
“Our digital transformation and migration of data to the cloud magnifies the business value we can extract from our information assets. However, granular data access control is essential to comply with international regulatory and contractual requirements. BigQuery row-level security helps us comply with data residency and export restrictions,” says Jarrett Garcia, Iron Mountain’s Enterprise Data Platform Senior Director. “It enables us to manage fine-grained access controls without replicating data. What used to take months for approval and access provisioning can now be done more efficiently and effectively. We are looking forward to implementing additional data security capabilities on the BigQuery roadmap to address other critical business use cases.”
How BigQuery row-level security works
Row-level security in BigQuery enables different user personas access to subsets of data in the same table. Customers who are currently using authorized views to enable these use cases can leverage RLS for ease of management. To express the concept of RLS, we have introduced a new entity in BigQuery called row access policy. Row access policies map a group of user principals to the rows that they can see, defined by a SQL filter predicate.
Secure logic rules created by data owners and administrators determines which user can see which rows through the creation of a row-level access policy. The row-level access policies created on a target table by administrators or data owners are applied when a query is run on the table. One table can have multiple policies applied to it.
Below is an example, where row-level access policies have been created to filter data based on users’ “region”.

In the illustrated scenario above, row-level access policies have been created to verify a querying user’s region and to give them access only to the subset of data relevant to that region. Access policies are granted to a grantee list which support all types of IAM principles such as individual users, groups, domains or service accounts. In this example, when a user queries the table, row-level access policies are evaluated to assess which, if any, policies are applicable to that user. The group ‘sales-apac’ is granted access to view a subset of rows where region = ‘APAC’ whereas the group ‘sales-us’ is granted access to view a subset of rows where the region = ’US’. Likewise, users in both groups will see rows in both regions, and users in neither group will not see any rows.
Row-level access policies can also be created using the SESSION_USER() function to restrict access only to rows that belong to the user running the query. If none of the row access policies are applicable to the querying user, the user will have no access to the data in the table.
When a user queries a table with a row-level access policy, BigQuery displays a banner notice indicating that their results may be filtered by a row-level access policy. This notice displays even if the user is a member of the `grantee_list`.

When to put BigQuery row-level security to work
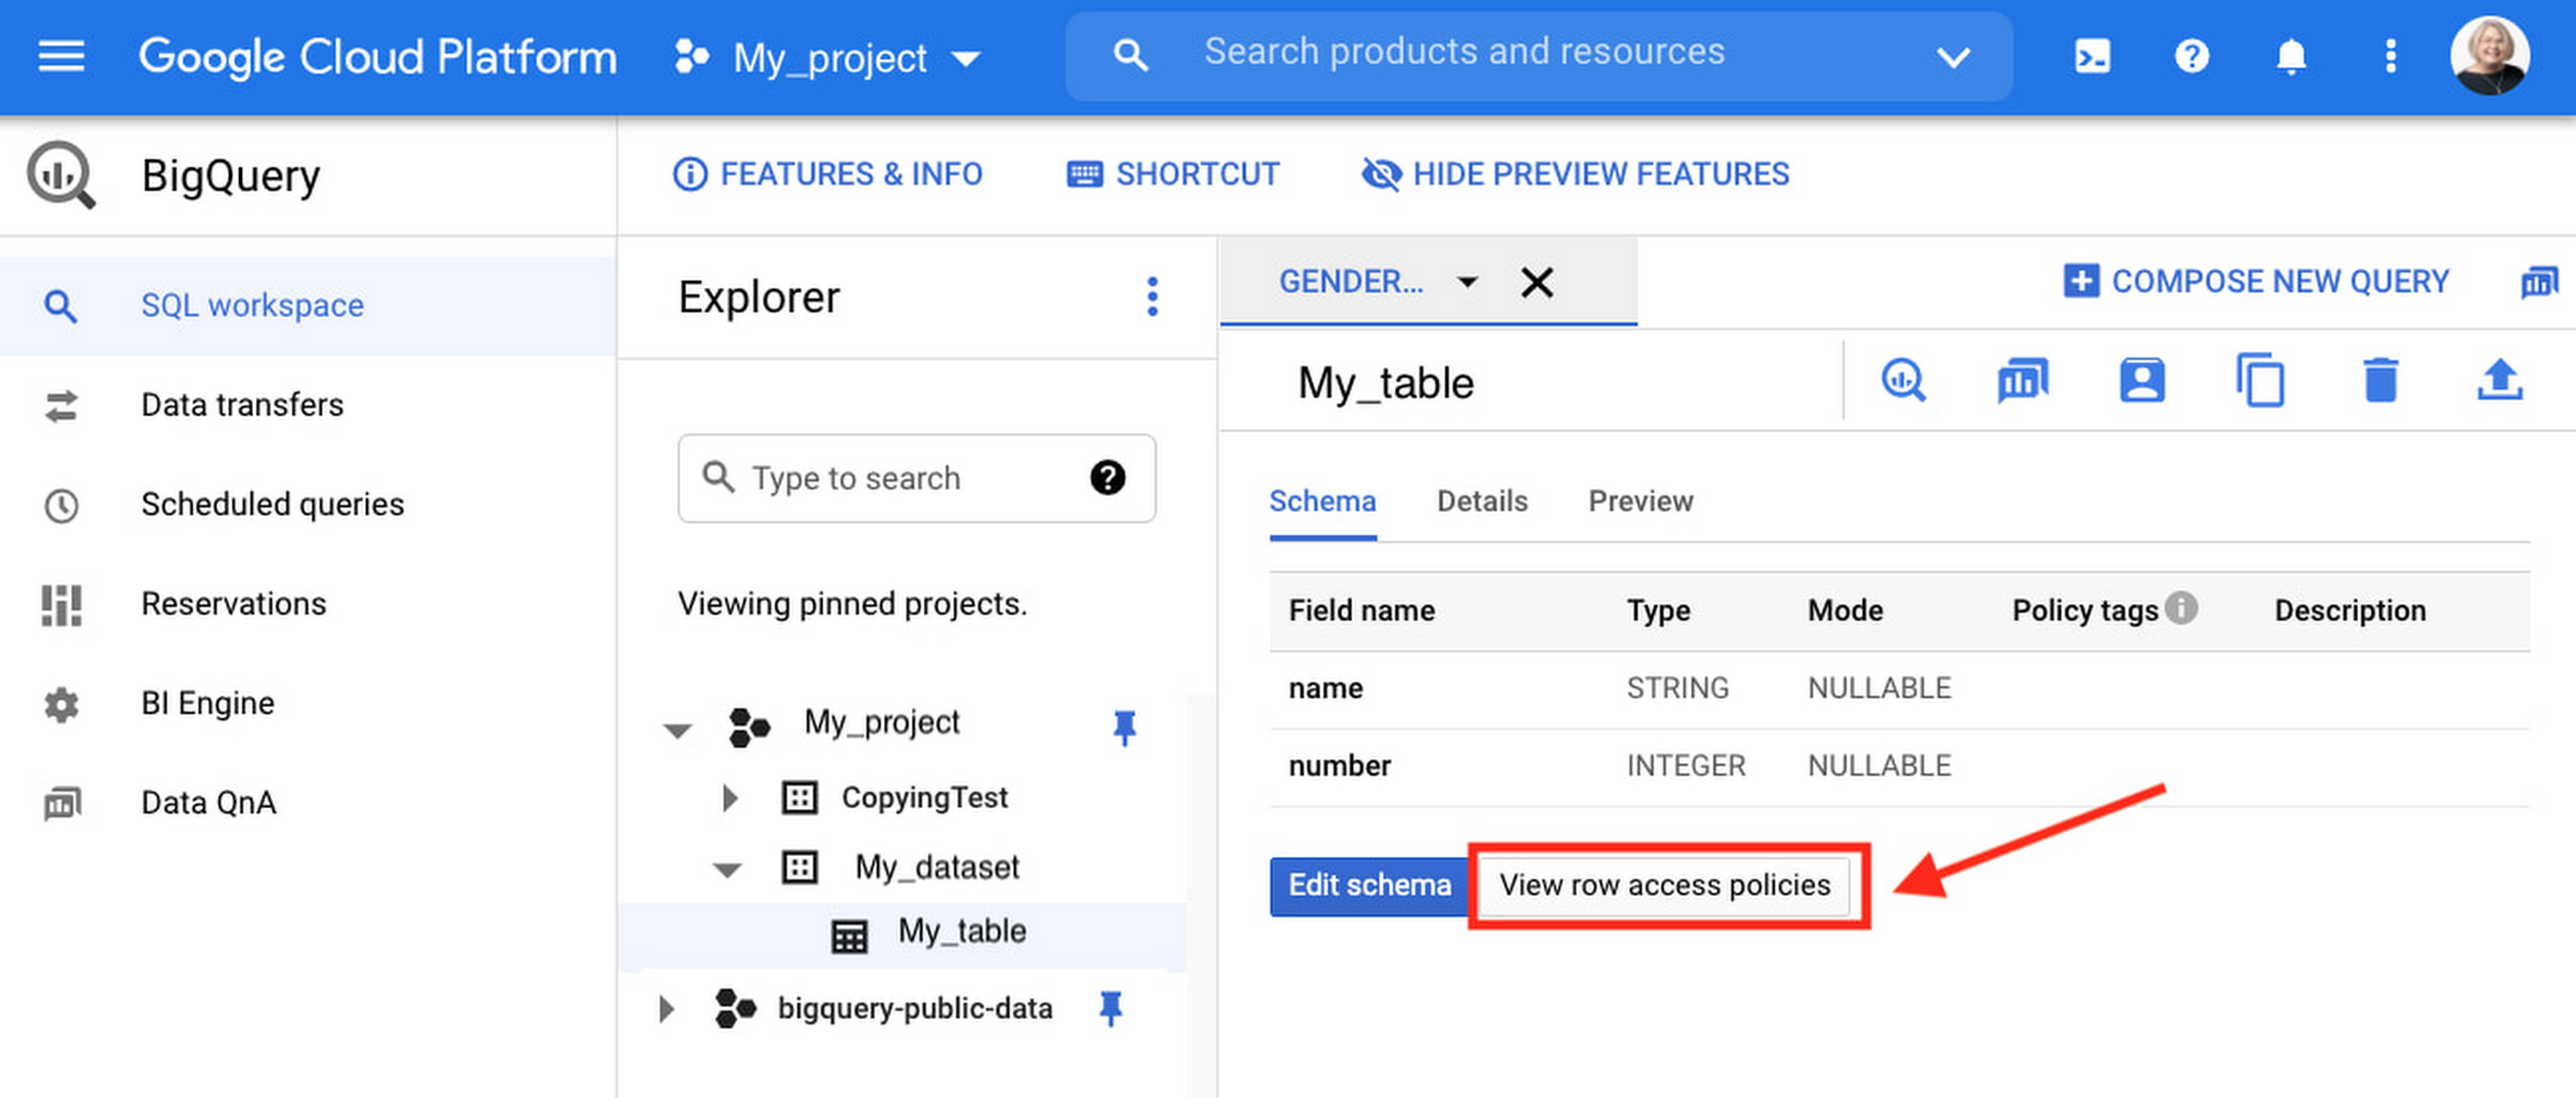
Row-level access policies are useful when you have a need to limit access to data based on filter conditions. The row-access policies’ filter predicate supports arbitrary SQL, and is conceptually similar to the WHERE clause of a SQL query. Filter predicates support the SESSION_USER() function to restrict access only to rows that belong to the user running the query. If none of the row access policies are applicable to the querying user, the user will have no access to the data in the table. Currently, the column used for filtering must be in the table, but we anticipate adding support for subqueries in the filter expression, opening up access to use cases where data is filtered based on lookup tables and calculated values. Row-level access policies can be created, updated and dropped using DDL statements. You will be able to see the list of row-level access policies applied to a table using the BigQuery schema pane in the Cloud Console, which simplifies the management of policies per table, or by using the bq command-line tool.
Row-level security is compatible with other BigQuery security features, and can be used along with column-level security for further granularity. Since row-level access policies are applied on the source tables, any actions performed on the table will inherit the table’s associated access policies, to ensure access to secure data is protected. Row-level access policies are applicable to every method used to access BigQuery data (API, Views, etc).
Try it out
We’re always working to enhance BigQuery’s (and Google Cloud’s) data governance capabilities, to provide more controls around managing your data. With row-level security, we are adding deeper protections for your data. You can learn more about BigQuery row-level security in our documentation and best practices.
Quilkin: How the Open-source UDP Proxy Enables High-performance Multiplayer Gaming

3342
Of your peers have already read this article.
4:00 Minutes
The most insightful time you'll spend today!
Traditionally, dedicated game servers for real time multiplayer games have used bespoke UDP protocols for communication and synchronization of gameplay among the players within a game. This communication is most often bundled into monolithic game servers and clients, pairing the technical functionality of communication protocols, such as custom network physics synchronisation, security, access control, telemetry and metrics, with the extremely high computational requirements of physics simulations, AI computation and more.
Developed in collaboration with Embark Studios, Quilkin is a UDP proxy, tailor-made for high performance real-time multiplayer games. Its aim is twofold:
- Pull common functionality, such as security, access control, telemetry and metrics out of monolithic dedicated game servers and clients.
- Provide this common functionality in a composable and configurable way, such that it can be reused across a wide set of multiplayer games.
This reusable foundation then allows game developers to spend more of their time focusing on building the game-specific aspects of building their multiplayer communication protocols, rather than these common aspects.
Challenges with multiplayer Game Server communication
In fast-paced, multiplayer games, the full simulation of a session of gameplay generally occurs within the memory of a monolithic dedicated game server, whose responsibility covers everything from network physics and AI simulation to communications from client back to server and more.
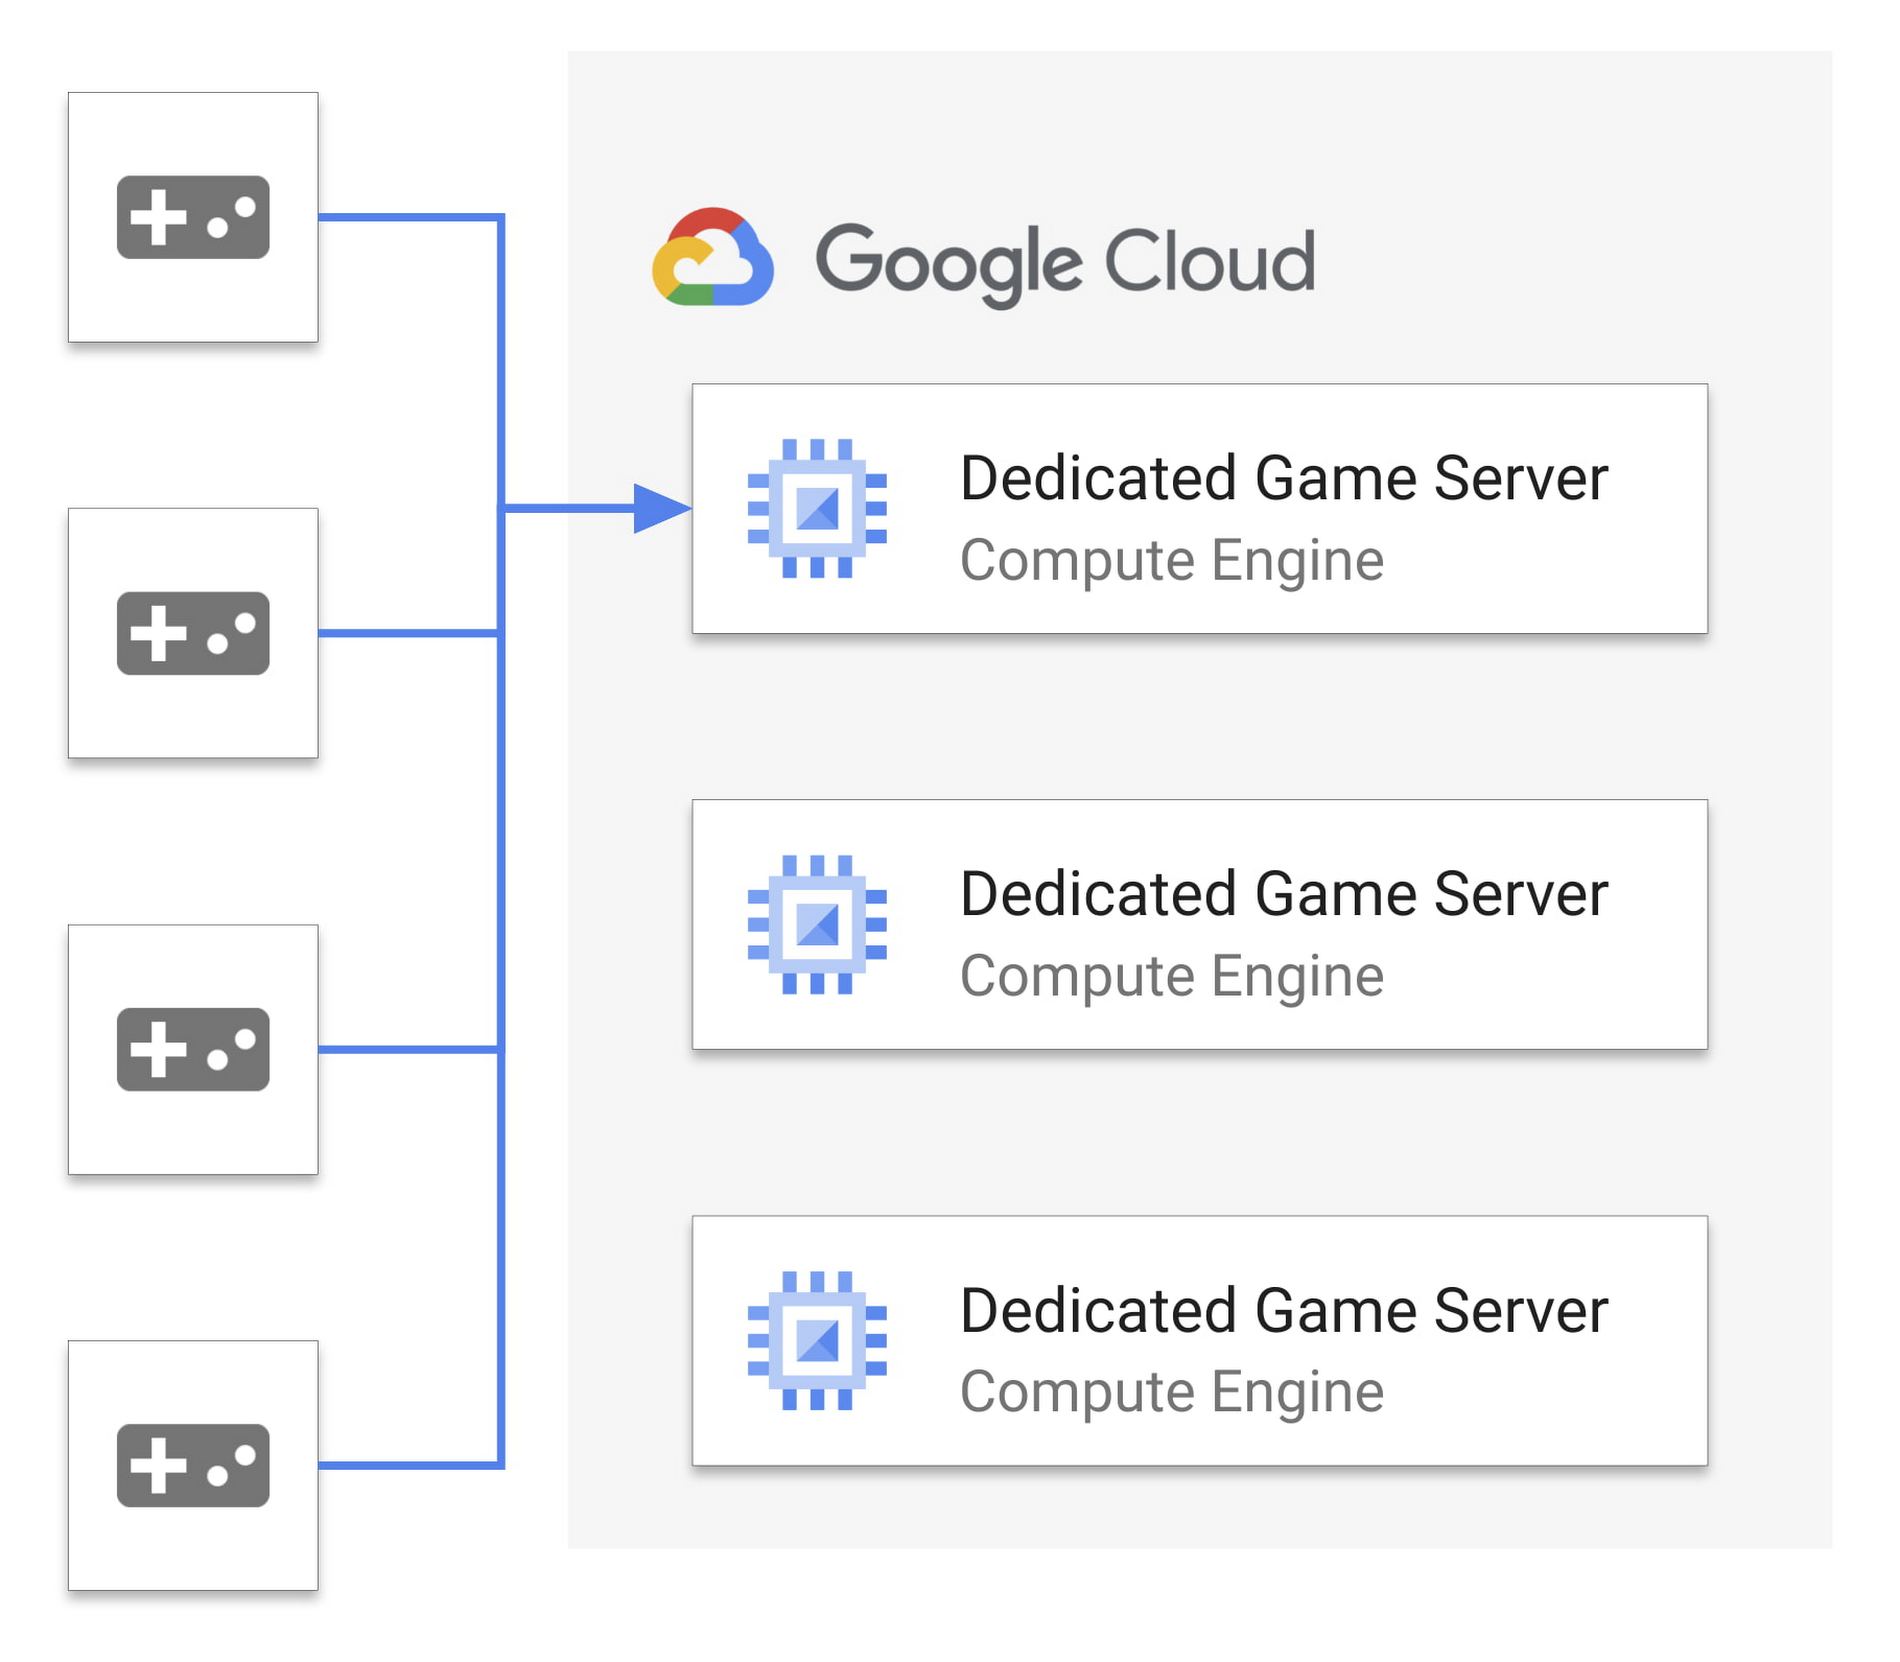
Since the entire state of the game is memory resident, each client connects directly to the dedicated game server the player is playing on, which presents several challenges:
- Each dedicated game server is a single point of failure. If it goes down, then the whole game session (or sometimes multiple sessions) fails. This makes it a target for malicious actors.
- The IP and port of connection to the game server is public, and exposed to the game client, making it easy to discover and target.
- Multiple aspects of game server simulation and network communication are tightly coupled in the same process, making reuse and modularity more difficult, and expanding risk of performance issues.
If we look at both web and mobile technologies over the past several years, some of these challenges start to look very familiar. Thankfully, one of the solutions to help drive dedicated server workloads to more redundant and distributed orchestration is the utilisation of traffic proxies!
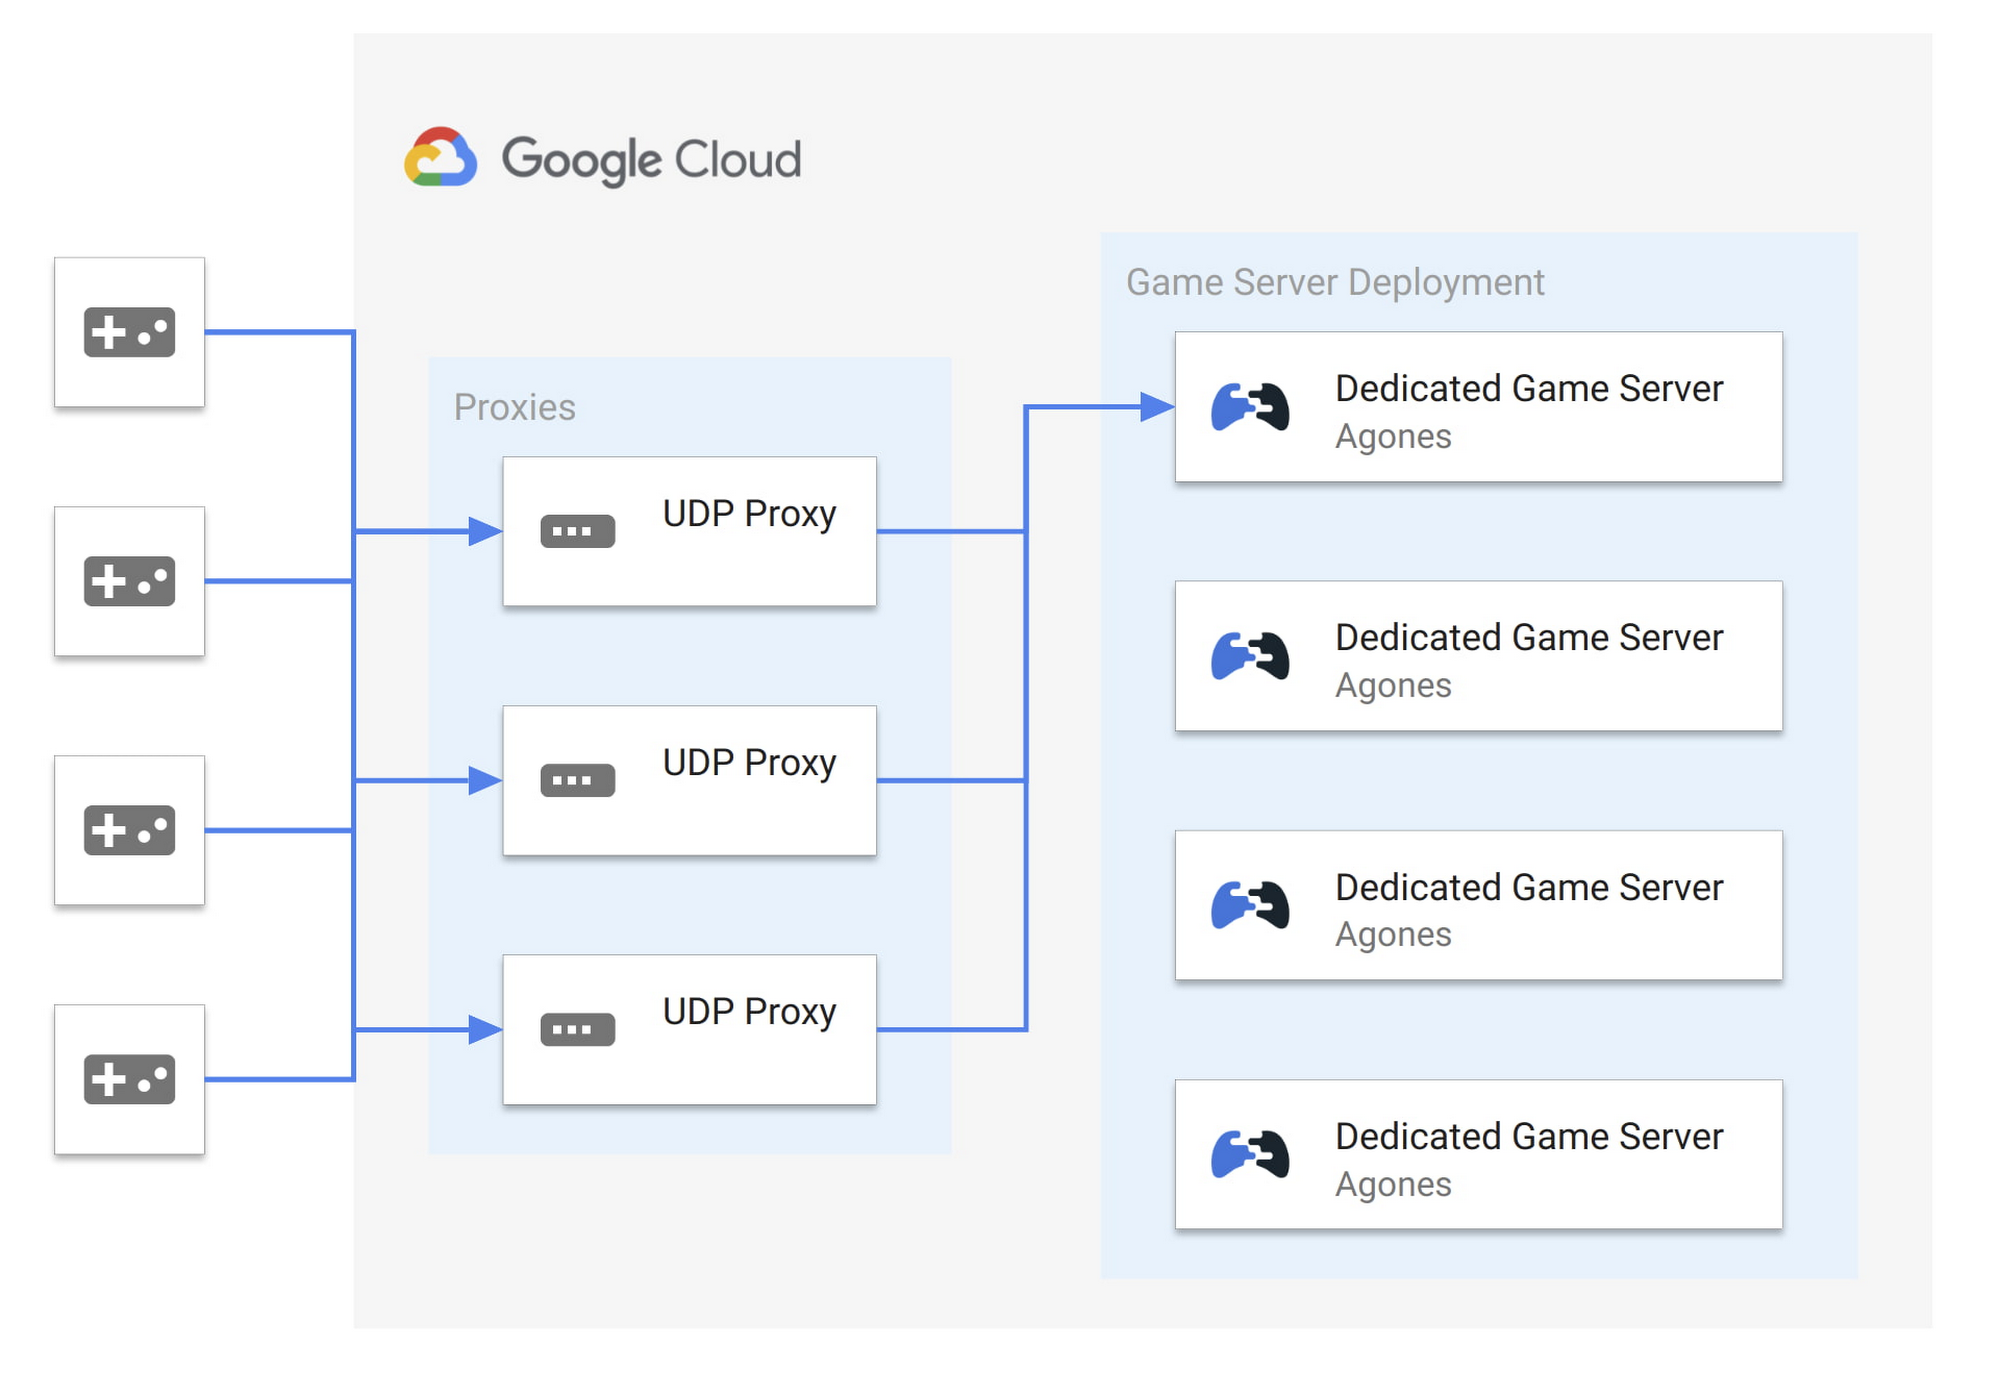
By using a proxy for multiplayer UDP traffic, in front of our dedicated games servers within a low latency network such as what is available on Google Cloud, we can address these key challenges as follows:
- Greater reliability. Proxies provide redundant points of communication entry. UDP packets can be sent to any number of proxies and routed to the dedicated game server. While a dedicated game server will still generally be a single point of failure, proxies improve redundancy and potential failover at the communication layer.
- Greater security. The IP and port of the dedicated game server is no longer public. Game clients may only have visibility into a subset of the proxy pool, limiting a potential attack surface.
- Greater scalability. We start to break apart the single process, as we can move aspects of the communication protocol, metrics, communication security and access control into the proxy. This removes the non-game specific computation out of your game server’s processing loop.
As a result, the entire system is now more resilient as proxies can be scaled independently, not only for performance reasons but also to distribute load in case of malicious actors.
Introducing Quilkin: The UDP proxy for Game Servers
Embark Studios and Google Cloud came together and built Quilkin, to provide a standard, open source solution. Based out of Stockholm, Embark Studios is a (relatively) new studio made up of seasoned industry veterans. They were the perfect collaboration partner to create Quilkin with, given their team’s experience with large scale real time multiplayer games.
Quilkin is an open-source, non-transparent UDP proxy specifically designed for use with large scale multiplayer dedicated game server deployments, to ensure security, access control, telemetry data, metrics and more.
Quilkin is designed to be used behind game clients as well as in front of dedicated game servers, and offers the following major benefits:
- Obfuscation. Non-transparent proxying of UDP data, making the internal state of your game architecture less visible to bad actors.
- Out of the box metrics. For UDP packet traffic and communication.
- Visibility. A composable set of processing filters that can be applied for routing, access control, rate limiting, and more.
- Flexibility. Ability to to be utilised as a standalone binary, with no client/server changes required or as a Rust library, depending on how deep an integration you wish for your system and/or custom processing Filters you wish to build.
- Compatibility. Can be integrated with existing C/C++ code bases via Rust FFI, if required.
- Onboarding. Multiple integration patterns, allowing you to choose the level of integration that makes sense for your architecture and existing platform.
Until now, these sorts of capabilities are only available to large game studios with resources to build their own proprietary technology.
We think leveling the playing field for everyone in the games industry is an important and worthy endeavor. That’s why we collaborated with Google Cloud and initiated this project together.
At Embark, we believe open source is the future of the games industry and that open, cross-company collaboration is the way forward, so that all studios, regardless of size, are able to achieve the same level of technical capabilities. —Luna Duclos, Tech Lead, Embark Studios
Google Cloud is excited to announce Quilkin as the latest entry in our portfolio of open-source solutions for gaming. Quilkin complements our existing OSS solutions including Agones for game servers, Open Match for matchmaking, and Open Saves for persistence. These are designed to work together as an open and integrated ecosystem for gaming. We’re proud to include Embark Studios as our latest open source collaborator for gaming along with Ubisoft, Unity, and 2K Games. Google Cloud will continue to work closely with our partners in industry and the community to offer planet-scale solutions to power the world’s largest games. —Rob Martin, Chief Architect, Google Cloud for Games
Getting started with Quilkin
While Quilkin can support more advanced deployment scenarios like above, the easiest way to get started with Quilkin is to deploy it as a sidecar to your existing dedicated game server. This may initially limit some of the benefits, but it’s an easy path to getting metrics and telemetry data about your UDP communication, with a very low barrier to entry and the ability to expand over time.
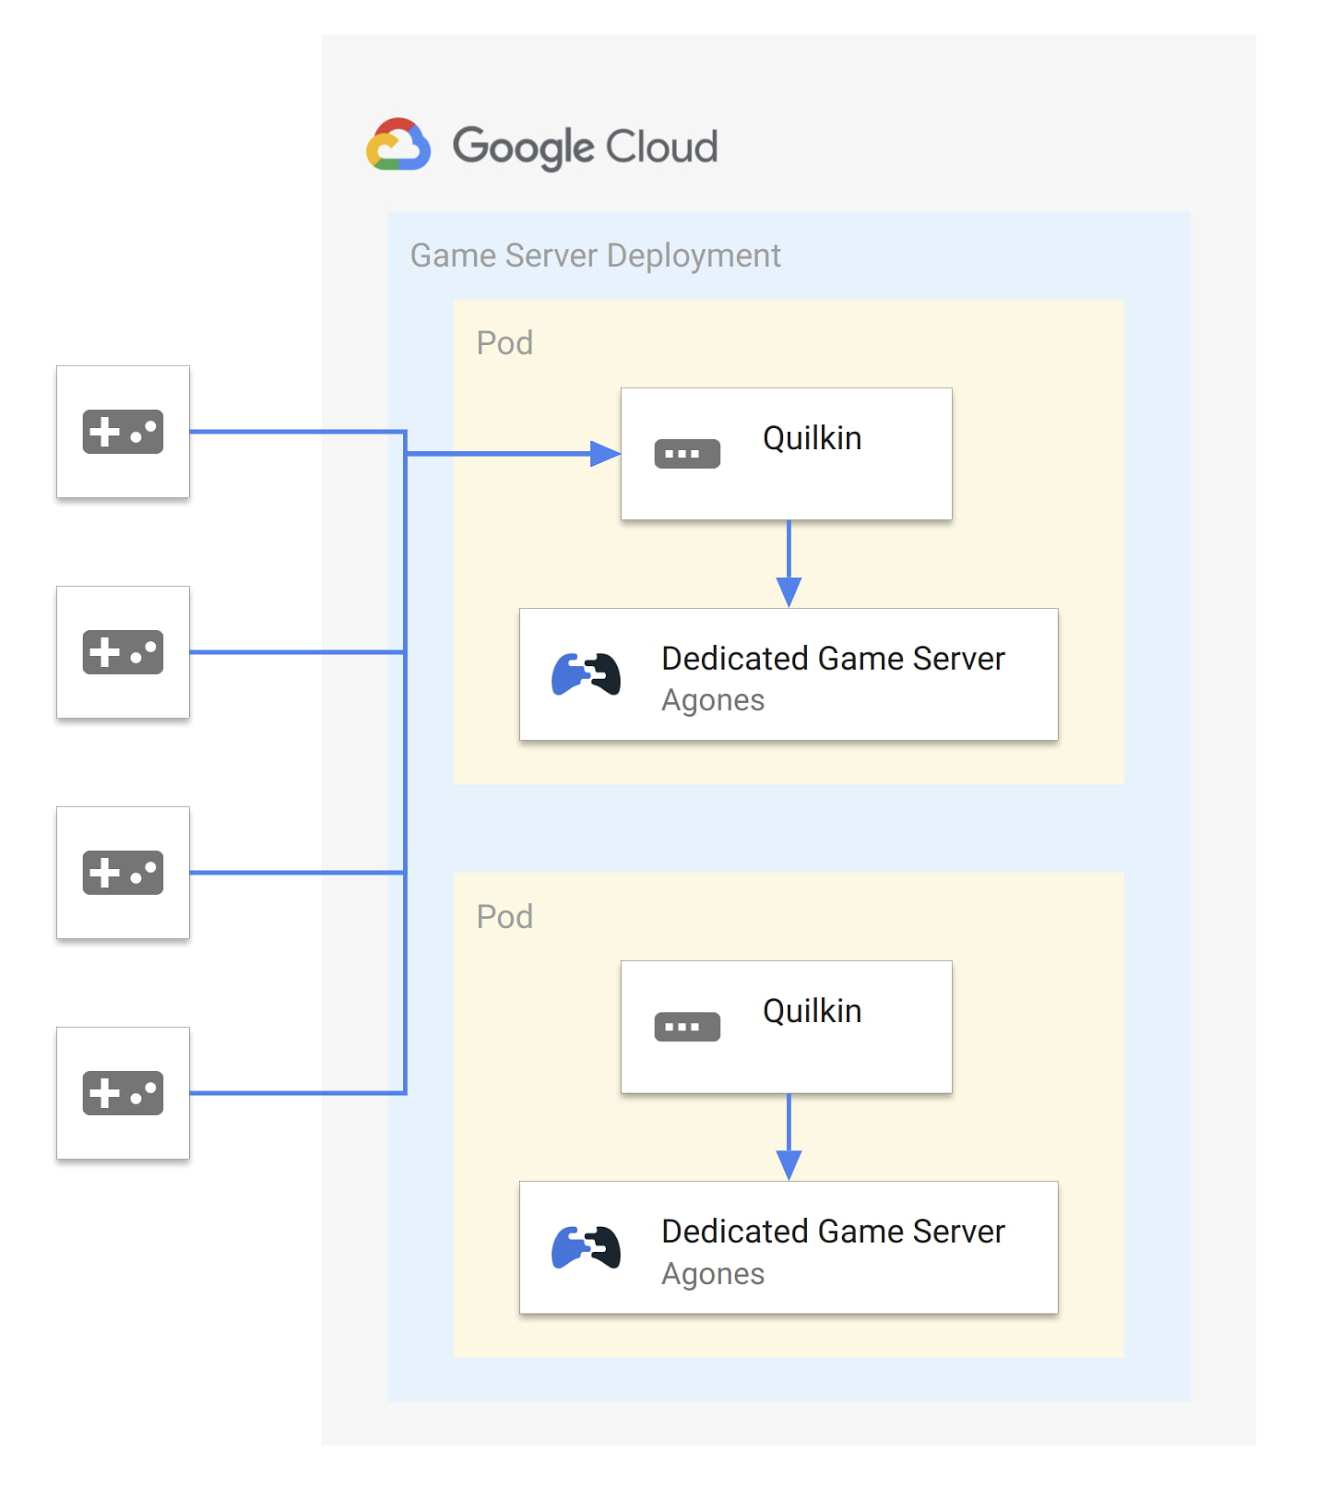
While Quilkin is released as both binaries and container images, and is not tied to any specific hosting platform, we’ll use Agones and Google Cloud Game Servers as our game server hosting platform for this example.
First we will create a ConfigMap to store the yaml for a static configuration for Quilkin that will accept connections on port 26001 and route then to the Xonotic (an open source, multiplayer FPS game) dedicated game server on port 26000:
apiVersion: v1kind: ConfigMapmetadata:name: quilkin-configdata:quilkin.yaml: | # quilkin configurationversion: v1alpha1proxy:port: 26001static:endpoints:- address: 127.0.0.1:26000
Second, we’ll take the example container that Agones provides for the Xonotic dedicated game server, and run Quilkin alongside each dedicated game server as a sidecar, in an Agones Fleet of game servers like so:
apiVersion: "agones.dev/v1"kind: Fleetmetadata:name: xonotic-sidecarspec:replicas: 2template:spec:container: xonoticports:- name: defaultcontainerPort: 26001container: quilkinhealth:initialDelaySeconds: 30periodSeconds: 60template:spec:containers:- name: xonoticimage: gcr.io/agones-images/xonotic-example:0.8- name: quilkin # quilkin sidecarimage: us-docker.pkg.dev/quilkin/release/quilkin:0.1.0volumeMounts:- name: configmountPath: "/etc/quilkin"livenessProbe:httpGet:path: /liveport: 9091initialDelaySeconds: 3periodSeconds: 2volumes:- name: configconfigMap:name: quilkin-config
Once applied, when we query the cluster for the running GameServers, everything looks the same as it would without Quilkin! Nothing else in our system needs to be aware that the traffic is being intercepted, and we can freely take advantage of the functionality of Quilkin without adjusting either client or server code.
$ kubectl get gameserversNAME STATE ADDRESS PORT NODE AGExonotic-sidecar-gdpgn-2pfkc Ready 34.95.106.201 7929 gke-0f7d8adc 25mxonotic-sidecar-gdpgn-c8bds Ready 34.95.106.201 7028 gke-0f7d8adc 25m
If this has piqued your interest, make sure to have a look at the walkthrough, where we step through this same scenario and then extend it to compress UDP packets from the game client to server, without having to change either programs.
This just scratches the surface, however: there’s even more to Quilkin, including an xDS compliant admin API, a variety of existing Filters to manipulate and route UDP packets and more.
What’s next for Quilkin
Quilkin is still in its early stages, with this 0.1.0 alpha release, but we’re very happy with the foundation that has been laid.
There are a variety of features in the roadmap, from enhanced metrics and telemetry, new filters and filter types, and more.
If you would like to try out this release, you can grab the binaries or container images from our releases page, step through our quickstarts and review different integration options with your dedicated game servers.
To get involved with the project, please:
- Check out our Github repository
- Join our Discord community
- Join the quilkin-discuss mailing list
- Follow us on Twitter
Embark Studios has also released their own announcement blog post, going deeper into the plans they have for their own production game backend infrastructure, and where Quilkin fits in.
Thanks to everyone who has been involved with this project across Google Cloud and Embark Studios, and we look forward to the future for Quilkin!
More Relevant Stories for Your Company

Digital Maturity in Higher Ed Tied to Improvements in Students’ Journey: Study
Why Higher Ed Needs to Go All-in on Digital In the wake of the COVID-19 pandemic, the majority of students within the 18-24-year-old demographic now expect hybrid learning environments--even once we are beyond the pandemic. And a vast number of adult learners are seeking options that accommodate their work and

Speed Up Data-driven Innovation in Life Sciences with Google Cloud
The last few years have underscored the importance of speed in bringing new drugs and medical devices to market, while ensuring safety and efficacy. Over this time, healthcare and life sciences organizations have transformed the way they research, develop, and deliver patient care by embracing agility and innovation. Now, the

The Cloud-First Imperative to Accelerate Digital Transformation in BFSI
In a study of 60 business and technology decision makers and influencers from Indian BFSI organizations, conducted by Forrester Consulting, it is revealed that public cloud adoption in India is on the rise with 78% of the organizations intending to increase the number of secure or compliance-sensitive workloads in the

A Record Breaking Calculation: 100 Trillion Digits of π on Google Cloud!
Records are made to be broken. In 2019, we calculated 31.4 trillion digits of π — a world record at the time. Then, in 2021, scientists at the University of Applied Sciences of the Grisons calculated another 31.4 trillion digits of the constant, bringing the total up to 62.8 trillion
