





Creating and Using Storage Buckets for Your Data Needs

1379
Of your peers have already read this article.
2:30 Minutes
The most insightful time you'll spend today!
So, you want to store objects on the cloud? But you’re really new to Google Cloud or Cloud Storage and would like someone to walk you through the process step by step?
Today is your lucky day!
I will help you understand the big steps involved in setting up and using Cloud Storage. For a walkthrough of all the steps involved that even includes highlighting of things to select so you don’t spend all your time playing “Where’s Waldo” on the page looking for that one button, click try the tutorial!
Creating buckets, storing objects in them, and adjusting permissions may feel challenging at first, but after you’ve walked through these steps, you’ll be able to create and use the Cloud Storage your project needs.
Resource Hierarchy
Projects contain all of the related parts of your application. Inside projects, you may have buckets, the top level containers in Cloud Storage. Files and folders are stored in buckets. You can grant access to a bucket, folder, or file using Identity and Access Management.
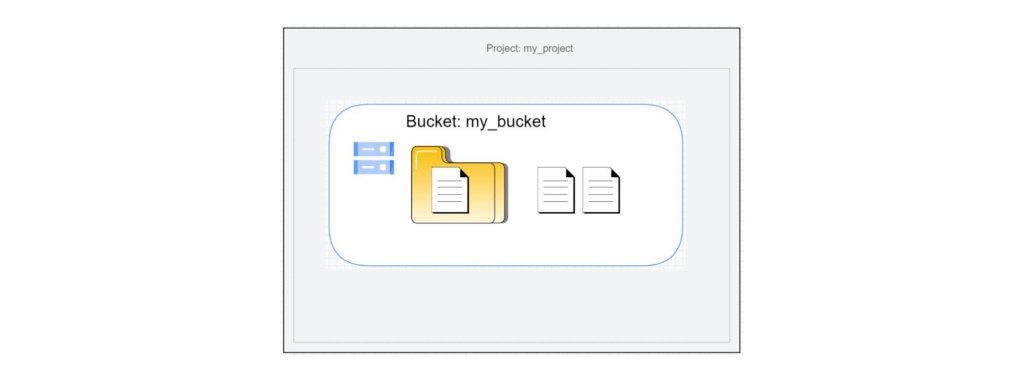
You can do all of that in this interactive tutorial. So let’s get started. I suggest you follow along in the tutorial so you can see the specific keys and screens as I describe them.
Creating a project
Everything in your application will be in a project, even if the only service you are using is storage. Projects need to be associated with a billing account, so if you don’t have one, consider signing up for the Free Trial. You’ll start in the Cloud Console.
Creating a bucket
Once you have a project, you can use storage by navigating to the Cloud Storage page by using either the Navigation menu at the top left of the console or by searching for “Cloud Storage” using the search box at the top of the console.
At the Buckets page of Cloud Storage, you’ll be able to create a bucket. The name of your bucket needs to be globally unique; that is no other bucket in Google Cloud Storage can have the same name. This is because if you or your organization allow your bucket to be accessible on the Internet, it will be at the URL https://storage.googleapis.com/<bucket name>. You can also consider implementing a security feature to prevent data exfiltration, organization restriction headers when you’re finished creating your bucket.. Pick a region close to you for your bucket. In some cases it may make sense to use multi-region or dual-region, but the details are more than I want to get into here. Don’t worry; you can find lots more information on them! Additionally, I won’t go into the details about selecting the appropriate storage class based on access frequency and longevity, but more information can be found here as well our recently introduced Autoclass tiering feature..
Since buckets can be accessed from the Internet, you need to be careful to only make the things you want to be public, public. The default value is to keep your data off of the Internet, so when you create the bucket, there’s an option to “Enforce public access prevention on this bucket” that is already selected. Since we’ll be making items in this bucket public later on, clear the option before confirming the bucket information. Don’t worry; you’ll see how to set that option back later.
Take a look at the Bucket detail page. There are tabs to see the objects in the bucket, the permissions on the bucket, and much more. There are commands to create folders and to upload files and folders. We’ll do some of this in the next section. You can even find out much more from the Learn option in the upper right.
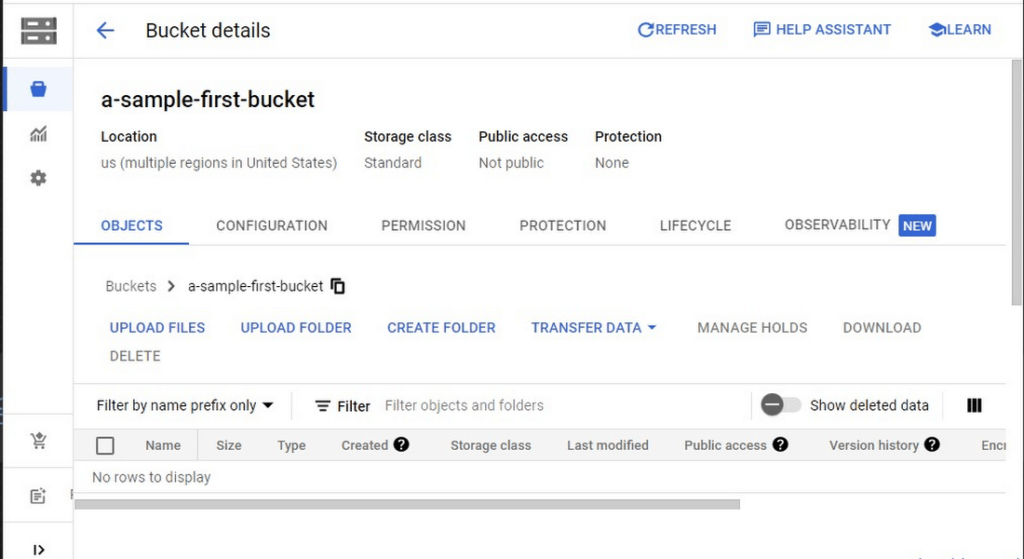
Adding items to the bucket
Find a file you’d like to upload to this bucket, remembering it will be made public to the Internet later. If you don’t have anything available, there’s a picture of a cat (of course, it’s a cat picture, this is the Internet!) in the interactive tutorial.
Go to the bucket details for your bucket. Using the “Upload files” button, you’ll just upload the file to the bucket by selecting the file from your computer. We won’t get into service classes here, but when you’re ready, there are links in the references.
Of course, if you have a lot of files in a bucket, you probably will want some sort of organization. You can do this by creating folders in your bucket with the “Create Folder” option. Once you’ve done that, you can go to the overflow menu (three vertical dots at the end line with the object information) and select Move. Remember, if you need help finding this, the interactive tutorial will point it out.
Making a bucket public
No surprise, the Bucket details hold lots of information about your bucket. You’ll change the bucket’s permissions in the Permission tab. (I hope that’s not a surprise.) You can then give access to individuals, groups, or all users. For this tutorial, follow the steps to grant access to allUsers. There are a variety of different levels of access you can grant to a user. In this case, just grant the ability to view the object using Storage Object Viewer.
Then go into the Objects tab to find the URL for the object you uploaded. Copy that URL and ensure you can indeed access the object from another tab or incognito window.
Now that you’ve done that, go back to the Permission tab for the bucket and select Prevent Public Access to secure the bucket again.
So, in a nutshell, to make all files in a bucket public, in the Permissions tab:
- Uncheck the option “Remove Public Access Prevention”
- Use Grant Access to give allUsers the Storage Object Viewer role in Cloud Storage.
To make all files in a bucket private, in the Permissions tab select Prevent Public Access.
Cleaning up
There is a charge to keep items in Cloud Storage, so you’ll probably want to delete the object you uploaded by selecting it and pressing Delete. You can delete the bucket in a similar way. The tutorial has details, of course.
While there are lots more details about Cloud Storage, you’ve got the big picture now. Go do something creative and useful with it!
So what now?
If you haven’t walked through the interactive tutorial, give it a try!
Renaulution: Renault’s story of migrating to 70 applications in 2 years

3310
Of your peers have already read this article.
3:00 Minutes
The most insightful time you'll spend today!
Editor’s note: Renault, the French automaker, embarked on a wholesale migration of its information systems—moving 70 applications to Google Cloud. Here’s how they migrated from Oracle databases to Cloud SQL for PostgreSQL.
The Renault Group, known for its iconic French cars has grown to include four complementary brands, and sold nearly 3 million vehicles in 2020. Following our company-wide strategic plan, “Renaulution,” we’ve shifted our focus over the past year from a car company integrating tech, to a tech company integrating cars that will develop software for our business. For the information systems group, that meant modernizing our entire portfolio and migrating 70 in-house applications (our quality and customer information systems) to Google Cloud. It was an ambitious project, but it’s paid off. In two years we migrated our Quality and Customer Satisfaction information systems applications, optimized our code, and cut costs thanks to managed database services. Compared to our on-premises infrastructure, using Google Cloud services and open-source technologies comes to roughly one dollar per user per year, which is significantly cheaper.
An ambitious journey to Google Cloud
We began our cloud journey in 2016 with digital projects integrating a new way of working and new technologies. These new technologies included those for agility at scale, data capabilities and CI/CD toolchain. Google Cloud stood out as the clear choice for its data capabilities. Not only are we using BigQuery and Dataflow to improve scaling and costs, but we are also now using fully managed database services like Cloud SQL for PostgreSQL. Data is a key asset for a modern car maker because it connects the car maker to the user, allows car makers to better understand usage and better informs what decisions we should make about our products and services. After we migrated our data lake to Google Cloud, it was a natural next step to move our front-end applications to Google Cloud so they would be easier to maintain and we could benefit from faster response times. This project was no small undertaking. For those 70 in-house applications (e.g. vehicle quality evaluation, statistical process control in plants, product issue management, survey analysis), for our information systems landscape, we had a range of technologies—including Oracle, MySQL, Java, IBM MQ, and CFT—with some applications created 20 years ago.
Champions spearhead each migration
Before we started the migration, we did a global analysis of the landscape to understand each application and its complexity. Then we planned a progressive approach, focusing on the smallest applications first such as those with a limited number of screens or with simple SQL queries, and saving the largest for last. Initially we used some automatic tools for the migration, but we learned very quickly nothing can replace the development team’s institutional knowledge. They served as our migration champions.
The apps go marching one by one
When we migrated our first few Oracle databases to Cloud SQL for PostgreSQL we tracked our learnings in an internal wiki to share common SQL patterns, which helped us speed up the process. For some applications, we simplified the architecture and took the opportunity to analyze and optimize SQL queries during the rework. We also used monitoring tools like Dynatrace and JavaMelody to ensure we improved the user experience.
The approach we developed was very successful—where database migration was initially seen as insurmountable, the entire migration project was completed in two years.
With on-premises applications it was hard for our developers to separate code performance from infrastructure limitations. So as part of our migration to Google Cloud, we optimized our applications with monitoring services. With these insights our team has more control over resources, which has reduced our maintenance and operations activity and resulted in faster, more stable applications. Plus, migrating to Cloud SQL has made it much easier for us to change our infrastructure as needed, add more power when necessary or even reduce our infrastructure size.
A new regime on Cloud SQL
Now that we’re running on Cloud SQL, we’ve improved performance even on large databases with many connected users. Thanks to built-in tools in the Google Cloud environment, we can now easily understand performance issues and quickly solve them. For example, we were able to reduce the duration of a heavy batch processing by a factor of three from nine to three hours. And we don’t have to wait for the installation of a new server, so our team can move faster. Beyond speed, we’ve also been able to cut costs. We optimized our code based on insights from monitoring tools, which not only enabled a more responsive application for the user, but it also reduced our costs because we’re not overprovisioned.
Learn more about the Renault Group and try out Cloud SQL today.
1 Developer. 5 Months. A Revenue Generating App With 100K Users With Firebase

7858
Of your peers have already read this article.
5:30 Minutes
The most insightful time you'll spend today!
This is a guest post authored by Firebase customer, Anton Ivanov, Founder & CEO of DealCheck
Real estate investing is a fantastic way to build a stream of passive income and grow your wealth. Numerous studies have pointed out that real estate investing has created more millionaires throughout history than any other form of investing (like this one and this one). So why don’t more people do it?
I asked myself this very question a few years ago after talking to a group of friends about the success I’ve had with real estate, and listening to their reasons why they think it’s out of their reach.
A common theme among them was that they viewed it as something too difficult to learn and master. There were too many steps, the learning curve was steep and there was a lot of room for mistakes for somebody just starting out, especially when analyzing the financial performance of potential investment properties.
Traditionally, most investors used spreadsheets to do the math – which works only if you know what and how you’re calculating something. But if you don’t know that, it’s very easy to make mistakes and overlook things. And no one wants to make mathematical errors before a huge purchase like an investment property.
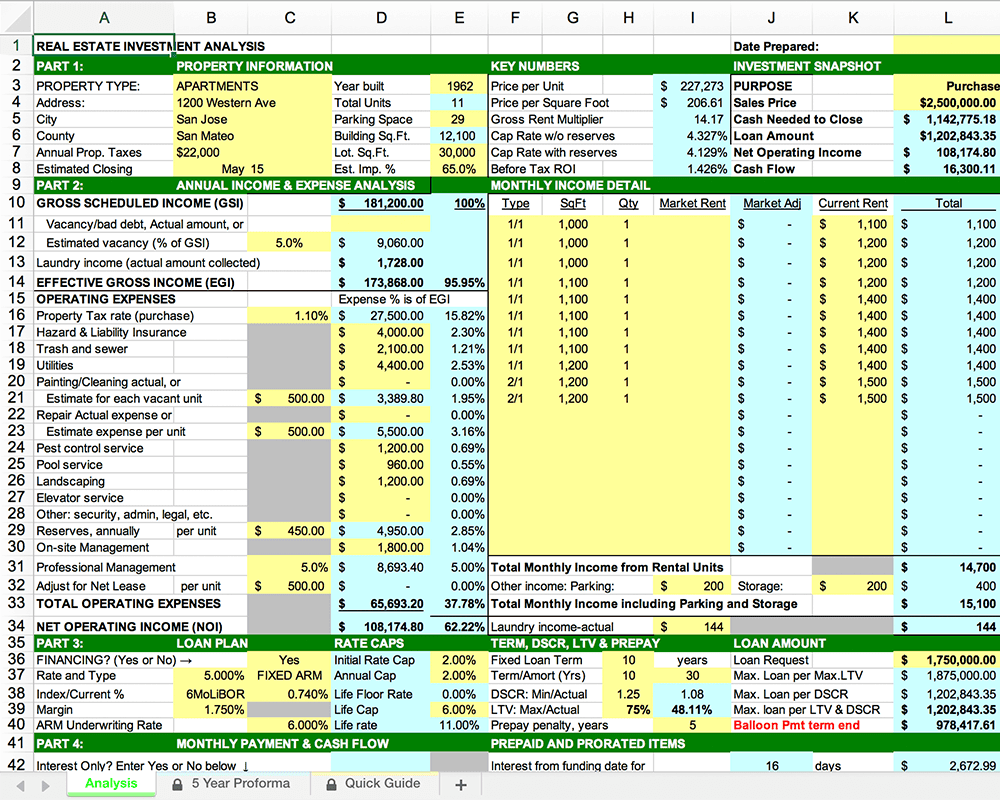
Where do I even begin?!
And that’s when I had the idea to build DealCheck – a cloud-based, easy-to-use property analysis tool for real estate investors and agents. I wanted to create a platform that would help new investors learn the ropes and avoid costly mistakes, but at the same time provide the flexibility to perform more advanced analysis with a click of a button.
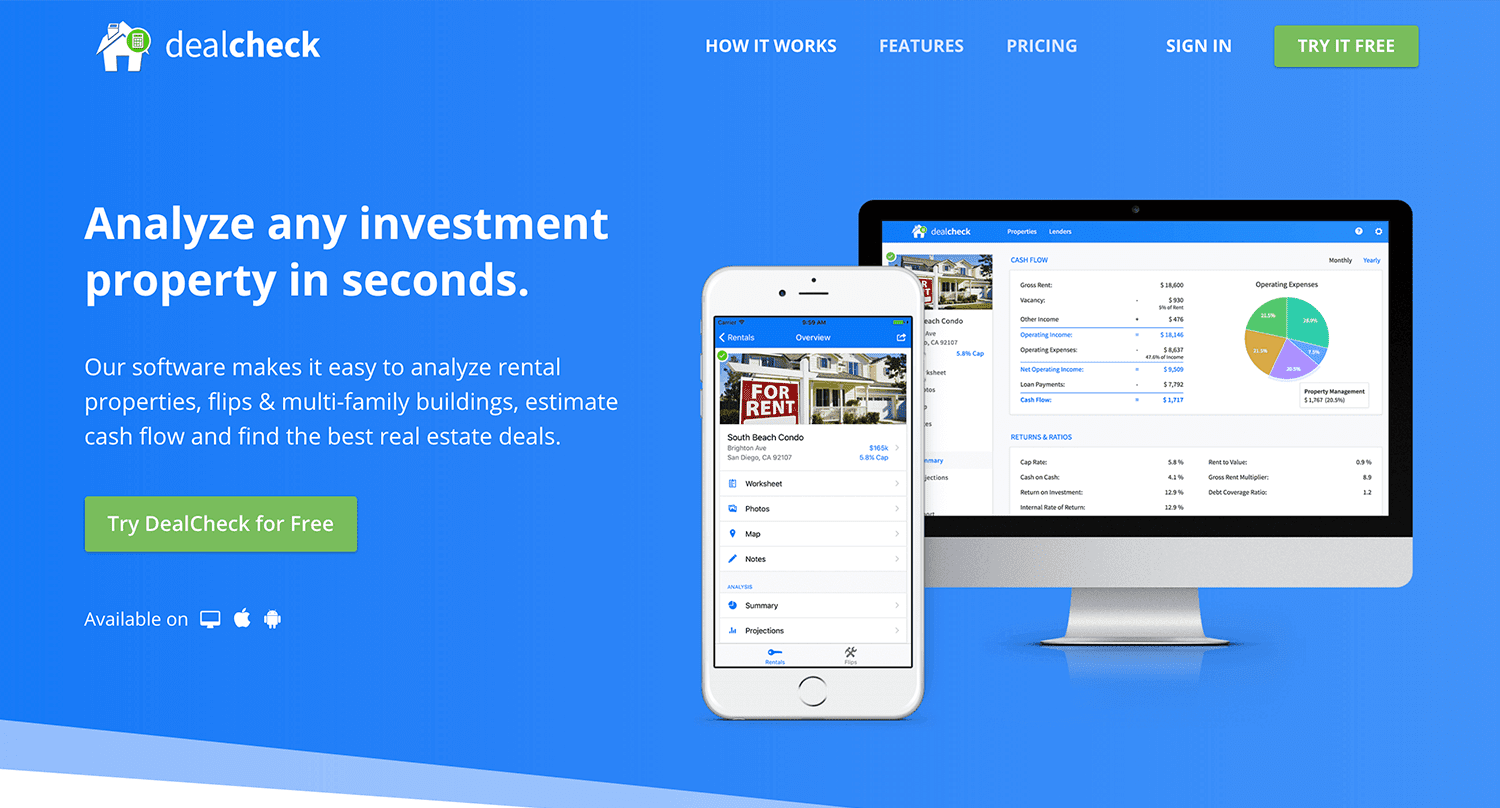
Making real estate investing easier and more accessible.
The Challenges of Solo Development
I was working as a front-end engineer at the time, so I knew I could build the UI myself, but what about the back-end, data storage, authentication, and a bunch of other things you need for a full-functioning cloud app?
I didn’t know anybody I could bring on as a co-founder, so I set out to research what technologies and platforms I could leverage to help me with the back-end and server infrastructure.
Firebase kept popping up again and again and I began to look at it in more detail. It was then recently acquired by Google and its collection of BaaS (backend-as-a-service) modules seemed to offer the exact solution I needed to build DealCheck.
I was especially impressed with the documentation for each feature and how well all of the different technologies could be tied together to create one unified platform.
It wasn’t long before I signed up and started building the first MVP of the app.
Using Firebase to Quickly Build a Scalable Backend
As the only developer on the project, I had limited time and resources to spend on building the back-end, so I set out to use every Firebase feature that was available at the time to my advantage.
My goal was actually to write as little server-side code as possible and instead focus on leveraging the different Firebase modules to solve three specific challenges:
Challenge #1 – Authentication and User Management
The first one was authentication and user management. DealCheck’s users needed the ability to create their accounts so they can view and analyze properties on any device (more on that later). I wanted to have the ability to sign in with email, Facebook or a Google account.
Firebase Authentication was designed specifically for this purpose and I used it to handle pretty much the entire authentication flow. Out-of-the-box, it has support for all the major social networks, cross-network credential linking and the basic account management operations like email changes, password resets and account deletions.
There was no server-side code required at all – I just needed to build the UI on the front-end.
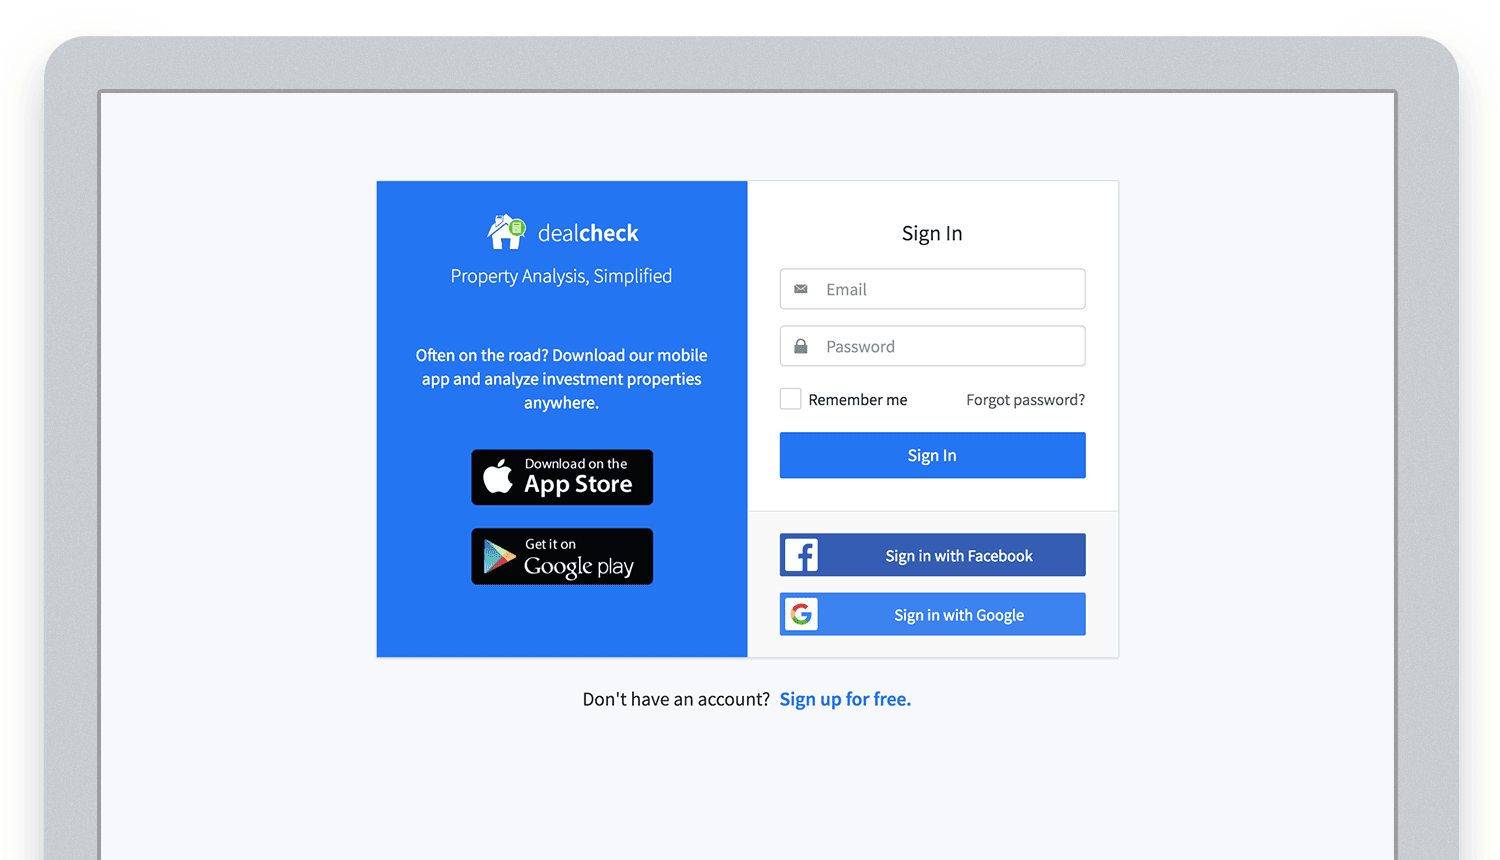
Email, Facebook and Google sign in powered by Firebase.
And as an added benefit, Firebase Authentication ties directly into the Realtime Database product to create a declarative permissions and access control framework that’s easy to implement and maintain. This helped me make sure user data was protected from unauthorized access, but also facilitate data sharing among users.
Challenge #2 – Cloud Storage with Cross-Device Sync
Next up was data storage. I knew that I wanted DealCheck’s users to be able to use the app and analyze properties online, on iOS and Android. So I needed a real-time, cloud-based database solution that could sync data across any device.
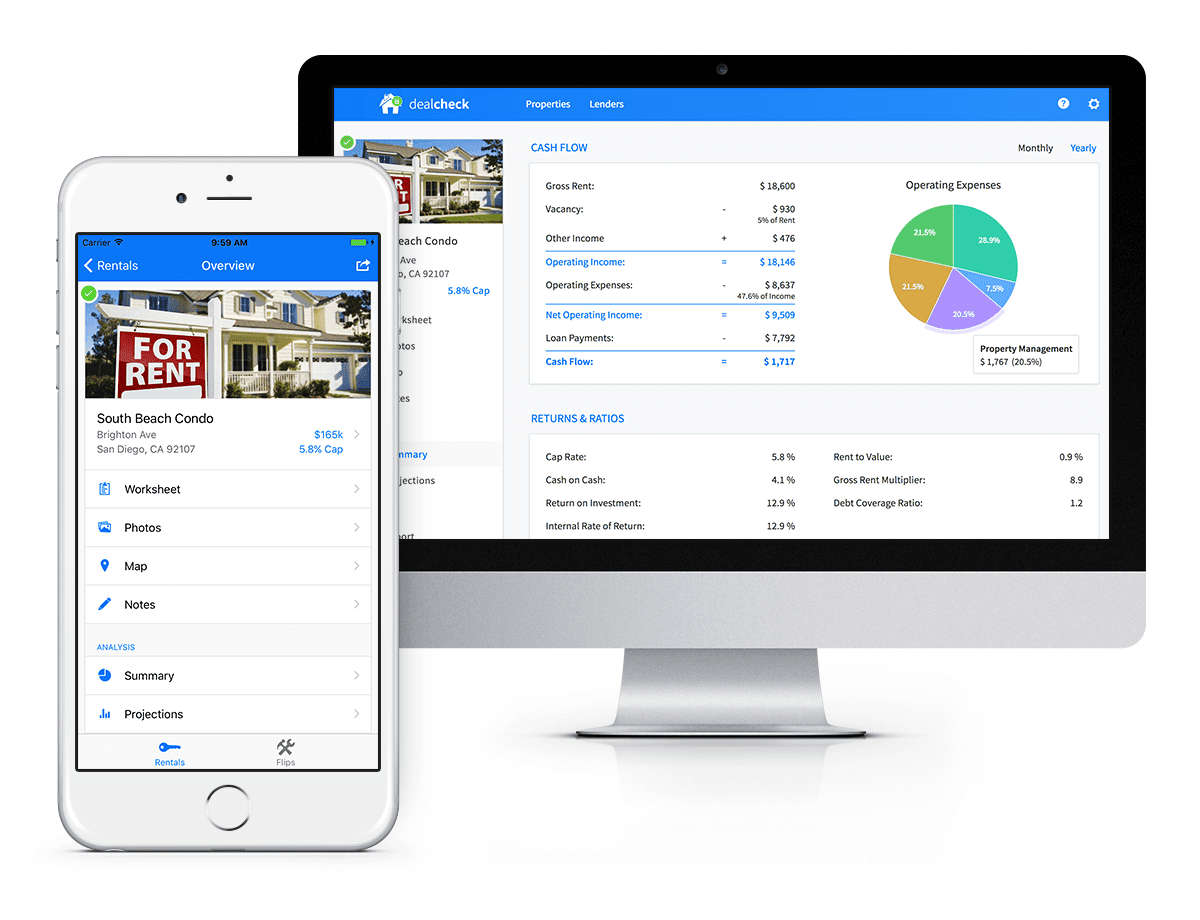
Syncing data across web and mobile is not easy!
Firebase Realtime Database is a NoSQL, JSON-based database solution that was designed exactly for this purpose, and I was actually surprised how great it worked. I used the official AngularJS bindings for Firebase on the front-end to read and write to it directly from the client.
I had to do some extra work on mobile to implement an offline mode with syncing after reconnections, but all-together the code required to make everything work was minimal.
As I mentioned, Firebase Authentication tied directly to the database to facilitate access control, so I really didn’t need to do anything extra there. And I was able to set up automatic daily backups of all the data with a click of a button.
Challenge #3 – Third-Party Integrations
Up to now, I had written exactly 0 lines of server-side code and everything was handled by the client directly. As DealCheck’s development progressed, however, I knew that I would need a server to handle some operations that could not be done in the client.
I wasn’t very experienced with server maintenance and DevOps, but fortunately the Firebase Cloud Functions product was able to solve all of my needs. Cloud Functions are essentially single-purpose functions that can be triggered (or executed) based on a specific HTTP request or events coming from the Authentication, Realtime Database or other Firebase products.
Each function can be run once based on a specific event trigger to perform its prescribed task. You don’t have to worry about provisioning a server instance or managing load – everything is done automatically for you by Firebase.
What’s even cooler, is that Cloud Functions can access the Realtime Database and Cloud Storage buckets of the same project, performing operations on them server-side, as needed.
This is how DealCheck processes subscription payments through Stripe, validates Apple and Google Play mobile subscription receipts, integrates with third-party APIs and updates database records without user interaction.
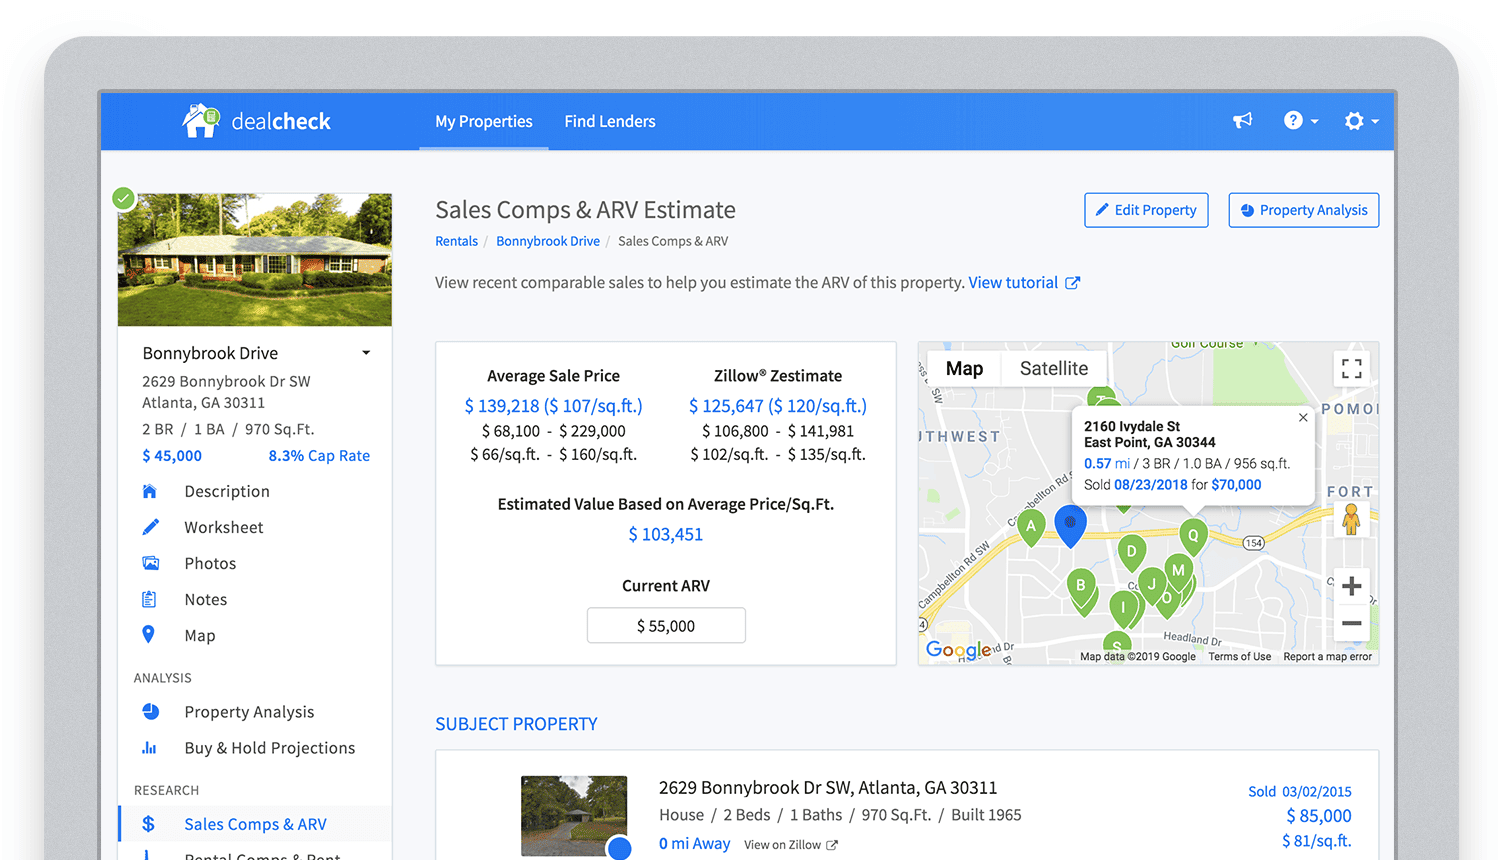
Bringing in sales comparable data from third-party providers into DealCheck.
Cloud Functions became the “glue” that tied the entire back-end infrastructure together.
Growing from an MVP to 100,000 Users with Firebase
The first version of the DealCheck app was built and launched in less than 5 months with just me on the development team. I definitely don’t think that would have been possible without Firebase powering the back-end infrastructure. Maybe the project wouldn’t have ever launched at all.
While Firebase is awesome for quick MVP development, it’s definitely designed to power production applications at scale as well. As DealCheck grew from a small side-project to one of the most popular real estate apps with over 100k users, all of the Firebase products that we use scaled to support the increasing load.
Moreover, the fantastic interoperability of all Firebase modules allows us to develop and release new features much faster because of the reduced coding requirements and ease of configuration.
So next time you’re looking to build an ambitious project with a small team – take a look at how Firebase can help you reduce development time and provide a suite of powerful tools that scale as your business grows.
This is exactly how DealCheck grew from a simple idea to make property analysis easier and faster, to an app that is helping tens of thousands of people grow their wealth and passive income through real estate investing. It’s a truly awesome and fulfilling experience to see your work positively impact so many people and it wouldn’t have been possible without Firebase.
Maximizing Storage Efficiency: A Guide to Reducing Point-in-Time Recovery Impact

1456
Of your peers have already read this article.
1:30 Minutes
The most insightful time you'll spend today!
Point-In-Time Recovery (PITR) is a critical capability for enterprise applications. It allows database administrators to recover from accidental data deletion by restoring their production databases to a time before the incident.
Cloud SQL for PostgreSQL launched support for PITR in July 2020, allowing you to recover from disasters like data corruption or accidental deletion by restoring your Cloud SQL instance to a previous time. We’re excited to announce an additional enhancement to PITR for Cloud SQL for PostgreSQL that makes enabling PITR an even easier decision: for instances with Point-in-Time Recovery newly-enabled, the write-ahead logs being stored for PITR operations (which are the transaction logs that are used to go back in time) will no longer consume disk storage space. Instead, when you enable PITR for new instances, Cloud SQL will store transaction logs collected during the retention window in Google Cloud Storage, and retrieve them when you perform a restore. Because transaction logs can grow rapidly when your database experiences a burst of activity, this move will help reduce the impact these bursts have on your provisioned disk storage. These logs will be stored for up to seven days in the same Google Cloud region as your instance at no additional cost to you.
PITR is enabled by default when you create a new Cloud SQL for PostgreSQL instance from the Google Cloud console, and transaction logs will no longer be stored on the instance for instances that have PITR newly enabled. If you have already enabled PITR on your PostgreSQL instances, this enhancement will be rolled out to your instances at a later point. If you want to take advantage of this change sooner, you can first disable and then re-enable PITR on your instance (which will reset your ability to perform a point-in-time restore to the time at which PITR was re-enabled). On instances with this feature enabled, you’ll notice that consumed storage on your instance will reduce relative to the volume of write-ahead logs (WAL) generated by your instance. The actual amount of storage your logs consume will vary by instance and by database activity – during busy times for your database, log size may shrink or grow. However, these logs will now only be stored on your instance long enough to successfully replicate to any replicas of the instance and to ensure that they are safely written to Cloud Storage; afterwards, they will be removed from your instance.
We’re excited to continue to enhance Cloud SQL for PostgreSQL to ensure that disaster recovery is easy to enable, cost effective, and seamless to use. Learn more about this change in our documentation.
Cloud Bigtable Helps Fraud-detection Company Meet Scalability Demands and Secure Customer Data

7095
Of your peers have already read this article.
3:00 Minutes
The most insightful time you'll spend today!
Editor’s note: Today we are hearing from Jono MacDougall , Principal Software Engineer at Ravelin. Ravelin delivers market-leading online fraud detection and payment acceptance solutions for online retailers. To help us meet the scaling, throughput, and latency demands of our growing roster of large-scale clients, we migrated to Google Cloud and its suite of managed services, including Cloud Bigtable, the scalable NoSQL database for large workloads.
As a fraud detection company for online retailers, each new client brings new data that must be kept in a secure manner and new financial transactions to analyze. This means our data infrastructure must be highly scalable and constantly maintain low latency. Our goal is to bring these new organizations on quickly without interrupting their business. We help our clients with checkout flows, so we need latencies that won’t interrupt that process—a critical concern in the booming online retail sector.
We like Cloud Bigtable because it can quickly and securely ingest and process a high volume of data. Our software accesses data in Bigtable every time it makes a fraud decision. When a client’s customer places an order, we need to process their full history and as much data as possible about that customer in order to detect fraud, all while keeping their data secure. Bigtable excels at accessing and processing that data in a short time window. With a customer key, we can quickly access data, bring it into our feature extraction process, and generate features for our models and rules. The data stays encrypted at rest in Bigtable, which keeps us and our customers safe.
Bigtable also lets us present customer profiles in our dashboard to our client, so that if we make a fraud decision, our clients can confirm the fraud using the same data source we use.

We have configured our bigtable clusters to only be accessible within our private network and have restricted our pods access to it using targeted service accounts. This way the majority of our code does not have access to bigtable and only the bits that do the reading and writing have those privileges.
We also use Bigtable for debugging, logging, and tracing, because we have spare capacity and it’s a fast, convenient location.
We conduct load testings against Bigtable. We started at a low rate of ~10 Bigtable requests per second and we peaked at ~167000 mixed read and write requests per second at absolute peak. The only intervention that was done to achieve this was pressing a single button to increase the number of nodes in the database. No other changes were made.
In terms of real traffic to our production system, we have seen ~22,000 req/s (combined read/write) on Bigtable in our live environment as a peak within the last 6 weeks.
Migrating seamlessly to Google Cloud
Like many startups, we started with Postgres, since it was easy and it was what we knew, but we quickly realized that scaling would be a challenge, and we didn’t want to manage enormous Postgres instances. We looked for a kind of key value store, because we weren’t doing crazy JOINS or complex WHERE clauses. We wanted to provide a customer ID and get everything we knew about it, and that’s where key value really shines.
I used Cassandra at a previous company, but we had to hire several people just for that chore. At Ravelin we wanted to move to managed services and save ourselves that headache. We were already heavy users and fans of BigQuery, Google Cloud’s serverless, scalable data warehouse, and we also wanted to start using Kubernetes. This was five years ago, and though quite a few providers offer Kubernetes services now, we still see Google Cloud at the top of that stack with Google Kubernetes Engine (GKE). We also like Bigtable’s versioning capability that helped with a use case involving upserts. All of these features helped us choose Bigtable.
Migrations can be intimidating, especially in retail where downtime isn’t an option. We were migrating not just from Postgres to Bigtable, but also from AWS to Google Cloud. To prepare, we ran in AWS like always, but at the same time we set up a queue at our API level to mirror every request over to Google Cloud. We looked at those requests to see if any were failing, and confirmed if the results and response times were the same as in AWS. We did that for a month, fine tuning along the way.
Then we took the big step and flipped a config flag and it was 100% over to Google Cloud. At the exact same time, we flipped the queue over to AWS so that we could still send traffic into our legacy environment. That way, if anything went wrong, we could fail back without missing data. We ran like that for about a month, and we never had to fail back. In the end, we pulled off a seamless, issue-free online migration to Google Cloud.
Flexing Bigtable’s features
For our database structure, we originally had everything spread across rows, and we’d use a hash of a customer ID as a prefix. Then we could scan each record of history, such as orders or transactions. But eventually we got customers that were too big, where the scanning wasn’t fast enough. So we switched and put all of the customer data into one row and the history into columns. Then each cell was a different record, order, payment method, or transaction. Now, we can quickly look up the one row and get all the necessary details of that customer. Some of our clients send us test customers who place an order, say, every minute, and that quickly becomes problematic if you want to pull out enormous amounts of data without any limits on your row size. The garbage collection feature makes it easy to clean up big customers.
We also use Bigtable replication to increase reliability, atomicity, and consistency. We need strong consistency guarantees within the context of a single request to our API since we make multiple bigtable requests within that scope. So within a request we always hit the same replica of Bigtable and if we have a failure, we retry the whole request. That allows us to make use of the replica and some of the consistency guarantees, a nice little trade-off where we can choose where we want our consistency to live.https://www.youtube.com/embed/0-eH5u7rrQQ?enablejsapi=1&
We also use BigQuery with Bigtable for training on customer records or queries with complicated WHERE clauses. We put the data in Bigtable, and also asynchronously in BigQuery using streaming inserts, which allows our data scientists to query it in every way you can imagine, build models, and investigate patterns and not worry about query engine limitations. Since our Bigtable production cluster is completely separate, doing a query on BigQuery has no impact on our response times. When we were on Postgres many years ago, it was used for both analysis and real time traffic and it was not the optimal solution for us. We also use Elasticsearch for powering text searches for our dashboard.
If you’re using Bigtable, we recommend three features:
- Key visualizer. If we get latency or errors coming back from Bigtable, we look at the key visualizer first. We may have a hotkey or a wide row, and the visualizer will alert us and provide the exact key range where the key lives, or the row in question. Then we can go in and fix it at that level. It’s useful to know how your data is hitting Bigtable and if you’re using any anti-patterns or if your clients have changed their traffic pattern that exacerbated some issue.
- Garbage collection. We can prevent big row issues by putting size limits in place with the garbage collection policies.
- Cell versioning. Bigtable has a 3d array, with rows, columns, and cells, which are all the different versions. You can make use of the versioning to get history of a particular value or to build a time series within one row. Getting a single row is very fast in Bigtable so as long as you can keep the data volume in check for that row, making use of cell versions is a very powerful and fast option. There are patterns in the docs that are quite useful and not immediately obvious. For example, one trick is to reverse your timestamps (MAXINT64 – now) so instead of the latest version, you can get the oldest version effectively reversing the cell version sorting if you need it.
Google Cloud and Bigtable help us meet the low-latency demands of the growing online retail sector, with speed and easy integration with other Google Cloud services like BigQuery. With their managed services, we freed up time to focus on innovations and meet the needs of bigger and bigger customers.
Learn more about Ravelin and Bigtable, and check out our recent blog, How BIG is Cloud Bigtable?
Boost Database Performance with AlloyDB Index Advisor: The Ultimate Optimization Tool

1377
Of your peers have already read this article.
4:00 Minutes
The most insightful time you'll spend today!
Intro
One of the time consuming tasks for DBAs is to maximize query performance. To optimize slow-running queries, they often have to do detailed analysis, understand optimizer plans, and go through a lot of trial and error before getting to the best set of indexes that help with improved query performance. However, even with expert knowledge of a database’s internals, it is challenging to choose an effective set of indexes, especially when workloads change over time. The complexity of queries including several joins, filters, and subqueries make the process of identifying the right set of indexes very challenging for DBAs. Also, the effect of an index on the query plan needs to be taken into account when considering further indexes. Creating an index may cause the query optimizer to select completely different join orders and join/scan methods. This effect is hard to predict and quantify for DBAs.
Imagine if the database itself is intelligent enough to identify such queries, and recommends creating specific B-tree indexes?
Google Cloud’s AlloyDB for PostgreSQL is a fully-managed and fully PostgreSQL-compatible database for demanding transactional and analytical workloads that provides enterprise-grade performance and availability. AlloyDB offers Index Advisor, a built-in feature that helps alleviate the guesswork of tuning query performance with deep analysis of the different parts of a query including subqueries, joins, and filters. It periodically analyzes the database workload, identifies queries that can benefit from indexes, and recommends new indexes that can increase query performance.
How the AlloyDB Index Advisor works
First, let’s review a few AlloyDB terms relevant to the Index Advisor’s work.
- PostgreSQL’s system catalog has schema metadata, such as information about tables and columns, and internal bookkeeping information.
- HypoPG is an open source PostgreSQL extension that helps with hypothetical indexes without actually creating them to see if the index helps with query execution.
- Query Optimizer generates optimal execution plan.
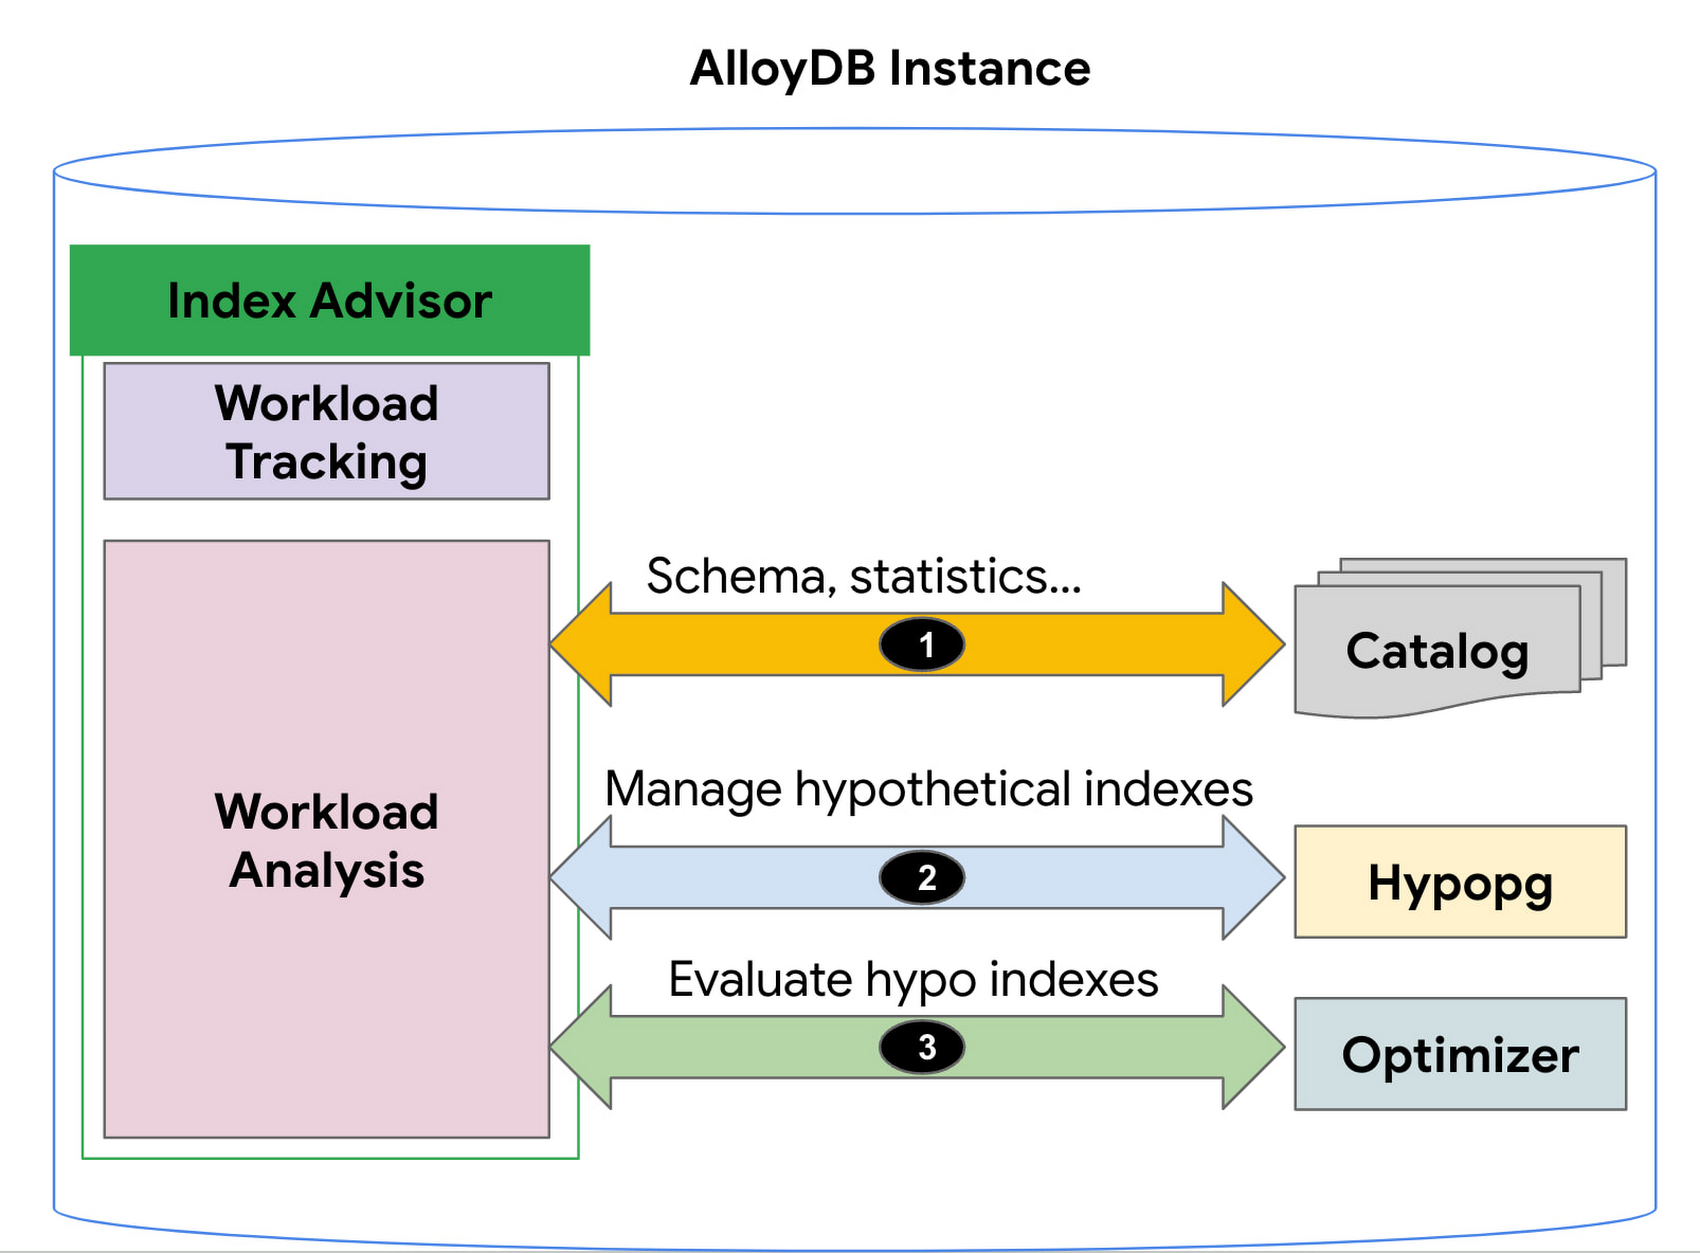
1. AlloyDB’s Index Advisor tracks the user query workload and analyzes it using statistics from the system catalog; it then identifies queries that could be improved significantly and potential candidate indexes for those cases. Note that there could be a large number of candidate indexes.
2. The Index Advisor evaluates each of these queries using hypothetical indexes based on the HypoPG, an open source extension and AlloyDB’s Query Optimizer.
3. The results of this evaluation are used to intelligently select the best set of indexes for the workload and to generate recommendations.
You can then simply copy and run the suggested index creation SQL commands. The Index Advisor consumes minimal resources and analyzes queries at a frequency that you define. It can also be constrained to have a user-specified maximum storage budget for the new indexes it recommends.
How to use the Index Advisor
1. Index Advisor is enabled by default. Its recommendation engine analyzes your workload at the specified frequency (every 24 hours by default) to capture any potential new index recommendations.
2. Run your queries that are representative of your workload to the instance. Index advisor tracks these queries automatically.
3. To request an index recommendation immediately, you can use the google_db_advisor_recommend_indexes() function. This function performs on-demand analysis and recommends indexes for the top 100 queries. SELECT * FROM google_db_advisor_recommend_indexes();
4. To view the recommended indexes and the queries based on periodic analysis, use the following query (also see the Usage Example section). SELECT DISTINCT recommended_indexes, queryFROM google_db_advisor_workload_report r JOIN google_db_advisor_workload_statements sON r.query_id = s.query_id;
Note that Index advisor analyzes queries issued by the connected user. For the user with the pg_read_all_stats role, it analyzes all tracked queries.
Currently, Index advisor only recommends new indexes. In future, the Index Advisor could be used to report unused indexes as well; dropping these can reduce index maintenance overhead for your transactional workload.
Evaluation
We will discuss two cases in this section.
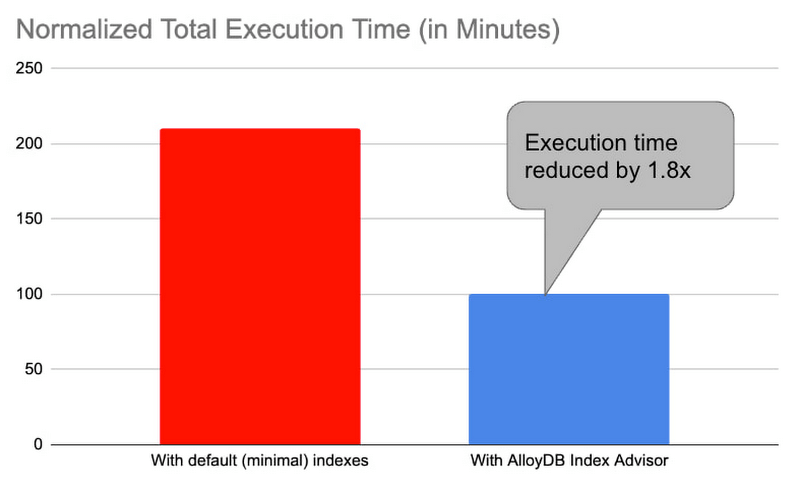
1. Decision support benchmark: We used a sample internal benchmark that modeled a decision support system. The benchmark dataset contained 450+ columns across 24 tables. The result quantified the performance of 100+ complex analytical queries. The benchmark initially had a minimal number of indexes and the normalized total query execution time was around 200+ minutes. We then enabled the AlloyDB Index Advisor and it recommended an additional 17 indexes. Creating those indexes and re-running the queries reduced the total execution time by half to ~100 minutes (1.8x).
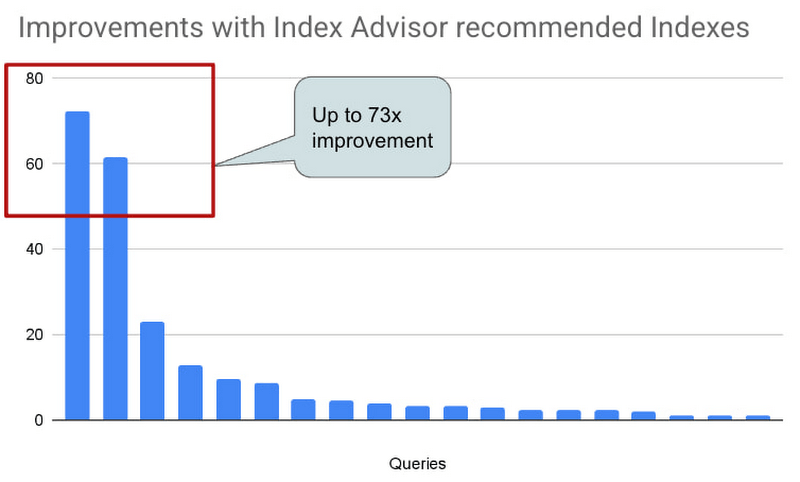
2. Real-world AlloyDB customer workload: This is a real-world workload from a large financial customer. They have a portfolio of complex analytical queries and business insights demand fast response times. Before using Index Advisor, DBAs had already created a few indexes that they considered to be useful to speed up these queries. Many of their queries joined 30+ tables, had 10+ filters and multiple subqueries. Those made it complex for DBAs to correctly identify the most beneficial indexes to create. AlloyDB Index Advisor analyzed these complex structures and identified four additional indexes. By adding the suggested indexes, performance of 17 queries were up by 5x – 73x. The response time of these queries dropped from seconds to milliseconds.
Usage Example
An example: We use the following example to demonstrate the use of Index Advisor. The example simulates a retail application performing analytics on its orders table.
1. Create a sample orders table.
CREATE TABLE orders (
    o_orderkey bigint NOT NULL,
    o_custkey int NOT NULL,
    o_orderstatus "char" NOT NULL,
    o_totalprice numeric(13,2) NOT NULL,
    o_orderdate date NOT NULL,
    o_orderpriority character varying(15) NOT NULL,
    o_clerk character varying(15) NOT NULL,
    o_shippriority int NOT NULL,
    o_comment character varying(79) NOT NULL
);
2. Insert 100K random orders into the table.
INSERT INTO orders
SELECT col, col, substr(md5(random()::text), 1, 1), random(), date '2023-01-01' + col * interval '1 hour', substr(md5(random()::text), 1, 1), concat('clerk', col), col%10, concat('comment', col)
 FROM generate_series(1,1000000) g(col);
3. Analyze the table to populate statistics.
ANALYZE orders;4. Run a query that counts the number of orders in the second week of Jan. You can run the query with timing on so that you can see how long it takes to run the query before and after the index is created.
\timing
SELECT COUNT(*) FROM ORDERS WHERE o_orderdate >= '2023-01-09' and o_orderdate <= '2023-01-15';

Time: 42.196 ms
5. Manually request an index recommendation.
SELECT * FROM google_db_advisor_recommend_indexes();
                      index                       | estimated_storage_size_in_mb
--------------------------------------------------+------------------------------
 CREATE INDEX ON "public"."orders"("o_orderdate") |                           25
(1 row)
6. View recommended indexes for tracked queries.
SELECT DISTINCT recommended_indexes, query
FROM google_db_advisor_workload_report r, google_db_advisor_workload_statements s
WHERE r.query_id = s.query_id AND recommended_indexes != '';
               recommended_indexes                |                                             query
--------------------------------------------------+------------------------------------------------------------------------------------------------
 CREATE INDEX ON "public"."orders"("o_orderdate") | SELECT COUNT(*) FROM ORDERS WHERE o_orderdate >= '2023-01-09' and o_orderdate <= '2023-01-15';
(1 row)
6. View recommended indexes for tracked queries.
SELECT DISTINCT recommended_indexes, query
FROM google_db_advisor_workload_report r, google_db_advisor_workload_statements s
WHERE r.query_id = s.query_id AND recommended_indexes != ”;
recommended_indexes | query
————————————————–+————————————————————————————————
CREATE INDEX ON “public”.”orders”(“o_orderdate”) | SELECT COUNT(*) FROM ORDERS WHERE o_orderdate >= ‘2023-01-09’ and o_orderdate <= ‘2023-01-15’;
(1 row)
7. Add the recommended index.
CREATE INDEX ON "public"."orders"("o_orderdate");8. Re-run the query.
\timing
SELECT COUNT(*) FROM ORDERS WHERE o_orderdate >= '2023-01-09' and o_orderdate <= '2023-01-15';

Time: 1.403 ms  (compared to 42.196ms before the index)
Learn more
- To learn more about AlloyDB’s Index Advisor, see Enable and use the index advisor | AlloyDB for PostgreSQL | Google Cloud
- To learn about AlloyDB, read AlloyDB for PostgreSQL intelligent scalable storage | Google Cloud Blog
- Start building on Google Cloud with $300 in free credits and 20+ always free products. https://cloud.google.com/free
More Relevant Stories for Your Company

BigQuery Now Supports Multi-statement Transactions
Mercury, the Roman god of commerce, is often depicted carrying a purse, symbolic of business transactions, wearing winged sandals, illustrating his abilities to move at great speeds. Transactions power the world’s business systems today, ranging from millions of packages moving worldwide tracked in real time by logistics companies to global

Tyson Foods’ Story of Unlocking Opportunities by Integrating Real-time Analytics with AI and BI
As data environments become more complex, companies are turning to streaming analytics solutions that analyze data as it’s ingested and deliver immediate, high-value insights into what is happening now. These insights enable decision makers to act in real time to take advantage of opportunities or respond to issues as they

The Fantastic Story of How BMG Enables a Micropayments Strategy So Music Artists Get Paid
The music industry is rapidly changing. Only 20 years ago, the availability of music and the infrastructure that was required to make an album a sales success were incredibly complex and expensive. With the decline of physical sales and a fundamental shift to digital, music streaming now accounts for more

Takeaways from Forrester’s Cloud Data Warehouse Q1 2021 Report
Cloud data warehouse (CDW) solutions have transformed the delivery of modern analytics and are known to have the capabilities to provision data warehouse of any size in a matter of minutes, autotune queries, scale resources including compute and storage on demand and auto-upgrade to the latest version. As the need
