





Contact Center AI & Automation Anywhere Help Virtual Agents Deliver Next Level CX

3041
Of your peers have already read this article.
2:30 Minutes
The most insightful time you'll spend today!
With the advent of the pandemic, contact center traffic has increased by as much as 300%, taxing center capabilities. To help handle the surge, and keep up with heightened customer demands, many customer experience providers have deployed automation in the form of virtual agents that serve as the first—and, sometimes the last—line of customer support. How effective these virtual agents are in delivering timely, complete customer service depends in large part on the contact center’s infrastructure and the power of the automation solution.
Customer support providers can now start to reimagine customer experience with Conversational AI and take advantage of the Google Cloud-Automation Anywhere partnership to modernize their operations.
Bringing together the Google Cloud Contact Center AI (CCAI) solution and the Automation Anywhere cloud-native Automation 360 platform, the partnership helps contact centers remain competitive by improving their performance metrics and customer satisfaction to exceed the continuously growing expectations.
Information here, there, anywhere—with limited access
Over the years, many contact centers have accumulated a multitude of systems, often creating a disconnected infrastructure. As a result, both human and virtual agents alike are challenged to keep up with growing customers’ expectations for timely, accurate, and complete service. Without up-to-date software and infrastructure, human agents have to perform a “swivel-chair” maneuver, logging in to the different systems, sifting through records, copying the needed information, and deciding what the next action should be. This approach is not conducive to achieving lower average handle times (or AHT), reduced processing errors, or increased customer satisfaction.
In such a siloed environment, virtual agents may not connect to all the relevant data systems and applications. That also limits what they can do to support human agents. Typically, a virtual agent can handle basic customer requests, such as providing banking customers with their account balances. For more complex requests, such as applying for a line of credit, a virtual agent still must transfer customers to human agents, and the swivel-chair maneuver begins.
Enter the RPA-assisted AI-powered virtual agent
The combination of Google Cloud Contact Center AI and Automation Anywhere’s Automation 360 RPA platform can help contact centers get the maximum benefit from utilizing virtual agents, enriching customer engagements. Further, by integrating automation, opening up APIs, and creating new processes for virtual agents, customer experience teams can help streamline operations by enabling users to quickly access the information they require. This helps minimize the need for the “swivel-chair” maneuver.
Automation 360 makes it possible for the CCAI virtual agents to access all systems and applications in both legacy and modern infrastructure, helping resolve every case quickly and easily. Not only can the virtual agents respond faster with answers, but they can complete more complex end-to-end requests. With RPA, customers are reporting 66% improved efficiency of contact center operations while exceeding their AHT reduction goals.
This video illustrates how such automation can dramatically reduce the processing time of a customer service request, and you can read more about the details of contact center automation, as well.
Additionally, a comprehensive development platform, the Google Cloud CCAI Dialogflow, powers virtual agents—chatbots and voicebots—with Conversational AI to deliver lifelike customer experiences anytime a customer reaches out to a brand. CCAI Agent Assist helps human agents with turn-by-turn guidance, ready-to-deliver answers, and ready-to-send responses. CCAI Insights identifies key metrics such as call drivers and customer sentiment for workflow optimization.
Living up to their potential
TELUS International, a leading digital customer experience provider and long-time partner of both Google Cloud and Automation Anywhere, has been leveraging virtual agents to enhance the employee and customer experience.
“We are very proud of the enormous value that we can provide our clients through combining our expertise in customer experience and digital transformation alongside the innovative solutions of our technology partners,” Jim Radzicki, CTO of TELUS International, explains. “For instance, through leveraging Google Cloud Contact Center AI and Automation Anywhere’s RPA integration, we are able to expand the capabilities of virtual agents to process a wider variety of customer requests while allowing our team members to focus on the most critical conversations and creating a meaningful connection with every customer.”
With CCAI and Automation 360, virtual agents can help contact centers deliver 24/7, comprehensive, accurate service, all of which helps eliminate wait times—even with heavy traffic. And this is just the start.
With deeper integration planned between Automation 360 and CCAI, RPA can augment CCAI Agent Assist’s abilities to help human agents by bringing untapped case-sensitive information to their fingertips. Furthermore, Automation 360 Bot Insight can complement CCAI Insights’ as well as TELUS International’s Intelligent Insights, a tool-agnostic platform to monitor and manage RPA solutions and bots, with backend data access metrics.
At Google Cloud and Automation Anywhere, we’ll continue developing our contact center solution to extend automation capabilities for better customer service and greater customer satisfaction. Instead of constantly swiveling, agents can once again be at the center of the call center action, taking their work—and the experience of their customers—to the next level.
How to Build A Basic Image Search Utility for Natural Language Queries

4701
Of your peers have already read this article.
6:00 Minutes
The most insightful time you'll spend today!
This post shows how to build an image search utility using natural language queries. Our aim is to use different GCP services to demonstrate this. At the core of our project is OpenAI’s CLIP model. It makes use of two encoders – one for images and one for texts. Each encoder is trained to learn representations such that similar images and text embeddings are projected as close as possible.
We will first create a Flask-based REST API capable of handling natural language queries and matching them against relevant images. We will then demonstrate the use of the API through a Flutter-based web and mobile application. Figure 1 shows how our final application would look like:
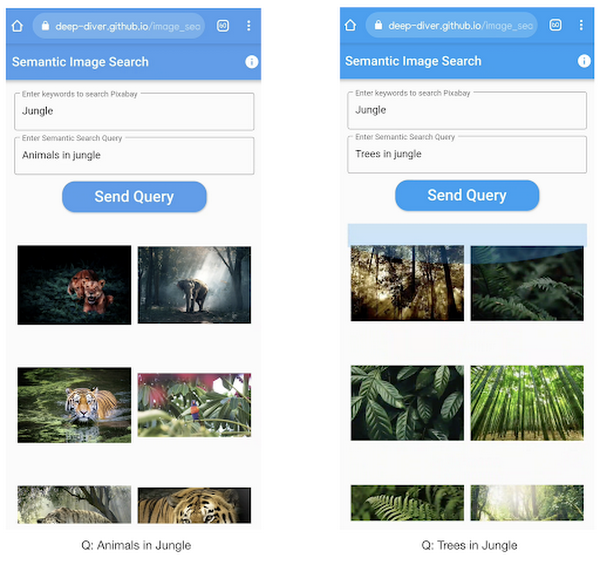
All the code shown in this post is available as a GitHub repository. Let’s dive in.
Application at a high-level
Our application will take two queries from the user:
- Tag or keyword query. This is needed in order to pull a set of images of interest from Pixabay. You can use any other image repositories for this purpose. But we found Pixabay’s API to be easier to work with. We will cache these images to optimize the user experience. Suppose we wanted to find images that are similar to this query: “horses amidst flowers”. For this, we’d first pull in a few “horse” images and then run another utility to find out the images that best match our query.
- Longer or semantic query that we will use to retrieve the images from the pool created in the step above. These images should be semantically similar to this query.
Note: Instead of two queries, we could have only taken a single long query and run named-entity extraction to determine the most likely important keywords to run the initial search with. For this post, we won’t be using this approach.
Figure 2 below depicts the architecture design of our application and the technical stack used for each of the components.
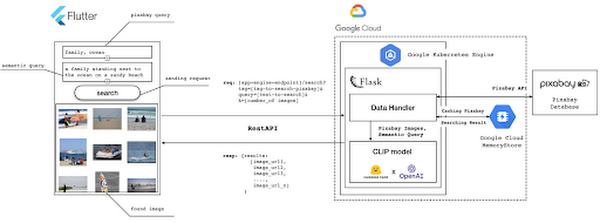
Figure 2 also presents the core logic of the API we will develop in bits and pieces in this post. We will deploy this API on a Kubernetes cluster using the Google Kubernetes Engine (GKE). The following presents a brief directory structure of our application code-base:
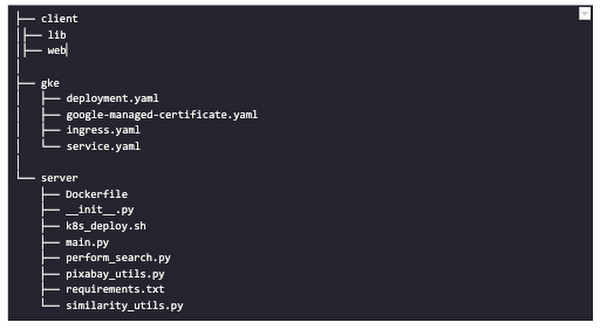
Next, we will walk through the code and other related components for building our image search API. For various machine learning-related utilities, we will be using PyTorch.
Building the backend API with Flask
First, we’d need to fetch a set of images with respect to user-provided tags/keywords before performing the natural language image search. The utility below from the pixabay_utils.py script can do this for us:
def fetch_images_tag(pixabay_search_keyword, num_images):"""Fetches images from Pixabay w.r.t a keyword.:param pixabay_search_keyword: Keyword to perform the search on Pixabay.:param num_images: Number of images to retrieve.:return: List of PIL images.:return: List of image URLs."""query = (PIXABAY_API+ "&q="+ pixabay_search_keyword.lower()+ "&image_type=photo&safesearch=true&per_page="+ str(num_images))response = requests.get(query)output = response.json()all_images = []all_image_urls = []for each in output["hits"]:imageurl = each["webformatURL"]response = requests.get(imageurl)image = Image.open(BytesIO(response.content)).convert("RGB")all_images.append(image)all_image_urls.append(imageurl)return (all_images, all_image_urls)
Note that all the API utilities are logging relevant information. But for brevity, we have omitted the lines of code responsible for that. Next, we will see how to invoke the CLIP model and select the images that would best match a given query semantically. For this, we’ll be using Hugging Face, an easy-to-use Python library offering state-of-the-art NLP capabilities. We’ll collate all the logic related to this search inside a SimilarityUtil class:
class SimilarityUtil:def __init__(self):self.model = CLIPModel.from_pretrained(CLIP_MODEL)self.processor = CLIPProcessor.from_pretrained(CLIP_PREPROCESSOR)self.device = "cuda" if torch.cuda.is_available() else "cpu"def perform_sim_search(self, images, query_phrase, top_k=3):"""Performs similarity search between the images and query.:param images: A list of PIL images initially retrieved withrespect to some entity e.g. Tiger.:param query_phrase: A list containing a single text query,e.g. "Tiger drinking water".:param top_k: Number of top images to return from `images`.:return: Top-k indices matching the query semantically andtheir similarity scores."""model = self.model.to(self.device)# Obtain the text-image similarity scoreswith torch.no_grad():inputs = self.processor(text=[query_phrase], images=images, return_tensors="pt", padding=True)inputs = inputs.to(self.device)outputs = model(**inputs)# Image-text similarity scoreslogits_per_image = outputs.logits_per_image.cpu()(top_indices, top_scores) = self.sort_scores(logits_per_image, top_k)return (top_indices, top_scores)def sort_scores(self, scores, top_k):"""Sorts the scores in a descending manner.:param scores: Scores to sort through.:param top_k: Number of top scores to return.:return: Top-k scores and their indices."""values, indices = scores.squeeze().topk(top_k)top_indices, top_scores = [], []for score, index in zip(values, indices):top_indices.append(int(index.numpy()))score = score.numpy().tolist()top_scores.append(round(score, 3))return (top_indices, top_scores)
CLIP_MODEL uses a ViT-base model to encode the images for generating meaningful embeddings with respect to the provided query. The text-based query is also encoded using A Transformers-based model for generating the embeddings. These two embeddings are matched with one another during inference. To know more about the particular methods we are using for the CLIP model please refer to this documentation from Hugging Face.
In the code above, we are first invoking the CLIP model with images and the natural language query. This gives us a vector (logits_per_image) that contains the similarity scores between each of the images and the query. We then sort the vector in a descending manner. Note that we are initializing the CLIP model while instantiating the SimilarityUtil to save us the model loading time. This is the meat of our application and we have tackled it already. If you want to interact with this utility in a live manner you can check out this Colab Notebook.
Now, we need to collate our utilities for fetching images from Pixabay and for performing the natural language image search inside a single script – perform_search.py. Following is the main class of that script:
class Searcher:def __init__(self):self.similarity_model = SimilarityUtil()def get_similar_images(self, keyword, semantic_query, pixabay_max, top_k):"""Finds semantically similar images.:param keyword: Keyword to search with on Pixabay.:param semantic_query: Query to find semantically similar images retrieved from Pixabay.:param pixabay_max: Number of maximum images to retrieve from Pixabay.:param top_k: Top-k images to return.:return: Tuple of top_k URLs and the similarity scores of the images present inside the URLs."""images_redis_key = keyword + "_images"urls_redis_key = keyword + "_urls"if redis_client.exists(images_redis_key) and redis_client.exists(urls_redis_key):keyword_images = redis_client.get(images_redis_key)keyword_image_urls = redis_client.get(urls_redis_key)else:(keyword_images, keyword_image_urls) = fetch_images_tag(keyword, pixabay_max)redis_client.set(images_redis_key, keyword_images)redis_client.set(urls_redis_key, keyword_image_urls)(top_indices, top_scores) = self.similarity_model.perform_sim_search(keyword_images, semantic_query, top_k)top_urls = [keyword_image_urls[index] for index in top_indices]return (top_urls, top_scores)
Here, we are just calling the utilities we had previously developed to return the URLs of the most similar images and their scores. What is even more important here is the caching capability. For that, we combined GCP’s MemoryStore and a Python library called direct-redis. More on setting up MemoryStore later.
MemoryStore provides a fully managed and low-cost platform for hosting Redis instances. Redis databases are in memory and light-weight making them an ideal candidate for caching. In the code above, we are caching the images fetched from Pixabay and their URLs. So, in the event of a cache hit, we won’t need to call the CLIP model and this will tremendously improve the response time of our API.
Other options for caching
We can cache other elements of our application. For example, the natural language query. When searching through the cached entries to determine if it’s a cache hit, we can compare two queries for semantic similarity and return results accordingly.
Consider that a user had entered the following natural language query: “mountains with dark skies”. After performing the search, we’d cache the embeddings of this query. Now, consider that another user entered another query: “mountains with gloomy ambiance”. We’d compute its embeddings and run a similarity search with the cached embeddings. We’d then compare the similarity scores with respect to a threshold and parse the most similar queries and their corresponding results. In case of a cache miss, we’d just call the image search utilities we developed above.
When working on real-time applications we often need to consider these different aspects and decide what enhances the user experience and maximizes business at the same time.
All that’s left now for the backend is our Flask application – main.py:
@app.route("/search", methods=["GET"])def get_images():tag = request.args.get("t").lower()query = request.args.get("s_query").lower()top_k = request.args.get("k")(top_urls, top_scores) = searcher.get_similar_images(tag, query, MAX_PIXABAY_SEARCH, int(top_k))return jsonify({"top_urls": top_urls, "top_scores": top_scores})
Here we are first parsing the query parameters from the request payload of our search API. We are then just calling the appropriate function from perform_search.py to handle the request. This Flask application is also capable of handling CORS. We do this via the flask_cors library:
cors = CORS(app,resources={r"/search/*": {"origin": "*"},r"/test/*": {"origin": "*"},},)
And this is it! Our API is now ready for deployment.
Deployment with Compute Engine and GKE
The reason why we wanted to deploy our API on Kubernetes is because of the flexibility Kubernetes offers for managing deployments. When operating at scale, auto scalability and load balancing are very important. With the comes the requirement of security — we’d not want to expose the utilities for interacting with any internal services such as databases. With Kubernetes, we can achieve all these easily and efficiently.
GKE provides secured and fully managed functionalities for operationalizing Kubernetes clusters. Here are the steps to deploy the API on GKE at a glance:
- We first build a Docker image for our API and then push it to the Google Container Registry (GCR).
- We then create a Kubernetes cluster on GKE and initialize a deployment.
- We then add scalability options.
- If any public exposure is needed for the API, we then tackle it.
We can assimilate all the above into a shell script – k8s_deploy.sh:
## Docker build and push ### We are inside the `server` directorydocker build -t gcr.io/${PROJECT_ID}/search_service .docker push gcr.io/${PROJECT_ID}/search_service## Deploy on a GKE cluster ### Configure the Docker command-line tool to authenticate to Container Registrygcloud auth configure-docker# Create a Kubernetes clustergcloud container clusters create image-search-nlp# Create a deploymentkubectl create deployment clip-search --image=gcr.io/${PROJECT_ID}/search_service# Number of worker replicaskubectl scale deployment clip-search --replicas=3# HorizontalPodAutoscaler resourcekubectl autoscale deployment clip-search --cpu-percent=80 --min=1 --max=5# Expose deploymentkubectl expose deployment clip-search --name=clip-search-service --type=LoadBalancer --port 80 --target-port 8080
These steps are well explained in this tutorial that you might want to refer to for more details. We can configure all the dependencies on our local machine and execute the shell script above. We can also use the GCP Console to execute it since a terminal on the GCP Console is pre-configured with the system-level dependencies we’d need. In reality, the Kubernetes cluster should only be created once and different deployment versions should be created under it.
After the above shell script is run successfully, we can run kubectl get service to know the external IP address of the service we just deployed:
NAME CLUSTER-IP EXTERNAL-IP PORT(S) AGEclip-search-service 10.3.251.122 203.0.113.0 80:30877/TCP 10s
We can now consume this API with the following base URI: http://203.0.113.0/. If we wanted to deal with only http-based API requests, then we are done here. But secured communication is often a requirement in order for applications to operate reliably. In the following section, we are to discuss how to configure the additional items to allow our Kubernetes cluster to allow https requests.
Configurations for handling https requests with GKE
A secure connection is almost often a must-have requirement in modern client/server applications. The front-end Flutter application would be hosted on GitHub Pages for this project, and it requires https-based connection as well. Even if configuring https connection particularly for a GKE-based cluster can be considered a chore, its setup might seem daunting at first.
There are six steps to configure https connection in the GKE environment:
- You need to have a domain name, and there are a lot of inexpensive options that you can buy. For instance, mlgde.com domain for this project is acquired via Gabia which is a Korean service provider.
- A reserved (static) external IP address has to be acquired via gcloud command or GCP console.
- You need to bind the domain name with the acquired external IP address. This is a platform-specific configuration that issued the domain name to you.
- There is a special ManagedCertificate resource which is specific to the GKE environment. ManagedCertificate resource specifies the domain that the SSL certificate will be created for, so you need this.
- An Ingress resource should be created by listing the static external IP address, ManagedCertificate resource, and the service name and port which the incoming traffic will be routed to. The Service resource could remain the same as in the above section with only changes from LoadBalancer to ClusterIP.
- Last but not least, you need to modify the existing Flask application and Deployment resource to support liveness and readiness probes which are used to check the health status of the Deployment. The Flask application side can be simply modified with the flask-healthz Python package, and you only need to add
livenessProbeandreadinessProbesections in the Deployment resource. In the code example below, thelivenessProbeandreadinessProbeare checked via/aliveand/readyendpoints respectively.
from flask_healthz import healthzfrom flask_healthz import HealthErrorapp = Flask(__name__)app.register_blueprint(healthz, url_prefix="/")def printok():print("Everything is fine")def liveness():try:printok()except Exception:raise HealthError("Can't connect to the file")def readiness():try:printok()except Exception:raise HealthError("Can't connect to the file")app.config.update(HEALTHZ = {"alive": "main.liveness","ready": "main.readiness",})
One thing to be careful of is the initialDelaySeconds attribute of the probes. It is uncommon to configure this attribute with a big number, but it could be bigger than 90 – 120 seconds depending on the size of the model to be used. For this project, it is configured in 90 seconds in order to wait until the CLIP model is fully loaded into memory (full YAML script here).
livenessProbe:httpGet:path: /aliveport: 8080initialDelaySeconds: 90periodSeconds: 10readinessProbe:httpGet:path: /readyport: 8080initialDelaySeconds: 90periodSeconds: 10
Again, these steps may seem daunting at first, but it will become clear when you have done it once. Here is the official document for Using Google-managed SSL certificates You can find all the GKE-related resources used in this project here.
Once every step is completed you should be able to see your server application running on the GKE environment. Please make sure to run kubectl apply command whenever you create Kubernetes resources such as Deployment, Service, Ingress, and ManagedCertificate, and it is important to wait for more than 10 minutes until the ManagedCertifcate provisioning is done.
You can run gcloud compute addresses list command to find out the static external IP address that you have configured.
NAME ADDRESS/RANGE TYPE PURPOSE NETWORK REGION SUBNET STATUSgde 34.149.231.34 EXTERNAL IN_USE
Then, the IP address has to be mapped to the domain. Figure 3 is a screenshot of a dashboard from where we got the mlgde.com domain. It clearly shows mlgde.com is mapped to the static external IP address configured in GCP.
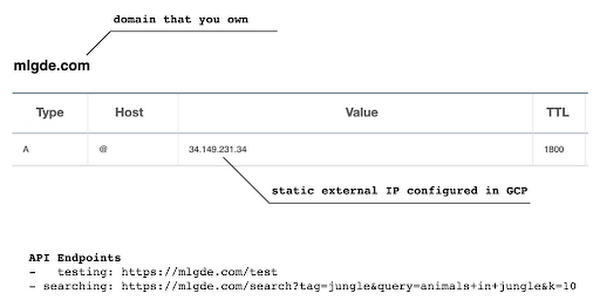
In case you’re wondering why we didn’t deploy this application on App Engine, well that is because of the compute needed to execute the CLIP model. App Engine instance won’t fit in that regime. We could have also incorporated compute-heavy capabilities via a VPC Connector. That is a design choice that you and your team would need to consider. In our experiments, we found the GKE deployment to be easier and suitable for our needs.
Infrastructure for the CLIP model
As mentioned earlier, at the core of our application is the CLIP model. It is computationally a bit more expensive than the regular deep learning models. This is why it makes sense to have the hardware infrastructure set up accordingly to execute it. We ran a small benchmark in order to see how a GPU-based environment could be beneficial here.
We ran the CLIP on a Tesla P100-based machine and also on a standard CPU-only machine 1000 times. The code snippet below is the meat of what we executed:
DEVICE = "cuda" if torch.cuda.is_available() else "cpu"start_time = time.time()for _ in range(1000):with torch.no_grad():model = model.to(DEVICE)inputs = processor(text=[semantic_search_phrase],images=all_images, return_tensors="pt", padding=True)inputs = inputs.to(DEVICE)outputs = model(**inputs)end_time = time.time() - start_timeprint(f"Total time: {end_time:.3f} seconds.")
As somewhat expected, with the GPU, the code took 13 minutes to complete execution. With no GPU, it took about 157 minutes.
It is uncommon to leverage GPUs for model prediction because of cost restrictions, but sometimes we have to access GPUs for deploying a big model like CLIP. We configured a GPU-based cluster on GKE and compared the performance differences with and without it. It took about 1 second to handle a request with GPU and MemoryStore cache while it took more than 4 seconds with MemoryStore only (without the GPUs).
For the purposes of this post, we used a CPU-based cluster on Kubernetes. But It is easy to configure GPU usage in a GKE cluster. This document shows you how to do so. For a short summary, there are two steps. First, a node should be configured with GPUs when creating a GKE cluster. Second, GPU drivers should be installed in GKE nodes. You don’t need to visit and manually install GPU drivers for each node by yourself. Rather you can simply apply the DaemonSet resource to GKE as described here.
Setting up MemoryStore
In this project, we first query the general concept of images to Pixabay, then we filter the images with a semantic query using CLIP. It means we can cache the initially retrieved images from Pixabay for the next specific semantic query. For instance, you may want to search with “gentleman wearing tie” at first, then you may want to retry searching for “gentleman wearing glass”. In this case, the base images remain all the same, so they could be stored in a cache server like Redis.
MemoryStore is a GCP service wrapping the Redis which is an in-memory data store, so you can simply use a standard Redis Python package for accessing it. The only thing to be careful about when provisioning a MemoryStore Redis instance is to make sure it is in the same region where your GKE cluster or Compute Engine instance is.
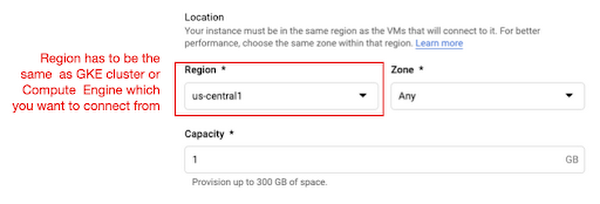
The code snippet below shows how to make a connection to the Redis instance in Python. Nothing specific to GCP, but you only need to be aware of the usage of the standard redis-py package.
# REDISHOST is the IP address to the MemoryStore instanceredis_host = os.environ.get("REDISHOST", "localhost")redis_port = int(os.environ.get("REDISPORT", 6379))redis_client = redis.StrictRedis(host=redis_host, port=redis_port)
After creating a connection, you can store and retrieve data from MemoryStore. There are more advanced use cases of Redis, but we only used exists, get, and set methods for the demonstration purpose. These methods should be very familiar if you know maps, dictionaries, or other similar data structures. For the code portion that uses Redis-related utilities, please refer to the Searcher Python class we discussed in an earlier section.
In the URLs below, you can find side-by-side comparisons of using MemoryStore:
- Without MemoryStore: https://youtu.be/7B88Eyrd-4s
- With MemoryStore (1st try): https://youtu.be/LE6xeEIRuMM
- With MemoryStore (2nd try): https://youtu.be/rRfK17sdk84
Putting everything together
All that’s left now is to collate the different components we developed in the sections above and deploy our application with a frontend. All the frontend-related code is present here.
- The front-end application is written in the Flutter development kit. The main screen contains two text fields for queries to Pixabay and CLIP model respectively. When you click the “Send Query” button, it will send out a RestAPI request to the server. After receiving the result back from the server, the retrieved images from the semantic query will be displayed at the bottom section of the screen.
- Please note that a Flutter application can be deployed to various environments including desktop, web, iOS, and Android. In order to keep as simple as possible, we chose to deploy the application to the GitHub Pages. Whenever there is any change to a client-side source directory, the GitHub Action will be triggered to build a web page and deploy the latest version to the GitHub Pages.
Our final application is deployed here and it looks like so:
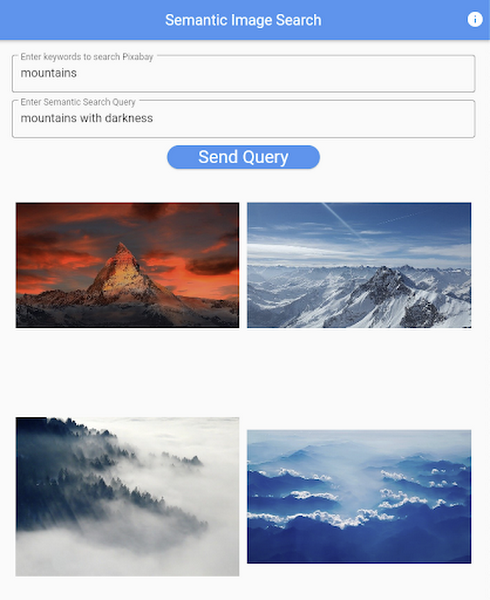
Note that due to constraints, the above-mentioned URL will only be live for one or two months.
It is also possible to redeploy the back-end application with a GitHub Action.
- The very first step is to craft a Dockerfile like below. Since Python is a scripting language, and there are lots of heavy packages that the application is dependent on, it is important to cache the steps. For instance, installing the dependencies should be separated from other commands.
FROM pytorch/pytorch:latestWORKDIR /app# install the dependenciesCOPY requirements.txt requirements.txtRUN pip install -r requirements.txtCOPY . .# set up environment variablesENV PIXABAY_API_KEY="..."ENV REDIS_IN_USE="true"ENV REDISHOST="..."# expose port that Flask app is listening onEXPOSE 8080# run the Flask appCMD [ "python3", "main.py" ]
- With the Dockerfile defined, we can use a GitHub Action like this for automatic deployment.
Edge cases
Since the CLIP model is pre-trained on a large corpus of image and text pairs it’s likely that it may not generalize well to every natural language query we throw at it. Also, because we are limiting the number of images on which the CLIP model can operate, this somehow restricts the expressivity of the model.
We may be able to improve the performance for the second situation by increasing the number of images to be pre-fetched and by indexing them into a low-cost and high-performance database like Datastore.
Costs
In this section, we wanted to provide the readers a breakdown of the costs they might incur in order to consume the various services used throughout the application.
- Frontend hosting
- The front-end application is hosted on GitHub Pages, so there is no expenditure for this.
- Compute Engine
- With an e2-standard-2 instance type without GPUs, the cost is around $48.92 per month. In case you want to add a GPU (NVIDIA K80), the cost goes up to $229.95 per month.
- MemoryStore
- The cost for MemoryStore depends on the size. With 1GB of space, the cost is around $35.77 per month, and whenever you add more GBs the cost will be doubled.
- Google Kubernetes Engine
- The monthly cost for a 3 node GKE cluster with n2-standard-2 (vCPUs: 2, RAM: 8GB without GPUs) is about $170.19. If you add one GPU (NVIDIA K80) to the cluster, the cost goes up to $835.48.
While you may think that is a lot cost-wise, it is good to know that Google gives away free $300 credits when you create a new GCP account. It is still not enough for leveraging GPUs, but it is enough to learn and experiment with GKE and MemoryStore usage.
Conclusion
In this post, we walked through the components needed to build a basic image search utility for natural language queries. We discussed how these different components are connected to each other. Our image search API is able to utilize caching and was deployed on a Kubernetes cluster using GKE. These elements are essential when building a similar service to cater to a much bigger workload. We hope this post will serve as a good starting point for that purpose. Below are some references on similar areas of work that you can explore:
- Building a real-time embeddings similarity matching system
- Detecting image similarity using Spark, LSH and TensorFlow
Acknowledgments: We are grateful to the Google Developers Experts program for supporting us with GCP credits. Thanks to Karl Weinmeister and Soonson Kwon of Google for reviewing the initial draft of this post.
How to Choose the Right ML Model for Your Applications
4885
Of your peers have already read this article.
2:00 Minutes
The most insightful time you'll spend today!
Many of our customers want to know how to choose a technology stack for solving problems with machine learning (ML). There are many choices for these solutions available, some that you can build and some that you can buy. We’ll be focusing on the build side here, exploring the various options and the problems they solve, along with our recommendations.
The best ML applications are trained with the largest amount of data
But first, keep in mind an important concept: the quality of your ML model improves with the size of your data. Dramatic ML performance and accuracy are driven by improvements in data size, as shown in the graph below. This is a text model, but the same principles hold for all kinds of ML models.
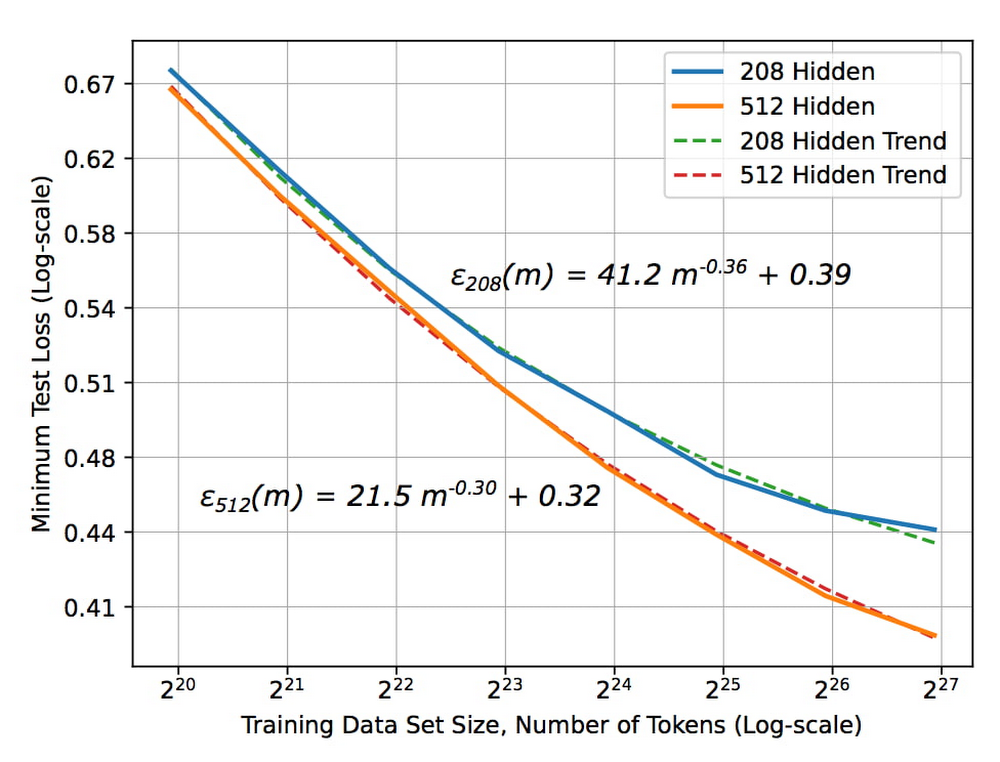
The X axis represents the size of the data set and the Y axis is the error rate. As the size of the data set increases, the error rate drops. But notice something critical about the size of the data set — the x-axis is2^20, 2^21, 2^ 22, etc. In other words, each new tic here is a doubling of the data set size. To get a linear decrease in your error rate you need to exponentially increase the size of your data set.
The blue curve in the graph represents a slightly more sophisticated ML model than the orange curve. Suppose you are deciding between two choices: create a better model or double the data set size. Assuming that these two choices cost the same, it’s better to keep gathering more data. It’s only when improvements due to data size increases start to plateau that it becomes necessary to build a better model.
Secondly, ML systems need to be retrained for new situations. For example, if you have a recommendation system in YouTube and you want to provide recommendations in Google Now, you can’t use the same recommendations model. You have to train it in the second instance on the recommendations you want to make in Google Now. So even though the model, the code, and the principles are the same, you have to retrain the model with new data for new situations.
Now, let’s combine these two concepts: you get a better ML model when you have more data, and an ML model typically needs to be retrained for a new situation. You have a choice of either spending your time building an ML model or buying a vendor’s off-the-shelf model.
To answer the question of whether to buy or whether to build, first determine if the buyable model is solving the same problem that you want to solve. Has it been trained on the same input and on similar labels? Let’s say you’re trying to do a product search, and the model has been trained on catalog images as inputs. But you want to do a product search based on users’ mobile phone photographs of the products. The model that was trained on catalog images won’t work on your mobile phone photographs, and you’d have to build a new model.
But let’s say you’re considering a vendor’s translation model that’s been trained on speeches in the European Parliament. If you want to translate similar speeches, the model works well as it uses the same kind of data.
The next question to ask: does the vendor have more data than you do? If the vendor has trained their model on speeches in the European Parliament but you have access to more speech data than they have, you should build. If they have more data, then we recommend buying their model.
Bottom line: buy the vendor’s solution if it’s trained on the same problem and has access to more data than you do.
Technology stack for common ML use cases
If you need to build, what is the technology stack you need? What are the skills your people need to develop? This depends on the type of problem you are solving. There are four broad categories of ML applications: predictive analytics, unstructured data, automation, and personalization. The recommended technology stack for each is slightly different.
Predictive analytics
Predictive analytics includes detecting fraud, predicting click-through rates, and forecasting demand.
Step one: build an enterprise data warehouse
Here, your data set is primarily structured data, so our recommended first step is to store your data in an enterprise data warehouse (EDW). Your EDW is a source of training examples and product histories tracked over time, and can break down silos and gather data from throughout your organization.
Step two: get good at data analytics
Next, you’d build a data culture, get skilled at data analytics, start to build dashboards, and enable data-driven decisions. At this point, you have all of the data and you know which pieces are trustworthy.
Step three: build ML
From your EDW, you can build your models using SQL pipelines. We recommend using BigQuery ML when doing ML with the data in your EDW. If you want to build a more sophisticated model, you can train TensorFlow/Keras models on BigQuery data. A third option is AutoML tables for state-of-the-art accuracy and for building online microservices.
Unstructured data
Examples of how our customers use ML to gain insights from unstructured data include annotating videos, identifying eye diseases, and triaging emails. Unstructured data can include videos, images, natural language, and text. Deep learning has revolutionized the way we do ML on unstructured data, whether you’re looking at language understanding, image classification, or speech-to-text.
For unstructured data, the models you use will employ deep learning. Here, the ROI heavily favors using AutoML. The amount of time that you’d spend trying to create a new ML model from scratch is almost never worth it. You can spend your money more effectively collecting more data than trying to get a slightly better model. Regardless of the type of unstructured data, our recommendation is to use AutoML for small and medium size data sizes.
But AutoML has a limit to scale. At some point, the size of your data set is going to be so large that architecture search is going to get really expensive. At that point, you may want to go to a best-of-breed model with custom retraining from TensorFlow Hub, for example. If you have data sets that are in the millions of examples, you can build your own custom neural network (NN) architectures. But determine if your data set size has started to plateau, by plotting a graph similar to the one at the top of this post. Build a custom NN architecture only after you’ve plateaued, where increasing amounts of data won’t give you a better model.
Automation
Some examples of how customers are using ML for automation include scheduling maintenance, counting retail footfall, and scanning medical forms. The key thing to keep in mind as you pick a technology stack for these problems is that you’re not building just one ML model. If you want to schedule maintenance orwant to reject transactions, for example, you’ll need to train multiple linked models.
Instead of individual models, think in terms of ML pipelines, which you can orchestrate using all of the technologies already mentioned. Then you have three choices for operationalizing, with three levels of sophistication.
- Vertex AI has turnkey serverless training and batch/online predictions. This is what is recommended for a team of data scientists. .
- Deep Learning VM Image, Cloud Run, Cloud Functions or Dataflow feature customized training and batch/online predictions. This is what is recommended if the team consists of data engineers and scientists.
- Vertex AI Pipelines are fully customizable and recommended for organizations with separate ML engineering and data science teams.
When doing automation, the individual models that you chain together into a pipeline will be a mix – some will be prebuilt, some will be customized, and others will be built from scratch. Vertex AI, by providing a unified interface for all these model types, simplifies the operationalization of these models.
Personalization
ML application examples of personalization include customer segmentation, customer targeting, and product recommendations. For personalization, we again recommend using an EDW, because customer segmentation uses structured marketing data. For product recommendations, you will similarly have prior purchases and web logs in your EDW., You can power clustering applications, or recommendation systems like matrix factorization, and create embeddings directly from your EDW for sophisticated recommendation systems.
For specific use cases, choose the technology stack based on your data size and scope. Start with BigQuery ML for its quick, easy matrix factorization approach. Once your application proves viable and you want a slightly better accuracy, then try AutoML recommendations. But once your data set grows beyond the capabilities of AutoML recommendations, consider training your own custom TensorFlow and Keras models.
To summarize, successful ML starts with the question, “Do I build or do I buy?” If an off-the-shelf solution exists that was trained with similar data and with access to more data than you have, then buy it. Otherwise build it, using the technology stack recommended above for the four categories of ML applications.
Learn more about our artificial intelligence (AI) and ML solutions and check out sessions from our Applied ML Summit on-demand.
12029
Of your peers have already watched this video.
3:26 Minutes
The most insightful time you'll spend today!
How L&T Financial Services Processes 95% of Motorcycle Loans in Less Than Two Minutes
L&T Financial Services is one of the largest lenders in India. India’s demonetization policy in recent years has led to a shift from cash transactions to digital payments. In 2016, the government withdrew 500 and 1000 rupee notes from circulation and encouraged a heavily cash-based population to deposit their canceled notes in banks. Financial institutions needed to pivot to a new way of doing business to stay competitive. L&T Financial Services modernized its IT infrastructure to keep up with changes and capture digital opportunities.
“Working capital is crucial to stimulate growth in rural communities. Our role as a lender is to provide access to funds. We don’t want to burden borrowers with the complexities of getting a loan. Towards this end, digitization is an important step,” says Dinanath Dubhashi, Managing Director and CEO at L&T Financial Services. “Google Cloud helps us streamline service delivery and identify the right customers. By offering the fastest processing time in the industry, we want to be the go-to lender for all customers.”
L&T Financial Services considered multiple cloud providers before choosing Google Cloud. According to Dinanath, Google Cloud understands both the need for businesses to move fast and the need for IT to modernize at different speeds. “We weren’t forced to abandon existing IT systems and migrate lock, stock, and barrel to Google Cloud on day one.”
L&T Financial Services engaged Google Cloud Professional Services to guide its digital transformation journey. The smooth migration from proof of concept to full-scale deployment on Google Cloud took a matter of months.
“Collaboration: a small idea with big opportunities. G Suite helps us connect remote branches with the head office, easily access shared files to submit and track approvals, and conduct face-to-face discussions to accelerate approval processes.”
—Dinanath Dubhashi, MD and CEO, L&T Financial Services
Digitizing the workforce with G Suite
The move to the cloud at L&T Financial Services started in 2017 when the company introduced G Suite to its 14,500 employees. The legacy email system was cumbersome to use, especially for frontline staff who need email access while they are on the road. Using Gmail, employees can connect with customers and co-workers from anywhere, on any device. Employees save time by scheduling meetings with Calendar, collaborating on Docs, and conducting video calls using Hangouts Meet.
Converting data into credit insights using BigQuery
Taking data intelligence one step further, L&T Financial Services adopts a responsible lending approach by applying algorithm-based data analytics to improve credit standards. Beyond traditional data such as credit score and credit payment history, the company also considers macro-economic indicators for risk audits. For example, a farmer’s ability to pay off the loan of his new tractor depends on a successful planting and harvest. So L&T Financial Services feeds long-term data into BigQuery and runs queries to predict loan defaults based on rainfall and crop yield.
Maximize Efficiency in Document Extraction Models with Document AI Workbench GA Release

1306
Of your peers have already read this article.
3:30 Minutes
The most insightful time you'll spend today!
Each day, more documents are created and used across companies to make decisions. However, the value in these documents is primarily expressed as unstructured data, which makes the value difficult and manually intensive to extract and use for business processes.
As the number and variety of documents used by businesses proliferate, machine learning (ML) solutions need to be more flexible to handle the broader set of use cases. That’s why we introduced the first Document AI Workbench model, Custom Document Extractor (CDE), in Public Preview at Google Cloud Next ‘22. CDE makes it fast and easy to apply ML to virtually any document-based workflow to extract structured data from unstructured document types, to automate business processes.
CDE lets developers and analysts use their own data to train models and extract fields from documents needed for the business. CDE lets organizations build models faster and with less data — thus accelerating time-to-value for processing and analysis of data in documents.
Today, we announce that Document AI Workbench is Generally Available (GA), open to all customers, ready for production use through APIs and the Google Cloud Console. Document AI Workbench is covered by the Document AI SLA — online and batch document prediction is supported with >=99.9% uptime. Furthermore, Document AI Workbench is now covered by Google Cloud’s GA product terms. For example, Google will notify customers at least 12 months before significantly modifying a customer-facing Google API in a backwards-incompatible manner.
In this blog post, we’ll explore ways customers are already using CDE and Document AI Workbench’s updated capabilities.
What users are saying about Workbench
Deliver higher model accuracy with Workbench
Users leverage Workbench to ultimately save time and money. A third party evaluated Document AI Workbench and concluded that it extracts data more accurately1 than several competing products for document types with variable layouts (e.g. invoice, receipt, bank statements, paystubs). Better accuracy drives higher automation rates, helping Workbench users save time and money.
Chris Jangareddy, managing director for Artificial Intelligence & Data at Deloitte Consulting LLP said, “Google Cloud Document AI is a leading document processing solution packed with rich features like multi-step classify and text extraction to automate sorting, classification, extraction, and quality assurance. By combining Document AI with Workbench, Google Cloud has created a forward-thinking and powerful AI platform for intelligent document processing that will allow for process transformation at an enterprise scale with predictable outcomes that can benefit businesses.”
Mansoor Khan, CEO of OneClinic said, “We help medical professionals scale their clinics through automation. We used Google’s Document AI Workbench to create a model to automatically extract data from patients’ insurance cards as part of our patient check-in software. Workbench is easy to use and we are really happy with the model accuracy — it extracts data more accurately than what we would expect from human data entry.”
Rajnish Palande, VP, Google Business Unit for BFSI, TCS said, “The Google Cloud Document AI Workbench leverages artificial intelligence (AI) to manage and glean insights from unstructured data. The Workbench brings together the power of classification, auto-annotation, page-number identification and multi-language support to help organizations rapidly deliver enhanced accuracy, improved operational efficiency, higher confidence in the information extract, and increased return on investment.”
Build production ready models faster with Workbench
Document AI Workbench helps users create machine learning models faster. For example, a third-party evaluation shows Document AI Workbench trains machine learning models up to 3x faster than a leading competitor. This is an important improvement which lowers total cost of ownership and increases value.
Dallas Dolen, Partner, Google Alliance Leader at PwC said, “Google Document AI Workbench helps to accelerate our custom parser models training as well as improves accuracy and performance using a custom document extractor with human in the loop. It helps us solve complex business problems for our clients in the financial services and healthcare industries.”
Ziang Jia, Senior DocAl Development Lead at Resultant, said, “Document AI Workbench has unlocked a brand-new machine learning development experience for information extraction solutions. Its simplicity and robustness enabled us to build models and deliver a highly accurate outcome in an agile way for a large government agency. We couldn’t be more impressed by its simplicity and robustness and are excited to see how the product will evolve in the future.”
Sean Earley, VP of Delivery Services of Zencore said, “Document AI Workbench allows us to develop highly accurate document parsing models in a matter of days. Our customers have automated tasks that formerly required significant human labor. For example, using Document AI Workbench, a team of two trained a model to split, classify and extract data from 15 document types to automate Home Mortgage Disclosure Act reporting. The mean trained model accuracy was 94%, drastically reducing the operational cost of our customer’s compliance reporting procedures.”
What’s new with Document AI Workbench
The latest Workbench capabilities make it even easier to train and deploy an extraction model:
- With Workbench’s public APIs, you can programmatically create, delete, train, evaluate and deploy models.
- Our updated dataset management tools automatically detect and create existing schema labels from your pre-annotated documents. They also provide you more flexibility when creating and managing schema.
- Our new DocAI Toolkit includes a labeled document converter so that you can easily convert your labeled documents to DocAI’s format and start training faster.
- We’ve reduced the cognitive load for labelers with efficiency enhancements to our Labeling UI.
- The revamped Processor Gallery helps you quickly identify the best model for your use case.
What’s next for Document AI Workbench
We continue to invest in Document AI Workbench to help you automate document processing. Here are a few things we’re working on that we’re excited about:
- Classify document types with the Custom Document Classifier (CDC), coming soon in public preview
- Copy processor versions across projects and processors to streamline managing development and production environments
- Support larger documents (e.g., longer than 50 pages) so you can process a wider array of documents
- Broader (non-latin) language support–equivalent to Document AI OCR
- And many more investments, using state of the art technology, to help you build world class models faster to automate document processing
Document AI Workbench is in GA and ready for production workloads. Learn more via Document AI Workbench documentation or try it out in the Google Cloud Console.
Acknowledgements: Tomas Moreno, Outbound Product Manager, Lukas Rutishauser, Software Engineering Manager, Michael Kwong, Software Engineering Manager, Rajagopal Janani, Software Engineering Manager, Michael Lanning, UX Designer.
1. When trained with 200+ documents
The Power of Personalization: Ocado Retail’s Strategy to Boost Revenue and Lower Churn

1729
Of your peers have already read this article.
3:30 Minutes
The most insightful time you'll spend today!
Retailers are becoming more skilled at making individual customers feel heard and valued. This is a necessity given the fact that 66% of respondents to a McKinsey survey stated that they expect email marketing messages to be tailored to their needs. While marketing personalization expertise is growing, it’s still difficult to manage, especially at scale.
Ocado Retail, one of the world’s largest dedicated online grocery retailers, delivering to over 645,000 customers in the U.K., has made personalization integral to its success.
Let’s look at how Ocado retail worked with Google Cloud and partner Cognizant to develop a new data platform to power its personalization efforts from the ground up.
Unifying data for more holistic, powerful personalization
To achieve its goals of personalization at scale, Ocado Retail needed a central data warehouse that could turn all forms of merchandising, advertising, business, and customer intelligence data into actionable insights. It wanted a means to accelerate customer segment identification, as well as the ideation and launch of relevant campaigns.
“We standardized on Google Cloud, including BigQuery, as the foundation for our data platform because we knew it was the right solution for now and the future,” says Kieren Johnson, Head of IT at Ocado Retail. “We have an incredibly lean team and we needed a partner with exceptional expertise to help build an ambitious enterprise data warehouse to provide powerful insights. Cognizant was also the clear choice to help us get there.”
Cognizant worked closely with Ocado Retail to make sure its expertise in Google Cloud and other technologies aligned with Ocado Retail’s vision to drive more advanced personalization at higher scales using machine learning. The partner helped build the foundation on BigQuery, and then incorporated other Google Cloud tools such as Cloud Run, Vertex AI, and Vertex AI Natural Language to provide no-ops, all-code warehousing, and analytics capabilities.
Cognizant also took advantage of the Google Cloud Partner Success Services (PSS) program to ensure best practices were being followed throughout the project. PSS provided advisory services that guided Cognizant through the highly complex process of building the new data warehouse for Ocado Retail on Google Cloud.
Building the enterprise data platform in this way allows Ocado Retail to leverage the full power of cloud-based analytics while maintaining a lean team. It also allows the company to greatly scale up its personalization efforts.
Making customers feel valued at every touch
The work Ocado Retail has done with Google Cloud and Cognizant has positioned it to make its growing customer base feel valued, understood, and supported in every interaction. Before launching the project with Cognizant and Google Cloud, Ocado Retail was only able to run a couple of campaigns per week and knew it lacked optimal insight into each campaign’s efficacy.
“We now run 10 times the number of campaigns we used to with the help of the data platform Cognizant built on Google Cloud,” says Kieren. “We run multiple campaigns every day for different customer segments, and all of that increased activity is entirely driven by data insights. The positive impacts on our marketing and customer service performance have been clear. We’re now working to expand what we do.”
Ocado Retail has enjoyed solid growth since the new data platform went live, including a 13% rise in active customers during fiscal year 2022, and has also seen a reduction in churn. It attributed these improvements to being better able to tailor products and communications to specific customer preferences.
Throughout the project, Cognizant supported data clean up while maximizing the scalable, flexible, and future-proofed data analytics infrastructure offered by Google Cloud.
Increasing data-driven actions
Ocado Retail plans to provide more data-driven insights to its commercial suppliers through a product called Beet Insights. So far, Beet Insights offers suppliers with intelligence about how their products are performing on the shelves. The result has been improving the role data plays throughout the supply chain, from production to purchase and beyond.
“By putting real-time insights about costs, marketing spend, and supply-funded activities into the hands of our commercial team and buyers, we are better positioned to improve our profits,” says Kieren. “At the same time, building data analytics into every part of our business will allow us to build on our personalization efforts.”
From the project’s inception, Ocado Retail ensured that the platform would be scalable and dynamic. Now, it is working to feed more data sources and streams into the warehouse to accelerate time to insights. Ocado Retail believes this next step in the evolution of the platform will unlock even more opportunities to initiate high-impact programs that transform personalization and every customer interaction.
Learn more about what Google Cloud and partners like Cognizant can do for your customer intelligence and personalization.
More Relevant Stories for Your Company

Ahead of the Curve: 5 Data and AI Trends Set to Shape 2023
How will your organization manage this year's data growth and business requirements? Your actions and strategies involving data and AI will improve or undermine your organization's competitiveness in the months and years to come. Our teams at Google Cloud have an eye on the future as we evolve our strategies

Make Meaningful Analysis with Geo Boundary Public Datasets on BigQuery
Geospatial data is a critical component for a comprehensive analytics strategy. Whether you are trying to visualize data using geospatial parameters or do deeper analysis or modeling on customer distribution or proximity, most organizations have some type of geospatial data they would like to use - whether it be customer




An Overview of Google’s Data Cloud
Data access, management and privacy has been at the center of priorities for enterprises that are aiming to be more agile, reliable and data-driven. Google Cloud's technology innovations spanning products like BigQuery, Spanner, Looker and VertexAI help organizations navigate the complexities related to siloed data in large volumes sprawled across

Woolaroo App and Vision AI are Helping Users Explore Native Languages
One of the most vibrant elements of culture is the use of native languages and the time-honored tradition of storytelling. Anthropologists and linguists have been vocal on the role that language plays in the preservation of culture and how it contributes to the appreciation of heritage. Unfortunately, of the more
