






Benchmarking Report for Indian Businesses: The State of Digital Commerce APIs
READ FULL INTRODOWNLOAD AGAIN5818
Of your peers have already downloaded this article
1:40 Minutes
The most insightful time you'll spend today!
3342
Of your peers have already watched this video.
25:30 Minutes
The most insightful time you'll spend today!
How to Build a Platform on Google Cloud from the Ground Up
Building distributed applications is hard! Building globally scalable distributed applications is harder. Maintaining and growing these services as your business grows is even harder.
Watch this video to know how to create a globally scalable platform for your business on Google Cloud using service meshes. It shows how to build a platform on Google Cloud from the ground up.
This content is agreed upon and a combined effort between SA, Anthos PM (specifically Istio and Anthos Service Mesh), and Anthos engineering.
Join Ameer Abbas, Solutions Architect at Google Cloud, as he goes through (design opinions and reasonings for) project hierarchy in a Google Cloud org, setting up global networking and GKE cluster, service mesh (Istio and ASM), observability, and, common tools and golden signals. After watching this video, you will be able to learn how to think about SLOs, SLAs, security and how to secure traffic between services (mTLS) or from an end user to a service running in your mesh. You will also learn routing and other multicluster routing considerations and, other common operational tasks like adding or migrating an application to the mesh, rolling out new versions of applications, DR and other hybrid or multi-cloud considerations.
How to Build A Basic Image Search Utility for Natural Language Queries

4698
Of your peers have already read this article.
6:00 Minutes
The most insightful time you'll spend today!
This post shows how to build an image search utility using natural language queries. Our aim is to use different GCP services to demonstrate this. At the core of our project is OpenAI’s CLIP model. It makes use of two encoders – one for images and one for texts. Each encoder is trained to learn representations such that similar images and text embeddings are projected as close as possible.
We will first create a Flask-based REST API capable of handling natural language queries and matching them against relevant images. We will then demonstrate the use of the API through a Flutter-based web and mobile application. Figure 1 shows how our final application would look like:
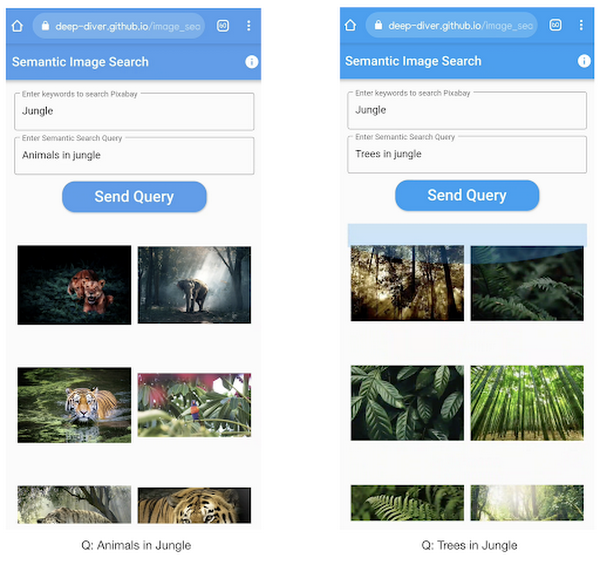
All the code shown in this post is available as a GitHub repository. Let’s dive in.
Application at a high-level
Our application will take two queries from the user:
- Tag or keyword query. This is needed in order to pull a set of images of interest from Pixabay. You can use any other image repositories for this purpose. But we found Pixabay’s API to be easier to work with. We will cache these images to optimize the user experience. Suppose we wanted to find images that are similar to this query: “horses amidst flowers”. For this, we’d first pull in a few “horse” images and then run another utility to find out the images that best match our query.
- Longer or semantic query that we will use to retrieve the images from the pool created in the step above. These images should be semantically similar to this query.
Note: Instead of two queries, we could have only taken a single long query and run named-entity extraction to determine the most likely important keywords to run the initial search with. For this post, we won’t be using this approach.
Figure 2 below depicts the architecture design of our application and the technical stack used for each of the components.
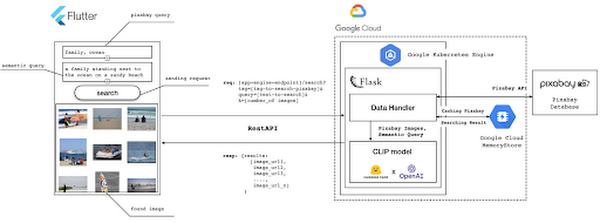
Figure 2 also presents the core logic of the API we will develop in bits and pieces in this post. We will deploy this API on a Kubernetes cluster using the Google Kubernetes Engine (GKE). The following presents a brief directory structure of our application code-base:
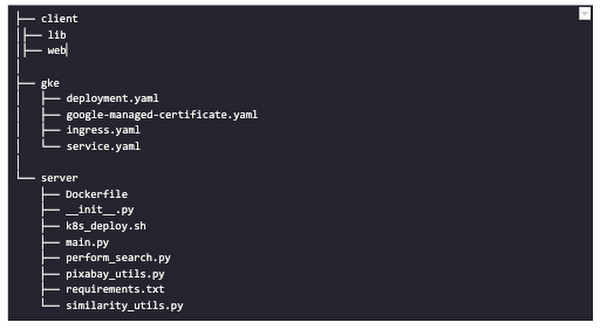
Next, we will walk through the code and other related components for building our image search API. For various machine learning-related utilities, we will be using PyTorch.
Building the backend API with Flask
First, we’d need to fetch a set of images with respect to user-provided tags/keywords before performing the natural language image search. The utility below from the pixabay_utils.py script can do this for us:
def fetch_images_tag(pixabay_search_keyword, num_images):"""Fetches images from Pixabay w.r.t a keyword.:param pixabay_search_keyword: Keyword to perform the search on Pixabay.:param num_images: Number of images to retrieve.:return: List of PIL images.:return: List of image URLs."""query = (PIXABAY_API+ "&q="+ pixabay_search_keyword.lower()+ "&image_type=photo&safesearch=true&per_page="+ str(num_images))response = requests.get(query)output = response.json()all_images = []all_image_urls = []for each in output["hits"]:imageurl = each["webformatURL"]response = requests.get(imageurl)image = Image.open(BytesIO(response.content)).convert("RGB")all_images.append(image)all_image_urls.append(imageurl)return (all_images, all_image_urls)
Note that all the API utilities are logging relevant information. But for brevity, we have omitted the lines of code responsible for that. Next, we will see how to invoke the CLIP model and select the images that would best match a given query semantically. For this, we’ll be using Hugging Face, an easy-to-use Python library offering state-of-the-art NLP capabilities. We’ll collate all the logic related to this search inside a SimilarityUtil class:
class SimilarityUtil:def __init__(self):self.model = CLIPModel.from_pretrained(CLIP_MODEL)self.processor = CLIPProcessor.from_pretrained(CLIP_PREPROCESSOR)self.device = "cuda" if torch.cuda.is_available() else "cpu"def perform_sim_search(self, images, query_phrase, top_k=3):"""Performs similarity search between the images and query.:param images: A list of PIL images initially retrieved withrespect to some entity e.g. Tiger.:param query_phrase: A list containing a single text query,e.g. "Tiger drinking water".:param top_k: Number of top images to return from `images`.:return: Top-k indices matching the query semantically andtheir similarity scores."""model = self.model.to(self.device)# Obtain the text-image similarity scoreswith torch.no_grad():inputs = self.processor(text=[query_phrase], images=images, return_tensors="pt", padding=True)inputs = inputs.to(self.device)outputs = model(**inputs)# Image-text similarity scoreslogits_per_image = outputs.logits_per_image.cpu()(top_indices, top_scores) = self.sort_scores(logits_per_image, top_k)return (top_indices, top_scores)def sort_scores(self, scores, top_k):"""Sorts the scores in a descending manner.:param scores: Scores to sort through.:param top_k: Number of top scores to return.:return: Top-k scores and their indices."""values, indices = scores.squeeze().topk(top_k)top_indices, top_scores = [], []for score, index in zip(values, indices):top_indices.append(int(index.numpy()))score = score.numpy().tolist()top_scores.append(round(score, 3))return (top_indices, top_scores)
CLIP_MODEL uses a ViT-base model to encode the images for generating meaningful embeddings with respect to the provided query. The text-based query is also encoded using A Transformers-based model for generating the embeddings. These two embeddings are matched with one another during inference. To know more about the particular methods we are using for the CLIP model please refer to this documentation from Hugging Face.
In the code above, we are first invoking the CLIP model with images and the natural language query. This gives us a vector (logits_per_image) that contains the similarity scores between each of the images and the query. We then sort the vector in a descending manner. Note that we are initializing the CLIP model while instantiating the SimilarityUtil to save us the model loading time. This is the meat of our application and we have tackled it already. If you want to interact with this utility in a live manner you can check out this Colab Notebook.
Now, we need to collate our utilities for fetching images from Pixabay and for performing the natural language image search inside a single script – perform_search.py. Following is the main class of that script:
class Searcher:def __init__(self):self.similarity_model = SimilarityUtil()def get_similar_images(self, keyword, semantic_query, pixabay_max, top_k):"""Finds semantically similar images.:param keyword: Keyword to search with on Pixabay.:param semantic_query: Query to find semantically similar images retrieved from Pixabay.:param pixabay_max: Number of maximum images to retrieve from Pixabay.:param top_k: Top-k images to return.:return: Tuple of top_k URLs and the similarity scores of the images present inside the URLs."""images_redis_key = keyword + "_images"urls_redis_key = keyword + "_urls"if redis_client.exists(images_redis_key) and redis_client.exists(urls_redis_key):keyword_images = redis_client.get(images_redis_key)keyword_image_urls = redis_client.get(urls_redis_key)else:(keyword_images, keyword_image_urls) = fetch_images_tag(keyword, pixabay_max)redis_client.set(images_redis_key, keyword_images)redis_client.set(urls_redis_key, keyword_image_urls)(top_indices, top_scores) = self.similarity_model.perform_sim_search(keyword_images, semantic_query, top_k)top_urls = [keyword_image_urls[index] for index in top_indices]return (top_urls, top_scores)
Here, we are just calling the utilities we had previously developed to return the URLs of the most similar images and their scores. What is even more important here is the caching capability. For that, we combined GCP’s MemoryStore and a Python library called direct-redis. More on setting up MemoryStore later.
MemoryStore provides a fully managed and low-cost platform for hosting Redis instances. Redis databases are in memory and light-weight making them an ideal candidate for caching. In the code above, we are caching the images fetched from Pixabay and their URLs. So, in the event of a cache hit, we won’t need to call the CLIP model and this will tremendously improve the response time of our API.
Other options for caching
We can cache other elements of our application. For example, the natural language query. When searching through the cached entries to determine if it’s a cache hit, we can compare two queries for semantic similarity and return results accordingly.
Consider that a user had entered the following natural language query: “mountains with dark skies”. After performing the search, we’d cache the embeddings of this query. Now, consider that another user entered another query: “mountains with gloomy ambiance”. We’d compute its embeddings and run a similarity search with the cached embeddings. We’d then compare the similarity scores with respect to a threshold and parse the most similar queries and their corresponding results. In case of a cache miss, we’d just call the image search utilities we developed above.
When working on real-time applications we often need to consider these different aspects and decide what enhances the user experience and maximizes business at the same time.
All that’s left now for the backend is our Flask application – main.py:
@app.route("/search", methods=["GET"])def get_images():tag = request.args.get("t").lower()query = request.args.get("s_query").lower()top_k = request.args.get("k")(top_urls, top_scores) = searcher.get_similar_images(tag, query, MAX_PIXABAY_SEARCH, int(top_k))return jsonify({"top_urls": top_urls, "top_scores": top_scores})
Here we are first parsing the query parameters from the request payload of our search API. We are then just calling the appropriate function from perform_search.py to handle the request. This Flask application is also capable of handling CORS. We do this via the flask_cors library:
cors = CORS(app,resources={r"/search/*": {"origin": "*"},r"/test/*": {"origin": "*"},},)
And this is it! Our API is now ready for deployment.
Deployment with Compute Engine and GKE
The reason why we wanted to deploy our API on Kubernetes is because of the flexibility Kubernetes offers for managing deployments. When operating at scale, auto scalability and load balancing are very important. With the comes the requirement of security — we’d not want to expose the utilities for interacting with any internal services such as databases. With Kubernetes, we can achieve all these easily and efficiently.
GKE provides secured and fully managed functionalities for operationalizing Kubernetes clusters. Here are the steps to deploy the API on GKE at a glance:
- We first build a Docker image for our API and then push it to the Google Container Registry (GCR).
- We then create a Kubernetes cluster on GKE and initialize a deployment.
- We then add scalability options.
- If any public exposure is needed for the API, we then tackle it.
We can assimilate all the above into a shell script – k8s_deploy.sh:
## Docker build and push ### We are inside the `server` directorydocker build -t gcr.io/${PROJECT_ID}/search_service .docker push gcr.io/${PROJECT_ID}/search_service## Deploy on a GKE cluster ### Configure the Docker command-line tool to authenticate to Container Registrygcloud auth configure-docker# Create a Kubernetes clustergcloud container clusters create image-search-nlp# Create a deploymentkubectl create deployment clip-search --image=gcr.io/${PROJECT_ID}/search_service# Number of worker replicaskubectl scale deployment clip-search --replicas=3# HorizontalPodAutoscaler resourcekubectl autoscale deployment clip-search --cpu-percent=80 --min=1 --max=5# Expose deploymentkubectl expose deployment clip-search --name=clip-search-service --type=LoadBalancer --port 80 --target-port 8080
These steps are well explained in this tutorial that you might want to refer to for more details. We can configure all the dependencies on our local machine and execute the shell script above. We can also use the GCP Console to execute it since a terminal on the GCP Console is pre-configured with the system-level dependencies we’d need. In reality, the Kubernetes cluster should only be created once and different deployment versions should be created under it.
After the above shell script is run successfully, we can run kubectl get service to know the external IP address of the service we just deployed:
NAME CLUSTER-IP EXTERNAL-IP PORT(S) AGEclip-search-service 10.3.251.122 203.0.113.0 80:30877/TCP 10s
We can now consume this API with the following base URI: http://203.0.113.0/. If we wanted to deal with only http-based API requests, then we are done here. But secured communication is often a requirement in order for applications to operate reliably. In the following section, we are to discuss how to configure the additional items to allow our Kubernetes cluster to allow https requests.
Configurations for handling https requests with GKE
A secure connection is almost often a must-have requirement in modern client/server applications. The front-end Flutter application would be hosted on GitHub Pages for this project, and it requires https-based connection as well. Even if configuring https connection particularly for a GKE-based cluster can be considered a chore, its setup might seem daunting at first.
There are six steps to configure https connection in the GKE environment:
- You need to have a domain name, and there are a lot of inexpensive options that you can buy. For instance, mlgde.com domain for this project is acquired via Gabia which is a Korean service provider.
- A reserved (static) external IP address has to be acquired via gcloud command or GCP console.
- You need to bind the domain name with the acquired external IP address. This is a platform-specific configuration that issued the domain name to you.
- There is a special ManagedCertificate resource which is specific to the GKE environment. ManagedCertificate resource specifies the domain that the SSL certificate will be created for, so you need this.
- An Ingress resource should be created by listing the static external IP address, ManagedCertificate resource, and the service name and port which the incoming traffic will be routed to. The Service resource could remain the same as in the above section with only changes from LoadBalancer to ClusterIP.
- Last but not least, you need to modify the existing Flask application and Deployment resource to support liveness and readiness probes which are used to check the health status of the Deployment. The Flask application side can be simply modified with the flask-healthz Python package, and you only need to add
livenessProbeandreadinessProbesections in the Deployment resource. In the code example below, thelivenessProbeandreadinessProbeare checked via/aliveand/readyendpoints respectively.
from flask_healthz import healthzfrom flask_healthz import HealthErrorapp = Flask(__name__)app.register_blueprint(healthz, url_prefix="/")def printok():print("Everything is fine")def liveness():try:printok()except Exception:raise HealthError("Can't connect to the file")def readiness():try:printok()except Exception:raise HealthError("Can't connect to the file")app.config.update(HEALTHZ = {"alive": "main.liveness","ready": "main.readiness",})
One thing to be careful of is the initialDelaySeconds attribute of the probes. It is uncommon to configure this attribute with a big number, but it could be bigger than 90 – 120 seconds depending on the size of the model to be used. For this project, it is configured in 90 seconds in order to wait until the CLIP model is fully loaded into memory (full YAML script here).
livenessProbe:httpGet:path: /aliveport: 8080initialDelaySeconds: 90periodSeconds: 10readinessProbe:httpGet:path: /readyport: 8080initialDelaySeconds: 90periodSeconds: 10
Again, these steps may seem daunting at first, but it will become clear when you have done it once. Here is the official document for Using Google-managed SSL certificates You can find all the GKE-related resources used in this project here.
Once every step is completed you should be able to see your server application running on the GKE environment. Please make sure to run kubectl apply command whenever you create Kubernetes resources such as Deployment, Service, Ingress, and ManagedCertificate, and it is important to wait for more than 10 minutes until the ManagedCertifcate provisioning is done.
You can run gcloud compute addresses list command to find out the static external IP address that you have configured.
NAME ADDRESS/RANGE TYPE PURPOSE NETWORK REGION SUBNET STATUSgde 34.149.231.34 EXTERNAL IN_USE
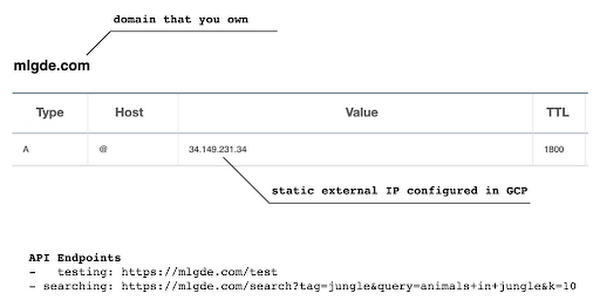
Then, the IP address has to be mapped to the domain. Figure 3 is a screenshot of a dashboard from where we got the mlgde.com domain. It clearly shows mlgde.com is mapped to the static external IP address configured in GCP.
In case you’re wondering why we didn’t deploy this application on App Engine, well that is because of the compute needed to execute the CLIP model. App Engine instance won’t fit in that regime. We could have also incorporated compute-heavy capabilities via a VPC Connector. That is a design choice that you and your team would need to consider. In our experiments, we found the GKE deployment to be easier and suitable for our needs.
Infrastructure for the CLIP model
As mentioned earlier, at the core of our application is the CLIP model. It is computationally a bit more expensive than the regular deep learning models. This is why it makes sense to have the hardware infrastructure set up accordingly to execute it. We ran a small benchmark in order to see how a GPU-based environment could be beneficial here.
We ran the CLIP on a Tesla P100-based machine and also on a standard CPU-only machine 1000 times. The code snippet below is the meat of what we executed:
DEVICE = "cuda" if torch.cuda.is_available() else "cpu"start_time = time.time()for _ in range(1000):with torch.no_grad():model = model.to(DEVICE)inputs = processor(text=[semantic_search_phrase],images=all_images, return_tensors="pt", padding=True)inputs = inputs.to(DEVICE)outputs = model(**inputs)end_time = time.time() - start_timeprint(f"Total time: {end_time:.3f} seconds.")
As somewhat expected, with the GPU, the code took 13 minutes to complete execution. With no GPU, it took about 157 minutes.
It is uncommon to leverage GPUs for model prediction because of cost restrictions, but sometimes we have to access GPUs for deploying a big model like CLIP. We configured a GPU-based cluster on GKE and compared the performance differences with and without it. It took about 1 second to handle a request with GPU and MemoryStore cache while it took more than 4 seconds with MemoryStore only (without the GPUs).
For the purposes of this post, we used a CPU-based cluster on Kubernetes. But It is easy to configure GPU usage in a GKE cluster. This document shows you how to do so. For a short summary, there are two steps. First, a node should be configured with GPUs when creating a GKE cluster. Second, GPU drivers should be installed in GKE nodes. You don’t need to visit and manually install GPU drivers for each node by yourself. Rather you can simply apply the DaemonSet resource to GKE as described here.
Setting up MemoryStore
In this project, we first query the general concept of images to Pixabay, then we filter the images with a semantic query using CLIP. It means we can cache the initially retrieved images from Pixabay for the next specific semantic query. For instance, you may want to search with “gentleman wearing tie” at first, then you may want to retry searching for “gentleman wearing glass”. In this case, the base images remain all the same, so they could be stored in a cache server like Redis.
MemoryStore is a GCP service wrapping the Redis which is an in-memory data store, so you can simply use a standard Redis Python package for accessing it. The only thing to be careful about when provisioning a MemoryStore Redis instance is to make sure it is in the same region where your GKE cluster or Compute Engine instance is.
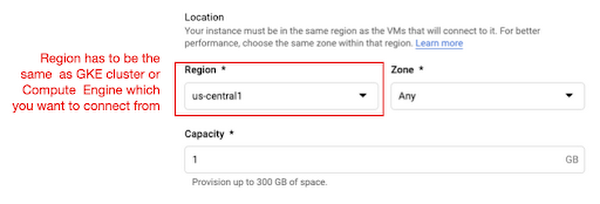
The code snippet below shows how to make a connection to the Redis instance in Python. Nothing specific to GCP, but you only need to be aware of the usage of the standard redis-py package.
# REDISHOST is the IP address to the MemoryStore instanceredis_host = os.environ.get("REDISHOST", "localhost")redis_port = int(os.environ.get("REDISPORT", 6379))redis_client = redis.StrictRedis(host=redis_host, port=redis_port)
After creating a connection, you can store and retrieve data from MemoryStore. There are more advanced use cases of Redis, but we only used exists, get, and set methods for the demonstration purpose. These methods should be very familiar if you know maps, dictionaries, or other similar data structures. For the code portion that uses Redis-related utilities, please refer to the Searcher Python class we discussed in an earlier section.
In the URLs below, you can find side-by-side comparisons of using MemoryStore:
- Without MemoryStore: https://youtu.be/7B88Eyrd-4s
- With MemoryStore (1st try): https://youtu.be/LE6xeEIRuMM
- With MemoryStore (2nd try): https://youtu.be/rRfK17sdk84
Putting everything together
All that’s left now is to collate the different components we developed in the sections above and deploy our application with a frontend. All the frontend-related code is present here.
- The front-end application is written in the Flutter development kit. The main screen contains two text fields for queries to Pixabay and CLIP model respectively. When you click the “Send Query” button, it will send out a RestAPI request to the server. After receiving the result back from the server, the retrieved images from the semantic query will be displayed at the bottom section of the screen.
- Please note that a Flutter application can be deployed to various environments including desktop, web, iOS, and Android. In order to keep as simple as possible, we chose to deploy the application to the GitHub Pages. Whenever there is any change to a client-side source directory, the GitHub Action will be triggered to build a web page and deploy the latest version to the GitHub Pages.
Our final application is deployed here and it looks like so:
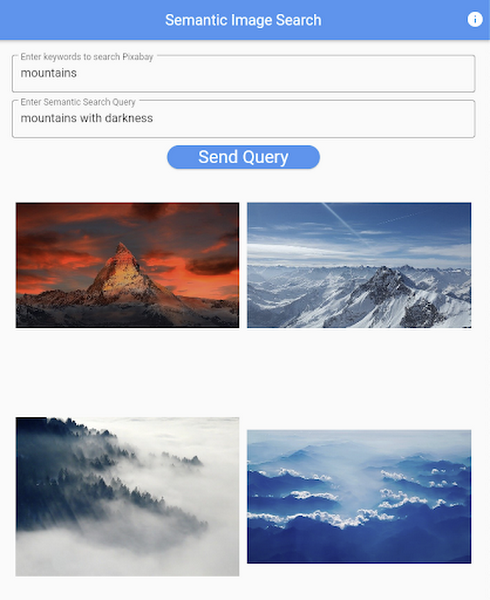
Note that due to constraints, the above-mentioned URL will only be live for one or two months.
It is also possible to redeploy the back-end application with a GitHub Action.
- The very first step is to craft a Dockerfile like below. Since Python is a scripting language, and there are lots of heavy packages that the application is dependent on, it is important to cache the steps. For instance, installing the dependencies should be separated from other commands.
FROM pytorch/pytorch:latestWORKDIR /app# install the dependenciesCOPY requirements.txt requirements.txtRUN pip install -r requirements.txtCOPY . .# set up environment variablesENV PIXABAY_API_KEY="..."ENV REDIS_IN_USE="true"ENV REDISHOST="..."# expose port that Flask app is listening onEXPOSE 8080# run the Flask appCMD [ "python3", "main.py" ]
- With the Dockerfile defined, we can use a GitHub Action like this for automatic deployment.
Edge cases
Since the CLIP model is pre-trained on a large corpus of image and text pairs it’s likely that it may not generalize well to every natural language query we throw at it. Also, because we are limiting the number of images on which the CLIP model can operate, this somehow restricts the expressivity of the model.
We may be able to improve the performance for the second situation by increasing the number of images to be pre-fetched and by indexing them into a low-cost and high-performance database like Datastore.
Costs
In this section, we wanted to provide the readers a breakdown of the costs they might incur in order to consume the various services used throughout the application.
- Frontend hosting
- The front-end application is hosted on GitHub Pages, so there is no expenditure for this.
- Compute Engine
- With an e2-standard-2 instance type without GPUs, the cost is around $48.92 per month. In case you want to add a GPU (NVIDIA K80), the cost goes up to $229.95 per month.
- MemoryStore
- The cost for MemoryStore depends on the size. With 1GB of space, the cost is around $35.77 per month, and whenever you add more GBs the cost will be doubled.
- Google Kubernetes Engine
- The monthly cost for a 3 node GKE cluster with n2-standard-2 (vCPUs: 2, RAM: 8GB without GPUs) is about $170.19. If you add one GPU (NVIDIA K80) to the cluster, the cost goes up to $835.48.
While you may think that is a lot cost-wise, it is good to know that Google gives away free $300 credits when you create a new GCP account. It is still not enough for leveraging GPUs, but it is enough to learn and experiment with GKE and MemoryStore usage.
Conclusion
In this post, we walked through the components needed to build a basic image search utility for natural language queries. We discussed how these different components are connected to each other. Our image search API is able to utilize caching and was deployed on a Kubernetes cluster using GKE. These elements are essential when building a similar service to cater to a much bigger workload. We hope this post will serve as a good starting point for that purpose. Below are some references on similar areas of work that you can explore:
- Building a real-time embeddings similarity matching system
- Detecting image similarity using Spark, LSH and TensorFlow
Acknowledgments: We are grateful to the Google Developers Experts program for supporting us with GCP credits. Thanks to Karl Weinmeister and Soonson Kwon of Google for reviewing the initial draft of this post.

Microservices Done Right: How Indian Businesses Can Build a Highly Scalable Business
DOWNLOAD E-BOOK4324
Of your peers have already downloaded this article
4:30 Minutes
The most insightful time you'll spend today!
Microservices represent a new form of API-based application architecture that enables enterprises to leverage continuous iteration/continuous deployment (CI/CD) tools and processes within containerized architectures and PaaS.
Nearly 70% of organizations are either using or investigating microservices, and nearly one-third are using them in production.
These are powerful techniques popularized by many companies, including Amazon, Netflix, and Airbnb. Amazon championed the approach and proved it to be useful in ensuring effective communication within teams and enabling the company to deploy code to production hundreds of times of day two.
At Netflix, one of the earliest adopters of microservices, roughly 30 independent teams have delivered over 500 microservices.
However, companies have struggled with security, with a lack of visibility into usage and performance of the microservices APIs, and with building agile microservices for clean reuse.
Their challenges include bolstering security in a zero-trust environment, ensuring compliance, providing transparent control to mitigate risk, improving the developer experience, and encouraging and increasing microservices reuse.
Managed microservices are the solution; companies are making strategic investments in API management platforms for their microservices success. All microservices have APIs and enterprises need to manage their microservices in the same way as they manage APIs.
New Visual Interface for Google Cloud’s Speech-to-Text API Makes API Easy to Use !

4667
Of your peers have already read this article.
2:00 Minutes
The most insightful time you'll spend today!
At Google Cloud, we’re committed to making artificial intelligence (AI) accessible to everyone and easier to harness for new use cases. That’s why we’re excited to announce the general availability of our intuitive, new visual user interface for Google Cloud’s Speech-to-Text (STT) API, right in Google Cloud Console, which makes the API much simpler and easier for developers to use.
The STT API lets developers convert speech into text by leveraging Google’s years of research in automatic speech recognition and transcription technology. As advancements in AI continue to bring speech to new interfaces and devices, the STT API helps developers add speech functionality to their applications in order to better meet consumer demands.
The STT API covers a wide variety of use cases, from dictation and short commands, to captioning and subtitles. Getting the most of STT, however, can be a complicated process. To achieve the highest accuracy on any AI use case requires careful testing and tuning.
Previously, developers building on the STT API had to do this work manually by carefully experimenting with our API. Just to get started, developers needed familiarity with GCP integration concepts and had to either build their own tools or manage various scripts and API calls to fully understand the API documentation. These actions required cumbersome and time-consuming effort and made measuring, customizing, and improving models even more difficult.
Today’s announcement significantly simplifies the process, facilitating iteration and integration of models into developers’ applications by letting developers perform every API function from within the Google Cloud Console. These tools will make it easier for developers to integrate the STT API with their products or services. This update also gives developers the ability to manage and quickly iterate on their STT model customizations with Model Adaptation.
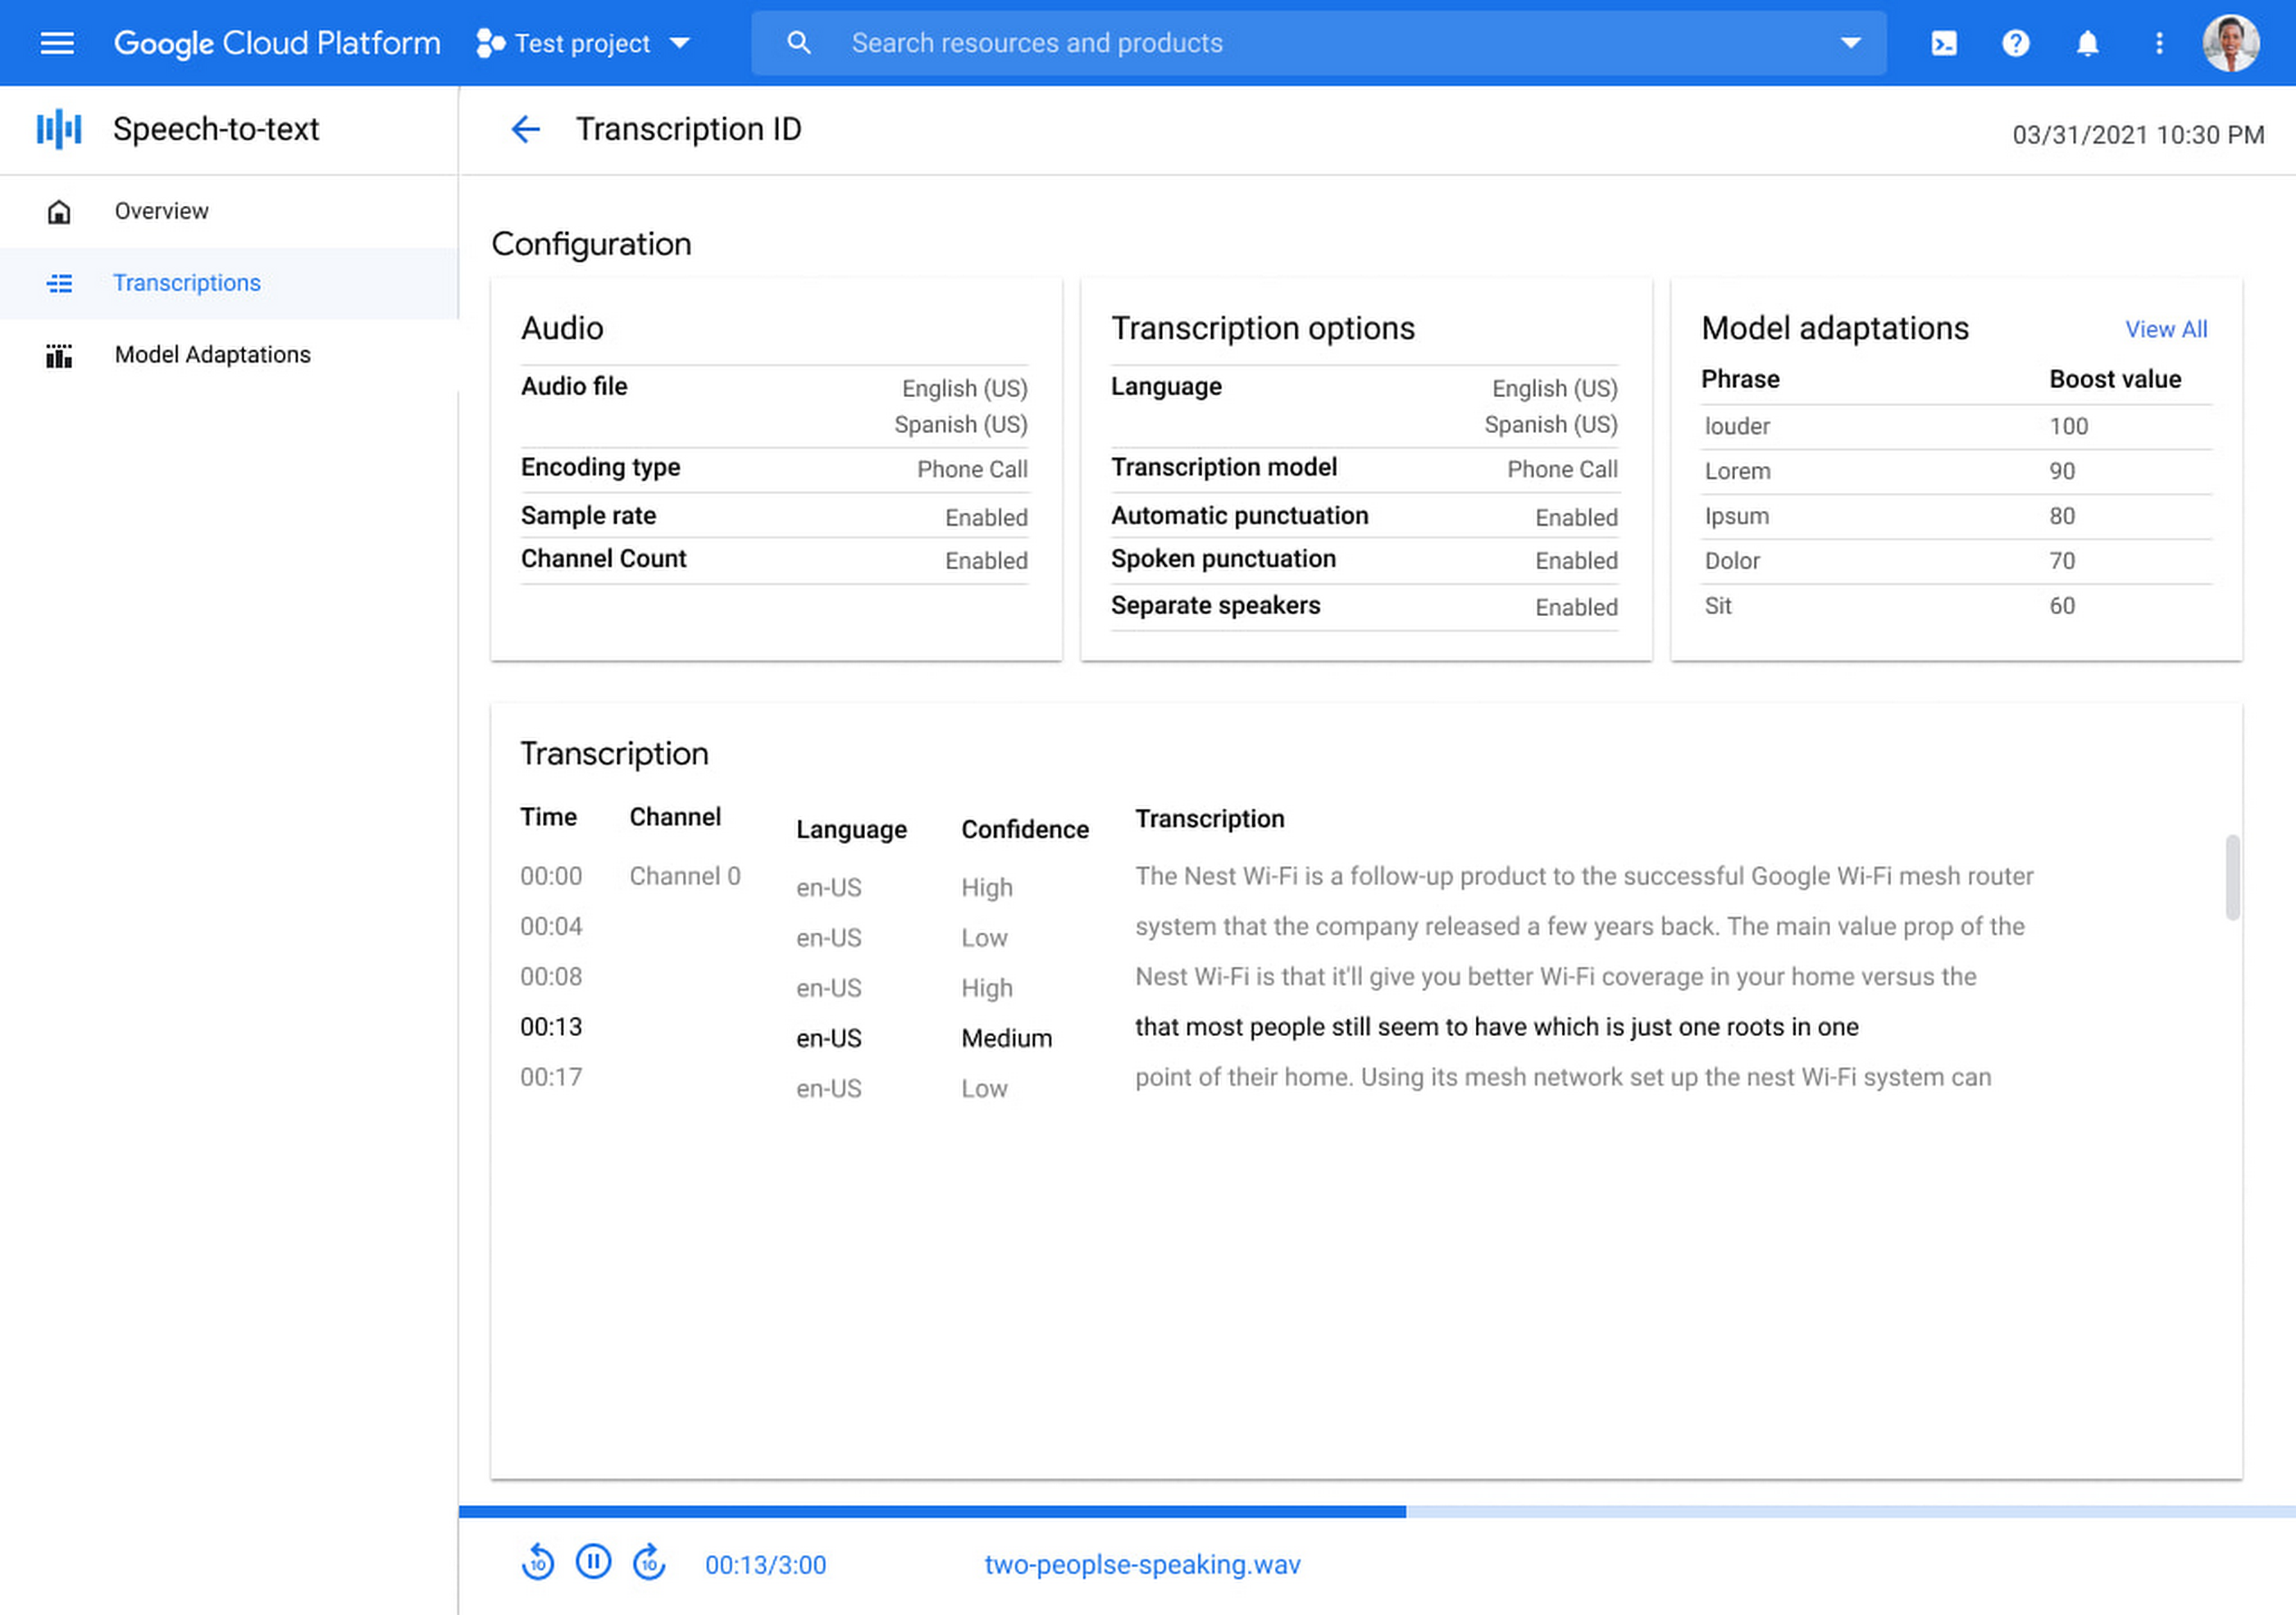
Model Adaptation allows developers to customize STT specifically for their domains or use cases. Developers can maintain lists of words and weights that will be applied to either every request or just single requests, depending on their needs. Model adaptations are reusable and composable, so once developers have seen good results in the STT Cloud Console, they can deploy to their entire solution.
The Speech-to-Text Cloud Console and Model Adaptation API is available now in all Google Cloud regions and languages and is accessible to all GCP users with no additional cost to that of the underlying API usage. The STT API supports over 70 languages in 120 different local variants. If you’re a developer looking for an easy to use, easy to integrate, and high-quality STT experience, sign up for our free trial and try our new interface on your own datasets today!
Google Cloud Celebrates Journey of 3 Inspiring Founders for the Asian Pacific American Heritage Month

8153
Of your peers have already read this article.
1:30 Minutes
The most insightful time you'll spend today!
May is Asian Pacific American Heritage Month —a time for us to come together to celebrate and remember the important people and history of Asian and Pacific Island heritage. This feature highlights three AAPI founders from the Google For Startups community.
Read on to learn how these three founders built their businesses, leverage Google tech, and suggestion they have for aspiring entrepreneurs.
CultivatePeople
Founder: Lola Han
Description: CultivatePeople’s compensation software, Kamsa, provides global market pay rate data and helps companies make data-driven salary decisions so they can attract and retain their most valuable asset: employees.
Why GCP: “CultivatePeople began using GCP when integrating SSO/SAML authentication after our SaaS product became a high priority. We were able to exceed our clients’ expectations and increase their level of trust in our platform’s capabilities. We’re currently investigating additional machine learning products, such as Cloud AutoML, that will allow us to quickly deliver exciting features.”
Note from the Founder: “I grew up with immigrant parents who value stability and are risk-averse. My parents discouraged me from starting my own company because they didn’t want to see me struggle financially or see my health suffer (due to stress). I felt strongly about what CultivatePeople could do, so I started the company as a sole founder in 2017 and watched it double in size year over year since. While the ones I love most may not have cheered me on initially, it was important for me to hang on to the encouraging words of former bosses, executives, and founders to keep me focused on my mission.
My advice for other AAPI founders is to be a “silent assassin” and believe in the mission and values of your organization. Always remember to stop along the way and:
1) Enjoy the journey by celebrating wins and giving yourself credit;
2) Follow your intuition—it’s (almost) always right;
3) Recognize and invest in your people regularly (ie. give increases more than once a year, if warranted);
4) Give regular words of affirmation to employees on even small achievements.”
Swit
Founder: Josh Lee and Max Lim
Description: Swit is a team collaboration platform that seamlessly combines team chat with task management by allowing teams to turn their conversations into trackable tasks and share tasks to chat with simple drag-and-drop functionality, ensuring everyone is on the same page and projects get done faster.
Why GCP: “Swit is a cross-category hybrid work tool for chat and tasks. This functionality requires more complicated and heavier architecture for performance. So, configuring and managing virtual machines was really challenging to scale up our systems, while handling occasional unexpected traffic surges and frequent updates. Eventually we divided our monolithic architecture into 35 microservices when we launched our official product. The migration to GKE took around one month, and it turned out to be well worth the effort—our systems became able to offer high scalability and enough resilience to keep its uptime no matter what happened. Now we’re operating 84 workloads and 252 microservices with high stability with remarkably low downtime – less than 0.00001%/year.”
Note from the Founder: “As an AAPI founder based in Silicon Valley, I feel proud of the work ethics and diligence fellow Korean American entrepreneurs and professionals have long demonstrated here. Especially with K-pop breaking into the mainstream, I feel even more proud of our culture that strives toward an absolute perfection molded through years of training and dedication. The mission-driven culture of Silicon Valley coupled with Google’s edging technology and creativity really helped us build a product that not only encompasses verticals but also transcends cultures. Swit is growing at an unprecedented rate, and we hope to join the long list of successful AAPI entrepreneurs here. Swit’s close network with the AAPI community wouldn’t have been possible without Google support. We are grateful for this collaborative environment, and we hope to become the next-generation ambassador for collaboration after Google.”
Check out more from Swit in their founder story.

WISY
Founder: Min Chen
Description: Wisy develops technology to bring digital efficiency into the physical world, supporting consumer products businesses and making them thrive in the new economy. All of us have a bad experience when we can’t find the product we want to buy. That is a $1.9T problem in the consumer-packaged goods industry that Wisy is solving with AI and analytics to help manufacturers and retailers sell more by reducing out-of-stocks and waste at a global scale.
Why GCP: “GCP has an intuitive, easy to use interface, was lower cost, and offered preemptible instances with flexible compute options. Some of the reasons why Wisy decided to use GCP include instance and payment configurability, privacy and traffic security, cost-efficiency, and Machine Learning.
Wisy has been able to advance quickly with product development, as well as collaborate better and iterate faster in the creation of our AI models, while reducing costs by 40%. At Wisy, we are solving a problem that affects everyone who shops at a store.“
Note from the Founder: “Two years ago, I moved to San Francisco to expand my second startup, Wisy. This is when I learned that my name ‘Min’ stands for ‘minority.’ I was born in China, raised in a Black community in Panama, received scholarships to attend both Carnegie Mellon and UC Berkeley. I worked for 20 years in several countries, but I have never felt so discriminated against due to my race, ethnicity, gender and age than during my time in Silicon Valley. However, this is also the place I learned that my diverse life experience is my competitive advantage. My background enables me to recruit and relate to people in different countries, create scalable and flexible products for multinational customers, and run global operations efficiently.
My recommendation to AAPI founders is to find strength in their multicultural background. Don’t hide what makes you unique, do not limit yourselves, and do not let others limit you. You will lose your edge when trading authenticity for validation. Be proud and own your story.”
If you want to learn more about how Google Cloud can help your startup, visit our Startup Program application page here and sign up for our monthly startup newsletter to get a peek at our community activities, digital events, special offers, and more.To learn more about how you can help #StopAsianHate during Asian Pacific American Heritage Month and beyond, visit their website here.
More Relevant Stories for Your Company

Speeding Up Digital Transformation with Industry Solutions
Most large enterprises started with their own data centers and developed in-house solutions to meet their specific business needs, regulations, and industry specifications. These solutions were based on traditional applications from legacy vendors like Oracle and Microsoft — or even mainframes — and from key technology providers like SAP and
Transforming the Bank of Anthos App with Spring Cloud GCP 4.0
We’re excited to announce that Spring Cloud GCP version 4.0 is now generally available! In this post, we’ll be describing what the new major version has to offer, and demonstrating the process of using the migration guide on one of our reference architectures, Bank of Anthos. What’s new? With this release, Spring Cloud


How Anthos Helps Organizations Implement Multi and Hybrid Cloud Strategy
Organizations have become increasingly focused on using modernization solutions to build competitive advantage, for faster time to market, serve customers better and seamlessly operate in hybrid and multi-cloud environments. Anthos by Google Cloud, a managed application platform plays an important role in application modernization and also in empowering customers to

Manage Packages Using Artifact Registry in Google Cloud Functions with Private Dependencies
Late last year, we announced that Artifact Registry was going GA, allowing GCP customers to manage their packages within the same platform as they were being deployed. In this blogpost, we want to show you how to do exactly that with a private dependency. Private dependencies allow your packages to be
