





Transform ‘Dark Data’ from Documents with Document AI, Cloud Functions and Workflows

8190
Of your peers have already read this article.
2:00 Minutes
The most insightful time you'll spend today!
At enterprises across industries, documents are at the center of core business processes. Documents store a treasure trove of valuable information whether it’s a company’s invoices, HR documents, tax forms and much more. However, the unstructured nature of documents make them difficult to work with as a data source. We call this “dark data” or unstructured data that businesses collect, process and store but do not utilize for purposes such as analytics, monetization, etc. These documents in pdf or image formats, often trigger complex processes that have historically relied on fragmented technology and manual steps. With compute solutions on Google Cloud and Document AI, you can create seamless integrations and easy to use applications for your users. Document AI is a platform and a family of solutions that help businesses to transform documents into structured data backed by machine learning. In this blog post we’ll walk you through how to use Serverless technology to process documents with Cloud Functions, and with workflows of business processes orchestrating microservices, API calls, and functions, thanks to Workflows.
At Cloud Next 2021, we presented how to build easy AI-powered applications with Google Cloud. We introduced a sample application for handling incoming expense reports, analyzing expense receipts with Procurement Document AI, a DocAI solution for automating procurement data capture from forms including invoices, utility statements and more. Then organizing the logic of a report approval process with Workflows, and used Cloud Functions as glue to invoke the workflow, and do analysis of the parsed document.
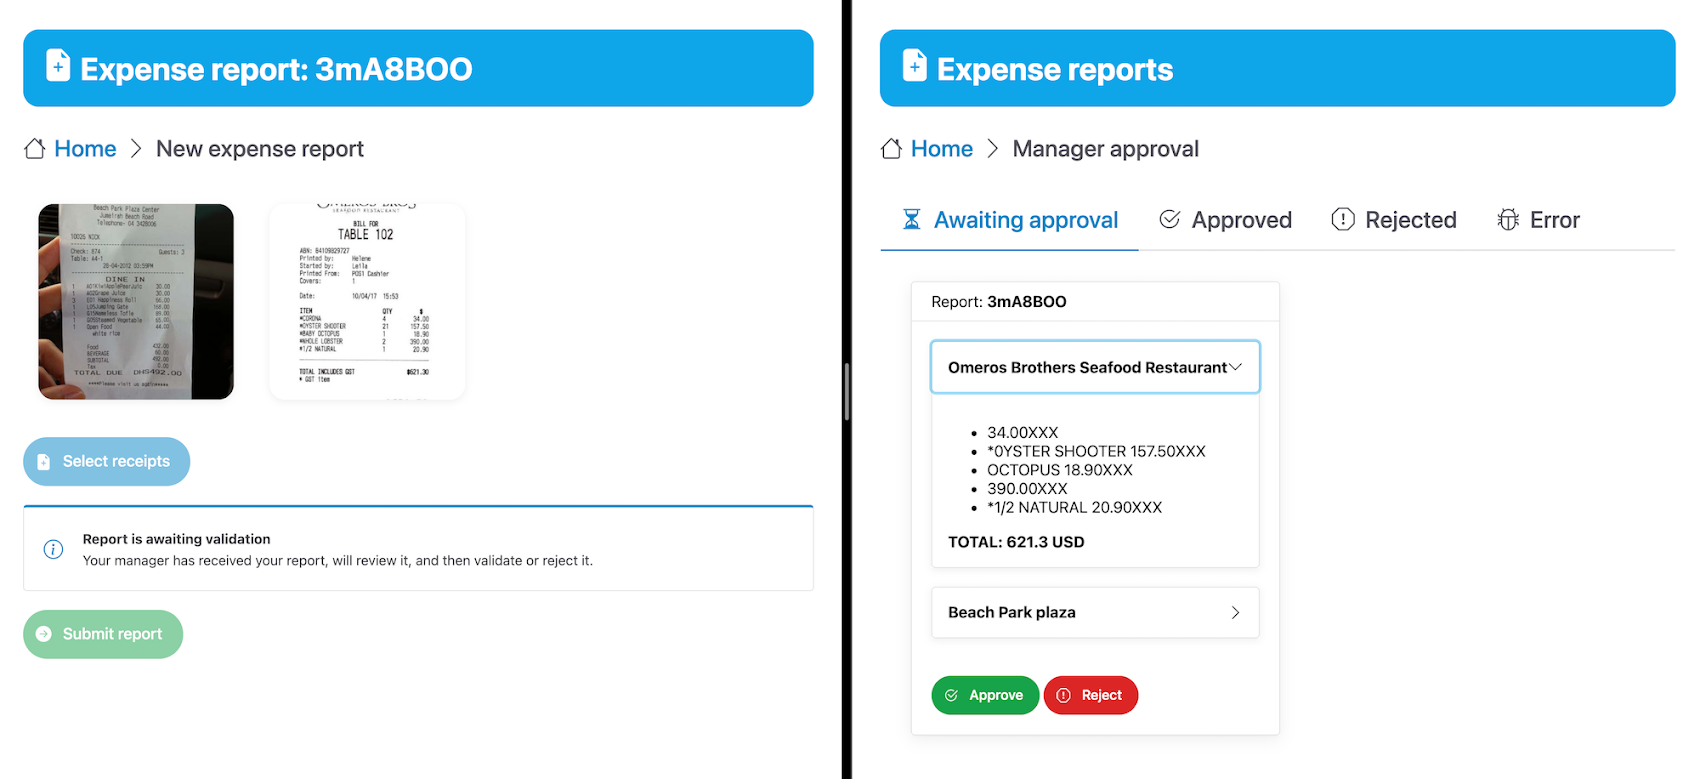
We also open sourced the code on this Github repository, if you’re interested in learning more about this application.
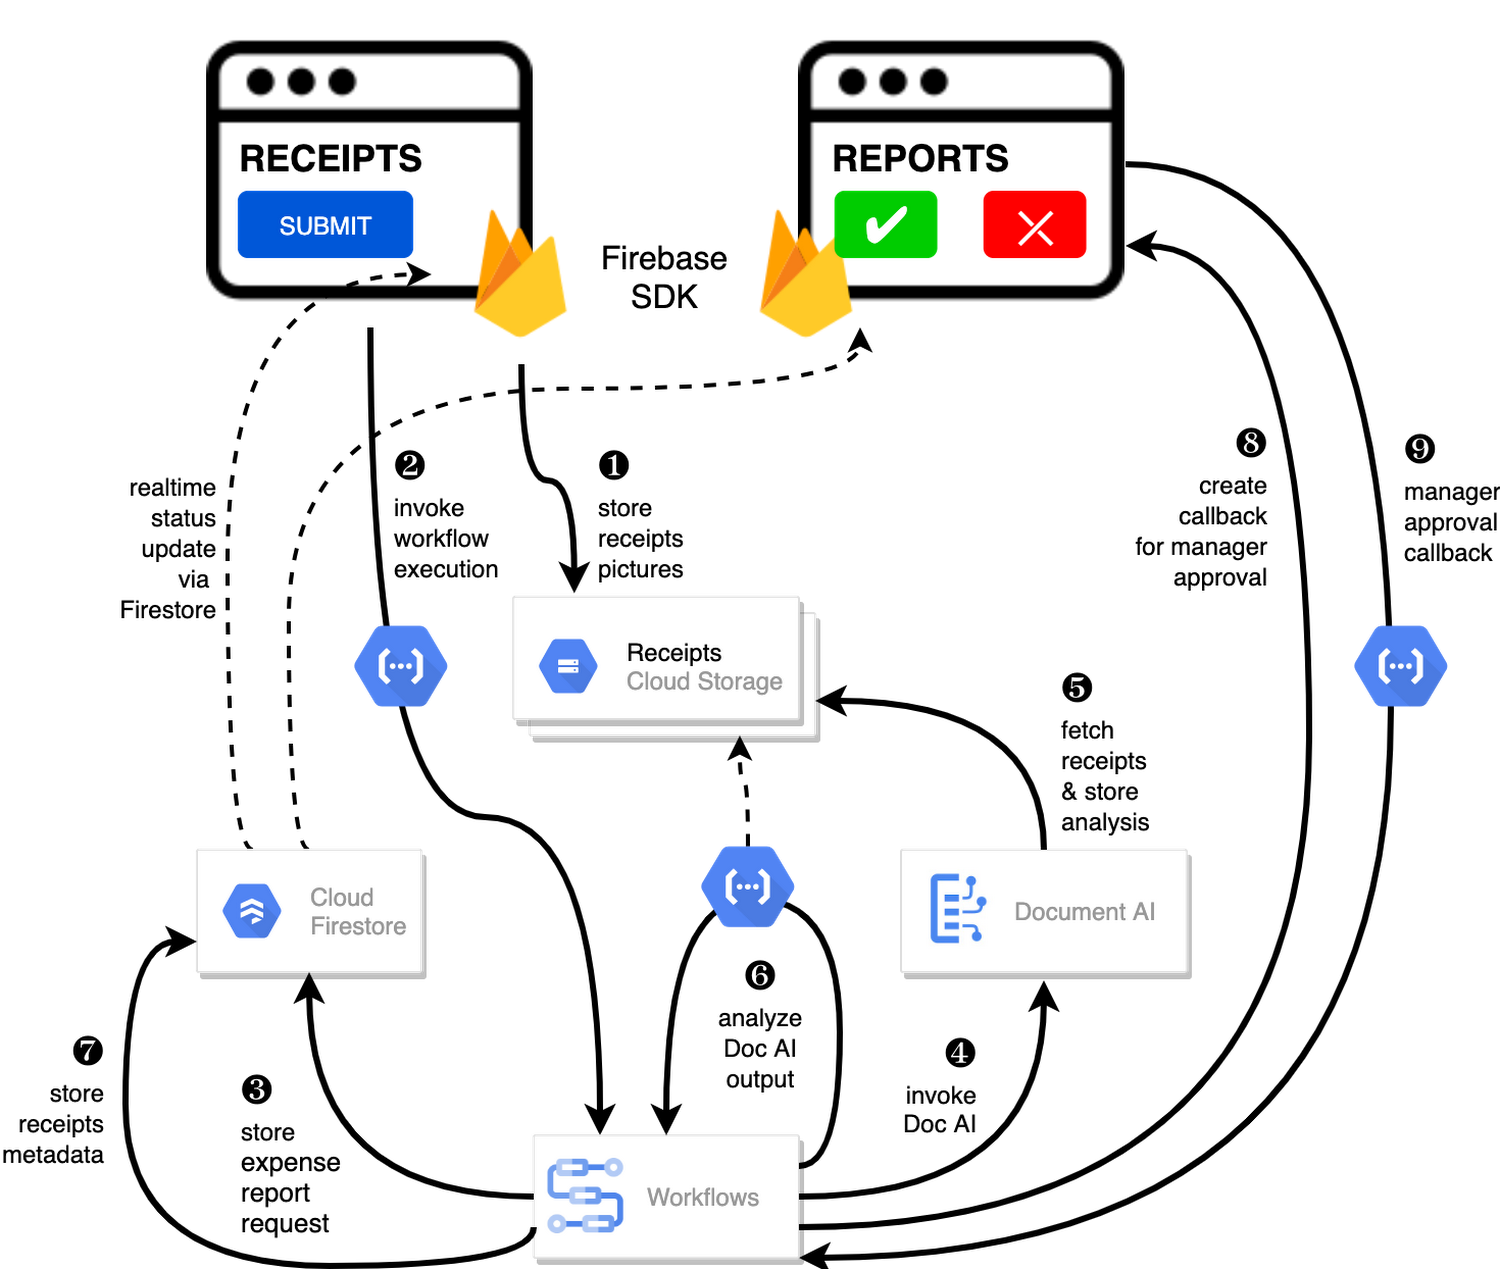
In the above diagram, there are two user journeys: the employee submitting an expense report where multiple receipts are processed at once, and the manager validating or rejecting the expense report.
First, the employee goes to the website, powered by Vue.js for the frontend progressive JavaScript framework and Shoelace for the library of web components. The website is hosted via Firebase Hosting. The frontend invokes an HTTP function that triggers the execution of our business workflow, defined using the Workflows YAML syntax.
Workflows is able to handle long-running operations without any additional code required, in our case we are asynchronously processing a set receipt files. Here, the Document AI connector directly calls the batch processing endpoint for service. This API returns a long-running operation: if you poll the API, the operation state will be “RUNNING” until it has reached a “SUCCEEDED” or “FAILED” state. You would have to wait for its completion. However, Workflows’ connectors handle such long-running operations, without you having to poll the API multiple times till the state changes. Here’s how we call the batch processing operation of the Document AI connector:
- invoke_document_ai:call: googleapis.documentai.v1.projects.locations.processors.batchProcessargs:name: ${"projects/" + project + "/locations/eu/processors/" + processorId}location: "eu"body:inputDocuments:gcsPrefix:gcsUriPrefix: ${bucket_input + report_id}documentOutputConfig:gcsOutputConfig:gcsUri: ${bucket_output + report_id}skipHumanReview: trueresult: document_ai_response
Machine learning uses state of the art Vision and Natural Language Processing models to intelligently extract schematized data from documents with Document AI. As a developer, you don’t have to figure out how to fine tune or reframe the receipt pictures, or how to find the relevant field and information in the receipt. It’s Document AI’s job to help you here: it will return a JSON document whose fields are: line_item, currency, supplier_name, total_amount, etc. Document AI is capable of understanding standardized papers and forms, including invoices, lending documents, pay slips, driver licenses, and more.
A cloud function retrieves all the relevant fields of the receipts, and makes its own tallies, before submitting the expense report for approval to the manager. Another useful feature of Workflows is put to good use: Callbacks, that we introduced last year. In the workflow definition we create a callback endpoint, and the workflow execution will wait for the callback to be called to continue its flow, thanks to those two instructions:
- create_callback:call: events.create_callback_endpointargs:http_callback_method: "POST"result: callback_details...- await_callback:try:call: events.await_callbackargs:callback: ${callback_details}timeout: 3600result: callback_requestexcept:as: esteps:- update_status_to_error:...
In this example application, we combined the intelligent capabilities of Document AI to transform complex image documents into usable structured data, with Cloud Functions for data transformation, process triggering, and callback handling logic, and Workflows enabled us to orchestrate the underlying business process and its service call logic.
Going further
If you’re looking to make sense of your documents, turning dark data into structured information, be sure to check out what Document AI offers. You can also get your hands on a codelab to get started quickly, in which you’ll get a chance at processing handwritten forms. If you want to explore Workflows, quickstarts are available to guide you through your first steps, and likewise, another codelab explores the basics of Workflows. As mentioned earlier, for a concrete example, the source code of our smart expense application is available on Github. Don’t hesitate to reach out to us at @glaforge and @asrivas_dev to discuss smart scalable apps with us.
How This Leading Trading Company Uses APIs to Build Fintech Apps Quickly and Cost-Effectively

4596
Of your peers have already read this article.
5:10 Minutes
The most insightful time you'll spend today!
Tradier uses the Apigee API management platform from Google to abstract the legacy complexities of capital markets so that developers can build FinTech applications in an agile, nimble, and quick fashion at minimal cost. The company embodies the evolution of what cloud technology can enable in the form of an API-first business delivered as a service.
The rise of API-powered FinTech
Historically, companies that wanted to build systems, applications, or services to interact with the stock market would have to build an entire brokerage operation from scratch. This would include data infrastructure, compliance infrastructure, and storage capabilities. It could take years and massive capital expense to accomplish everything that was required to be ready to serve customers.
Tradier provides this infrastructure as an API-based service so that the same companies can launch investor applications in as little as a few weeks. This democratized access means that FinTech innovation can come from anywhere, giving the same opportunities to create new products to everyone, from enterprise customers to startups.
“Financial markets are becoming fundamentally decentralized and unbundled,” says Dan Raju, co-founder, CEO, and chairman at Tradier. “The services that large legacy banks and brokerage firms used to offer are being supplanted by Tradier’s microservices and APIs, which power innovation.”
More than 200 companies use Tradier to develop and launch new products, or to add new features and functions that they traditionally would not have offered in existing products. With a large and diverse user base, Tradier faced the challenge of managing its partners in way that helps ensure it can grant credentials, track, monitor, and report in an efficient and equitable manner.
At the same time, the company recognized the inherent value of its partners for their power to leverage Tradier APIs to innovate. Tradier’s fundamental market disruption is the partner ecosystem, where the company is engaged along with its partners to deliver value to the entire ecosystem in the form of new products and services.
Embracing an API-powered ecosystem
Tradier has moved beyond providing great APIs toward engaging its ecosystem. If a customer wants a specific dataset, the company doesn’t automatically build a new product. Instead, Tradier looks to the ecosystem to build the product. With this approach, Tradier has taken its capabilities and multiplied them by hundreds.
“The fundamental difference between thinking about an API ecosystem versus an API product is the difference between being a participant who’s enabling innovation and not just a company delivering a set of technical capabilities,” Raju says.
Tradier takes an outside-in approach toward engaging its API ecosystem. Constantly listening to participants and helping to enable and empower them to create value is fundamental to the company’s business model. Rather than simply focusing on building new capabilities on its own, Tradier listens to what functionalities customers need and facilitates development. In many cases, the ecosystem generates the requested product organically rather than Tradier needing to do it.
“I love APIs because they allow you to empower others to create value. The concept of empowering others to create value along with you is what is the most satisfying, and the most fascinating, thing about APIs,” says Raju.
Delivering value at scale
Tradier handles between 500 million to 1 billion API calls and a billion dollars in transactions a month, and all of them run through the Apigee API management platform. Apigee’s last mile forms the single layer that manages Tradier’s infrastructure, including security, analytics, developer interactions, and execution. The company also uses Apigee to comply with an array of regulatory reporting, mandated by Tradier’s status as a FINRA (Financial Industry Regulatory Authority)-regulated entity.
“Apigee is integral to the Tradier offering. They have been great partners and have always collaborated and enabled us to innovate at a pace that helped Tradier attract developers and innovative companies. We see tremendous potential in the synergy of Apigee and Google as it brings to the market a vast extended capability set based on the Google Cloud Platform.”
Tradier is an API-centric ecosystem that delivers value to an entire set of players where the nucleus is the Apigee API management suite, which helps deliver, innovate, publish, manage, monitor, and secure the ecosystem on a day-to-day basis. Simplicity combined with product evangelism is the key to success in the API space, Raju says.
Tradier’s capabilities to innovate, iterate, and travel the journey with its customers, partners, and developers has yielded many rewards. The company’s long history of working with Apigee has enabled it to assemble a set of people and resources for creating engagement, as well as to create a winning set of APIs for delivering FinTech capabilities.
Considering the transformative future
Looking toward a future in which the financial services industry will experience ongoing disruption, Raju predicts that Tradier will continue to leverage APIs to lead the way.
“I think traditional banks are under attack. They are being replaced by a set of nimble, agile players that are offering a lot of new functionality to customers. This is forcing banks to think about how they can digitize their products through APIs so that they can provide the same functionalities as newer players.”
With companies like Tradier and others offering functionality that used to be in-house and exposing it outside, traditional brokerage firms are also being forced to rethink their model. Raju believes that this line of thinking also extends to the Blockchain.
“Exposing Blockchain-like capabilities through APIs is going to be a disruptive influence, and it will be critical for companies to think about how APIs, and more importantly Blockchain, can create value for us.”
Manage Packages Using Artifact Registry in Google Cloud Functions with Private Dependencies

3382
Of your peers have already read this article.
2:30 Minutes
The most insightful time you'll spend today!
Late last year, we announced that Artifact Registry was going GA, allowing GCP customers to manage their packages within the same platform as they were being deployed. In this blogpost, we want to show you how to do exactly that with a private dependency.
Private dependencies allow your packages to be shared with only a select group of viewers. If your codebase is already private, a private dependency can help modularize functionality using the same methodologies you use in your open source projects. Furthermore, you can experimentally develop your private dependency without breaking your overall codebase by pinning the version of the dependency on a working release. It can also provide necessary and durable abstraction if multiple projects depend on the same functionality. It does so by allowing multiple teams access to up-to-date and tested code rather than relying on copying and pasting fragmented code snippets.
With Artifact Registry, you can now wire together your serverless processes with your private dependencies without ever leaving Google Cloud Platform. This blogpost will discuss one example of how you can host your private dependency and later deploy to a serverless host like Google Cloud Functions using Cloud Build to automate the deployment.
Before getting started, take a look at the sample code here to copy and follow along.
Creating a package
Let’s walk through deploying a Google Cloud Function with a simple private dependency written in Node. Our example dependency will return the input given in unicode. It’s index.js file will look like this:
const unicode = require('to-unicode');// This function returns the input in unicode.module.exports = (input) => {return unicode(input);};
First, you’ll want to prepare your package to upload to Artifact Registry. For Node, this package should have a package.json file, which should dictate the entry point and information about the package. You can create a simple one like the one below by running the command npm init -y.
For the name of the package you should specify your scope. A scope allows you to group packages, which is helpful if you want to publish a private package; alternatively, publishing without a scope would make the repository public by default. In this blogpost, we’re going to use the scope @example, but you should name it after your private dependency’s group (i.e., your company, team or project).
{"name": "@example/blog-repo","version": "1.0.0","description": "A sample repository for blogpost demonstration purposes.","main": "index.js","scripts": {"test": "echo \"Error: no test specified\" && exit 1","artifactregistry-login": "npx google-artifactregistry-auth"},"author": "Blogpost Authors","license": "ISC","devDependencies": {"google-artifactregistry-auth": "^2.1.0"},"dependencies": {"to-unicode": "^1.0.2"}}
Another important detail in this file is that the devDependencies property contains the dependency for authenticating to the google artifact registry. To authenticate, you will use the command in the scripts section later in this tutorial.
Uploading the package to Artifact Registry & setting up authentication
Follow the instructions on these guides for creating an npm package repository on Artifact Registry, without configuring npm or pushing the repository. Next, you’ll want to configure the .npmrc file. To do so, simply add an empty file titled .npmrc, which should live at the base of your repository. To configure this file to deploy to the registry you just created, run the following command, and add the output to the .npmrc file. (Note: you may need to install the Google Cloud SDK before running the command.)
gcloud alpha artifacts print-settings npm –scope=@example
—repository=blog-repo —location=”us-central1”
Copy that output into your .npmrc file. Ultimately, it should look like this, substituting <projectId> for your Google Cloud Platform project ID.
@example:registry=https://us-central1-npm.pkg.dev/<projectId>/blog-repo///us-central1-npm.pkg.dev/<projectId>/blog-repo/:_authToken=""//us-central1-npm.pkg.dev/<projectId>/blog-repo/:always-auth=true
Then, you can push the package to the artifact repository. To do so, run this command (ensuring that you’ve copied the scripts portion from the package.json file above):
npm run artifactregistry-login <path to your .npmrc file>
This command allows you to refresh your access token when pushing your repository.
Then, simply publish by running:
npm publish
You can confirm you’ve deployed your library by searching for the repo in Artifact Registry in your Google Cloud Platform dashboard.
Setting up your Google Cloud Function
Once you have set up a repository in Artifact Registry, you can start to build your applications on top of it. Take a simple serverless example, like a Google Cloud Function:
const unicode = require('@example/blog-repo');const escapeHtml = require('escape-html');exports.mygcf= (req, res) => {res.send(`Hello ${escapeHtml(unicode(req.query.name || req.body.name || 'World'))}!`);};
This simple Cloud Function uses our private dependency to print out “Hello World” to the specified URL in unicode (it actually uses the same example in this tutorial). But how will Cloud Function successfully pull the private dependency? By using the .npmrc file you created in your original repository.
To see it in action, follow instructions for creating a simple Google Cloud Function. You can follow the tutorial exactly, ensuring that the following three key elements are in your function:
- When you create the index.js file (as done in the tutorial), it should live at the base of the repository, and should use the private dependency you’ve set up in artifact registry (like the example above),
- Its package.json should list:
- Your dependency with the version as listed in Artifact Registry
- A script to authenticate with artifact registry (just as for your dependency)
{"name": "mygcf","version": "1.0.0","description": "","main": "index.js","scripts": {"test": "echo \"Error: no test specified\" && exit 1","artifactregistry-login": "npx google-artifactregistry-auth .npmrc"},"author": "","license": "ISC","dependencies": {"escape-html": "^1.0.3","@example/blog-repo": "1.0.0","ini":: "^2.0.0"}}
- And, most importantly, you should copy over your
.nmprcfile to the base of this Google Cloud Function to authenticate your npmrc token.
Then, you can deploy the function using the following command:
gcloud functions deploy mygcf --runtime nodejs12 --trigger-http --allow-unauthenticated
To see it in action, simply follow the http trigger link (from the tutorial) and check out your input in unicode.
Automate and protect your Cloud Function
The command above will deploy the function, but it does so by exposing your token in your .npmrc file, and by forcing you to manually re-authenticate each time you redeploy the function. To automate the redeployment of the function in a safe manner, you can add a cloudbuild.yaml file to the root of your Cloud Function package.
First, let’s start by creating a helper function to modify the .npmrc file. You should save the following file to the root of your Cloud Function package, and name it npmrc-parser.js:
const fs = require('fs');const ini = require('ini');function main(pathToAuthToken, pathToNpmrc) {const config = ini.parse(fs.readFileSync(pathToNpmrc, 'utf-8'));const token = config[pathToAuthToken];config[pathToAuthToken] = "${TOKEN}";fs.writeFileSync(pathToNpmrc, ini.stringify(config));console.log(token);return token;}const args = process.argv.slice(2);main(...args);
Next, let’s create the file cloud build file. To do so, copy the following file in the root of your directory, and title it cloudbuild.yaml:
steps:- name: nodeentrypoint: npmargs: ['run', 'artifactregistry-login']- name: nodeentrypoint: npmargs: ['install']- name: nodeentrypoint: /bin/bashargs:- -c- |token=$(node npmrc-parser.js ${_PATHTOTOKEN} ${_PATHTONPMRC})echo $tokenecho $token > _TOKEN- name: gcr.io/cloud-builders/gcloudentrypoint: /bin/bashargs:- -c- |gcloud functions deploy "${_FUNCTIONNAME}" \--trigger-http \--runtime nodejs12 \--allow-unauthenticated \--set-build-env-vars TOKEN="$(cat _TOKEN)"
The first two steps of the build file will authenticate your private dependency, and install all dependencies on the project. The third step will call the custom helper function we created above to prepare your .npmrc file. This function takes two arguments, pathToAuthToken, and pathToNpmrc. The pathToAuthToken is the left-hand side of the authToken assignment in your .npmrc file. It should look something like this, replacing projectId with your own project:
"//us-central1-npm.pkg.dev/<projectId>/blog-repo/:_authToken"
The pathToNpmrc would be wherever you’ve saved your .npmrc file. In this case, the value would look like so:
".npmrc"
This build step removes the token value on the file and saves it to a variable, and replaces the .npmrc file with the environment variable TOKEN. So, the Cloud Function never stores the actual token in the source code, and the .npmrc file that is saved locally looks like this:
@example:registry=https://us-central1-npm.pkg.dev/<projectId>/blog-repo/
//us-central1-npm.pkg.dev/<projectId>/blog-repo/:_authToken=””
//us-central1-npm.pkg.dev/<projectId>/blog-repo/:always-auth=true
The last step in the build file redeploys the function, replacing the environment variable in the .npmrc file with the token value we just created. To run the build steps, you can set up a trigger, or run the following command manually, replacing the variables as we’ve described above:
gcloud builds submit --config=cloudbuild.yaml \ --substitutions=_PATHTOTOKEN="<PATHTOTOKEN>",_PATHTONPMRC="<PATHTONPMRC>",_FUNCTIONNAME="<CLOUDFUNCTIONNAME>"
Before running, make sure you’ve set the appropriate permissions for your Cloud Build function.
That’s all there is to it! Once set up this way, your Google Cloud Function can pull in your private dependency from Artifact Registry without hosting on any external package managers, and without any manual deployment steps.
Automate publishing your private dependency
To speed up the deployment of your local package to Artifact Registry, you can also add a Cloud Build file to your Artifact Registry package that will trigger a publishing event when changes are saved to your package. You can follow the setup steps here, but here is a snippet of a sample cloudbuild.yaml file that would live in your private dependency:
steps:- name: gcr.io/cloud-builders/npmargs: ['run', 'artifactregistry-login']- name: gcr.io/cloud-builders/npmargs: ['publish','${_PACKAGE}']
What about other languages and runtimes?
Even though this blog post focuses on Node.js, Cloud Functions and Artifact Registry support other runtimes as well, like Python and Java. For example, with Python the steps for deploying the module to Python aren’t much more complicated than Node. Once you’ve readied your private dependency and published to Artifact Registry, you can start creating a Google Cloud Function like the one above, but in Python. Next, you will want to fetch and package these dependencies locally.

5678
Of your peers have already downloaded this article
5:30 Minutes
The most insightful time you'll spend today!
Modernizing apps on the cloud isn’t an “all or nothing” decision. Businesses want the option to modernize on-premises or choose multi-cloud solutions that meet their needs. That’s why we created a new solution for running apps anywhere – simply, flexibly, and securely. Embracing open standards, Anthos lets you run your applications, unmodified, on existing on-prem hardware investments or in the public cloud. So that you write once and deploy anywhere.
Download this report and find out how to:
- Decouple infrastructure and applications with containers and Kubernetes
- Decouple cloud teams from one another so they can work independently
- Meet the challenges of microservice management using service mesh
- Implement a zero-trust security model to enforce more granular controls while maintaining a consistent user experience
Largest Beauty Retailer in the US Powers Digital Transformation with Google Cloud Smart Analytics

9242
Of your peers have already read this article.
3:15 Minutes
The most insightful time you'll spend today!
Digital technology offers increasing flexibility and choice to consumers. As a result, the retail industry is dramatically shifting toward more tailored and personalized experiences for shoppers, and businesses are rethinking how they deliver value to customers.
This couldn’t be more true for the beauty retailing industry where leading companies are turning to digital technology to create customized shopping experiences.
At Google Cloud, we’re particularly excited about our work with Ulta Beauty, the largest beauty retailer in the United States with more than 1196 stores in all 50 states, and how the company is using Google Cloud technology solutions to power personalization and redefine beauty retailing.
Established in 1990, Ulta Beauty has had incredible success as a company, and as customers become more discerning and curious about their purchases, the company is finding new ways to meet their changing needs.
Recently, leaders at Ulta Beauty recognized a huge opportunity to complement and enhance the shopping experience by helping beauty enthusiasts navigate through more than 500 brands and 25,000 products carried in their stores and online channel.
They decided to leverage the data from Ulta Beauty’s successful Ultamate Rewards loyalty program to create and offer more unique and personalized user experiences.
With more than 30 million members generating data through sales, transactions, product reviews, and social media engagement, Ulta Beauty’s Loyalty Program creates a comprehensive data set, and the company sought the right technology partner to help organize, analyze and transform that data into valuable insights for its customers.
Ulta Beauty’s leaders knew they had an opportunity to leverage data analytics and machine learning to reach customers in new ways, enhance the guest experience, and continue to grow their active loyalty member base. After considering a number of cloud providers, they chose to expand their existing partnership with Google Cloud.
“Google Cloud listened to our needs and worked in tandem with our engineering team to address our challenges,” said Michelle Pacynski, vice president of digital innovation at Ulta Beauty. “The ease of working with the Google Cloud team and their breadth of experience made the decision a no-brainer, laying the foundation for a great partnership.”
In 2019, Ulta Beauty announced it was working with Google Cloud Platform to unify and organize its data, using:
- BigQuery to perform data analysis and generate dynamic content, personalized product recommendations, and event-based messages for customers.
- Cloud Storage to provide highly available, secure, resilient and cost-effective access to data across the entire enterprise.
- Compute Engine for the high-performance scalability needed to grow with customer demand while painlessly migrating existing applications to the cloud.
- Anthos to build a hybrid cloud foundation that allows their applications to take advantage of all this data, combining the power and flexibility of GKE with the ability to leverage their existing investment in secure infrastructure on-premises.
Our partnership with Ulta Beauty has enabled increased engagement with customers in store and online, and the creation of new tools and capabilities, including a new Virtual Beauty Advisor tool to deliver tailored recommendations and help shoppers choose the right products, and a Customer Conversation Platform that’s enabling deeper connections with guests, ultimately driving customer loyalty.
“It’s been a really efficient process so far due in part to the ease of working with the Google team,” said Michelle Pacynski, vice president of digital innovation at Ulta Beauty. “They’re experienced, approachable, and their can-do style makes for a great partnership. They listened to our needs and worked in tandem with our engineering team, figuring things out, and getting it done.”
3241
Of your peers have already watched this video.
1:30 Minutes
The most insightful time you'll spend today!
How to Become a Hero by Metering and Understanding Your Utilization on GKE
It’s hard to believe that GKE is already celebrating its fifth birthday. Over these last five years it’s been inspiring to see what businesses have accomplished with Google Cloud and GKE—from powering multi-million QPS retail services, to helping a game publisher deploy 1700 times to production in the week of its launch, to accelerating research into discovery of treatments for both rare and common conditions in cardiology and immunology, to helping map the human brain. These were all made possible by Kubernetes.
The benefits of containers and Kubernetes over traditional on-premises architectures are well-documented and understood. This video introduces the concept of cost or efficiency control with GKE autoscaling. Together with our customer and design partner OpenX, we show the story of tuning and controlling infrastructure utilization while balancing cost through use of the GKE autoscalers.
More Relevant Stories for Your Company

What You Need to Know About Compute Engines
Compute Engine is a customizable compute service that lets you create and run virtual machines on Google’s infrastructure. You can create a Virtual Machine (VM) that fits your needs. Predefined machine types are pre-built and ready-to-go configurations of VMs with specific amounts of vCPU and memory to start running apps

Enterprises can Push the Limits of Edge Even Further!
Whether with the cloud or within their own data centers, enterprises have undergone a period of remarkable consolidation and centralization of their compute resources. But with the rise of ever more powerful mobile devices, and increasingly capable cellular networks, application architects are starting to think beyond the confines of the




Telstra Leverages APIs To Accelerate Digital Transformation
Telstra is Australia’s leading telecommunications and technology company, offering a full range of communication services and competing in all telecommunications markets. In Australia, it provides 17.7 million retail mobile services, 4.9 million retail fixed voice services and 3.6 million retail fixed broadband services. But owing to legacy infrastructure the company

Groww’s Google Cloud-Powered Platform: The Key to Secure and Successful Investing
Groww makes investments simple and accessible, using Google Kubernetes Engine to ensure a reliable platform for customers, and makes data-backed decisions to grow its business with BigQuery. Google Cloud results Reduces hardware costs with Preemptable Virtual Machines Enables a lean DevOps team with Google Cloud Analyzes data effectively and quickly
