





Khan Academy’s Shortcut to Growth: The Trick Behind the Scenes

3588
Of your peers have already read this article.
4:15 Minutes
The most insightful time you'll spend today!
Based in Mountain View, California, Khan Academy is a not-for-profit that produces and posts a vast collection of free educational online videos about math and science topics ranging from algebra and trigonometry to biology and economics.
Millions of students, educators, and self-learners around the world watch the videos, both on the Khan Academy’s YouTube channel and on its hugely popular website (www.khanacademy.org), where students answer some 1.5 million practice questions per school day. The Khan Academy development team continually tweaks the site based on how visitors choose to learn.
Challenge
Khan Academy’s beginnings date back to 2004, when Sal Khan’s cousin asked him to remotely tutor her daughter in math. Khan was happy to help and more than qualified, given his three MIT degrees and his Harvard MBA.
As more relatives and friends asked Khan for tutoring assistance, he began videotaping short lessons and posting them to YouTube. His knack for distilling complex concepts into easy-to-follow tutorials helped the videos go viral.
Sal knew he needed to offload the technical and maintenance concerns so he could work on what was important. To grow, it was important for him to be able to stop worrying about things like deployment issues and running his own server.
Ben Kamens, lead developer for Khan Academy
Khan maintained a website for his growing video library for several years, but the platform experienced limitations as traffic increased.
At the same time, media attention was growing, and technology industry leaders, including Microsoft founder Bill Gates and Silicon Valley venture capitalist John Doerr, began lending their support and evangelizing Khan’s mission and work. It was at this point that Khan quit his job as a hedge fund analyst to devote his full-time attention to the site’s growing potential.
“With Google App Engine, we don’t need a system administrator or anyone dedicated to deploying our app, so 99 percent of our time is spent working on our application,” says Ben Kamens, lead developer, Khan Academy.
“Sal knew he needed to offload the technical and maintenance concerns so he could work on what was important, which was to make more videos for the Khan Academy library,” explains Ben Kamens, lead developer for Khan Academy. “To grow, it was important for him to be able to stop worrying about things like deployment issues and running his own server.”
Solution
Khan Academy chose App Engine as its hosting and application development platform because App Engine could easily house its growing collection of 2,000-plus videos, resolving the organization’s overall server and maintenance issues with a single solution.
Using App Engine freed the team to focus on the user experience and the array of content that makes the academy such a powerhouse.
“A lot of what the Khan Academy is about is collecting data on student behavior so we can teach them better,” Kamens says. “Did they use a hint? Have they watched the video before? That data is being stored on Google App Engine so we can figure out what the most effective videos are, or where students struggle the most.”
Khan Academy provides individual profiles to students so they can analyze their learning progress, which means the organization needs systems running in the background to collect and track of all this data. Because App Engine takes care of server support, Khan Academy’s five developers can spend almost all of their time improving site functionality.
“If we didn’t have Google App Engine, we’d be spending a lot more time figuring out server setup and working on routers,” Kamens says. “Our ability to focus on the actual product is the benefit of Google App Engine.”
With the App Engine dashboard, which provides information like response time, uptime, and error rates, the development team also has an easy way to watch over site performance. “It lets us see what the average response time is, so we can keep it really low,” Kamens explains.
Results
During the US school year, Khan Academy receives more than 3.8 million unique visits a month — all served through App Engine. To support this much traffic, a typical company would need an internal system administration staff.
“With Google App Engine, we don’t need a system administrator or anyone dedicated to deploying our app, so 99 percent of our time is spent working on our application,” explains Kamens. “Our application lives on Google App Engine, and we bank all of our scalability and traffic concerns on Google App Engine. Even huge traffic spikes from Sal’s media appearances don’t worry us since we know that Google App Engine will handle the spike.”
Kamens also likes the fact that he and his team can turn to the Google App Engine support team for assistance when they need it. He also finds helpful tips on the Google App Engine blog.
The Khan Academy staff has come to completely rely on App Engine. “We are constantly using more of Google App Engine’s capabilities and have been happy with the performance,” Kamens says. “It’s nice to have an easy deployment process since we deploy the site on average at least once a day, [and] sometimes up to nine or 10 times [a day].”
Develop for Compute Engine in your IDE with Cloud Code

2817
Of your peers have already read this article.
2:30 Minutes
The most insightful time you'll spend today!
When developing services with Compute Engine, our customizable compute service that lets you create and run virtual machines on Google’s infrastructure, you’ll likely find yourself frequently switching between your code editor, terminal, and the Google Cloud Console.
Cloud Code is a set of IDE plugins for popular IDEs like VS Code and IntelliJ that make it easier to develop applications that use Google Cloud services. And now, Cloud Code makes it easy to develop with Compute Engine by incorporating common workflows with your favorite IDE’s user interface.
Specifically, this new integration between Compute Engine and Cloud Code makes it easier to manage your commonly used virtual machines in the IDE, view details about them, connect to them over SSH, upload your application files to them, and view their logs.
Before you begin
Let’s demonstrate how the new integration works in Cloud Code for VS Code. Install Cloud Code for VS Code, and once installed, open its icon on the activity bar on the left and find “Compute Engine”:
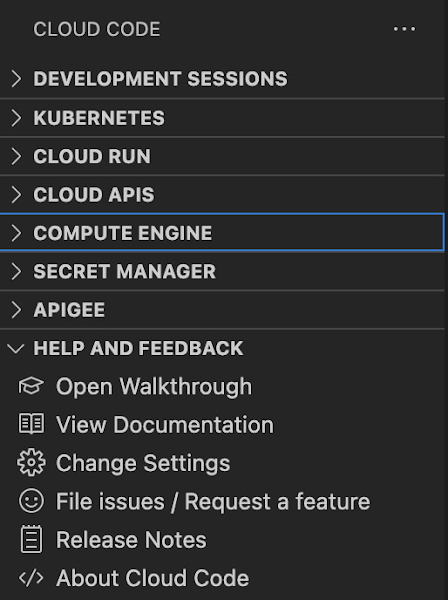
Cloud Code for Jetbrains IDEs (such as IntelliJ) could be installed similarly, and you will find Compute Engine in the list of your IDE tool windows.
View your VMs
Cloud Code makes it easy to see all relevant VMs in your GCP project and view details needed to effectively work with the VM from the IDE. To start working with a Compute Engine VM in the IDE, navigate to Cloud Code’s new Compute Engine explorer. From there, you can see all the VMs in your current Cloud project. Clicking on a VM will display details such as machine type, boot image, IP address and more. You can also right click on a VM for a quick link to the Google Cloud Console where you can take additional action.
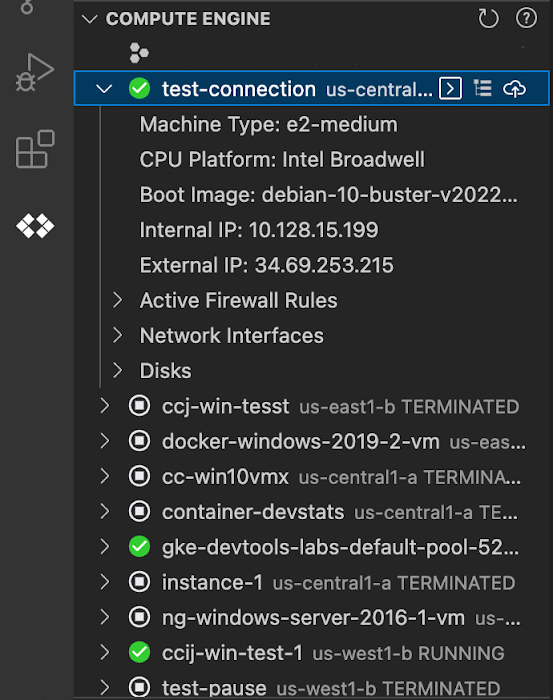
Connect to your VMs over SSH
Once you’ve found the VM you want to work with, Cloud Code makes it easy to connect to that VM over SSH. Again, find the VM you want to connect to in Cloud Code’s Compute Engine explorer, right click it, and select “Open SSH”. Cloud Code will then establish an SSH connection from your IDEs terminal into the VM. If there’s any difficulty establishing a connection, Cloud Code can run a troubleshooting diagnostic to help resolve the issue.
Many organizations maintain VMs that don’t have a public IP address, making it difficult to establish an SSH connection to them. For those VMs that use Identity-Aware Proxy, Cloud Code can still securely connect to them over SSH, even without a public IP address.
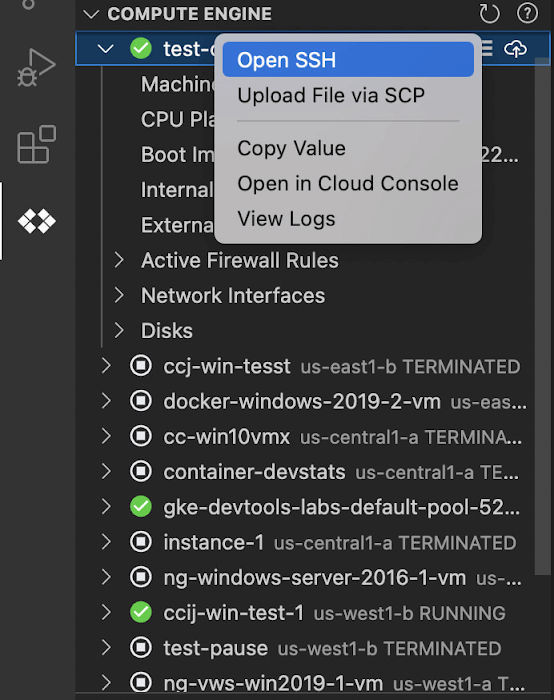
Upload files to your VMs
You might want to try a debug version of your application, run a script, or try a new code in an environment identical to production, in this case on a development VM instance which might not have access to full source code or is not a part of your CI/CD pipeline. Cloud Code provides an easy way to upload your code files into a VM instance.
Find the VM you want to connect to in Cloud Code’s Compute Engine explorer, right click it, and select “Upload File via SCP”. Choose a file from your local system and Cloud Code will upload it to a VM instance using SCP. Once upload completes, Cloud Code offers to open a new SSH connection to access the files and work with them on a remote VM instance. Again, if there’s any difficulty establishing a connection, Cloud Code can run a troubleshooting diagnostic to help resolve the issue.
View your VM logs
As you’re working with your VM, you can right click it and select to view the VM instance logs. From Visual Studio Code this will open a logs viewer in the IDE. From IntelliJ, the logs viewer in the Cloud Console will be opened. If you’ve configured application logs to be collected with Cloud Logging, you can also view those in these logs viewers as well.
Get Started
We invite you to try out Compute Engine with Cloud Code to better streamline your development workflow. To learn more, check out the Compute Engine documentation for Visual Studio Code and JetBrains IDEs. If you’re new to development with IDEs, you can take the first step by installing Visual Studio Code or IntelliJ.
Optimizing Cloud Load Balancing in Hybrid and Multicloud Architectures

2761
Of your peers have already read this article.
3:30 Minutes
The most insightful time you'll spend today!
Today’s enterprise applications are often assembled across distributed environments. This includes the integration of services across multi-cloud, multi-SaaS and on-premises environments. While the approach has the advantage of enabling enterprises to choose the best service available to support their applications, it adds the complexity of delivering services across heterogeneous environments. To solve this, Cloud Load Balancing supports an open cloud strategy, which includes:
- Supporting universal traffic management policies across heterogeneous environment by leveraging open source and open standards
- Enabling a global front-end so applications can leverage a common set of policies and security postures
- Providing tools that give your users the highest possible performance and reliability
Universal traffic management with open source and open standards
Kubernetes is a great solution for managing containers across environments. We believe that traffic management policies should also be supported across environments. Cloud Load Balancing creates homogeneous traffic policies across highly distributed heterogeneous environments by supporting standard-based traffic management in a fully managed solution, and allowing open source Envoy Proxy sidecars to be used on-premises or in a multi-cloud environment, using the same traffic management as our fully managed Cloud Load Balancers.
As enterprises start modernizing services and refactor monolithic applications, they require solutions that can provide consistent traffic management across distributed systems at scale. But organizations want to invest their time and resources innovating and building new applications — not on the infrastructure and networking required to deploy and manage these services. Envoy is an open-source high-performance proxy that runs alongside the application to deliver common platform-agnostic networking capabilities, including:
- New load balancing algorithms, (e.g. round robin, ring hash, least conns)
- Weighted traffic splitting
- Fault injection
- Request mirroring
- Outlier detection
- Additional header transformation options
- Request retries
- Additional backend session affinity options
- Cross-origin resource sharing (CORS)
Hybrid Load Balancing across multi-cloud and private clouds
Over the years Google has deployed Load Balancers across 173+ Edge Pop locations, delivering customer applications at massive-scale on Google infrastructure. And now Google Cloud has introduced Hybrid Load Balancing, extending our Load Balancing capabilities beyond Google’s network to on-premises private clouds and multi-cloud solutions. This allows our customers to migrate applications to the cloud iteratively, or build hybrid applications that are assembled from services that are running across heterogeneous environments.
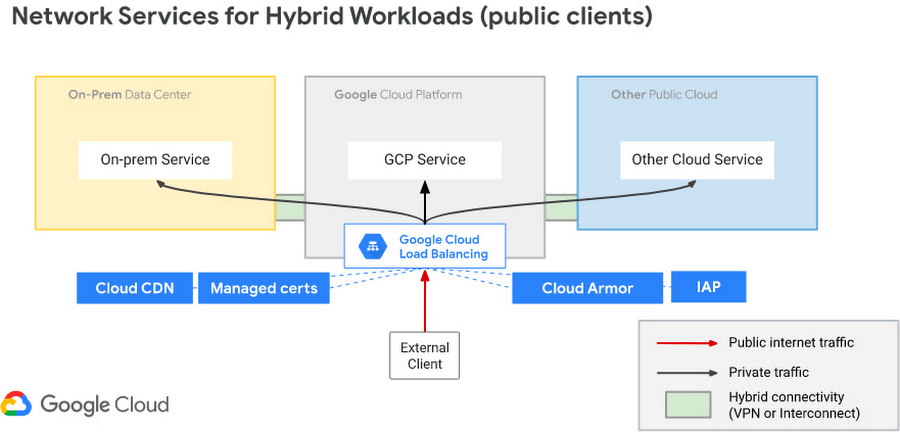
Supporting modern application delivery with HTTP3/QUIC
Cloud Load Balancing is a fully distributed load balancing solution that balances user traffic (HTTP(s), HTTPS/2, HTTPS/3 with gRPC, TCP/SSL, UDP, and QUIC) to multiple backends to avoid congestion, reduce latency, increase security, and reduce costs. It is built on the same frontend-serving infrastructure that powers Google services, supporting millions of queries per second with consistent high performance and low latency.
To serve massive amounts of traffic, Google built the first scaled-out software-defined load balancing, Maglev, which has been serving global traffic since 2008. It has sustained the rapid global growth of Google services, and it also provides network load balancing functions for Google Cloud Platform customers. To accommodate ever-increasing traffic, Maglev is specifically optimized for packet processing performance with Linux Kernel Offload. Maglev is also equipped with consistent hashing and connection tracking features, to minimize the negative impact of unforeseen faults and failures on connection-oriented protocols.
Another key enabler to support this global-scale is that our Cloud Load Balancers are built on top of QUIC(RFC9000), a protocol developed from the original Google QUIC) (gQUIC). HTTP/3 is supported between the External HTTP(S) Load Balancer, Cloud CDN, and end clients. And once enabled, customers typically see dramatic improvements in performance and throughput.

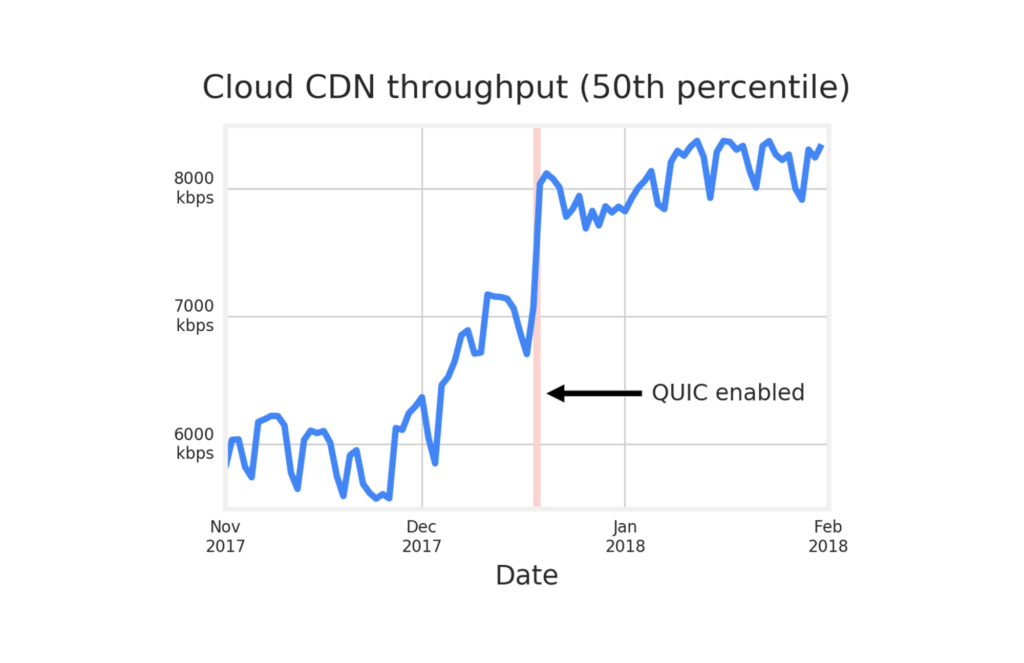
Google Cloud already supports HTTP3 in Cloud Load Balancer. To use HTTP/3 for your applications, you can enable it on your external HTTPS Load Balancers via the Google Cloud Console or the gCloud SDK with a single click.
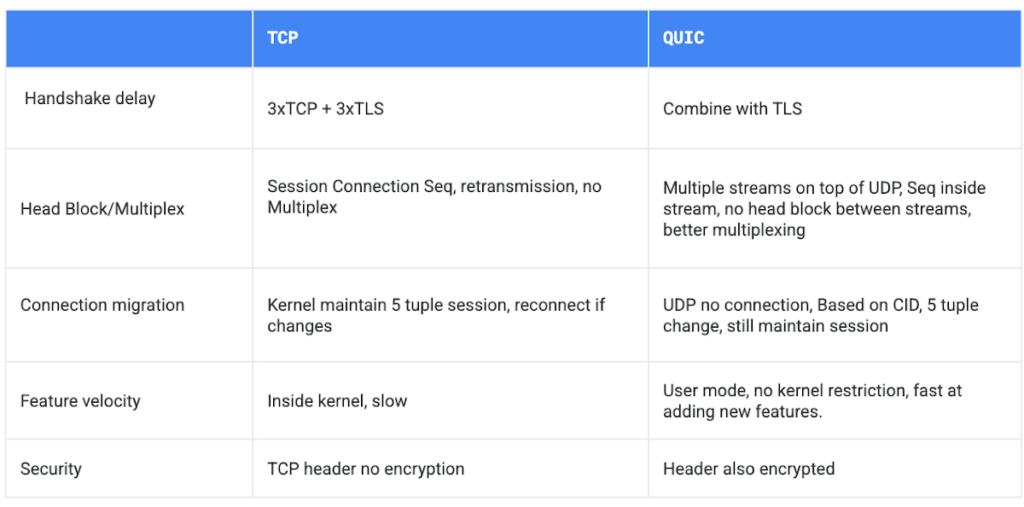
If your service is sensitive to latency, QUIC will make it faster because it establishes connections with reduced handshakes. When a web client uses TCP and TLS, it requires two to three round trips with a server to establish a secure connection before the browser can send a request. With QUIC, if a client has connected with a given server before, it can start sending data without any round trips, so your web pages will load faster.
QUIC has advantages over legacy TCP as follows.
Summary
Since 2008, Google has been an innovator in software-defined networking, supporting applications running at massive scale. Google Cloud Load Balancers support HTTP3 and QUIC as a next generation web transport protocol, which significantly improves customer traffic latency. Google Load Balancers also have incorporated the Envoy proxy as a foundational technology, providing our customers with advanced traffic management that’s compatible with the open source Envoy ecosystem. This allows our users to have the choice to combine Google’s fully-managed Cloud Load Balancers with open source Envoy Proxies, to enable consistent traffic management capabilities across a multi-cloud distributed environment. And with Hybrid Load Balancing, customers can leverage our 173+ world wide PoPs to seamlessly manage traffic across Google Cloud, on-premises and other cloud providers.
Google Cloud Load Balancers include all these capabilities natively. And when used together, they support globally-scaled applications that run seamlessly across the heterogeneous environments many enterprises deploy today.
Consent is a Key Component for a Successful Embedded Financial Solution: Read Why

3237
Of your peers have already read this article.
5:00 Minutes
The most insightful time you'll spend today!
When banks and other financial institutions make their products available via non-banks, we call that Embedded Finance. Think, for example, of a retailer offering financing for people buying goods; or a budgeting app gathering bank transactions to help you categorize and understand your spending patterns. The finance – the money management – has been embedded into the retailer or the budgeting experience.
This last example falls under the Data Exchange category of Embedded Finance , and it’s often also called Open Banking. In many countries this active data exchange is actually mandated by law, with specific Open Banking standards encoded into law for all financial institutions. As of this blog post, there are approximately 37 countries with such laws already in place or currently being worked on.
In an Embedded Finance scheme there are three main players: The financial institution offering their products and services, a third party provider (TPP) making use of those products or services, and an end user who is a customer of the financial institution and is interacting with the TPP.
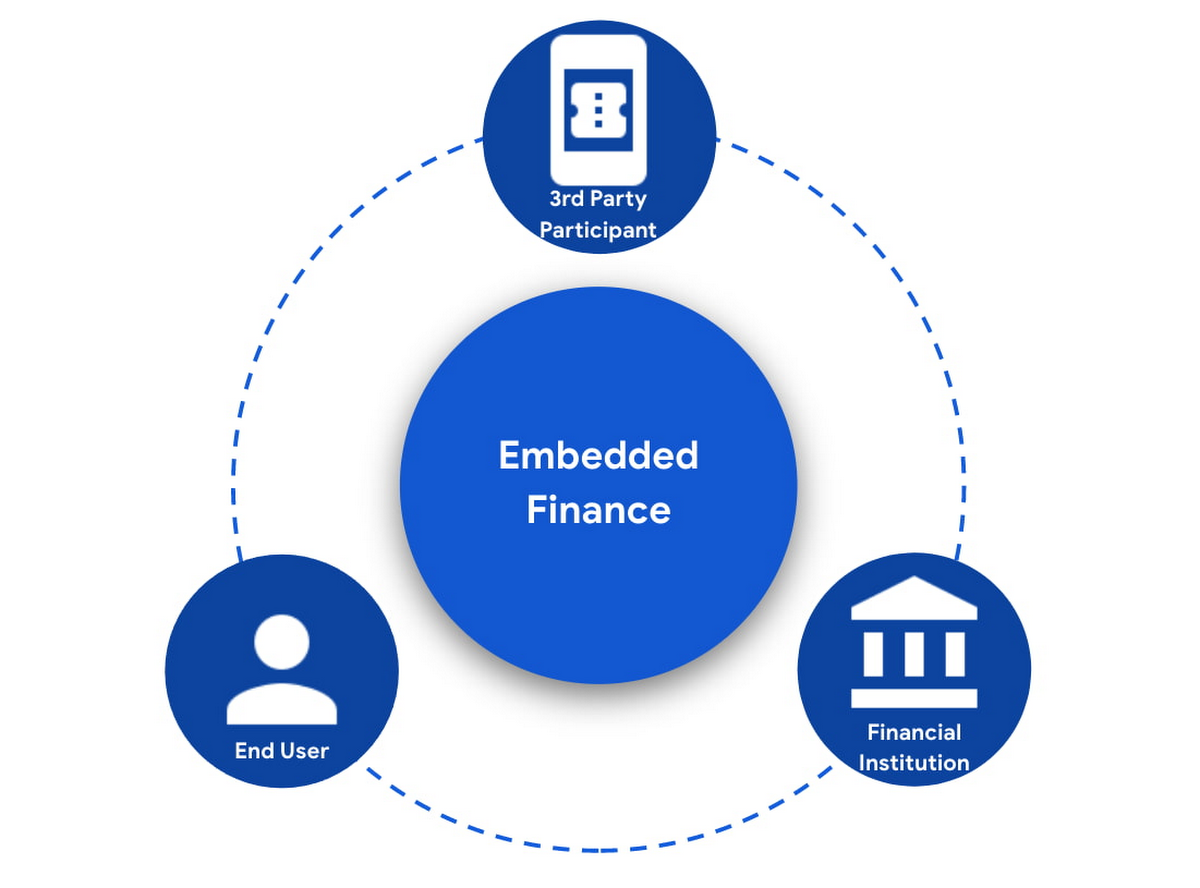
The most important ingredient for these schemes is consumer trust. If a consumer does not trust that their data will be safely shared with a third party, and that they can easily understand the terms they have agreed to and stop sharing their data whenever they want to, consumers will simply not participate. When a consumer agrees for their data to be shared, this is called consent.
What components do I need for a successful Embedded Finance solution?
Banks’ products and services are made available to other parties via APIs, thus a fundamental component is an API Management platform. An API Management Platform lets you design, secure, analyze, and scale APIs anywhere with visibility and control.
Also, we need a component to manage consents given by end users. Consent Management refers not only to the capability of checking whether a certain action by a third party (eg: access an end user’s account balance) is valid according to the consent granted by the end user to that TPP, but also the availability of tools for end users to check existing consents, modify them or revoke them, as well as tools for financial institutions to perform similar actions on behalf of their customers.
Finally, we need an Identity Platform capable of authenticating an end user and establishing their identity.

A Google Cloud based embedded finance solution uses Apigee as the API management platform, Identity Platform or your own identity platform of choice, and a consent management service (CMS). Google Cloud has partnered with two leading providers in the consent management space: Clarip and CloudEntity.

How do these components work together?
The main roles and responsibilities of each of the three components are quite clear, but there is a certain degree of flexibility on how to orchestrate the interactions between the components, and which component performs which function when there is an overlap of functionality between them.
Google Cloud has tested the following interaction patterns:
- Interaction Pattern #1: Apigee as the main orchestrator
In this interaction pattern, Apigee interacts with both the consent management service and the identity platform, coordinating end user authentication with the identity platform, and authorization and consent with the consent management service. Apigee acts as the “broker” between users, their identity, and their consent.
- Interaction Pattern #2: The consent management service abstracts the identity platform.
In this case, the consent management service manages all the interactions with the identity management platform, and the identity platform acts as the “broker”. Apigee only interacts with the consent service.
The three components share a common pool of client apps and end users. One of the components is typically designated as the source of truth for these entities, while the other components that need to know about these entities synchronize that information from the source of truth.
The identity platform is typically the source of truth for end user identities and the consent management component will synchronize that information by pulling it from the identity platform.
The consent management service is the source of truth for user opt-in and current consent status. Apigee will either check with the service the validity of a consent every time a request comes through, or to make it more efficient, it will validate the main attributes of the consent based on information stored in Apigee. To maintain consistency, the consent management service should tell Apigee to invalidate any tokens associated with a consent when it is revoked via other means (for example, if an end user revoked consent from a consent dashboard).
For client apps, either Apigee or the consent management component can act as the source of truth, with the other component synchronizing the information. In the context of Open Banking in particular, standards often mandate that financial institutions support Dynamic Client Registration. This means having endpoints that new clients can use to register themselves as clients for the Open Banking APIs. In this case, the synchronization of clients can easily be incorporated into Dynamic Client Registration.
Let’s look now into more detail about how the three components interact. There are two user journeys that are particularly relevant:
Authentication/Authorization/Consent
This is the beginning of the typical consumer client journey, when an end user starts using a third party app that requires access to that user’s data. The third party app needs to authenticate itself, and request authorization to access the user’s data. This will trigger the authentication of the end user and consent granting: Consent granting being the process of, the user authorizing the operations the app will execute on their behalf, and establishing the list of accounts on which these operations will be performed. The authorization is represented by an access token, which the app will need to include in all subsequent requests.
This is quite a complex journey with many steps involved in order to make this as secure as possible. To make it easier to understand, we will simplify some of the steps (apologies in advance to you OIDC/FAPI experts out there!).
At a high level, these are the steps involved in this user journey:
- End user starts using an app
- The app requests permission to access user’s data
- The identity platform (IdP) authenticates the end user
- The consent management service obtains consent from end user
- An access token is issued for the app, encapsulating the authorized permissions, accounts, etc. A refresh token is also issued – the access token normally has a short life (measured in minutes), but the app can use the refresh token, which typically lasts much longer (days or months), in order to obtain a new access token without the need of going through the end user authentication/authorization/consent process again.
The way these steps are orchestrated varies depending on the interaction pattern among the components.
Pattern #1: Apigee orchestrates all interactions
When the client requests permission, Apigee will record the request and then redirect the client app to the IdP login page. Once the end user logs in, the IdP will return an authorization code to the callback URL that Apigee registered in the IdP configuration.
Apigee will then redirect the client app to the Consent Management service, so that the consent form is displayed. Once the user grants consent, selects the desired permissions, and selects the accounts it will apply to, the Consent Management Service will update Apigee with the status of the consent, via a callback Apigee registered in the consent configuration.
Now that the end user has authenticated and granted consent, Apigee can now issue an authorization code, and associate all the necessary information, for instance, details about the consent, the authorization code issued by the Identity Platform (IdP), the identification of the end user in the IdP, etc. Apigee will return this authorization code to the client app via a callback endpoint that the app provided when registering with Apigee.
The app will then exchange the authorization code for an access token. Apigee will obtain an access token from the IdP, abd update the status of the consent before issuing an access token to the client.
Pattern #2: The Consent Management Service is the center of the Architecture
In Pattern #2, Apigee will only communicate with the Consent Management Service, which acts as an authorization server for the app and will also coordinate all interaction with the IdP.
When the client requests permission, Apigee will forward the request to the CMS. The CMS will record the request and then redirect the client app to the IdP login page. Once the end user logs in, the IdP will return an authorization code to the callback the CMS registered in the IdP configuration.
The CMS then displays the consent form. Once the user approves the consent and selects the desired permissions and accounts it will apply to, the Consent Management Service will return an authorization code to Apigee, via a callback Apigee registered in the CMS configuration.
From now on, the flow is the same as explained above. Apigee will issue an authorization code, associate all the necessary information and will return this authorization code to the client app via a callback endpoint. The app will then exchange the authorization code for an access token. Apigee will obtain an access token from the CMS, before issuing an access token to the client.
Let’s now look at the other relevant user journey:
Access shared data
Once the third party app has been authorized, it will then start requesting that end user’s data. For instance, it may request the list of accounts or the balance of a particular account.
When that request goes through, a series of checks need to be performed: Is this third party app still authorized? Has it been granted the right permission for the operation being requested? Is the account involved included in the list of accounts authorized by the end user? Apigee can perform all these checks by inspecting the access token presented by the third party app.
There is, however, one other check which cannot be done simply by inspecting the token. Imagine for a moment that in-between the user granting consent and the app requesting the user’s data, the end user decided to revoke that consent. This could be done by other means than the app itself, for instance by checking all consents granted to all apps in a consent dashboard accessible via other channels such as an “Internet Banking” site. When the app requests the user data, the token is still valid, however the consent has already been revoked. Therefore, in this user journey, Apigee will check with the Consent Management service to check if the consent is still valid. This adds a bit of overhead, which can be minimized by other means. For instance, one popular optimization is to make sure that the Consent Management service asks Apigee to revoke any access or refresh tokens associated with a given consent when that consent is revoked via other channels. If that guardrail is in place, then Apigee can determine if a request should be allowed simply by validating the access token and using the consent information stored alongside the token.
The following diagram summarizes the interactions required between Apigee and the Consent Management component. The interaction is essentially the same in both interaction patterns.

What’s next?
In this article we have described how Apigee, a Consent Management service, and an Identity Platform are the fundamental ingredients of a successful and secure Embedded Finance solution. We have also looked at how these components interact with each other to keep user consent consistent and available. Both interaction patterns described are valid and have been proven to work. So which one may be right for you? The answer ultimately depends on your particular requirements, the choice of consent management service, and your choice of identity platform. As a rule of thumb, if you have multiple application experiences, identity systems, and sources of consent, an Apigee-centric architecture is a great solution. If you are looking at a Consent Management service in the context of an Open Banking implementation mandated by a centralized authority (eg: Open Banking Brazil, Consumer Data Standards in Australia), CloudEntity is a good choice for consent management, as their product is also Certified Financial-grade API (FAPI) OpenID Provider, with profiles for the various Open Banking standards. CloudEntity integrates with Apigee using Pattern #2.
For more details on both Clarip and CloudEntity’s offerings and how their particular solution works with GCP please check:
- Clarip: Universal Consent Management Platform – GDPR
- CloudEntity: Certified OpenBanking & Consent (UK, Brazil and Australia) at scale
For more details on Apigee API Management, see https://cloud.google.com/apigee
You can also learn about our solutions for retail banking or contact sales.
Google Unveils New Cloud Region in Delhi NCR to Power India’s Digitization

8330
Of your peers have already read this article.
2:00 Minutes
The most insightful time you'll spend today!
In the past year, Google has worked to surface timely and reliable health information, amplify public health campaigns, and help nonprofits get urgent support to Indians in need. Now, we are continuing to focus on helping India’s businesses accelerate their digital transformation, deepening our commitment to India’s digitization and economic recovery. To support customers and the public sector in India and across Asia Pacific, we’re excited to announce that our new Google Cloud region in Delhi National Capital Region (NCR) is now open.
Designed to help both Indian and global companies alike build highly available applications for their customers, the Delhi NCR region is our second Google Cloud region in India and 10th to open in Asia Pacific.
What customers and partners are saying
Navigating this past year has been a challenge for companies as they grapple with changing customers demands and economic uncertainty. Technology has played a critical role, and we’ve been fortunate to partner with and serve people, companies, and government institutions around the world to help them adapt. The Google Cloud region in Delhi NCR will help our customers adapt to new requirements, new opportunities and new ways of working, like we’ve helped so many companies do in the region:
- InMobi scaled a personalized AI platform to support 120+ million active users. “With the arrival of the Google Cloud Delhi NCR, InMobi Group sees the opportunity to continue closing the gap between our users and products,” says Mohit Saxena, Co-founder and Group CTO of Inmobi. “Glance, especially, has been serving AI-powered personalised content to over 120 million active users. We can’t wait to continue giving them truly meaningful experiences that are speedy, scale well, and are relevant to them, by expanding the use of our current tools working on Google Cloud with the opening of a new region.”
- Groww now supports a sizable user base. “Google Cloud provides great technology that enables us to build and scale infrastructure to millions of users, and the new Google Cloud region in Delhi NCR will continue to help more businesses and startups in India access powerful cloud-based infrastructure, products and services,” says Neeraj Singh, Co-founder and Chief Technology Officer, Groww.
- HDFC Bank is positioned for the future. “At HDFC Bank, we are harnessing technology platforms to both run and build the bank. As we progress to be future ready, the objective is to invest in future technologies that give us scale, efficiency and resiliency. Towards this the Google Cloud region in Delhi NCR will enable us to enhance our resiliency and help us in building an active-active design framework for our new generation applications on cloud,” says Ramesh Lakshminarayanan, CIO, HDFC Bank.
- Dr. Reddy’s Lab built a modern data platform with Google Cloud. “At Dr Reddy’s, we pride ourselves in helping patients regain good health, acting quickly to provide innovative solutions to address patients’ unmet needs and in accelerating access to medicines to people worldwide. Our Google Cloud-powered data platform is helping us realize these objectives and we welcome Google’s investment in the new Delhi NCR region as helping us and other businesses in India make further contributions to our social and economic future,” says Mukesh Rathi, Senior Vice President & CIO, Dr. Reddy’s Laboratories.
- “To survive the disruption caused by the pandemic and to succeed in the long term, organizations need to become digital natives, so they can be more agile, explore new business models and build new capabilities that boost resilience. A cloud-first strategy plays a key role in enabling businesses to do this,” said Piyush N. Singh, Lead – India market unit & lead – Growth and Strategic Client Relationships, Asia Pacific and Latin America, Accenture. “Harnessing the potential of cloud requires the right data infrastructure and this expansion by Google Cloud will undoubtedly help Indian enterprises in their digital transformation journeys.”
A global network of regions
Delhi NCR joins 25 existing Google Cloud regions connected via our high-performance network, helping customers better serve their users and customers throughout the globe. As the second region in India, customers benefit from improved business continuity planning with distributed, secure infrastructure needed to meet IT and business requirements for disaster recovery, while maintaining data sovereignty.
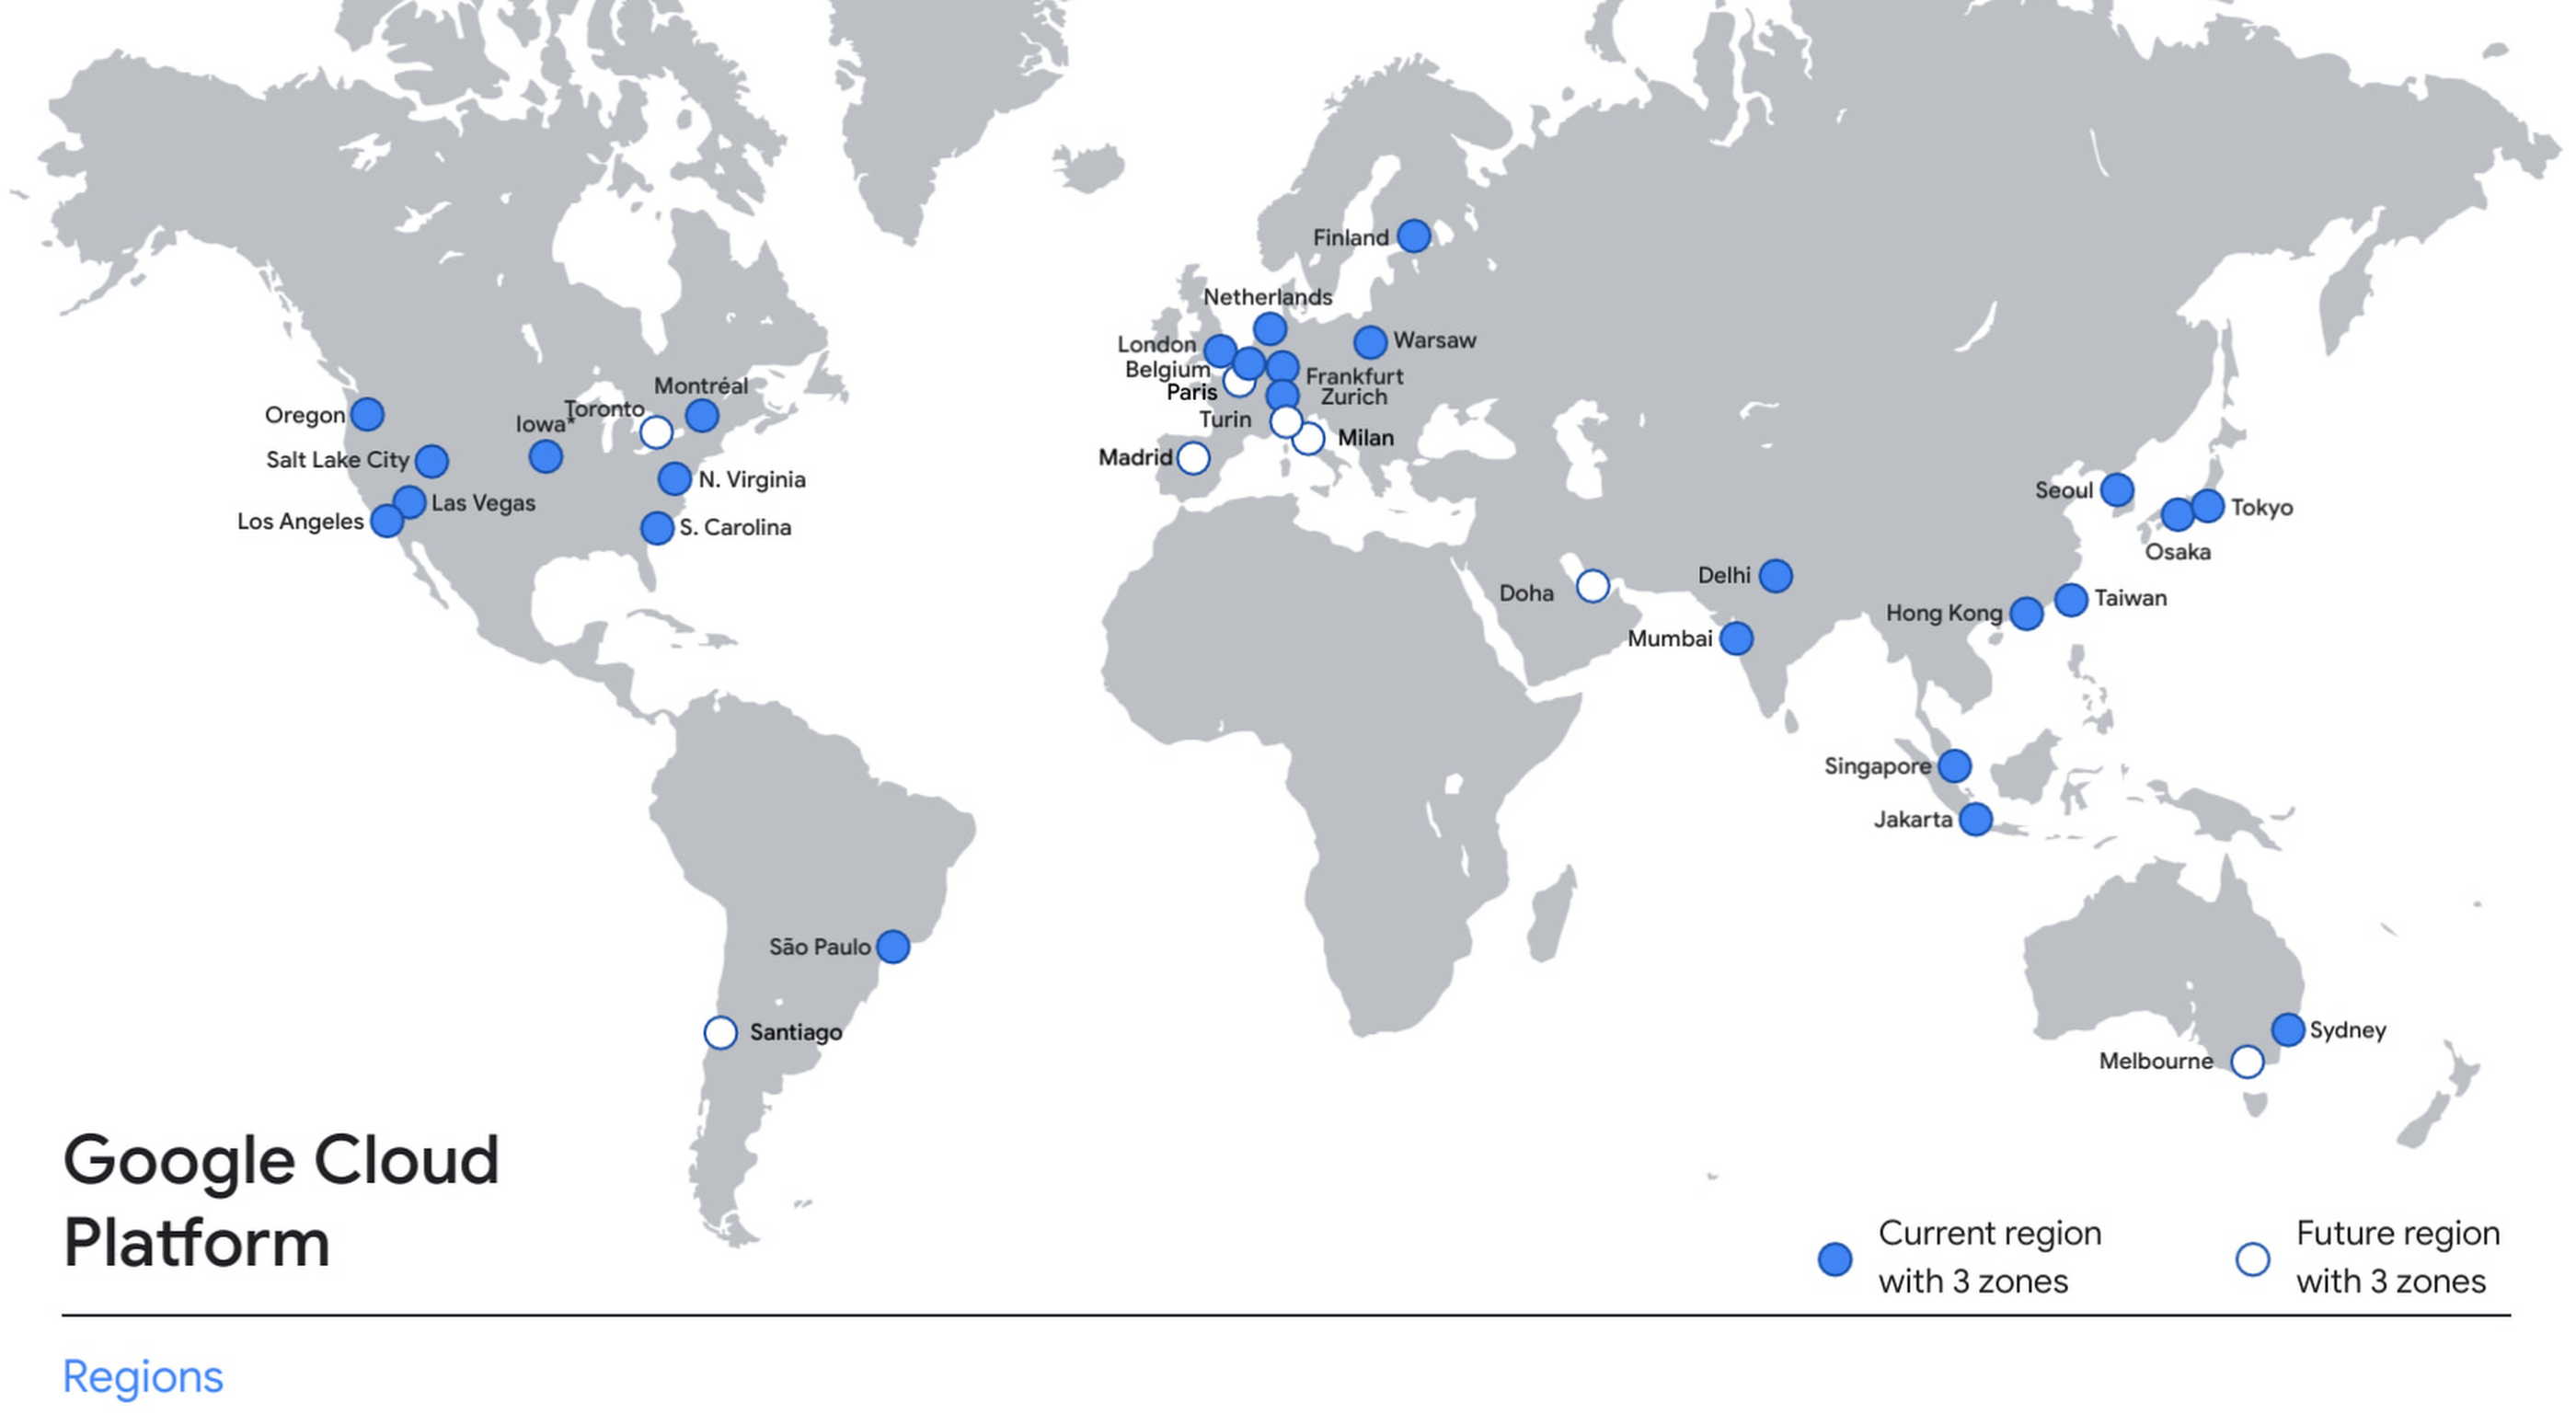
With this new region, Google Cloud customers operating in India also benefit from low latency and high performance of their cloud-based workloads and data. Designed for high availability, the region opens with three availability zones to protect against service disruptions, and offers a portfolio of key products, including Compute Engine, App Engine, Google Kubernetes Engine, Cloud Bigtable, Cloud Spanner, and BigQuery.
Supporting India’s recovery with training and education
Google and Google Cloud will also continue to support our customers with people and education programs. We’re investing in local talent and the local developer community to help enterprises digitally transform and support economic recovery.
Through the India Digitization Fund, we expanded our efforts to support India’s recovery from COVID-19—in particular, through programs to support education and small businesses. In addition to expanding internet access, and investments to help start-ups accelerate India’s digital transformation, we’ve grown our Grow with Google efforts. Businesses can access digital tools to maintain business continuity, find resources like quick help videos, and learn digital skills—in both English and in Hindi.
Helping customers build their transformation clouds
Google Cloud is here to support businesses, helping them get smarter with data, deploy faster, connect more easily with people and customers throughout the globe, and protect everything that matters to their businesses. The cloud region in Delhi NCR offers new technology and tools that can be a catalyst for this change. To learn more, visit the Google Cloud locations page, and be sure to watch the region launch event here.
Google Maps Platform Helps BungkusIT Fulfil its Promise of Deliveries in One Hour!

5525
Of your peers have already read this article.
2:00 Minutes
The most insightful time you'll spend today!
Editor’s note: Today’s post is written by Hatim M, Chief Commercial Officer at BungkusIT. The on-demand delivery service delivers packages within the hour for one million customers across Malaysia and uses Google Maps Platform to create a seamless end-to-end delivery experience for its customers.
Imagine it’s the end of a long day at work, and you’re heading home for dinner as you look forward to a restful evening. Then just as you arrive at the doorstep, your phone buzzes with a message from a family member, asking if you could grab a carton of milk from the supermarket.
With moments like these in mind, we founded BungkusIT to alleviate the stress of everyday chores and give people a break from having to run seemingly mundane errands that can often be time-consuming. With so much to do and so few hours in a day, we want to make life simpler by providing our customers with an on-demand delivery service.

As a social enterprise, our mission is to create jobs and increase earning potential for BungkusIT roadies (those who run deliveries), while also increasing online visibility for local small and medium enterprises through an e-commerce platform. As such, we don’t charge merchants a fee for being featured on our app.
Our roadies help connect users with products and services that they need. Whether it’s picking up the keys you forgot, or buying a birthday cake for a loved one, our on-demand roadies can help accomplish your task quickly and efficiently. In fact, we’ve helped many seniors—a large and often underserved population—to run errands and provide last mile support.
Providing reliable service, 24/7
From the day we launched, our promise has always been to complete every task given to us within one hour. Google Maps Platform empowers us to fulfil this promise. We understand the importance of selecting a reliable mapping service from the get-go. After exploring different map products, we made the decision to go with Google Maps Platform due to its detailed and accurate location mapping system. With the support of our partner Searce, we’ve been able to quickly integrate all the relevant products on our platform and optimize our API calls.
On a day-to-day basis, our roadies rely on the Places API to navigate their journeys. It pinpoints the exact location set by customers so that our roadies can be sure they arrive at the correct destination. With so many small roads and alleys in Malaysia, it can be challenging to find the exact place based on an address. Dropping a pin on a specific location removes any confusion.
Because we price our services based on distance, it’s business critical to determine the exact distance of a location and the most efficient route to reach it. By automating that process with the Distance Matrix API, we can guarantee that customers don’t get overcharged, while making sure that we’re adequately compensated for our services.
Improving the user experience
At the end of the day, we want to make people’s lives easier. That’s why having an app that is intuitive is key. More than that, we want customers to be able to create a request as quickly as possible. By automatically completing the location a customer is typing after they’ve keyed in the first few characters, Place Autocomplete does that job for us.

As a fairly young company, we’ve got a long way to go. I believe that we’ll continue evolving alongside Google Maps Platform and exploring the new features it has to offer. We’re already talking to global brands to expand our services and I’m confident that with Google Maps Platform as our maps partner, we will go a long way.
For more information on Google Maps Platform, visit our website.
More Relevant Stories for Your Company

SoFi Stadium Personalizes Fan Experiences with Game-changing App Built on Google Cloud and Deloitte
Editor’s note: Engineers from SoFi Stadium, Google Cloud, and Deloitte built a fan-ready Personal Concierge app that uses advanced analytics to tailor game-day experiences for every visitor. SoFi's 10-year partnership with Google Cloud not only pumps up the fans. Advanced analytics also enable stadium employees to securely store, analyze, and action

Fully-managed-zero-trust Security Solution, Traffic Director Integrated with CA Service
We created Traffic Director to bring to you a fully managed service mesh product that includes load balancing, traffic management and service discovery. And now, we’re happy to announce the availability of a fully-managed zero-trust security solution using Traffic Director with Google Kubernetes Engine (GKE) and Certificate Authority (CA) Service. When platform administrators and security




FedEx Ground Makes Talent Recruitment More Effective with AI
FedEx Ground is a package shipping company and is a subsidiary of FedEx. It wanted to make hiring easier, and more intuitive so that it could hire the best people. "We need to have every advantage we can to recruit and retain talent. That's what led us to the work with



API Management with Istio
Kubernetes can be a great orchestration platform for your microservices but these services can grow complex and difficult to manage. Istio simplifies the life of organizations contemplating a “microservices” approach, or who are simply deploying many services that communicate with each other. Istio creates a “service mesh” that routes traffic
