





How Vertex Vizier’s Automated Hyperparameter Tuning Improves ML Models

5032
Of your peers have already read this article.
1:30 Minutes
The most insightful time you'll spend today!
We recently launched Vertex AI to help you move machine learning (ML) from experimentation into production faster and manage your models with confidence—speeding up your ability to improve outcomes at your organization.
But we know many of you are just getting started with ML and there’s a lot to learn! In tandem with building the Vertex AI platform, our teams are dropping as much best practices content as we can to help you come up to speed. Plus, we have a dedicated event on June 10th, Applied ML Summit, with sessions on how to apply ML technology in your projects, as well as grow your skills in this field.
In the meantime, we couldn’t resist a quick lesson on hyperparameter tuning, because (a) it’s incredibly cool (b) you will impress your coworkers (c) Google Cloud has some unique battle tested tech in this area and (d) you will save time by getting better ML models into production faster. Vertex Vizier, on average, finds optimal parameters for complex functions in over 80% fewer trials than traditional methods.
So it’s incredibly cool, but what is it?
While machine learning models automatically learn from data, they still require user-defined knobs which guide the learning process. These knobs, commonly known as hyperparameters, control, for example, the tradeoff between training accuracy and generalizability. Examples of hyperparameters are the optimizer being used, its learning rate, regularization parameters, the number of hidden layers in a DNN, and their sizes.
Setting hyperparameters to their optimal values for a given dataset can make a huge difference in model quality. Typically, optimal hyperparameter values are found via grid searching a small number of combinations, or tedious manual experimentation. Hyperparameter tuning automates this work for you by searching for the best configuration of hyperparameters for optimal model performance.
Vertex Vizier enables automated hyperparameter tuning in several ways:
- “Traditional” hyperparameter tuning: by this we mean finding the optimal value of hyperparameters by measuring a single objective metric which is the output of an ML model. For example, Vizier selects the number of hidden layers and their sizes, an optimizer and its learning rate, with the goal of maximizing model accuracy.
- When hyperparameters are evaluated, models are trained and evaluated on splits of the data set. If evaluation metrics are streamed to Vizier (e.g. as a function of epoch) as the model is trained, Vizier’s early stopping algorithms can predict the final objective value, and recommend which unpromising trials should be early stopped. This conserves compute resources and speeds up convergence.
- Oftentimes, models are tuned sequentially on different data sets. Vizier’s built in transfer learning learns priors from previous hyperparameter tuning studies, and leverages them to converge faster on subsequent hyperparameter tuning studies.
- AutoML is a variant of #1, where Vertex Vizier performs both model selection, and also tunes architectures/non-architecture modifying hyperparameters. AutoML usually requires more code on top of Vertex Vizier (to ingest data etc), but Vizier is in most cases the “engine” behind the process. AutoML is implemented by defining a tree like (DAG) search space, rather than a “flat” search space (like in #1). Note that you can use DAG search spaces for any other purpose where searching over a hierarchical space makes sense.
- There are times when you may wish to optimize more than one metric. For example, we would like to optimize model accuracy, while minimizing model latency. Vizier can find the Pareto frontier, which presents tradeoffs for multiple metrics, allowing users to choose the appropriate tradeoff. Simple example: I want to make a more accurate model, but would like to minimize serving latency. I do not know ahead of time what’s the tradeoff between the two metrics. Vizier can be used to explore and plot a tradeoff curve, so users can select on the most appropriate one. For example, “a latency decrease of 200ms will only decrease accuracy by 0.5%”
Google Vizier is all yours with Vertex AI
Google published the Vizier research paper in 2017, sharing our work and use cases for black-box optimization—i.e. The process of finding the best settings for a bunch of parameters or knobs when you can’t peer inside a system to see how well the knobs are working. The paper discusses our requirements, infrastructure design, underlying algorithms, and advanced features such as transfer learning that the service provides. Vizier has been essential to our progress with machine learning at Google, which is why we are so excited to make it available to you on Vertex AI.
Vizier has already tuned millions of ML models at Google, and its algorithms are continuously improved for faster convergence and handling of real-life edge cases. Vertex Vizier’s models are very well calibrated and are self-tuning (they adapt to user data), and offer unique power features, such as hierarchical search spaces and multi-objective optimization. We believe Vertex Vizier’s set of features is a unique capability to Google Cloud, and look forward to optimizing the quality of your models by automatically tuning hyperparameters for you.
To learn more about Vertex Vizier, check out these docs and if you are interested in what’s coming in machine learning over the next five years, tune in to our Applied ML Summit on June 10th, or watch the sessions on demand in your own time.
6793
Of your peers have already watched this video.
2:30 Minutes
The most insightful time you'll spend today!
What is BigQuery?
BigQuery is Google Cloud’s enterprise data warehouse designed to help you ingest, store, analyze, and visualize big data with ease.
Organizations rely on data warehouses to aggregate data from disparate sources, process it, and make it readily available for data analysis that supports their strategic decision-making.
You can ingest data into BigQuery either through batch uploading or streaming data directly to deliver real-time insights.
As a fully-managed data warehouse, Google takes care of the infrastructure so you can focus on analyzing your data up to petabyte scale.
BigQuery supports the same Structured Query Language, or SQL, for analyzing your data, which you may be familiar with if you’ve worked with ANSI-compliant relational databases in the past.
If you’re looking to create machine learning models using your enterprise data, you can do so with BigQuery ML.
With only a few lines of SQL, you can train and execute models on your BigQuery data without needing to move it around.
When it comes time to visualize your data, BigQuery integrates with Looker, as well as several other business intelligence tools across our partner ecosystem.
Now, how do you use BigQuery?
Luckily, it’s straightforward to get up and running with BigQuery.
After creating a GCP project, you can immediately start querying public data sets, which Google Cloud hosts and makes available to all BigQuery users, or you can load your own data into BigQuery to analyze.
Interacting with BigQuery to load data, run queries, or even create ML models can be done in three different ways.
First is by using the UI and the Cloud Console. Second is by using the BigQuery command line tool. And third is by making calls to the BigQuery API, using client libraries available in several languages.
BigQuery is integrated with Google Cloud’s Identity and Access Management Service so you can securely share your data and analytical insights across the organization.
What does it cost to use BigQuery?
With BigQuery, you pay for storing and querying data and streaming inserts.
Loading and exporting data are free of charge.
Storage costs are based on the amount of data stored and have two rates based on how often the data is changing.
Query costs can be either on demand, meaning you are charged per query by the amount of data processed, or flat rate for customers who want to purchase dedicated resources.
Accuracy and Real-time Updates with Google Maps’ On-Demand Rides and Delivery Solution Impacts CX

5633
Of your peers have already read this article.
3:00 Minutes
The most insightful time you'll spend today!
Last year we launched our on-demand rides and delivery solution to help businesses improve operations as well as transform the driver and customer journey from booking to arrival or delivery. When it comes to on-demand rides and deliveries, every minute matters. When users book a ride or order food, they want a seamless experience and real-time accurate updates. Today, we’re taking a closer look into data quality improvements for location, time and distance accuracy, and motorbike routes.
Machine learning helps drive location accuracy
Location accuracy stands at the base of our customers’ operation. The location signals that are coming from mobile devices can sometimes be off for various reasons and a driver’s location can get stuck, or jump around.
Recently we developed mechanisms in our fleet management product that can take in multiple location signals and determine the most reliable location to use for a given vehicle. With that, we noticed drastic improvements:
- Eliminated long periods of location ‘stuckness’ almost completely; a vehicle is considered ‘stuck’ when we think it’s moving but the measured location is not
- Reduced the jumpiness of the location signal by 52%-86%: ‘jumpiness’ is when a vehicle shows a sudden and usually drastic change in location. A jump is determined to exist when the speed the vehicle had to go at in order to cover the distance it did is unrealistic
- Reduced the average jump distance by 44%-86% : ‘jump distance’ is the distance between two consecutive location pings when we determined a ‘location jump’ has occurred.
Dunzo, a local e-commerce platform in India, explains how integrating the order tracking capability within Google Maps Platform’s On Demand Rides and Delivery solution has helped reduce support calls by 90%. The out-of-the-box solution helped Dunzo’s motorbike delivery partners with updating location sync to reduce stuckness and jumpiness as well as deliver premium user experiences.
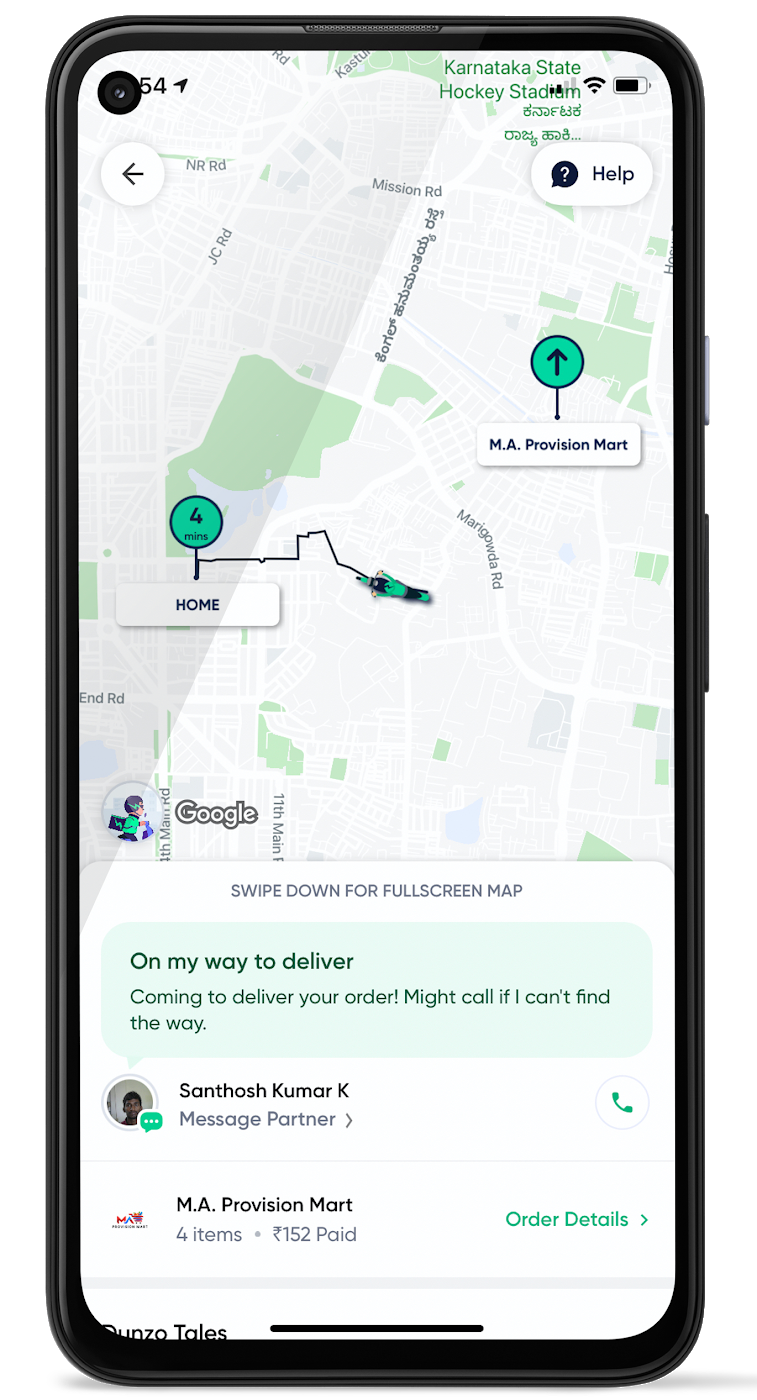
When the vehicle location is more reliable, the dispatch decision is of higher quality, meaning there is a higher chance you will be able to make the optimal decision. This can lead to less wait time for consumers, increased driver happiness and fewer cancellations.
Improvements in ETA accuracy in motorbike routes
In many geographic areas, road space is limited and car ownership is prohibitively expensive so motorbike is a prominent transportation mode. Motorbike mapping requires unique routing, ETA models, and navigation capabilities. Improvements in motorbike routing and ETA estimation have enabled customers like Gojek to offer better overall services, even in geographies with poor wifi or missing roads.
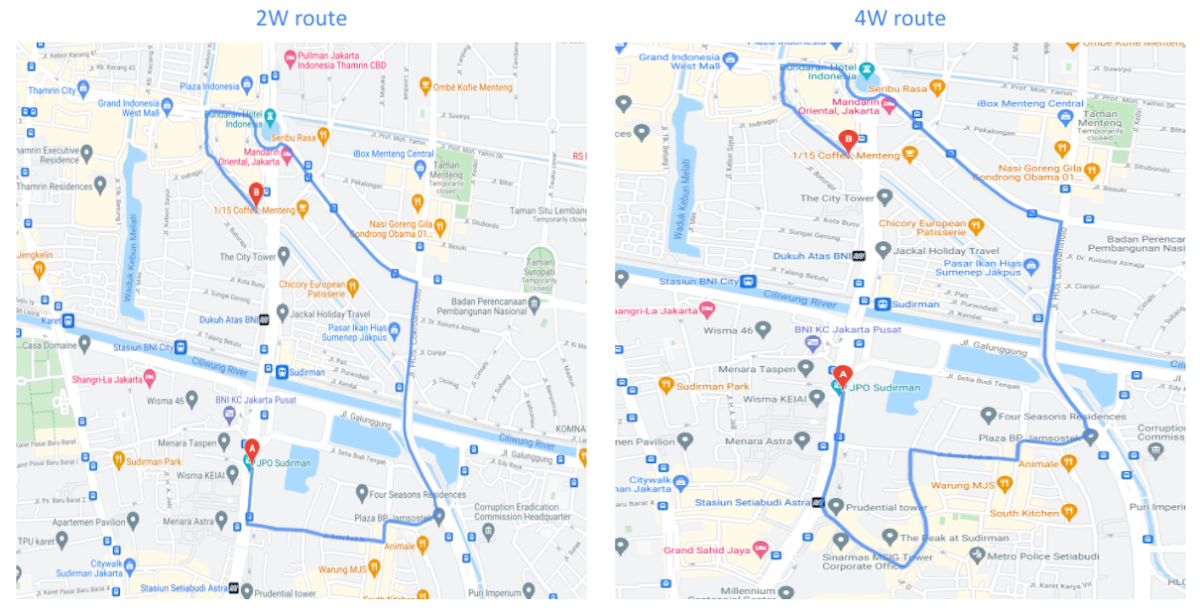
Recently, we further improved ETA outcomes by developing new machine learning models trained specifically for motorbikes. These models help our systems account for differences in congestion and traffic flow that arise in different regions and scenarios.
Globally, we measured an ~8% improvement in ETA accuracy for riders in the general public, and a ~6% improvement in on-demand rides and deliveries ETA accuracy. In this on-demand economy, where consumers are accustomed to real-time trip and order progress, these improvements will significantly improve their experience.
We will continue to innovate on both our car and motorbike on-demand rides and deliveries capabilities based on customer demand and requirements. We are committed to the success of our customers by building a seamless experience for all parties—consumers, drivers, and fleet operators—in the rides and deliveries journey.
For more information on Google Maps Platform, visit our website.
Speak Now to Book a Flight: easyJet’s Uses AI to Improve Customer Experience

3472
Of your peers have already read this article.
4:30 Minutes
The most insightful time you'll spend today!
With a growing fleet of 325 aircraft that cover more than 1,000 routes across 158 airports, easyJet is one of Europe’s most popular airlines. And easyJet serves an average of 90 million passengers each year, so a helpful mobile experience for its customers is a top priority.
Travellers today are inherently mobile-first, so finding new ways to make it easier for them to search and book flights is key. To do exactly that, easyJet partnered with technology company Travelport to develop Speak Now, a new feature on easyJet’s mobile app that interprets voice searches to deliver accurate and relevant flight information to travelers.
See how it works:
Powered by Dialogflow, Google Cloud’s natural language understanding tool for building conversational experiences, Speak Now lets customers ask questions to determine exactly what they’re looking for—from destinations, to dates and times, to airports they want to fly from.
Dialogflow, a core component of Google Cloud Contact Center AI, makes it easy to build accurate, flexible conversation interfaces that allow users to ask questions and accomplish tasks in everyday language.
How do we create conversational experiences across devices and platforms for enterprises?
It’s clear that the rise in voice search is changing the way we go about our daily lives. Twenty-seven percent of the global online population already uses voice search on mobile, and the rapid adoption of this technology is reshaping entire industries. It’s no surprise that easyJet looked to adopt this technology to positively transform experiences for their customers.
Dialogflow, a core component of Google Cloud Contact Center AI, makes it easy to build accurate, flexible conversation interfaces that allow users to ask questions and accomplish tasks in everyday language. It understands the nuances of human language and translates end-user text or audio during a conversation to structured data that apps and services can understand.
Speak Now is a great example of how we’re using cloud technologies and AI to make the experience of buying and managing travel continually better for everyone.
Daniel Young, Head of Digital Experience, easyJet
Daniel Young, Head of Digital Experience at easyJet commented: “We picked Dialogflow due to its strengths and ease with which a powerful conversational agent can be built. Speak Now is a great example of how we’re using cloud technologies and AI to make the experience of buying and managing travel continually better for everyone. This is the latest in a series of innovative features that will make booking travel as easy as it can possibly be, giving easyJet customers a helpful digital experience.”
Consumers already rely on voice assistants to play their favorite music, add items to a shopping list, and order taxis, Speak Now is a great example of how voice assistants can now make the customer experience better and more intuitive for travel.
The Future of Workloads: Google Cloud’s Purpose-Built Infrastructure Evolution

3821
Of your peers have already read this article.
3:30 Minutes
The most insightful time you'll spend today!
For far too long, cloud infrastructure has focused on raw speeds and feeds of building blocks such as VMs, containers, networks, and storage. Today, Moore’s law is slowing, and the burden of picking the right combination of infrastructure components increasingly falls on IT.
At Google Cloud we are committed to removing that burden. We’ve engineered golden paths from silicon to the console, with a recipe of purpose-built infrastructure, prescriptive architectures, and an ecosystem to deliver workload-optimized infrastructure. And at this year’s Google Cloud Next, we made some exciting new announcements across key workloads.
In this post, we will put the new Google Cloud releases and capabilities in the context of popular workloads: From AI/ML to high performance computing and data analytics, to SAP, VMware, and mainframes.
Powering AI/ML workloads
No single technology has the potential to drive more transformation than AI and ML. At Next, we announced several new AI-based services: Translation Hub and DocAI services, and the OpenXLA Project, an open-source ecosystem of ML compiler technologies co-developed by a consortium of industry leaders.
To build these innovative services, you also need a powerful infrastructure platform. Today, we announced the following additions to our compute offerings:
- Cloud TPU v4 Pods – Now in General Availability (GA), Google’s advanced machine learning infrastructure is based on the world’s largest publicly available ML hub in Oklahoma and offers up to 9 exaflops of peak aggregate compute. Developers and researchers can use TPU v4 to train increasingly sophisticated models to power workloads such as large-scale natural language processing (NLP), recommendation systems, and computer vision algorithms in a cost effective and sustainable way. In June 2022, Cloud TPU v4 recorded the fastest training times on five MLPerf 2.0 benchmarks, with up to 80% better performance and up to 50% lower cost of training than the next best available alternative.
- A2 Ultra GPU VM instances – Now GA, you can use A2 Ultra GPU VM instances with Compute Engine, Google Kubernetes Engine and Deep Learning VMs. A2 Ultra GPUs have the largest and fastest GPU memory of the Google Cloud portfolio and are optimized for large AI/ML and HPC workloads with use cases such as AI assistants, recommendation systems, and autonomous driving. Powered by NVIDIA A100 Tensorcore GPU with 80 GBs of GPU memory, A2 Ultra delivers 25% higher throughput on inference and 2x higher performance on HPC simulations than original A2 machine shapes.
Learn more about A2 Ultra and hear how you can accelerate your ML development and learn from our customers Uber and Cohere in breakout session MOD300.
Boost HPC and data-intensive workloads
Customers rely on Google Cloud to help them run data-intensive workloads such as HPC and Hadoop. The new C3 machine series (currently in Preview) is the first in the public cloud to include the new 4th Gen Intel Xeon processor and Google’s custom Intel Infrastructure Processing Unit that enables 200Gbps, low-latency networking. Learn more about top HPC best practices in breakout session MOD106.
You can pair the C3 with Hyperdisk (currently in Private Preview), our new generation block storage, which offers 80% higher IOPS per vCPU for high-end database management system (DBMS) workloads when compared to other hyperscalers. Data workloads such as Hadoop and databases may no longer need oversized compute instances to benefit from high IOPS. Learn more about Hyperdisk in breakout session MOD206.
Enable new streaming experiences
Media and entertainment customers want streaming optimized workloads that build on our innovation in edge and our global network. Here are some new developments to support streaming use cases:
- Cloud CDN, our original content delivery networking offering, now offers Dynamic compression to reduce the size of responses transferred from the edge to a client, significantly helping to accelerate page load times and reduce egress traffic.
- Media CDN, introduced earlier this year, now supports the Live Stream API to ingest and package source content into HTTP-Live Streaming and DASH formats for optimized live streaming. We are also enabling two new developer-friendly integrations in Preview for Media CDN: Dynamic Ad Insertion with Google Ad Manager, which provides customized video ad placements, and third-party Ad Insertion using our Video Stitcher API for personalized ad placement. With these options, content producers can introduce additional monetization and personalization opportunities to their streaming services.
- For advanced customization, we are introducing the Preview of Network Actions for Media CDN, a fully managed serverless solution based on open-source web assembly that enables programmability for customers to deploy their own code directly in the request/response path at the edge.
With Media CDN, customers like Paramount+ are able to deliver a high-quality experience on the same Google infrastructure we’ve tested and tuned to serve YouTube’s 2 billion users globally.
“Streaming is one of the key growth areas for Paramount Global. When we migrated traffic onto Media CDN, we observed consistently superior performance and offload metrics. Partnering with Google Cloud enables us to provide our subscribers with the highest quality viewing experience.” — Chris Xiques, SVP of Video Technology Group, Paramount Global
Bringing Google Cloud to your workloads
For customers in regulated markets and in countries with strict sovereignty laws, Google Cloud has a spectrum of offerings to help them achieve varying degrees of sovereignty. Sovereign Controls by T-Systems is now GA, and Local Controls by S3NS, the Thales-Google partnership, is now available in Preview. You can expect more region and market announcements in the coming months. And for the most stringent sovereignty needs, we offer Google Distributed Cloud Hosted for a disconnected Google Cloud footprint deployed at the customer’s chosen site.
We are also expanding functionality for existing offerings to give you even more options to run your cloud where you want, how you want.
- Anthos, our cloud-centric container platform to run modern apps anywhere consistently at scale, now has a more robust user interface and an upgraded fleet management experience. Create, update, and reconfigure your Anthos clusters the same way from one dashboard or command-line interface, wherever your clusters run. New fleet management capabilities let you manage growing fleets of container clusters across clouds, on-premises, and at the edge and for different use cases (isolate dev from prod, apply fleet-specific security controls, enforce configurations fleet-wide). And we are pleased to announce the GA of virtual machine support on Anthos clusters for retail edge environments. Learn more about how Anthos can help you run modern applications anywhere in breakout session MOD208.
- Google Distributed Cloud Edge GPU-Optimized Config, is now GA in server-rack form factors powered by 12 Nvidia T4 GPUs. GDC Edge is designed to enable low-latency and high-performance hybrid workloads as a complement to your primary Google Cloud environment or as an independent edge deployment. We’re seeing early adoption by customers and partners for workloads such as augmented reality and retail self-checkout. In addition, software partners such as 66degrees are taking advantage of GDC Edge GPU optimization to provide real-time insights on in-store product availability, while Ipsotek is using machine intelligence at the edge to perform crowd and foot-traffic analysis in large locations such as malls, airports and railway stations. Learn more about GDC Edge and new partner validated solutions here, or watch breakout session MOD207 to hear how you can modernize your data center and accelerate your edge.
Infrastructure building blocks for cloud-first workloads
For most new projects, developers prefer them to be cloud-first optimized workloads, and nearly half of all developers use containers today. Google Kubernetes Engine (GKE) is the most automated and scalable container management service on the market today, and when you use GKE Autopilot, developers can get started faster than other leading cloud providers. At Next ‘22, we’re excited to unveil:
- A new workshop to help you discover how to unlock efficiency and innovation with a GKE Autopilot — sign up to get started.
- A new security posture management dashboard in GKE that provides opinionated guidance on Kubernetes security along with bundled tools to expertly help improve the security posture of your Kubernetes clusters and workloads.
When building scalable web applications or running background jobs that require lightweight batch processing, developers are increasingly turning to serverless technologies. We’re helping developers choose serverless with numerous updates to Cloud Run, our managed serverless compute service.
- With new Cloud Run integrations, Cloud Run and Google Cloud services work together smoothly. For example, configuring domains with a Load Balancer or connecting to a Redis Cache is now as easy as a single click, with more scenarios on the way.
- Cloud Run customized health checks for services is now available in Preview, providing user-defined HTTP and TCP Startup probes at the container level. This capability allows Cloud Run users to define criteria as to when their application has started and is ready to start serving traffic, and is particularly useful for applications that might require additional startup time on their first initialization.
- To make continuous deployment easier for our customers, we added an integration between Cloud Deploy, our fully managed continuous deployment service, and Cloud Run. With this integration in place, you can do continuous deployment through Cloud Deploy directly to Cloud Run, with one-click approvals and rollbacks, enterprise security and audit, and built-in delivery metrics. Learn more on Cloud Deploy web page.
Learn more about how to build next-level web applications with Cloud Run in breakout session BLD203.
You also need confidence in the building blocks that make up your workloads from the outset. To help get you started, we introduced Software Delivery Shield, which provides a comprehensive suite of tools offering a fully managed, end-to-end solution that helps protect your software supply chain. The Software Delivery Shield launch also included the following announcements:
- Cloud Workstations, currently in Preview, provides fully-managed development environments built to meet the needs of security-sensitive enterprises. With Cloud Workstations, developers can access secure, fast, and customizable development environments via a browser anytime and anywhere, with consistent configurations and customizable tooling. To learn more about Cloud Workstations, please visit the web page and check out breakout session BLD100.
- A new partnership with JetBrains provides fully managed Jetbrains IDEs as part of Cloud Workstations. This integration can give developers access to several popular IDEs with minimal management overhead for their admin teams.
Read more about Software Delivery Shield.
Open source and open standards are an important part of building applications. With that, we are excited to announce that Google has joined the Eclipse Adoptium Working Group, a consortium of leaders in the Java community working to establish a higher quality, developer-centric standard for Java distributions. Also, we are making Eclipse Temurin available across Google Cloud products and services. Eclipse Temurin provides Java developers a higher quality developer experience and more opportunities to create integrated, enterprise-focused solutions, with the openness they deserve.
Pioneering new technology with Web3 optimized infrastructure
It’s incredible to see the energy in Web3 right now and the focus on developing the broader benefits, use cases, and core capabilities of blockchain. We are helping customers with scalability, reliability, security, and data, so they can spend the bulk of their time on innovation in the Web3 space — unlocking deep user value and building the next app to attract a billion users to the ecosystem.
Companies like Near, Nansen, Solana, Blockdaemon, Dapper Labs & Sky Mavis use Google Cloud’s infrastructure. Yesterday, we announced a strategic partnership with Coinbase to better serve the growing Web3 ecosystem.
“We could not ask for a better partner to execute our vision of building a trusted bridge into the Web3 economy and accelerating broader growth and adoption of blockchain technology. I started Coinbase with a desire to create a more accessible financial system for everyone, and Google’s history of supporting open source and decentralized ecosystems made this a natural fit. Our partnership marks a major inflection point and, together, we are removing barriers to blockchain adoption and accelerating innovation.” — Brian Armstrong, CEO, Coinbase
Lift and transform traditional workloads
Not all workloads were born in the cloud — or have completed their journey to it. Google Cloud offers a variety of programs and capabilities to help optimize traditional workloads for a new cloud era, regardless of whether you’re looking to migrate it as-is, do light optimizations, or fully modernize and transform:
- Migration Center – Now in Preview. For organizations looking to migrate to the cloud and transform their businesses, Migration Center can reduce the complexity, time, and cost by providing an integrated migration and modernization experience. It brings together our assessment, planning, migration, and modernization tooling in one centralized location with a shared data platform so you can proceed faster, more intelligently, and more easily through your journey. Learn more at the Migration Center webpage.
- Google Cloud VMware Engine – Google Cloud is the first VMware partner to market with VMware Cloud Universal support, simplifying the migration of on-premises VMware VMs to VMware Engine in the cloud. With a cloud market-leading 99.99% availability SLA in a single site, VMware Engine is helping large organizations like Carrefour move to Google Cloud.
- Dual Run for Google Cloud – Now in Preview, this first-of-its-kind solution helps eliminate many of the common risks associated with mainframe modernizations by letting customers simultaneously run workloads on their existing mainframes and their modernized version on Google Cloud. This means customers can perform real-time testing and quickly gather data on performance and stability with no disruption to their business. Once satisfied that the performance of the two systems is functionally equivalent, the customer can make the Google Cloud environment the system of record, and operate the existing mainframe system as needed, typically as a backup. Learn more about Dual Run in this press release or on our Mainframe Modernization webpage.
- Google Cloud Workload Manager – Now in Preview for SAP workloads, and available in the Google Cloud console, Workload Manager provides automated analysis of your enterprise systems on Google Cloud to help continuously improve system quality, reliability, and performance. Google Cloud Workload Manager evaluates your SAP workloads by detecting deviations from documented standards and best practices to help proactively prevent issues, continuously analyze workloads, and simplify system troubleshooting.
Learn more about how organizations like Global Payments and Loblaw Technology have migrated with ease and speed in breakout session MOD104.
Protect all your workloads
The foundation of any workload is storage, and this year we expanded the number of supported regions with our Cloud Storage dual-region buckets (GA), so you can ensure that your workloads are protected. In the event of an outage, your application can easily access the data in the alternate region. You can add Turbo replication (GA) with your dual-region buckets. Turbo replication is backed by a 15-minute Recovery Point Objective (RPO) SLA.
Also, we recently announced Google Cloud’s Backup and DR Service (GA). This service is a fully integrated data-protection solution for critical applications and databases that lets you centrally manage data protection and disaster recovery policies directly within the Google Cloud console, and fully protect databases and applications with a few mouse clicks.
Learn more about Storage best practices in breakout session MOD206.
Migrate, observe, and secure network traffic
We also announced many new capabilities and enhancements to the Cloud Networking portfolio that help customers migrate, modernize, secure, and observe workloads traveling to and in Google Cloud:
- Private Service Connect helps simplify migrations by giving more control to users and integrations with 5 new partners.
- Network Intelligence Center can monitor the network for you with enhanced capabilities like the Performance Dashboard that will give you latency visibility between Google Cloud and the Internet.
- We expanded our Cloud Firewall product line and introduced two new tiers: Cloud Firewall Essentials and Cloud Firewall Standard.
For more information on what’s new with networking, read this blog and check out breakout session MOD205.
Optimize costs
Our customers’ workloads also require technical and commercial options that can deliver the best return on their investments. Here are some new enhancements that can help:
- Flex CUDs – GA coming soon, Flexible Committed Use Discounts help you save up to 46% off on-demand Compute Engine VM pricing, in exchange for a one- or three-year commitment. Like standard CUDs, you can apply Flex CUDs across projects within the same billing account, to VMs of different sizes, and across operating systems. Learn more.
- Batch – Now GA, Batch is a fully managed service that helps you run batch jobs easily, reliably, and at scale. Without having to install any additional software, Batch dynamically and efficiently manages resource provisioning, scheduling, queuing, and execution, freeing you up to focus on analyzing results. There’s no charge for using Batch, and you only pay for the resources used to complete the tasks.
Learn more about how you can optimize for cost savings with Google Cloud in MOD103.
Optimize for sustainability
Any new workloads you develop should have the smallest possible carbon footprint. Google Cloud Carbon Footprint helps you measure, report, and reduce your cloud carbon emissions, and is now GA. Since introducing Carbon Footprint last year, we added features that cover Scope 1, 2 and 3 emissions, and provided role-based access to other users such as sustainability teams. Active Assist’s carbon emissions estimates related to removing unattended projects are also now GA. Learn how to build a more sustainable cloud with lower carbon emissions in MOD103, and start using Carbon Footprint today.
“At Box, we’re focused on reducing our carbon footprint and we’re excited for the visibility and transparency the Carbon Footprint tool will provide as we continue our work to operate sustainably.” — Corrie Conrad, VP Communities and Impact and Executive Director of Box.org at Box
“At SAP we’re working to achieve net-zero by 2030, making it crucial to measure carbon emissions all along our value chain. Collaborating with Google Cloud on Carbon Footprint ensures that accurate emissions data is available in a timely manner, helping our many Solution Areas make more sustainable decisions.” — Thomas Lee, SVP and Head of Multicloud Products and Services at SAP
Designed around your workloads
These are only a few examples of the many golden paths we are enabling for your workloads. We strive to be the ‘open infrastructure cloud’ that is the most intuitive to consume because everything is designed around your workloads, providing tremendous TCO benefits.
To get even more information on all of this and more check out the Modernize breakout session track and these “What’s New” sessions available on demand at Next ’22:
- MOD105 to learn about new infrastructure solutions for enterprise architects and developers.
- BLD106 to learn what’s new to help developers build, deploy, and run applications.
- OPE100 to learn about the biggest announcements for DevOps teams, sysadmins, and operators.
How to Build A Basic Image Search Utility for Natural Language Queries

4686
Of your peers have already read this article.
6:00 Minutes
The most insightful time you'll spend today!
This post shows how to build an image search utility using natural language queries. Our aim is to use different GCP services to demonstrate this. At the core of our project is OpenAI’s CLIP model. It makes use of two encoders – one for images and one for texts. Each encoder is trained to learn representations such that similar images and text embeddings are projected as close as possible.
We will first create a Flask-based REST API capable of handling natural language queries and matching them against relevant images. We will then demonstrate the use of the API through a Flutter-based web and mobile application. Figure 1 shows how our final application would look like:
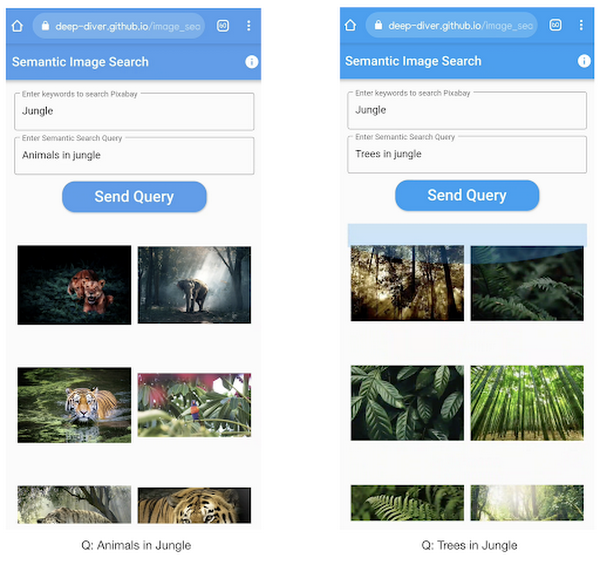
All the code shown in this post is available as a GitHub repository. Let’s dive in.
Application at a high-level
Our application will take two queries from the user:
- Tag or keyword query. This is needed in order to pull a set of images of interest from Pixabay. You can use any other image repositories for this purpose. But we found Pixabay’s API to be easier to work with. We will cache these images to optimize the user experience. Suppose we wanted to find images that are similar to this query: “horses amidst flowers”. For this, we’d first pull in a few “horse” images and then run another utility to find out the images that best match our query.
- Longer or semantic query that we will use to retrieve the images from the pool created in the step above. These images should be semantically similar to this query.
Note: Instead of two queries, we could have only taken a single long query and run named-entity extraction to determine the most likely important keywords to run the initial search with. For this post, we won’t be using this approach.
Figure 2 below depicts the architecture design of our application and the technical stack used for each of the components.
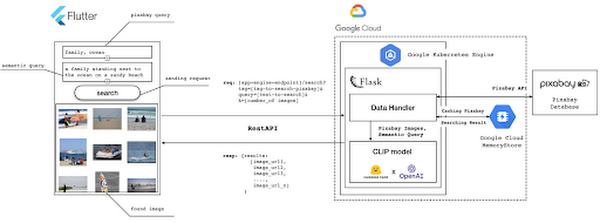
Figure 2 also presents the core logic of the API we will develop in bits and pieces in this post. We will deploy this API on a Kubernetes cluster using the Google Kubernetes Engine (GKE). The following presents a brief directory structure of our application code-base:
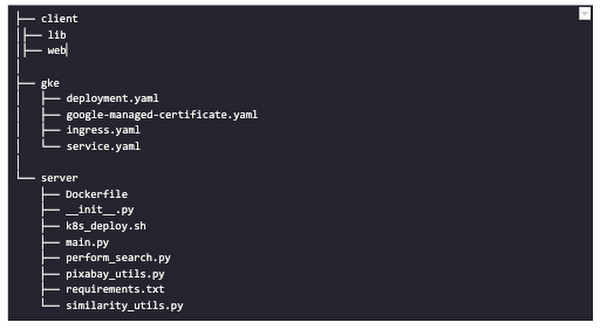
Next, we will walk through the code and other related components for building our image search API. For various machine learning-related utilities, we will be using PyTorch.
Building the backend API with Flask
First, we’d need to fetch a set of images with respect to user-provided tags/keywords before performing the natural language image search. The utility below from the pixabay_utils.py script can do this for us:
def fetch_images_tag(pixabay_search_keyword, num_images):"""Fetches images from Pixabay w.r.t a keyword.:param pixabay_search_keyword: Keyword to perform the search on Pixabay.:param num_images: Number of images to retrieve.:return: List of PIL images.:return: List of image URLs."""query = (PIXABAY_API+ "&q="+ pixabay_search_keyword.lower()+ "&image_type=photo&safesearch=true&per_page="+ str(num_images))response = requests.get(query)output = response.json()all_images = []all_image_urls = []for each in output["hits"]:imageurl = each["webformatURL"]response = requests.get(imageurl)image = Image.open(BytesIO(response.content)).convert("RGB")all_images.append(image)all_image_urls.append(imageurl)return (all_images, all_image_urls)
Note that all the API utilities are logging relevant information. But for brevity, we have omitted the lines of code responsible for that. Next, we will see how to invoke the CLIP model and select the images that would best match a given query semantically. For this, we’ll be using Hugging Face, an easy-to-use Python library offering state-of-the-art NLP capabilities. We’ll collate all the logic related to this search inside a SimilarityUtil class:
class SimilarityUtil:def __init__(self):self.model = CLIPModel.from_pretrained(CLIP_MODEL)self.processor = CLIPProcessor.from_pretrained(CLIP_PREPROCESSOR)self.device = "cuda" if torch.cuda.is_available() else "cpu"def perform_sim_search(self, images, query_phrase, top_k=3):"""Performs similarity search between the images and query.:param images: A list of PIL images initially retrieved withrespect to some entity e.g. Tiger.:param query_phrase: A list containing a single text query,e.g. "Tiger drinking water".:param top_k: Number of top images to return from `images`.:return: Top-k indices matching the query semantically andtheir similarity scores."""model = self.model.to(self.device)# Obtain the text-image similarity scoreswith torch.no_grad():inputs = self.processor(text=[query_phrase], images=images, return_tensors="pt", padding=True)inputs = inputs.to(self.device)outputs = model(**inputs)# Image-text similarity scoreslogits_per_image = outputs.logits_per_image.cpu()(top_indices, top_scores) = self.sort_scores(logits_per_image, top_k)return (top_indices, top_scores)def sort_scores(self, scores, top_k):"""Sorts the scores in a descending manner.:param scores: Scores to sort through.:param top_k: Number of top scores to return.:return: Top-k scores and their indices."""values, indices = scores.squeeze().topk(top_k)top_indices, top_scores = [], []for score, index in zip(values, indices):top_indices.append(int(index.numpy()))score = score.numpy().tolist()top_scores.append(round(score, 3))return (top_indices, top_scores)
CLIP_MODEL uses a ViT-base model to encode the images for generating meaningful embeddings with respect to the provided query. The text-based query is also encoded using A Transformers-based model for generating the embeddings. These two embeddings are matched with one another during inference. To know more about the particular methods we are using for the CLIP model please refer to this documentation from Hugging Face.
In the code above, we are first invoking the CLIP model with images and the natural language query. This gives us a vector (logits_per_image) that contains the similarity scores between each of the images and the query. We then sort the vector in a descending manner. Note that we are initializing the CLIP model while instantiating the SimilarityUtil to save us the model loading time. This is the meat of our application and we have tackled it already. If you want to interact with this utility in a live manner you can check out this Colab Notebook.
Now, we need to collate our utilities for fetching images from Pixabay and for performing the natural language image search inside a single script – perform_search.py. Following is the main class of that script:
class Searcher:def __init__(self):self.similarity_model = SimilarityUtil()def get_similar_images(self, keyword, semantic_query, pixabay_max, top_k):"""Finds semantically similar images.:param keyword: Keyword to search with on Pixabay.:param semantic_query: Query to find semantically similar images retrieved from Pixabay.:param pixabay_max: Number of maximum images to retrieve from Pixabay.:param top_k: Top-k images to return.:return: Tuple of top_k URLs and the similarity scores of the images present inside the URLs."""images_redis_key = keyword + "_images"urls_redis_key = keyword + "_urls"if redis_client.exists(images_redis_key) and redis_client.exists(urls_redis_key):keyword_images = redis_client.get(images_redis_key)keyword_image_urls = redis_client.get(urls_redis_key)else:(keyword_images, keyword_image_urls) = fetch_images_tag(keyword, pixabay_max)redis_client.set(images_redis_key, keyword_images)redis_client.set(urls_redis_key, keyword_image_urls)(top_indices, top_scores) = self.similarity_model.perform_sim_search(keyword_images, semantic_query, top_k)top_urls = [keyword_image_urls[index] for index in top_indices]return (top_urls, top_scores)
Here, we are just calling the utilities we had previously developed to return the URLs of the most similar images and their scores. What is even more important here is the caching capability. For that, we combined GCP’s MemoryStore and a Python library called direct-redis. More on setting up MemoryStore later.
MemoryStore provides a fully managed and low-cost platform for hosting Redis instances. Redis databases are in memory and light-weight making them an ideal candidate for caching. In the code above, we are caching the images fetched from Pixabay and their URLs. So, in the event of a cache hit, we won’t need to call the CLIP model and this will tremendously improve the response time of our API.
Other options for caching
We can cache other elements of our application. For example, the natural language query. When searching through the cached entries to determine if it’s a cache hit, we can compare two queries for semantic similarity and return results accordingly.
Consider that a user had entered the following natural language query: “mountains with dark skies”. After performing the search, we’d cache the embeddings of this query. Now, consider that another user entered another query: “mountains with gloomy ambiance”. We’d compute its embeddings and run a similarity search with the cached embeddings. We’d then compare the similarity scores with respect to a threshold and parse the most similar queries and their corresponding results. In case of a cache miss, we’d just call the image search utilities we developed above.
When working on real-time applications we often need to consider these different aspects and decide what enhances the user experience and maximizes business at the same time.
All that’s left now for the backend is our Flask application – main.py:
@app.route("/search", methods=["GET"])def get_images():tag = request.args.get("t").lower()query = request.args.get("s_query").lower()top_k = request.args.get("k")(top_urls, top_scores) = searcher.get_similar_images(tag, query, MAX_PIXABAY_SEARCH, int(top_k))return jsonify({"top_urls": top_urls, "top_scores": top_scores})
Here we are first parsing the query parameters from the request payload of our search API. We are then just calling the appropriate function from perform_search.py to handle the request. This Flask application is also capable of handling CORS. We do this via the flask_cors library:
cors = CORS(app,resources={r"/search/*": {"origin": "*"},r"/test/*": {"origin": "*"},},)
And this is it! Our API is now ready for deployment.
Deployment with Compute Engine and GKE
The reason why we wanted to deploy our API on Kubernetes is because of the flexibility Kubernetes offers for managing deployments. When operating at scale, auto scalability and load balancing are very important. With the comes the requirement of security — we’d not want to expose the utilities for interacting with any internal services such as databases. With Kubernetes, we can achieve all these easily and efficiently.
GKE provides secured and fully managed functionalities for operationalizing Kubernetes clusters. Here are the steps to deploy the API on GKE at a glance:
- We first build a Docker image for our API and then push it to the Google Container Registry (GCR).
- We then create a Kubernetes cluster on GKE and initialize a deployment.
- We then add scalability options.
- If any public exposure is needed for the API, we then tackle it.
We can assimilate all the above into a shell script – k8s_deploy.sh:
## Docker build and push ### We are inside the `server` directorydocker build -t gcr.io/${PROJECT_ID}/search_service .docker push gcr.io/${PROJECT_ID}/search_service## Deploy on a GKE cluster ### Configure the Docker command-line tool to authenticate to Container Registrygcloud auth configure-docker# Create a Kubernetes clustergcloud container clusters create image-search-nlp# Create a deploymentkubectl create deployment clip-search --image=gcr.io/${PROJECT_ID}/search_service# Number of worker replicaskubectl scale deployment clip-search --replicas=3# HorizontalPodAutoscaler resourcekubectl autoscale deployment clip-search --cpu-percent=80 --min=1 --max=5# Expose deploymentkubectl expose deployment clip-search --name=clip-search-service --type=LoadBalancer --port 80 --target-port 8080
These steps are well explained in this tutorial that you might want to refer to for more details. We can configure all the dependencies on our local machine and execute the shell script above. We can also use the GCP Console to execute it since a terminal on the GCP Console is pre-configured with the system-level dependencies we’d need. In reality, the Kubernetes cluster should only be created once and different deployment versions should be created under it.
After the above shell script is run successfully, we can run kubectl get service to know the external IP address of the service we just deployed:
NAME CLUSTER-IP EXTERNAL-IP PORT(S) AGEclip-search-service 10.3.251.122 203.0.113.0 80:30877/TCP 10s
We can now consume this API with the following base URI: http://203.0.113.0/. If we wanted to deal with only http-based API requests, then we are done here. But secured communication is often a requirement in order for applications to operate reliably. In the following section, we are to discuss how to configure the additional items to allow our Kubernetes cluster to allow https requests.
Configurations for handling https requests with GKE
A secure connection is almost often a must-have requirement in modern client/server applications. The front-end Flutter application would be hosted on GitHub Pages for this project, and it requires https-based connection as well. Even if configuring https connection particularly for a GKE-based cluster can be considered a chore, its setup might seem daunting at first.
There are six steps to configure https connection in the GKE environment:
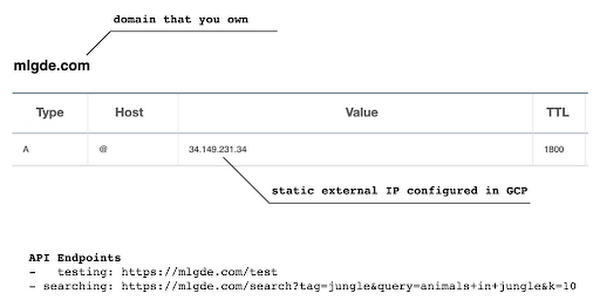
- You need to have a domain name, and there are a lot of inexpensive options that you can buy. For instance, mlgde.com domain for this project is acquired via Gabia which is a Korean service provider.
- A reserved (static) external IP address has to be acquired via gcloud command or GCP console.
- You need to bind the domain name with the acquired external IP address. This is a platform-specific configuration that issued the domain name to you.
- There is a special ManagedCertificate resource which is specific to the GKE environment. ManagedCertificate resource specifies the domain that the SSL certificate will be created for, so you need this.
- An Ingress resource should be created by listing the static external IP address, ManagedCertificate resource, and the service name and port which the incoming traffic will be routed to. The Service resource could remain the same as in the above section with only changes from LoadBalancer to ClusterIP.
- Last but not least, you need to modify the existing Flask application and Deployment resource to support liveness and readiness probes which are used to check the health status of the Deployment. The Flask application side can be simply modified with the flask-healthz Python package, and you only need to add
livenessProbeandreadinessProbesections in the Deployment resource. In the code example below, thelivenessProbeandreadinessProbeare checked via/aliveand/readyendpoints respectively.
from flask_healthz import healthzfrom flask_healthz import HealthErrorapp = Flask(__name__)app.register_blueprint(healthz, url_prefix="/")def printok():print("Everything is fine")def liveness():try:printok()except Exception:raise HealthError("Can't connect to the file")def readiness():try:printok()except Exception:raise HealthError("Can't connect to the file")app.config.update(HEALTHZ = {"alive": "main.liveness","ready": "main.readiness",})
One thing to be careful of is the initialDelaySeconds attribute of the probes. It is uncommon to configure this attribute with a big number, but it could be bigger than 90 – 120 seconds depending on the size of the model to be used. For this project, it is configured in 90 seconds in order to wait until the CLIP model is fully loaded into memory (full YAML script here).
livenessProbe:httpGet:path: /aliveport: 8080initialDelaySeconds: 90periodSeconds: 10readinessProbe:httpGet:path: /readyport: 8080initialDelaySeconds: 90periodSeconds: 10
Again, these steps may seem daunting at first, but it will become clear when you have done it once. Here is the official document for Using Google-managed SSL certificates You can find all the GKE-related resources used in this project here.
Once every step is completed you should be able to see your server application running on the GKE environment. Please make sure to run kubectl apply command whenever you create Kubernetes resources such as Deployment, Service, Ingress, and ManagedCertificate, and it is important to wait for more than 10 minutes until the ManagedCertifcate provisioning is done.
You can run gcloud compute addresses list command to find out the static external IP address that you have configured.
NAME ADDRESS/RANGE TYPE PURPOSE NETWORK REGION SUBNET STATUSgde 34.149.231.34 EXTERNAL IN_USE
Then, the IP address has to be mapped to the domain. Figure 3 is a screenshot of a dashboard from where we got the mlgde.com domain. It clearly shows mlgde.com is mapped to the static external IP address configured in GCP.
In case you’re wondering why we didn’t deploy this application on App Engine, well that is because of the compute needed to execute the CLIP model. App Engine instance won’t fit in that regime. We could have also incorporated compute-heavy capabilities via a VPC Connector. That is a design choice that you and your team would need to consider. In our experiments, we found the GKE deployment to be easier and suitable for our needs.
Infrastructure for the CLIP model
As mentioned earlier, at the core of our application is the CLIP model. It is computationally a bit more expensive than the regular deep learning models. This is why it makes sense to have the hardware infrastructure set up accordingly to execute it. We ran a small benchmark in order to see how a GPU-based environment could be beneficial here.
We ran the CLIP on a Tesla P100-based machine and also on a standard CPU-only machine 1000 times. The code snippet below is the meat of what we executed:
DEVICE = "cuda" if torch.cuda.is_available() else "cpu"start_time = time.time()for _ in range(1000):with torch.no_grad():model = model.to(DEVICE)inputs = processor(text=[semantic_search_phrase],images=all_images, return_tensors="pt", padding=True)inputs = inputs.to(DEVICE)outputs = model(**inputs)end_time = time.time() - start_timeprint(f"Total time: {end_time:.3f} seconds.")
As somewhat expected, with the GPU, the code took 13 minutes to complete execution. With no GPU, it took about 157 minutes.
It is uncommon to leverage GPUs for model prediction because of cost restrictions, but sometimes we have to access GPUs for deploying a big model like CLIP. We configured a GPU-based cluster on GKE and compared the performance differences with and without it. It took about 1 second to handle a request with GPU and MemoryStore cache while it took more than 4 seconds with MemoryStore only (without the GPUs).
For the purposes of this post, we used a CPU-based cluster on Kubernetes. But It is easy to configure GPU usage in a GKE cluster. This document shows you how to do so. For a short summary, there are two steps. First, a node should be configured with GPUs when creating a GKE cluster. Second, GPU drivers should be installed in GKE nodes. You don’t need to visit and manually install GPU drivers for each node by yourself. Rather you can simply apply the DaemonSet resource to GKE as described here.
Setting up MemoryStore
In this project, we first query the general concept of images to Pixabay, then we filter the images with a semantic query using CLIP. It means we can cache the initially retrieved images from Pixabay for the next specific semantic query. For instance, you may want to search with “gentleman wearing tie” at first, then you may want to retry searching for “gentleman wearing glass”. In this case, the base images remain all the same, so they could be stored in a cache server like Redis.
MemoryStore is a GCP service wrapping the Redis which is an in-memory data store, so you can simply use a standard Redis Python package for accessing it. The only thing to be careful about when provisioning a MemoryStore Redis instance is to make sure it is in the same region where your GKE cluster or Compute Engine instance is.
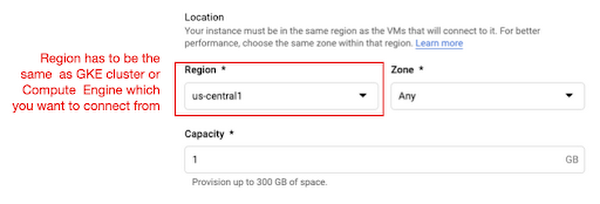
The code snippet below shows how to make a connection to the Redis instance in Python. Nothing specific to GCP, but you only need to be aware of the usage of the standard redis-py package.
# REDISHOST is the IP address to the MemoryStore instanceredis_host = os.environ.get("REDISHOST", "localhost")redis_port = int(os.environ.get("REDISPORT", 6379))redis_client = redis.StrictRedis(host=redis_host, port=redis_port)
After creating a connection, you can store and retrieve data from MemoryStore. There are more advanced use cases of Redis, but we only used exists, get, and set methods for the demonstration purpose. These methods should be very familiar if you know maps, dictionaries, or other similar data structures. For the code portion that uses Redis-related utilities, please refer to the Searcher Python class we discussed in an earlier section.
In the URLs below, you can find side-by-side comparisons of using MemoryStore:
- Without MemoryStore: https://youtu.be/7B88Eyrd-4s
- With MemoryStore (1st try): https://youtu.be/LE6xeEIRuMM
- With MemoryStore (2nd try): https://youtu.be/rRfK17sdk84
Putting everything together
All that’s left now is to collate the different components we developed in the sections above and deploy our application with a frontend. All the frontend-related code is present here.
- The front-end application is written in the Flutter development kit. The main screen contains two text fields for queries to Pixabay and CLIP model respectively. When you click the “Send Query” button, it will send out a RestAPI request to the server. After receiving the result back from the server, the retrieved images from the semantic query will be displayed at the bottom section of the screen.
- Please note that a Flutter application can be deployed to various environments including desktop, web, iOS, and Android. In order to keep as simple as possible, we chose to deploy the application to the GitHub Pages. Whenever there is any change to a client-side source directory, the GitHub Action will be triggered to build a web page and deploy the latest version to the GitHub Pages.
Our final application is deployed here and it looks like so:
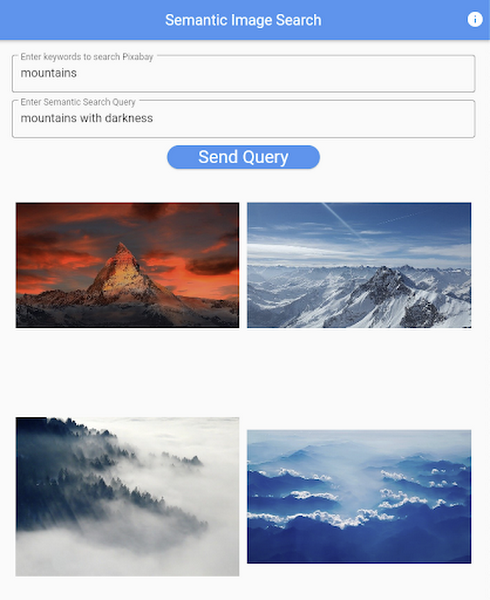
Note that due to constraints, the above-mentioned URL will only be live for one or two months.
It is also possible to redeploy the back-end application with a GitHub Action.
- The very first step is to craft a Dockerfile like below. Since Python is a scripting language, and there are lots of heavy packages that the application is dependent on, it is important to cache the steps. For instance, installing the dependencies should be separated from other commands.
FROM pytorch/pytorch:latestWORKDIR /app# install the dependenciesCOPY requirements.txt requirements.txtRUN pip install -r requirements.txtCOPY . .# set up environment variablesENV PIXABAY_API_KEY="..."ENV REDIS_IN_USE="true"ENV REDISHOST="..."# expose port that Flask app is listening onEXPOSE 8080# run the Flask appCMD [ "python3", "main.py" ]
- With the Dockerfile defined, we can use a GitHub Action like this for automatic deployment.
Edge cases
Since the CLIP model is pre-trained on a large corpus of image and text pairs it’s likely that it may not generalize well to every natural language query we throw at it. Also, because we are limiting the number of images on which the CLIP model can operate, this somehow restricts the expressivity of the model.
We may be able to improve the performance for the second situation by increasing the number of images to be pre-fetched and by indexing them into a low-cost and high-performance database like Datastore.
Costs
In this section, we wanted to provide the readers a breakdown of the costs they might incur in order to consume the various services used throughout the application.
- Frontend hosting
- The front-end application is hosted on GitHub Pages, so there is no expenditure for this.
- Compute Engine
- With an e2-standard-2 instance type without GPUs, the cost is around $48.92 per month. In case you want to add a GPU (NVIDIA K80), the cost goes up to $229.95 per month.
- MemoryStore
- The cost for MemoryStore depends on the size. With 1GB of space, the cost is around $35.77 per month, and whenever you add more GBs the cost will be doubled.
- Google Kubernetes Engine
- The monthly cost for a 3 node GKE cluster with n2-standard-2 (vCPUs: 2, RAM: 8GB without GPUs) is about $170.19. If you add one GPU (NVIDIA K80) to the cluster, the cost goes up to $835.48.
While you may think that is a lot cost-wise, it is good to know that Google gives away free $300 credits when you create a new GCP account. It is still not enough for leveraging GPUs, but it is enough to learn and experiment with GKE and MemoryStore usage.
Conclusion
In this post, we walked through the components needed to build a basic image search utility for natural language queries. We discussed how these different components are connected to each other. Our image search API is able to utilize caching and was deployed on a Kubernetes cluster using GKE. These elements are essential when building a similar service to cater to a much bigger workload. We hope this post will serve as a good starting point for that purpose. Below are some references on similar areas of work that you can explore:
- Building a real-time embeddings similarity matching system
- Detecting image similarity using Spark, LSH and TensorFlow
Acknowledgments: We are grateful to the Google Developers Experts program for supporting us with GCP credits. Thanks to Karl Weinmeister and Soonson Kwon of Google for reviewing the initial draft of this post.
More Relevant Stories for Your Company

How Public Sectors Leverage Google Cloud to Push the Envelop in Human Services and Labor
The COVID-19 pandemic tested our nation’s public benefits system in unimaginable ways. With an unprecedented 60 million individuals turning to unemployment and social services to satisfy their basic needs, state and local governments were stretched to meet the demand. But state and local government leaders have risen to the challenge

Google and AI Researchers Work towards Building Data-centric AI
AI researchers and engineers need better data to enable better AI solutions. The quality of an AI solution is determined by both the learning algorithm (such as a deep-neural network model) and the datasets used to train and evaluate that algorithm. Historically, AI research has focused much more on algorithms

How Vertex AI Helps Coca-Cola Bottlers Japan Analyze Billions of Data Records
Japan is home to millions of vending machines installed on streets and in buildings, sports stadiums and other facilities. Vending machine owners and operators, including beverage manufacturers, stock these machines with different product combinations depending on location and demand. For example, they primarily display coffee and energy drinks in machines

4 Methods How AI/ML Boosts Innovation and Reduces Costs
“Cloud Wisdom Weekly: for tech companies and startups” is a new blog series we’re running this fall to answer common questions our tech and startup customers ask us about how to build apps faster, smarter, and cheaper. In this installment, we explore how to leverage artificial intelligence (AI) and machine
