





How to Build A Basic Image Search Utility for Natural Language Queries

4697
Of your peers have already read this article.
6:00 Minutes
The most insightful time you'll spend today!
This post shows how to build an image search utility using natural language queries. Our aim is to use different GCP services to demonstrate this. At the core of our project is OpenAI’s CLIP model. It makes use of two encoders – one for images and one for texts. Each encoder is trained to learn representations such that similar images and text embeddings are projected as close as possible.
We will first create a Flask-based REST API capable of handling natural language queries and matching them against relevant images. We will then demonstrate the use of the API through a Flutter-based web and mobile application. Figure 1 shows how our final application would look like:
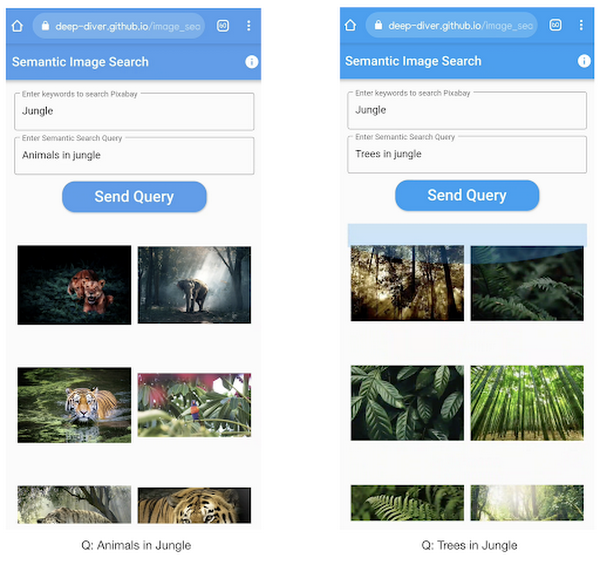
All the code shown in this post is available as a GitHub repository. Let’s dive in.
Application at a high-level
Our application will take two queries from the user:
- Tag or keyword query. This is needed in order to pull a set of images of interest from Pixabay. You can use any other image repositories for this purpose. But we found Pixabay’s API to be easier to work with. We will cache these images to optimize the user experience. Suppose we wanted to find images that are similar to this query: “horses amidst flowers”. For this, we’d first pull in a few “horse” images and then run another utility to find out the images that best match our query.
- Longer or semantic query that we will use to retrieve the images from the pool created in the step above. These images should be semantically similar to this query.
Note: Instead of two queries, we could have only taken a single long query and run named-entity extraction to determine the most likely important keywords to run the initial search with. For this post, we won’t be using this approach.
Figure 2 below depicts the architecture design of our application and the technical stack used for each of the components.
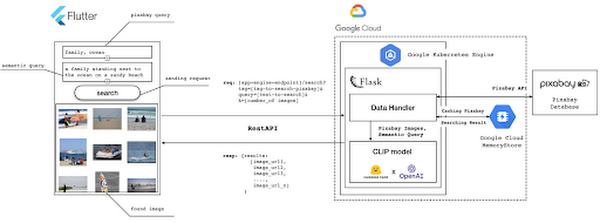
Figure 2 also presents the core logic of the API we will develop in bits and pieces in this post. We will deploy this API on a Kubernetes cluster using the Google Kubernetes Engine (GKE). The following presents a brief directory structure of our application code-base:
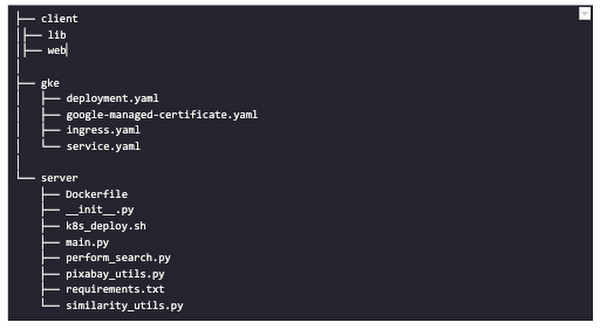
Next, we will walk through the code and other related components for building our image search API. For various machine learning-related utilities, we will be using PyTorch.
Building the backend API with Flask
First, we’d need to fetch a set of images with respect to user-provided tags/keywords before performing the natural language image search. The utility below from the pixabay_utils.py script can do this for us:
def fetch_images_tag(pixabay_search_keyword, num_images):"""Fetches images from Pixabay w.r.t a keyword.:param pixabay_search_keyword: Keyword to perform the search on Pixabay.:param num_images: Number of images to retrieve.:return: List of PIL images.:return: List of image URLs."""query = (PIXABAY_API+ "&q="+ pixabay_search_keyword.lower()+ "&image_type=photo&safesearch=true&per_page="+ str(num_images))response = requests.get(query)output = response.json()all_images = []all_image_urls = []for each in output["hits"]:imageurl = each["webformatURL"]response = requests.get(imageurl)image = Image.open(BytesIO(response.content)).convert("RGB")all_images.append(image)all_image_urls.append(imageurl)return (all_images, all_image_urls)
Note that all the API utilities are logging relevant information. But for brevity, we have omitted the lines of code responsible for that. Next, we will see how to invoke the CLIP model and select the images that would best match a given query semantically. For this, we’ll be using Hugging Face, an easy-to-use Python library offering state-of-the-art NLP capabilities. We’ll collate all the logic related to this search inside a SimilarityUtil class:
class SimilarityUtil:def __init__(self):self.model = CLIPModel.from_pretrained(CLIP_MODEL)self.processor = CLIPProcessor.from_pretrained(CLIP_PREPROCESSOR)self.device = "cuda" if torch.cuda.is_available() else "cpu"def perform_sim_search(self, images, query_phrase, top_k=3):"""Performs similarity search between the images and query.:param images: A list of PIL images initially retrieved withrespect to some entity e.g. Tiger.:param query_phrase: A list containing a single text query,e.g. "Tiger drinking water".:param top_k: Number of top images to return from `images`.:return: Top-k indices matching the query semantically andtheir similarity scores."""model = self.model.to(self.device)# Obtain the text-image similarity scoreswith torch.no_grad():inputs = self.processor(text=[query_phrase], images=images, return_tensors="pt", padding=True)inputs = inputs.to(self.device)outputs = model(**inputs)# Image-text similarity scoreslogits_per_image = outputs.logits_per_image.cpu()(top_indices, top_scores) = self.sort_scores(logits_per_image, top_k)return (top_indices, top_scores)def sort_scores(self, scores, top_k):"""Sorts the scores in a descending manner.:param scores: Scores to sort through.:param top_k: Number of top scores to return.:return: Top-k scores and their indices."""values, indices = scores.squeeze().topk(top_k)top_indices, top_scores = [], []for score, index in zip(values, indices):top_indices.append(int(index.numpy()))score = score.numpy().tolist()top_scores.append(round(score, 3))return (top_indices, top_scores)
CLIP_MODEL uses a ViT-base model to encode the images for generating meaningful embeddings with respect to the provided query. The text-based query is also encoded using A Transformers-based model for generating the embeddings. These two embeddings are matched with one another during inference. To know more about the particular methods we are using for the CLIP model please refer to this documentation from Hugging Face.
In the code above, we are first invoking the CLIP model with images and the natural language query. This gives us a vector (logits_per_image) that contains the similarity scores between each of the images and the query. We then sort the vector in a descending manner. Note that we are initializing the CLIP model while instantiating the SimilarityUtil to save us the model loading time. This is the meat of our application and we have tackled it already. If you want to interact with this utility in a live manner you can check out this Colab Notebook.
Now, we need to collate our utilities for fetching images from Pixabay and for performing the natural language image search inside a single script – perform_search.py. Following is the main class of that script:
class Searcher:def __init__(self):self.similarity_model = SimilarityUtil()def get_similar_images(self, keyword, semantic_query, pixabay_max, top_k):"""Finds semantically similar images.:param keyword: Keyword to search with on Pixabay.:param semantic_query: Query to find semantically similar images retrieved from Pixabay.:param pixabay_max: Number of maximum images to retrieve from Pixabay.:param top_k: Top-k images to return.:return: Tuple of top_k URLs and the similarity scores of the images present inside the URLs."""images_redis_key = keyword + "_images"urls_redis_key = keyword + "_urls"if redis_client.exists(images_redis_key) and redis_client.exists(urls_redis_key):keyword_images = redis_client.get(images_redis_key)keyword_image_urls = redis_client.get(urls_redis_key)else:(keyword_images, keyword_image_urls) = fetch_images_tag(keyword, pixabay_max)redis_client.set(images_redis_key, keyword_images)redis_client.set(urls_redis_key, keyword_image_urls)(top_indices, top_scores) = self.similarity_model.perform_sim_search(keyword_images, semantic_query, top_k)top_urls = [keyword_image_urls[index] for index in top_indices]return (top_urls, top_scores)
Here, we are just calling the utilities we had previously developed to return the URLs of the most similar images and their scores. What is even more important here is the caching capability. For that, we combined GCP’s MemoryStore and a Python library called direct-redis. More on setting up MemoryStore later.
MemoryStore provides a fully managed and low-cost platform for hosting Redis instances. Redis databases are in memory and light-weight making them an ideal candidate for caching. In the code above, we are caching the images fetched from Pixabay and their URLs. So, in the event of a cache hit, we won’t need to call the CLIP model and this will tremendously improve the response time of our API.
Other options for caching
We can cache other elements of our application. For example, the natural language query. When searching through the cached entries to determine if it’s a cache hit, we can compare two queries for semantic similarity and return results accordingly.
Consider that a user had entered the following natural language query: “mountains with dark skies”. After performing the search, we’d cache the embeddings of this query. Now, consider that another user entered another query: “mountains with gloomy ambiance”. We’d compute its embeddings and run a similarity search with the cached embeddings. We’d then compare the similarity scores with respect to a threshold and parse the most similar queries and their corresponding results. In case of a cache miss, we’d just call the image search utilities we developed above.
When working on real-time applications we often need to consider these different aspects and decide what enhances the user experience and maximizes business at the same time.
All that’s left now for the backend is our Flask application – main.py:
@app.route("/search", methods=["GET"])def get_images():tag = request.args.get("t").lower()query = request.args.get("s_query").lower()top_k = request.args.get("k")(top_urls, top_scores) = searcher.get_similar_images(tag, query, MAX_PIXABAY_SEARCH, int(top_k))return jsonify({"top_urls": top_urls, "top_scores": top_scores})
Here we are first parsing the query parameters from the request payload of our search API. We are then just calling the appropriate function from perform_search.py to handle the request. This Flask application is also capable of handling CORS. We do this via the flask_cors library:
cors = CORS(app,resources={r"/search/*": {"origin": "*"},r"/test/*": {"origin": "*"},},)
And this is it! Our API is now ready for deployment.
Deployment with Compute Engine and GKE
The reason why we wanted to deploy our API on Kubernetes is because of the flexibility Kubernetes offers for managing deployments. When operating at scale, auto scalability and load balancing are very important. With the comes the requirement of security — we’d not want to expose the utilities for interacting with any internal services such as databases. With Kubernetes, we can achieve all these easily and efficiently.
GKE provides secured and fully managed functionalities for operationalizing Kubernetes clusters. Here are the steps to deploy the API on GKE at a glance:
- We first build a Docker image for our API and then push it to the Google Container Registry (GCR).
- We then create a Kubernetes cluster on GKE and initialize a deployment.
- We then add scalability options.
- If any public exposure is needed for the API, we then tackle it.
We can assimilate all the above into a shell script – k8s_deploy.sh:
## Docker build and push ### We are inside the `server` directorydocker build -t gcr.io/${PROJECT_ID}/search_service .docker push gcr.io/${PROJECT_ID}/search_service## Deploy on a GKE cluster ### Configure the Docker command-line tool to authenticate to Container Registrygcloud auth configure-docker# Create a Kubernetes clustergcloud container clusters create image-search-nlp# Create a deploymentkubectl create deployment clip-search --image=gcr.io/${PROJECT_ID}/search_service# Number of worker replicaskubectl scale deployment clip-search --replicas=3# HorizontalPodAutoscaler resourcekubectl autoscale deployment clip-search --cpu-percent=80 --min=1 --max=5# Expose deploymentkubectl expose deployment clip-search --name=clip-search-service --type=LoadBalancer --port 80 --target-port 8080
These steps are well explained in this tutorial that you might want to refer to for more details. We can configure all the dependencies on our local machine and execute the shell script above. We can also use the GCP Console to execute it since a terminal on the GCP Console is pre-configured with the system-level dependencies we’d need. In reality, the Kubernetes cluster should only be created once and different deployment versions should be created under it.
After the above shell script is run successfully, we can run kubectl get service to know the external IP address of the service we just deployed:
NAME CLUSTER-IP EXTERNAL-IP PORT(S) AGEclip-search-service 10.3.251.122 203.0.113.0 80:30877/TCP 10s
We can now consume this API with the following base URI: http://203.0.113.0/. If we wanted to deal with only http-based API requests, then we are done here. But secured communication is often a requirement in order for applications to operate reliably. In the following section, we are to discuss how to configure the additional items to allow our Kubernetes cluster to allow https requests.
Configurations for handling https requests with GKE
A secure connection is almost often a must-have requirement in modern client/server applications. The front-end Flutter application would be hosted on GitHub Pages for this project, and it requires https-based connection as well. Even if configuring https connection particularly for a GKE-based cluster can be considered a chore, its setup might seem daunting at first.
There are six steps to configure https connection in the GKE environment:
- You need to have a domain name, and there are a lot of inexpensive options that you can buy. For instance, mlgde.com domain for this project is acquired via Gabia which is a Korean service provider.
- A reserved (static) external IP address has to be acquired via gcloud command or GCP console.
- You need to bind the domain name with the acquired external IP address. This is a platform-specific configuration that issued the domain name to you.
- There is a special ManagedCertificate resource which is specific to the GKE environment. ManagedCertificate resource specifies the domain that the SSL certificate will be created for, so you need this.
- An Ingress resource should be created by listing the static external IP address, ManagedCertificate resource, and the service name and port which the incoming traffic will be routed to. The Service resource could remain the same as in the above section with only changes from LoadBalancer to ClusterIP.
- Last but not least, you need to modify the existing Flask application and Deployment resource to support liveness and readiness probes which are used to check the health status of the Deployment. The Flask application side can be simply modified with the flask-healthz Python package, and you only need to add
livenessProbeandreadinessProbesections in the Deployment resource. In the code example below, thelivenessProbeandreadinessProbeare checked via/aliveand/readyendpoints respectively.
from flask_healthz import healthzfrom flask_healthz import HealthErrorapp = Flask(__name__)app.register_blueprint(healthz, url_prefix="/")def printok():print("Everything is fine")def liveness():try:printok()except Exception:raise HealthError("Can't connect to the file")def readiness():try:printok()except Exception:raise HealthError("Can't connect to the file")app.config.update(HEALTHZ = {"alive": "main.liveness","ready": "main.readiness",})
One thing to be careful of is the initialDelaySeconds attribute of the probes. It is uncommon to configure this attribute with a big number, but it could be bigger than 90 – 120 seconds depending on the size of the model to be used. For this project, it is configured in 90 seconds in order to wait until the CLIP model is fully loaded into memory (full YAML script here).
livenessProbe:httpGet:path: /aliveport: 8080initialDelaySeconds: 90periodSeconds: 10readinessProbe:httpGet:path: /readyport: 8080initialDelaySeconds: 90periodSeconds: 10
Again, these steps may seem daunting at first, but it will become clear when you have done it once. Here is the official document for Using Google-managed SSL certificates You can find all the GKE-related resources used in this project here.
Once every step is completed you should be able to see your server application running on the GKE environment. Please make sure to run kubectl apply command whenever you create Kubernetes resources such as Deployment, Service, Ingress, and ManagedCertificate, and it is important to wait for more than 10 minutes until the ManagedCertifcate provisioning is done.
You can run gcloud compute addresses list command to find out the static external IP address that you have configured.
NAME ADDRESS/RANGE TYPE PURPOSE NETWORK REGION SUBNET STATUSgde 34.149.231.34 EXTERNAL IN_USE
Then, the IP address has to be mapped to the domain. Figure 3 is a screenshot of a dashboard from where we got the mlgde.com domain. It clearly shows mlgde.com is mapped to the static external IP address configured in GCP.
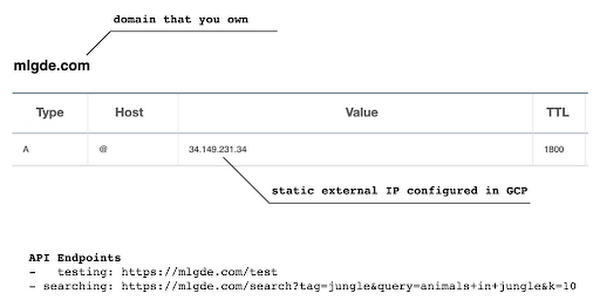
In case you’re wondering why we didn’t deploy this application on App Engine, well that is because of the compute needed to execute the CLIP model. App Engine instance won’t fit in that regime. We could have also incorporated compute-heavy capabilities via a VPC Connector. That is a design choice that you and your team would need to consider. In our experiments, we found the GKE deployment to be easier and suitable for our needs.
Infrastructure for the CLIP model
As mentioned earlier, at the core of our application is the CLIP model. It is computationally a bit more expensive than the regular deep learning models. This is why it makes sense to have the hardware infrastructure set up accordingly to execute it. We ran a small benchmark in order to see how a GPU-based environment could be beneficial here.
We ran the CLIP on a Tesla P100-based machine and also on a standard CPU-only machine 1000 times. The code snippet below is the meat of what we executed:
DEVICE = "cuda" if torch.cuda.is_available() else "cpu"start_time = time.time()for _ in range(1000):with torch.no_grad():model = model.to(DEVICE)inputs = processor(text=[semantic_search_phrase],images=all_images, return_tensors="pt", padding=True)inputs = inputs.to(DEVICE)outputs = model(**inputs)end_time = time.time() - start_timeprint(f"Total time: {end_time:.3f} seconds.")
As somewhat expected, with the GPU, the code took 13 minutes to complete execution. With no GPU, it took about 157 minutes.
It is uncommon to leverage GPUs for model prediction because of cost restrictions, but sometimes we have to access GPUs for deploying a big model like CLIP. We configured a GPU-based cluster on GKE and compared the performance differences with and without it. It took about 1 second to handle a request with GPU and MemoryStore cache while it took more than 4 seconds with MemoryStore only (without the GPUs).
For the purposes of this post, we used a CPU-based cluster on Kubernetes. But It is easy to configure GPU usage in a GKE cluster. This document shows you how to do so. For a short summary, there are two steps. First, a node should be configured with GPUs when creating a GKE cluster. Second, GPU drivers should be installed in GKE nodes. You don’t need to visit and manually install GPU drivers for each node by yourself. Rather you can simply apply the DaemonSet resource to GKE as described here.
Setting up MemoryStore
In this project, we first query the general concept of images to Pixabay, then we filter the images with a semantic query using CLIP. It means we can cache the initially retrieved images from Pixabay for the next specific semantic query. For instance, you may want to search with “gentleman wearing tie” at first, then you may want to retry searching for “gentleman wearing glass”. In this case, the base images remain all the same, so they could be stored in a cache server like Redis.
MemoryStore is a GCP service wrapping the Redis which is an in-memory data store, so you can simply use a standard Redis Python package for accessing it. The only thing to be careful about when provisioning a MemoryStore Redis instance is to make sure it is in the same region where your GKE cluster or Compute Engine instance is.
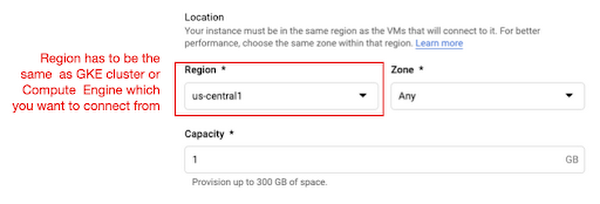
The code snippet below shows how to make a connection to the Redis instance in Python. Nothing specific to GCP, but you only need to be aware of the usage of the standard redis-py package.
# REDISHOST is the IP address to the MemoryStore instanceredis_host = os.environ.get("REDISHOST", "localhost")redis_port = int(os.environ.get("REDISPORT", 6379))redis_client = redis.StrictRedis(host=redis_host, port=redis_port)
After creating a connection, you can store and retrieve data from MemoryStore. There are more advanced use cases of Redis, but we only used exists, get, and set methods for the demonstration purpose. These methods should be very familiar if you know maps, dictionaries, or other similar data structures. For the code portion that uses Redis-related utilities, please refer to the Searcher Python class we discussed in an earlier section.
In the URLs below, you can find side-by-side comparisons of using MemoryStore:
- Without MemoryStore: https://youtu.be/7B88Eyrd-4s
- With MemoryStore (1st try): https://youtu.be/LE6xeEIRuMM
- With MemoryStore (2nd try): https://youtu.be/rRfK17sdk84
Putting everything together
All that’s left now is to collate the different components we developed in the sections above and deploy our application with a frontend. All the frontend-related code is present here.
- The front-end application is written in the Flutter development kit. The main screen contains two text fields for queries to Pixabay and CLIP model respectively. When you click the “Send Query” button, it will send out a RestAPI request to the server. After receiving the result back from the server, the retrieved images from the semantic query will be displayed at the bottom section of the screen.
- Please note that a Flutter application can be deployed to various environments including desktop, web, iOS, and Android. In order to keep as simple as possible, we chose to deploy the application to the GitHub Pages. Whenever there is any change to a client-side source directory, the GitHub Action will be triggered to build a web page and deploy the latest version to the GitHub Pages.
Our final application is deployed here and it looks like so:
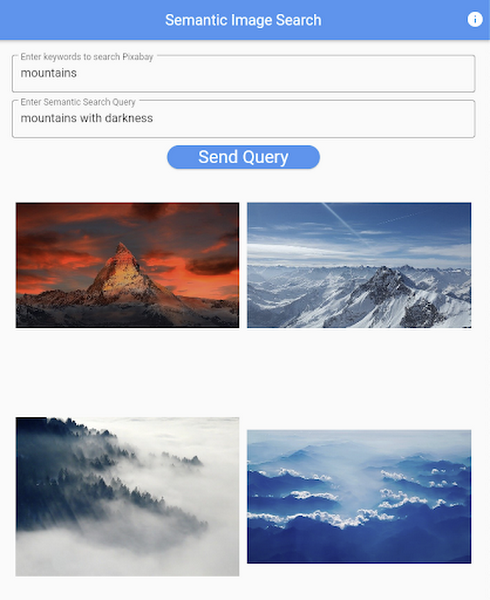
Note that due to constraints, the above-mentioned URL will only be live for one or two months.
It is also possible to redeploy the back-end application with a GitHub Action.
- The very first step is to craft a Dockerfile like below. Since Python is a scripting language, and there are lots of heavy packages that the application is dependent on, it is important to cache the steps. For instance, installing the dependencies should be separated from other commands.
FROM pytorch/pytorch:latestWORKDIR /app# install the dependenciesCOPY requirements.txt requirements.txtRUN pip install -r requirements.txtCOPY . .# set up environment variablesENV PIXABAY_API_KEY="..."ENV REDIS_IN_USE="true"ENV REDISHOST="..."# expose port that Flask app is listening onEXPOSE 8080# run the Flask appCMD [ "python3", "main.py" ]
- With the Dockerfile defined, we can use a GitHub Action like this for automatic deployment.
Edge cases
Since the CLIP model is pre-trained on a large corpus of image and text pairs it’s likely that it may not generalize well to every natural language query we throw at it. Also, because we are limiting the number of images on which the CLIP model can operate, this somehow restricts the expressivity of the model.
We may be able to improve the performance for the second situation by increasing the number of images to be pre-fetched and by indexing them into a low-cost and high-performance database like Datastore.
Costs
In this section, we wanted to provide the readers a breakdown of the costs they might incur in order to consume the various services used throughout the application.
- Frontend hosting
- The front-end application is hosted on GitHub Pages, so there is no expenditure for this.
- Compute Engine
- With an e2-standard-2 instance type without GPUs, the cost is around $48.92 per month. In case you want to add a GPU (NVIDIA K80), the cost goes up to $229.95 per month.
- MemoryStore
- The cost for MemoryStore depends on the size. With 1GB of space, the cost is around $35.77 per month, and whenever you add more GBs the cost will be doubled.
- Google Kubernetes Engine
- The monthly cost for a 3 node GKE cluster with n2-standard-2 (vCPUs: 2, RAM: 8GB without GPUs) is about $170.19. If you add one GPU (NVIDIA K80) to the cluster, the cost goes up to $835.48.
While you may think that is a lot cost-wise, it is good to know that Google gives away free $300 credits when you create a new GCP account. It is still not enough for leveraging GPUs, but it is enough to learn and experiment with GKE and MemoryStore usage.
Conclusion
In this post, we walked through the components needed to build a basic image search utility for natural language queries. We discussed how these different components are connected to each other. Our image search API is able to utilize caching and was deployed on a Kubernetes cluster using GKE. These elements are essential when building a similar service to cater to a much bigger workload. We hope this post will serve as a good starting point for that purpose. Below are some references on similar areas of work that you can explore:
- Building a real-time embeddings similarity matching system
- Detecting image similarity using Spark, LSH and TensorFlow
Acknowledgments: We are grateful to the Google Developers Experts program for supporting us with GCP credits. Thanks to Karl Weinmeister and Soonson Kwon of Google for reviewing the initial draft of this post.
10 Reasons that Make Google Cloud the Champion of IaaS

10426
Of your peers have already read this article.
5:00 Minutes
The most insightful time you'll spend today!
When you choose to run your business on Google Cloud you benefit from the same planet-scale infrastructure that powers Google’s products such as Maps, YouTube, and Workspace.
We have picked 10 ways in which Google Cloud Infrastructure services outshine alternatives in the market in how they simplify your operations, save money, and secure your data.
1. Custom Machine Types means no wasted resources
Compute Engine offers predefined machine types that you can use when you create a VM instance. A predefined machine type has a preset number of vCPUs and a preset amount of memory; each type is billed at a set price as described on the Compute Engine pricing page.
If predefined machine types don’t meet your needs, you can create a VM instance with a custom number of vCPUs and custom amount of memory, effectively building a custom machine type. Custom machine types are available only for general-purpose machine families. When you create a custom machine type, you are deploying a custom machine type from the E2, N2, N2D, or N1 machine family on GCP. No other leading cloud vendor offers custom machine types so extensively.
Custom machine types are a good idea for workloads that aren’t a good fit for the predefined machine types and for workloads that require more processing power or memory but don’t need all of the upgrades provided by the next machine type level. This translates into lower operating costs. They are also useful for controlling software licensing costs that are based on the number of underlying compute cores.
Jeremy Lloyd, Infrastructure and Application Modernization Lead at Appsbroker, a Google partner:
“Custom machine types coupled with Google’s StratoZone data center discovery tool provides Appsbroker with the flexibility we need to provide cost efficient virtual machines matched to a virtual machine’s actual utilization. As a result, we are able to keep our customers’ operating costs low while still providing the ability to scale as needed.”
2. Compute Engine Virtual Machines are optimized for scale-out workloads
For scale-out workloads, T2D, the first instance type in the Tau VM family, is based on 3rd Gen AMD EPYC processors and leapfrogs VMs for scale-out workloads of any leading public cloud provider today, both in terms of performance and price-performance. Tau VMs offer 56% higher absolute performance and 42% higher price-performance compared to general-purpose VMs from any leading public cloud vendor (source). The x86 compatibility provided by these AMD EPYC processor-based VMs gives you market-leading performance improvements and cost savings, without having to port your applications to a new processor architecture. Sign up here if you are interested in trying out T2D instances in Preview.
For SAP HANA, Google Cloud has demonstrated with SAP how we can run the world’s largest scale-out HANA system in the public cloud (96TB). With such innovation, you are covered as your business grows exponentially.
3. Largest single node GPU-enabled VM
Google is the only public cloud provider to offer up to 16 NVIDIA A100 GPUs in a single VM, making it possible to train very large AI models. Users can start with one NVIDIA A100 GPU and scale to 16 GPUs without configuring multiple VMs for single-node ML training, without crossing the VM layer.
Additionally, customers can choose smaller GPU configurations—1, 2, 4 and 8 GPUs per VM—providing the flexibility to scale their workload as needed.
The A2 VM family was designed to meet today’s most demanding applications—workloads like CUDA-enabled machine learning (ML) training and inference, for example. This family is built on the A100 GPU which offers up to 20x the compute performance compared to the previous generation GPU and comes with 40 GB of high-performance HBM2 GPU memory. To speed up multi-GPU workloads, the A2 VMs use NVIDIA’s HGX A100 systems to offer high-speed NVLink GPU-to-GPU bandwidth that delivers up to 600 GB/s. A2 VMs come with up to 96 Intel Cascade Lake vCPUs, optional Local SSD for workloads requiring faster data feeds into the GPUs and up to 100 Gbps of networking. A2 VMs provide full vNUMA transparency into the architecture of underlying GPU server platforms, enabling advanced performance tuning. Google Cloud offers these GPUs globally.
4. Non-disruptive maintenance means you worry less about planned downtime
Compute Engine offers live migration (non-disruptive maintenance) to keep your virtual machine instances running even when a host system event, such as a software or hardware update, occurs. Google’s Compute Engine live migrates your running instances to another host in the same zone without requiring your VMs to be rebooted. Live migration enables Google to perform maintenance that is integral to keeping infrastructure protected and reliable without interrupting any of your VMs. When a VM is scheduled to be live-migrated, Google provides a notification to the guest that a migration is imminent.
Live migration keeps your instances running during:
- Regular infrastructure maintenance and upgrades
- Network and power grid maintenance in the data centers
- Failed hardware such as memory, CPU, network interface cards, disks, power, and so on. This is done on a best-effort basis; if a hardware component fails completely or otherwise prevents live migration, the VM crashes and restarts automatically and a hostError is logged.
- Host OS and BIOS upgrades
- Security-related updates
- System configuration changes, including changing the size of the host root partition, for storage of the host image and packages
Live migration does not change any attributes or properties of the VM itself. The live migration process transfers a running VM from one host machine to another host machine within the same zone. All VM properties and attributes remain unchanged, including internal and external IP addresses, instance metadata, block storage data and volumes, OS and application state, network settings, network connections, and so on. This has the benefit of reducing operational and maintenance overhead, helps you build a more robust security posture where infrastructure can be consciously revamped from a known good state and minimizes risks for advanced persistent threats.
Refer to Lessons learned from a year of using live migration in production on Google Cloud from the Google engineering team.
5. Trusted Computing: Shielded VMs guard you against advanced, persistent attacks
Establishing trust in your environment is multifaceted, involving hardware and firmware, as well as host and guest operating systems. Unfortunately, threats like boot malware or firmware rootkits can stay undetected for a long time, and an infected virtual machine can continue to boot in a compromised state even after you’ve installed legitimate software.
Shielded VMs can help you protect your system from attack vectors like:
- Malicious guest OS firmware, including malicious UEFI extensions
- Boot and kernel vulnerabilities in the guest OS
- Malicious insiders within your organization
To guard against these kinds of advanced persistent attacks, Shielded VMs use:
- Unified Extensible Firmware Interface (UEFI) BIOS: Helps ensure that firmware is signed and verified
- Secure and Measured Boot: Helps ensure that a VM boots an expected, healthy kernel
- Virtual Trusted Platform Module (vTPM): Establishes root-of-trust, underpins Measured Boot, and prevents exfiltration of vTPM-sealed secrets
- Integrity Monitoring: Provides tamper-evident logging, integrated with Stackdriver, to help you quickly identify and remediate changes to a known integrity state
The Google approach allows customers to deploy Shielded VMs with only a simple click, thereby easing implementation.
6. Confidential Computing encrypts data while in use
Google Cloud was a founding member of the Confidential Computing Consortium. Along with encryption of data in transit and at rest using customer-managed encryption keys (CMEK) and customer-supplied encryption keys (CSEK), Confidential VM adds a “third pillar” to the end-to-end encryption story by encrypting data while in use. Confidential Computing uses processor-based technology that allows data to be encrypted in use while it is being processed in the public cloud. Confidential VM allows you to to encrypt memory in use on a Google Compute Engine VM by checking a single checkbox.
All Confidential VMs support the previously mentioned Shielded VM features under the covers—you can think of Shielded VM as helping to address VM integrity, while Confidential VM addresses the memory encryption aspect which relies on CPU features. With the confidential execution environments provided by Confidential VM and AMD Secure Encrypted Virtualization (SEV), Google Cloud keeps customers’ sensitive code and other data encrypted in memory during processing. Google does not have access to the encryption keys. In addition, Confidential VM can help alleviate concerns about risk related to either dependency on Google infrastructure or Google insiders’ access to customer data in the clear.
See what Google Cloud partners say about Confidential Computing here.
7. Advanced networking delivers full-stack networking and security services with fast, consistent, and scalable performance
Google Cloud’s network delivers low latency, reduces operational costs and ensures business continuity, enabling organizations to seamlessly scale up or down in any region to meet business needs. Our planet-scale network uses advanced software-defined networking and security with edge caching services to deliver fast, consistent, and scalable performance. With 28 regions, 85 zones, and 146 PoPs connected by 16 subsea fiber cables around the world, Google Cloud’s network offers a full stack of layer 1 to layer 7 services for enterprises to run their workloads anywhere. Enterprises can be assured that they have best-in-class networking and security services connecting their VMs, containers, and bare metal resources in hybrid and multi-cloud environments with simplicity, visibility, and control.
Google Cloud’s network has protected customers from one of the world’s largest DDoS attacks at 2.54 Tbps. With our multi-layer security architecture and products such as Cloud Armor, our customers ran their business with no disruptions. Furthermore, our recent integration of Cloud Armor with reCAPTCHA Enterprise adds best-in-class bot and fraud management to prevent volumetric attacks. Cloud Armor is deployed with our Cloud Load Balancer and Cloud CDN, extending the secure benefits at the network edge for traffic coming into Google Cloud so customers have security, performance, and reliability all built in. Furthermore, we are excited to offer Cloud IDS in preview, which was co-developed with security industry leader, Palo Alto Networks, to run natively in Google Cloud.
Our advanced networking capabilities also extends to GKE and Anthos networking. With the GKE Gateway controller, customers can manage internal and external HTTPS load balancing for a GKE cluster or a fleet of GKE clusters with multi-tenancy while maintaining centralized admin policy and control. Unlike other Kubernetes offerings, we offer eBPF dataplane which brings powerful tooling such as Kubernetes network policy and logging to GKE. eBPF is known to kernel engineers as a “superpower” for its unique architecture to load and unload modules in kernel space, and now this capability is built in with Google Cloud networking.
For observability and monitoring, our customers deploy Network Intelligence Center, Google Cloud’s comprehensive network monitoring, verification and optimization platform. With four key modules in Network Intelligence Center, and several more to come, we are working towards realizing our vision of proactive network operations that can predict and heal network failures, driven by AI/ML recommendations and remediation. Network Intelligence Center provides unmatched visibility into your network in the cloud along with proactive network verification. Centralized monitoring cuts down troubleshooting time and effort, increases network security and improves the overall user experience.
8. Regional Persistent Disk for High Availability
Regional Persistent Disk is a storage option that provides synchronous replication of data between two zones in a region. Regional Persistent Disks can be a great building block if you need to ensure high availability of your critical applications as they offer cost-effective durable storage and replication of data between two zones in the same region.
Regional Persistent Disks are also easy to set up within the Google Cloud Console. If you are designing robust systems or high availability services on Compute Engine, Regional Persistent Disks combined with other best practices such as backing up your data using snapshots enable you to build an infrastructure that is highly available and recoverable in a disaster. Regional Persistent Disks are also designed to work with regional managed instance groups. In the unlikely event of a zonal outage, Regional Persistent Disks allow continued I/O through failover of your workloads to another zone. Regional Persistent Disks can help meet zero RPO and near-zero RTO requirements and other stringent SLAs that your critical applications might require by maximizing application availability and protection of data during events such as host/VM failures and zonal outages.
9. Cloud Storage’s single namespace for dual-region and multi-region means managing regional replication is incredibly simple
Similar to how Persistent Disk makes data more available by replicating data across zones, Cloud Storage provides similar benefits for object storage. Cloud Storage within a region is cross-zone by definition, reducing the risk that a zonal outage would take down your application. Cloud Storage adds to this by also providing a cross-region option that can protect against a regional outage and gets your data closer to distributed users. This comes in the form of Dual-region or Multi-region settings for a bucket. These are the simplest to implement cross-region replication offerings in the industry—just a simple button or API call to enable them. In addition to being simple to implement, they offer an added advantage of using a single bucket name that spans regions.
This is unique in the industry. Competitive offerings currently require setting up and managing two distinct buckets, one in each region and they don’t offer the strong consistency properties Cloud Storage offers across regions. Operations and app development are burdened by this design. Google’s single namespace approach dramatically simplifies application development (the app runs on single region or dual/multi-region without any changes), and provides simpler application restarts and testing for DR.
10. Predictive autoscaling
Customers use predictive autoscaling to improve response times for applications with long initialization times or for applications with workloads that vary predictably with daily or weekly cycles. When you enable predictive autoscaling, Compute Engine forecasts future load based on your Managed Instance Group’s history and scales out the MIG’s in advance of predicted load, so that new instances are ready to serve when the load arrives. Without predictive autoscaling, an autoscaler can only scale a group reactively, based on observed changes in load in real time.
With predictive autoscaling enabled, the autoscaler works with real-time data as well as with historical data to cover both the current and forecasted load. Forecasts are refreshed every few minutes (faster than competing clouds) and consider daily and weekly seasonality, leading to more accurate forecasts of load patterns.
For more information, see How predictive autoscaling works and Checking if predictive autoscaling is suitable for your workload.
These are just a few examples of customer-centric innovation that set Google Cloud infrastructure apart. Bring your applications and let the platform work for you.
Get started by learning about your options for migration, or talk to our sales team to join the thousands of customers who have embarked upon this journey.
Acknowledgement
Special thanks to Dheeraj Konidena (Google) for contributing to this article.
Contact Center AI (CCAI) with Agent Assist can Lower Opex and Handle 28% More Chats

4820
Of your peers have already read this article.
1:30 Minutes
The most insightful time you'll spend today!
Contact Center AI (CCAI) brings Google’s innovation in conversational AI to solve the most challenging customer service needs while lowering operational costs. More than a thousand customers have deployed CCAI and are steadily turning it on to power their production contact centers.
Today, we’re excited to announce that we’ve made CCAI even stronger with Agent Assist for Chat, now in public preview.
Agent Assist provides your human agents with continuous support during their calls and now chats by identifying the customers’ intent and providing them with real-time recommendations such as articles and FAQs as well as responses to customer messages to more effectively resolve the conversation.
Customers using Agent Assist for Chat have been able to manage up to 28% more conversations concurrently, while also driving up customer satisfaction by 10%. Additionally, we’ve seen them respond up to 15% faster to chats, reducing chat abandonment rates and solving more customer problems.
Agent Assist provides two key components to help agents manage conversations better:
- Smart Reply provides response suggestions to agents so they can quickly and appropriately respond to customer messages. These suggestions can be taken from your top performing agents as well as modified even further to ensure suggestions properly reflect the tone and voice of your brand. Agent Assist learns when and what recommendations to make by building a custom model that’s trained on your (and only your) data.
- Knowledge Assist unlocks the power of your knowledge base to provide articles and FAQ suggestions to agents in real-time as the conversation progresses. When using Knowledge Assist, agents no longer need to make the customer wait while they navigate multiple applications and data to find the resolution to the customer’s issue — the answer is delivered right to them.
“We’ve been very impressed by the chat capabilities of Agent Assist,” said Chris Smith, Vice President of Digital Service at Optus, one of the largest telecommunications companies in Australia
Optus has been using CCAI Dialogflow CX to send queries to virtual agents and sees great potential to use Agent Assist to provide recommendations to their customer support representatives. They expect Agent Assist to help minimize repetitive tasks by providing response and typeahead suggestions, helping improve the efficiency of their agents and the quality and consistency of service they provide.
Another customer, LoveHolidays, is using Agent Assist to support their agents and customers in the travel industry.
“Agent Assist has been a beneficial aid to agents and our customers alike… It gives us the power to flex our contact center staff levels in hours not weeks,” said Eugene Neale, Director of CX Engineering & Business IT at LoveHolidays
Analysts say online chat is becoming one of the most popular ways to reach out to businesses for customer support. IDC research finds that single-function contact centers worldwide are increasingly rare — in 2020, although phone/voice is still responsible for most interactions (at around 18%); email is responsible for around 13% of interactions, and live chat (without automation) is responsible for around 8% of interactions, according to IDC, Toward the AI-Powered Contact Center, Doc # EUR147017320, December 2020.
Deploying CCAI with Agent Assist for Chat
As part of Google’s Contact Center AI suite, Agent Assist provides a seamless handoff from chats managed by your Dialogflow CX virtual agents. If a conversation or customer requires a live agent, Agent Assist will help your team pick it up quickly and drive it to a satisfying resolution.
Historically, when managers saw contact center volumes increase they had two choices: allow customers to wait longer to speak to someone (lowering customer satisfaction) or bring on more agents (increasing cost to serve). Deploying CCAI provides contact center leaders with a third choice: equip agents with tools like, Agent Assist for Chat, to efficiently manage customer interactions while maintaining high quality service.
Global CCAI partners support Agent Assist for Chat
Agent Assist for Chat is a set of public APIs that your engineering team can integrate directly into an agent desktop to control the agent experience from end-to-end. For a more out-of-the-box solution, we have partnered with LivePerson and 247.ai to build Agent Assist directly into their agent desktops.
“Integrating our Conversational Cloud directly with Agent Assist means agents can leverage cutting-edge productivity AI to build even further on the massive ROI of conversational commerce, from reduced agent effort and time-to-respond to increased customer satisfaction and revenue,” said Alex Spinelli, CTO of LivePerson.
More Agent Assist resources
To learn more, check out the Agent Assist webpage. Give Agent Assist a try by training a model and then testing it using the Agent Assist simulator.
Trading and Investment Companies will Increase Consumption of Cloud Services: Study Confirms

4893
Of your peers have already read this article.
3:00 Minutes
The most insightful time you'll spend today!
While some traditional financial services companies have more slowly transitioned to the cloud, capital markets firms have embraced cloud computing across their entire value chains — front-, middle-, and back-office. We wanted to understand the dynamics behind this rapid adoption, the most common use cases, and the types of technology most in use, particularly as it relates to market data. Google Cloud commissioned Coalition Greenwich to survey 102 institutional capital markets professionals — at exchanges, trading systems, data aggregators, data producers, asset managers, hedge funds, and investment banks — in the United States, Canada, France, Germany, Italy, the Netherlands, Switzerland, and the United Kingdom.
Our research found that while there are many drivers, demand for easier accessibility is fueling widespread adoption of cloud-based market data services, and associated trading infrastructures, across the buy side and sell side. In fact, 68% of sell-side and buy-side users find it critical for market data providers to offer public cloud-based data services. At the same time, exchanges, market data providers, aggregators, and trading systems are embracing the cloud as a delivery model by offering access to data directly via their own cloud services, APIs or partners.
Here were five noteworthy takeaways from the study:
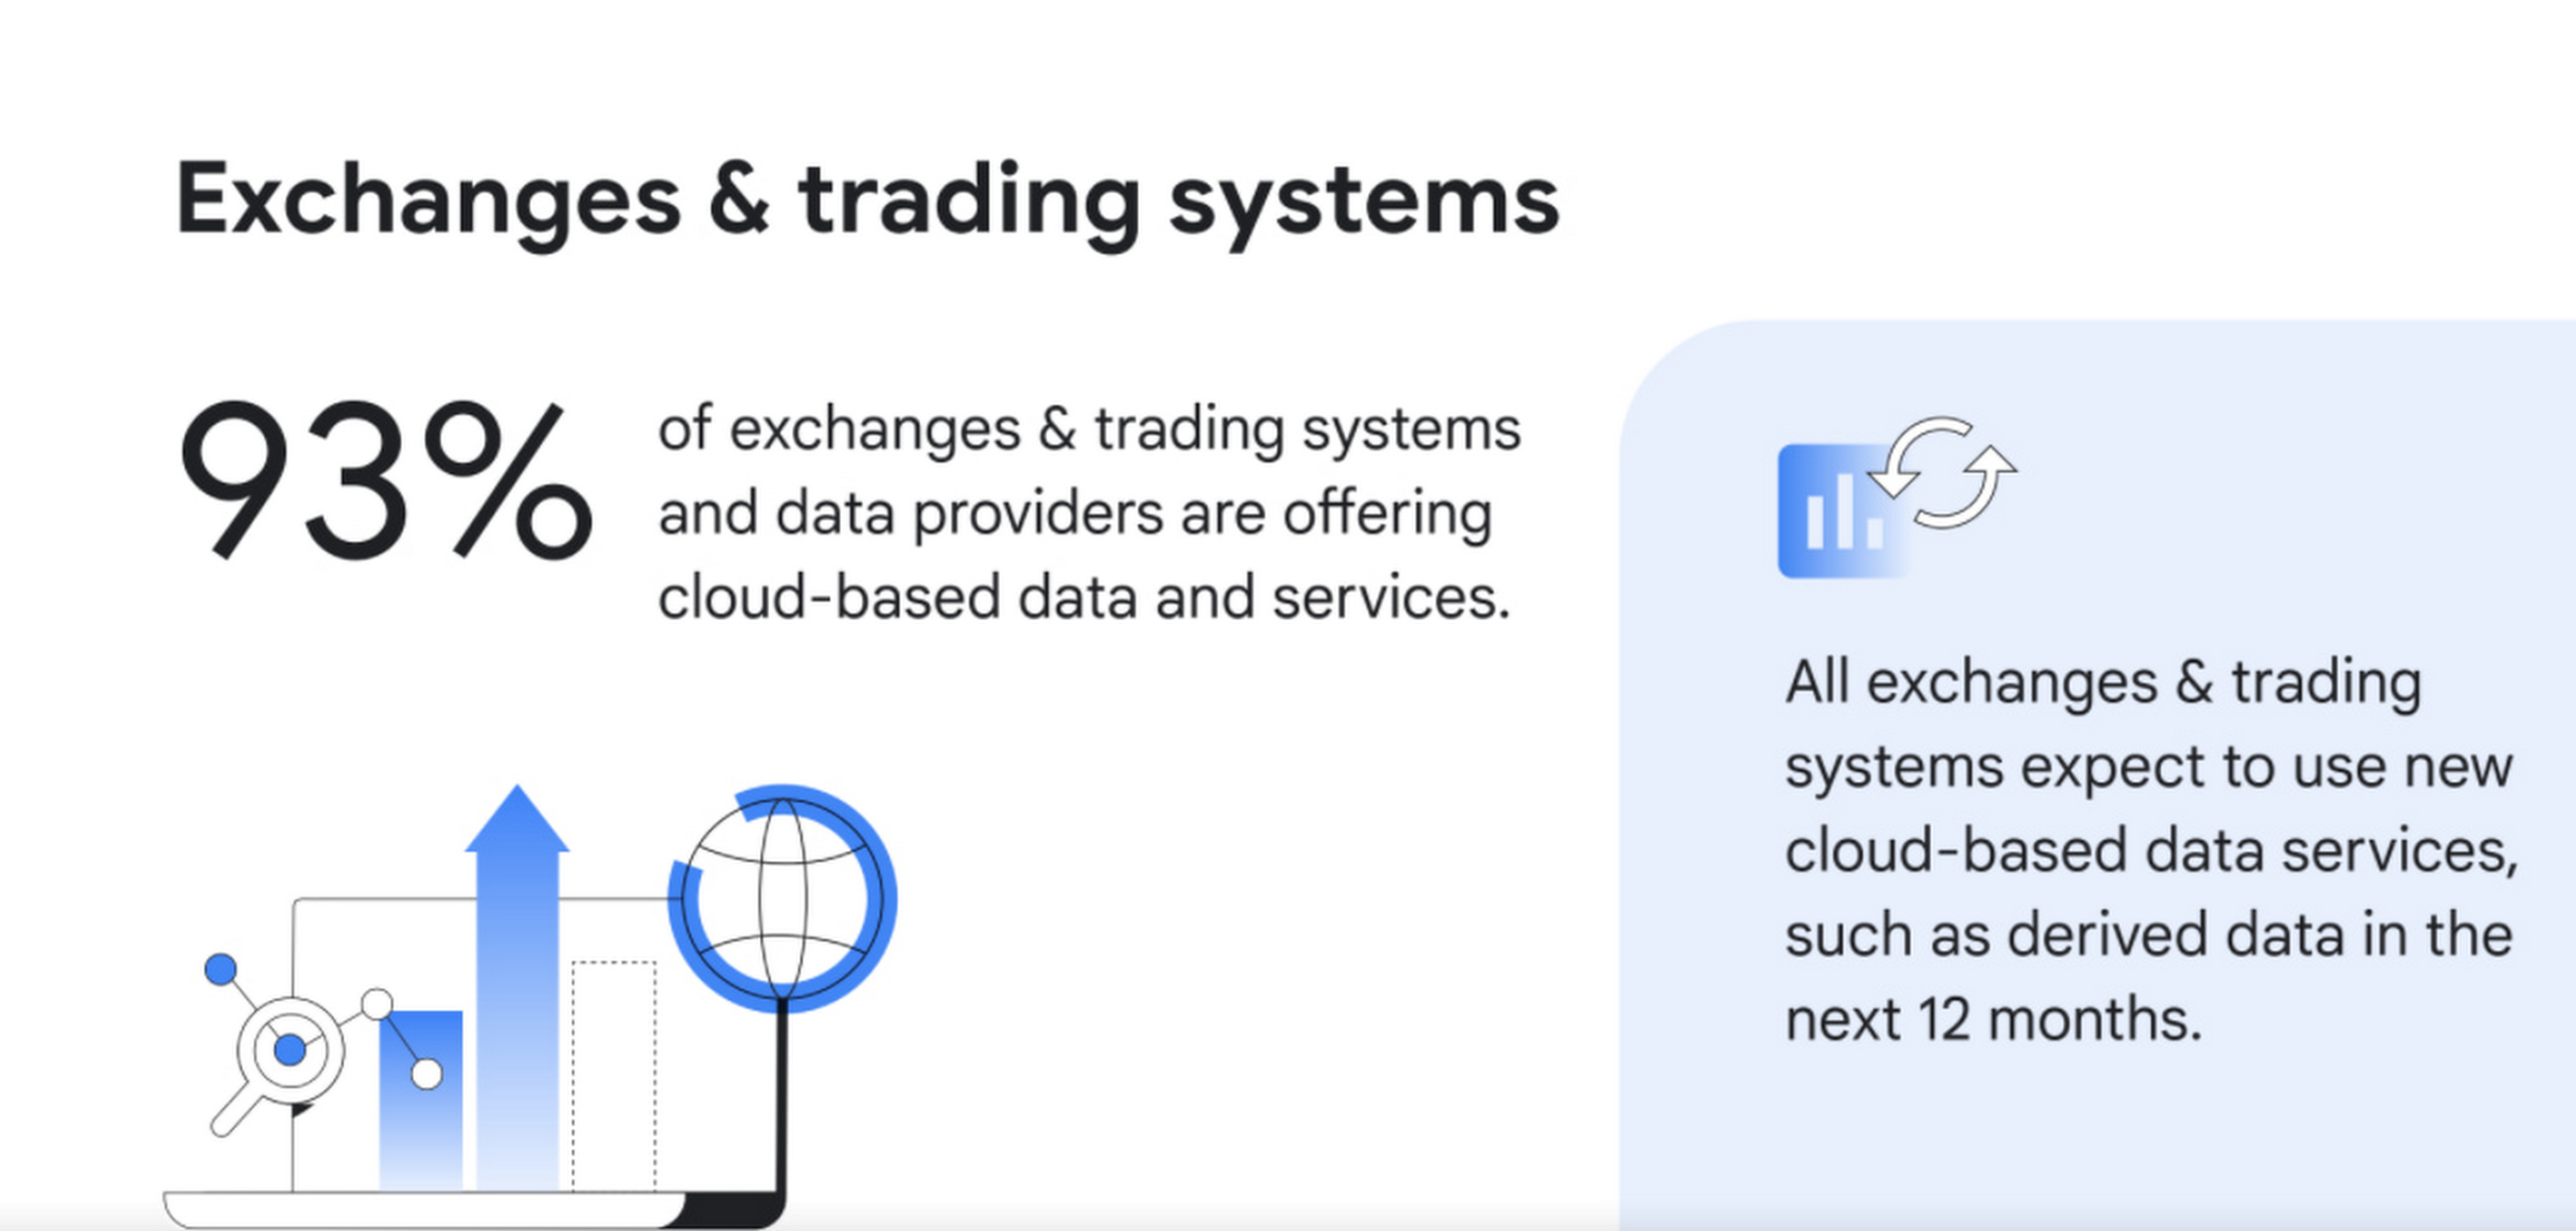
1. Cloud services are becoming ubiquitous for data delivery. Today, the cloud is pervasive, with 93% of exchanges, trading systems and data providers offering cloud-based data and services, according to surveyed executives. Moreover, 100% of those surveyed intend to offer new cloud-based services, such as derived data, in the next 12 months.
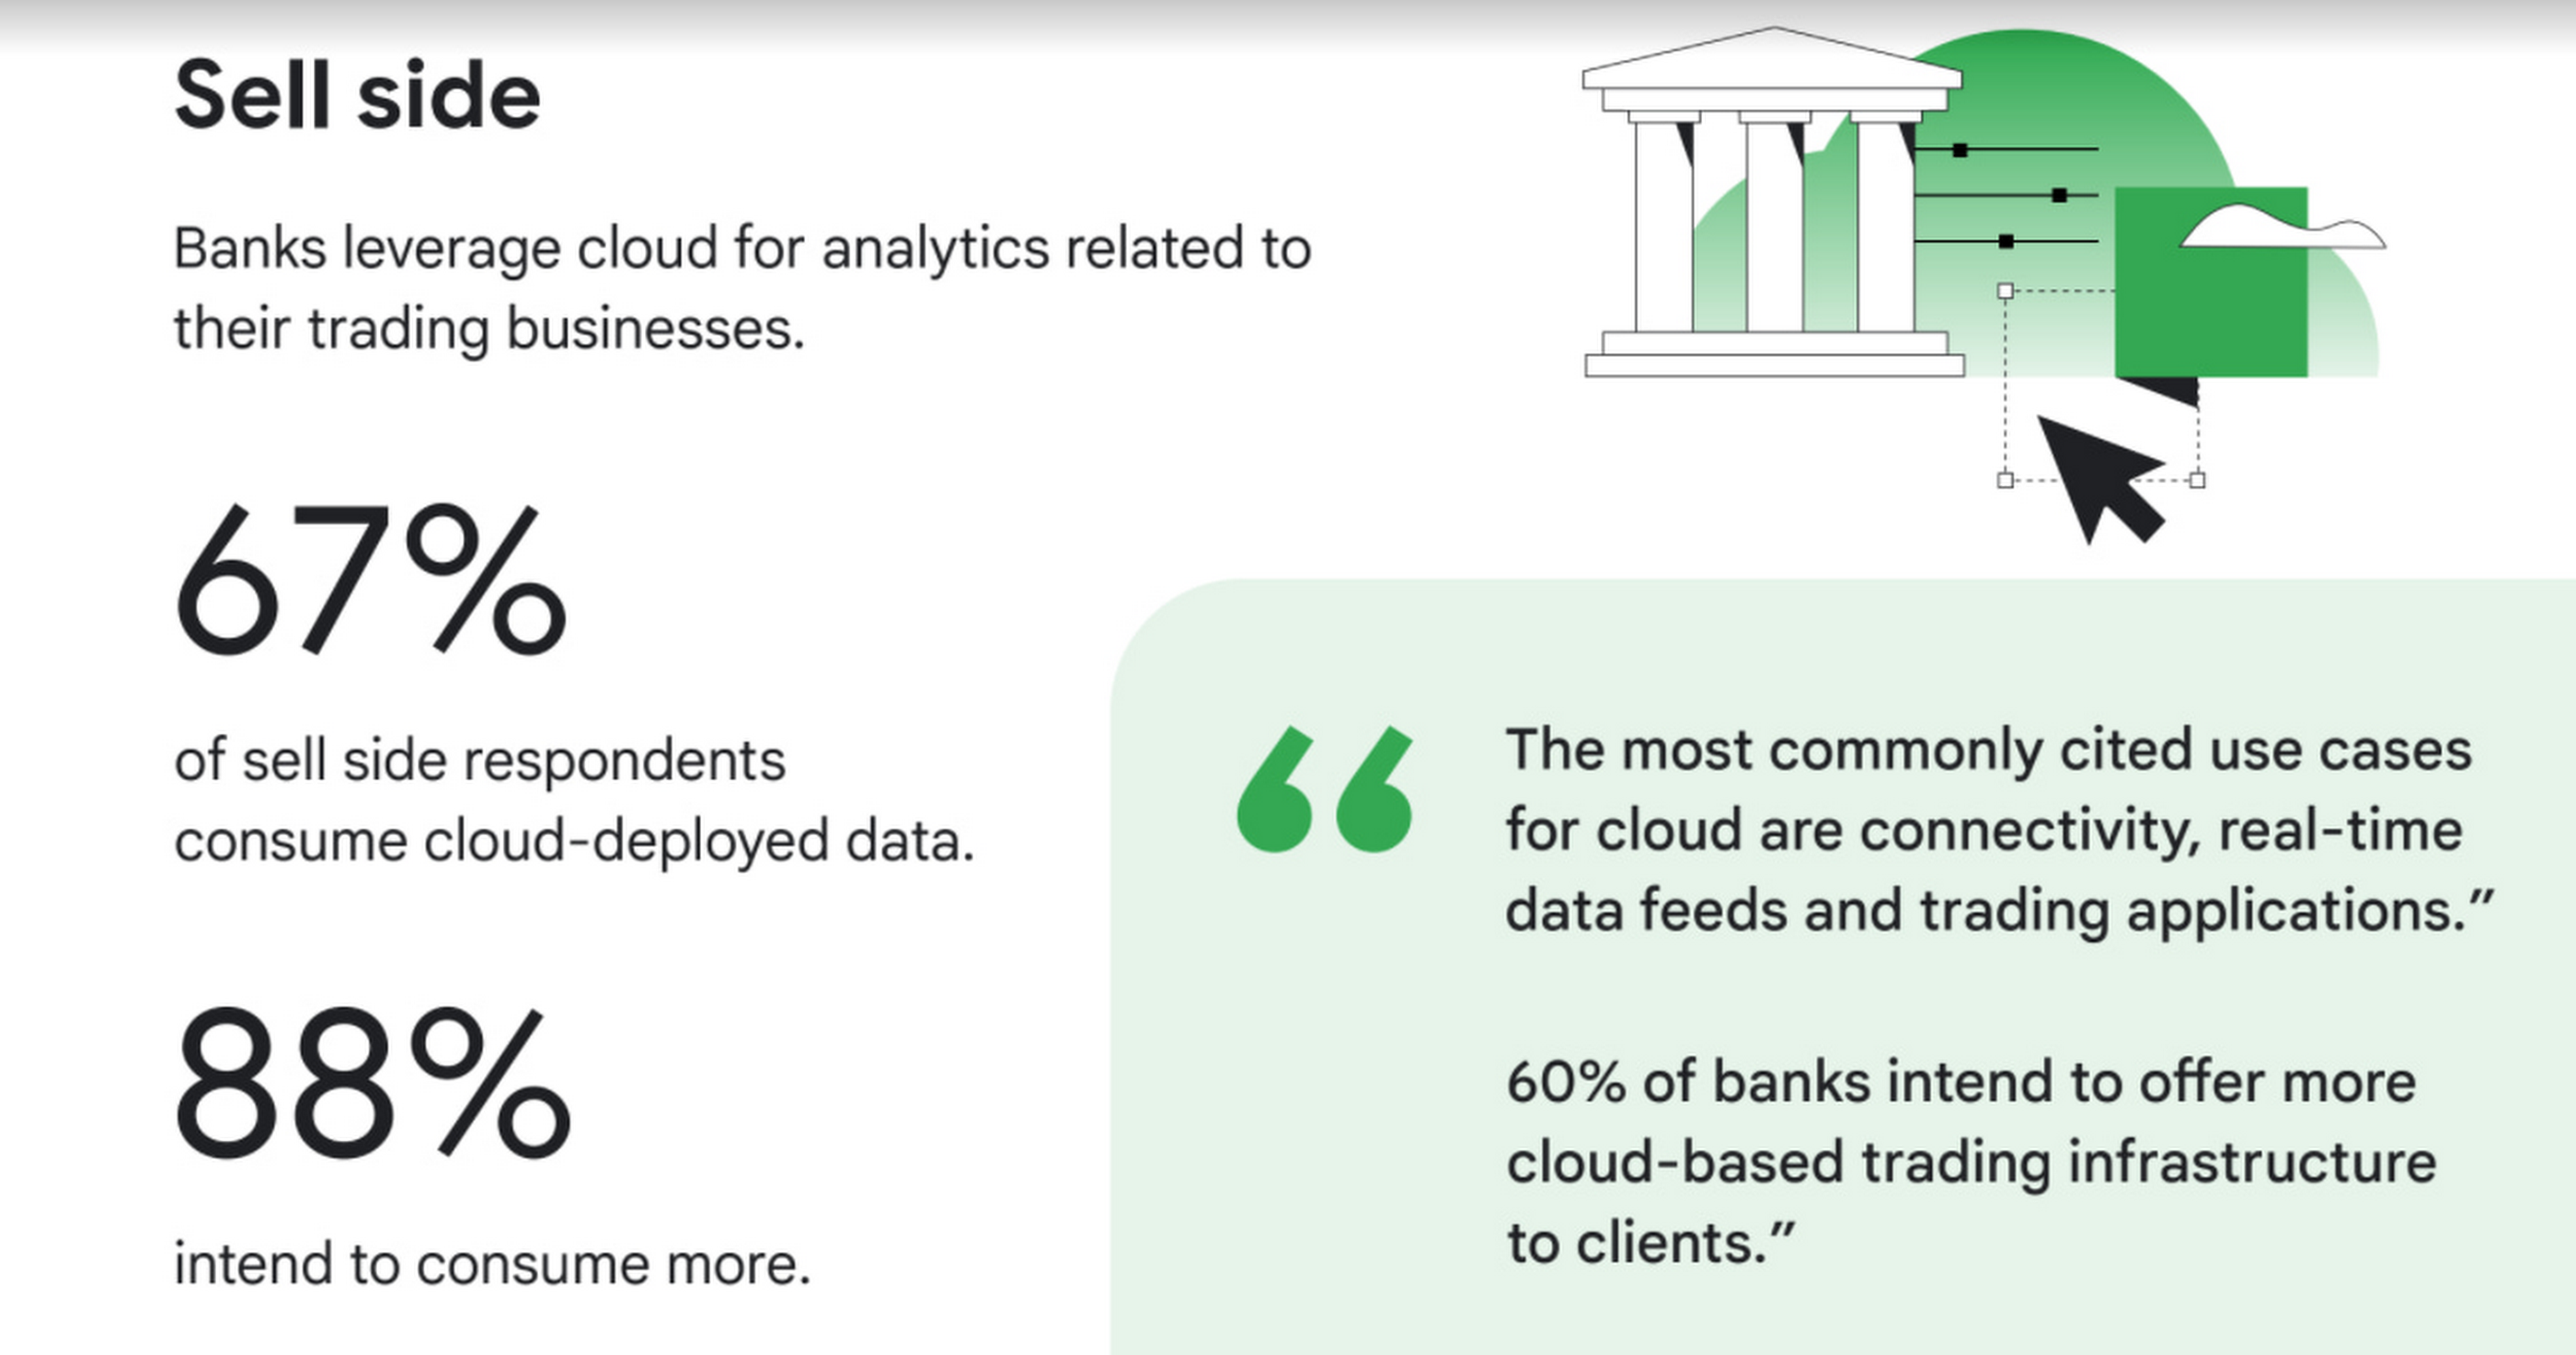
2. Commercial and investment banks are offering additional connectivity, real-time data feeds, and trading applications delivered via the cloud,demonstrating that it’s not only exchanges, trading systems, and data providers that are moving rapidly to the cloud. Internal use cases abound as well, with 67% of those surveyed consuming cloud-deployed market data, primarily for data analytics. 88% of surveyed sell-side firms intend to consume cloud-based market data services, with digital transformation, data science and quant research as the top use cases.
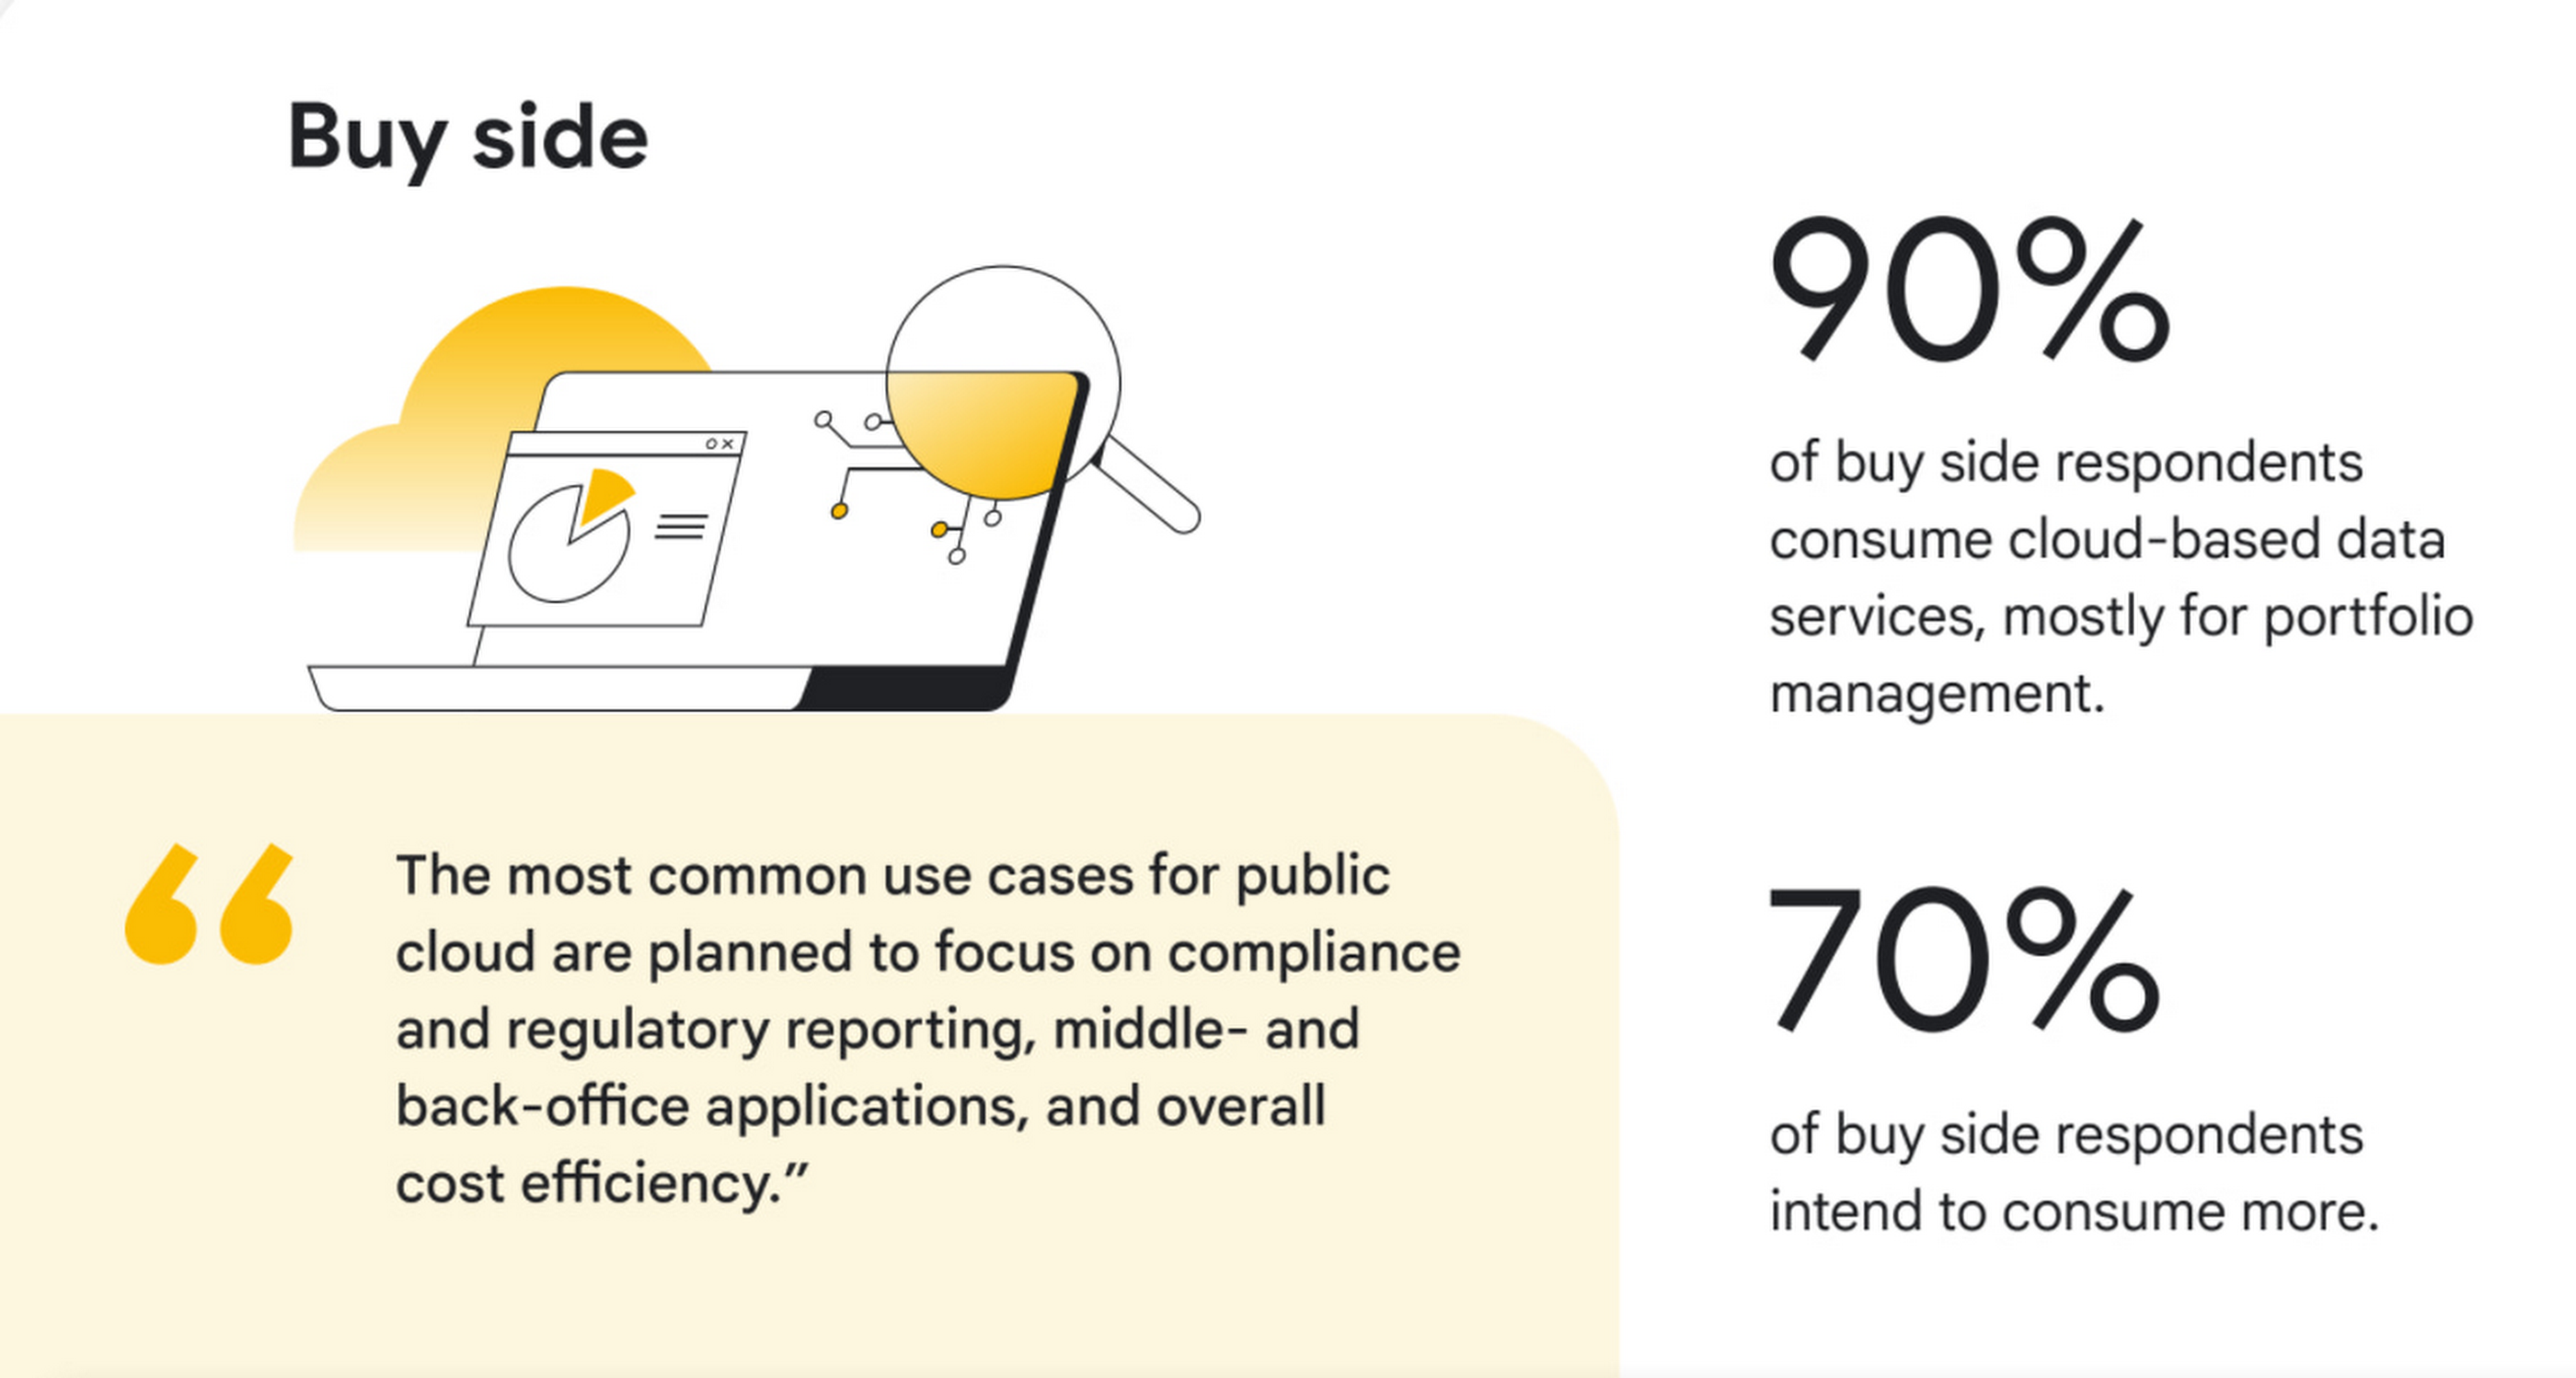
3. Buy side firms will consume even more cloud-deployed data. Today, 90% of surveyed buy-side firms are consuming cloud-deployed market data, mostly for portfolio management. 70% of buy-side firms intend to consume more public cloud-based market data services in the next 12 months, adding services such as compliance and regulatory reporting.
4. AI/ML, powered by cloud, is moving out of the pilot phase and into mainstream use. Today, 50% of exchanges, trading systems, and data providers are offering data products or services powered by AI/ML, and of those, 42% intend to offer AI-powered trade execution and trading analytics services in the next 12 months. Within commercial and investment banks, 55% said they are currently using AI/ML in the cloud, and while that was true for only 14% of overall buy-side respondents, 44% of large buy-side respondents are using it.

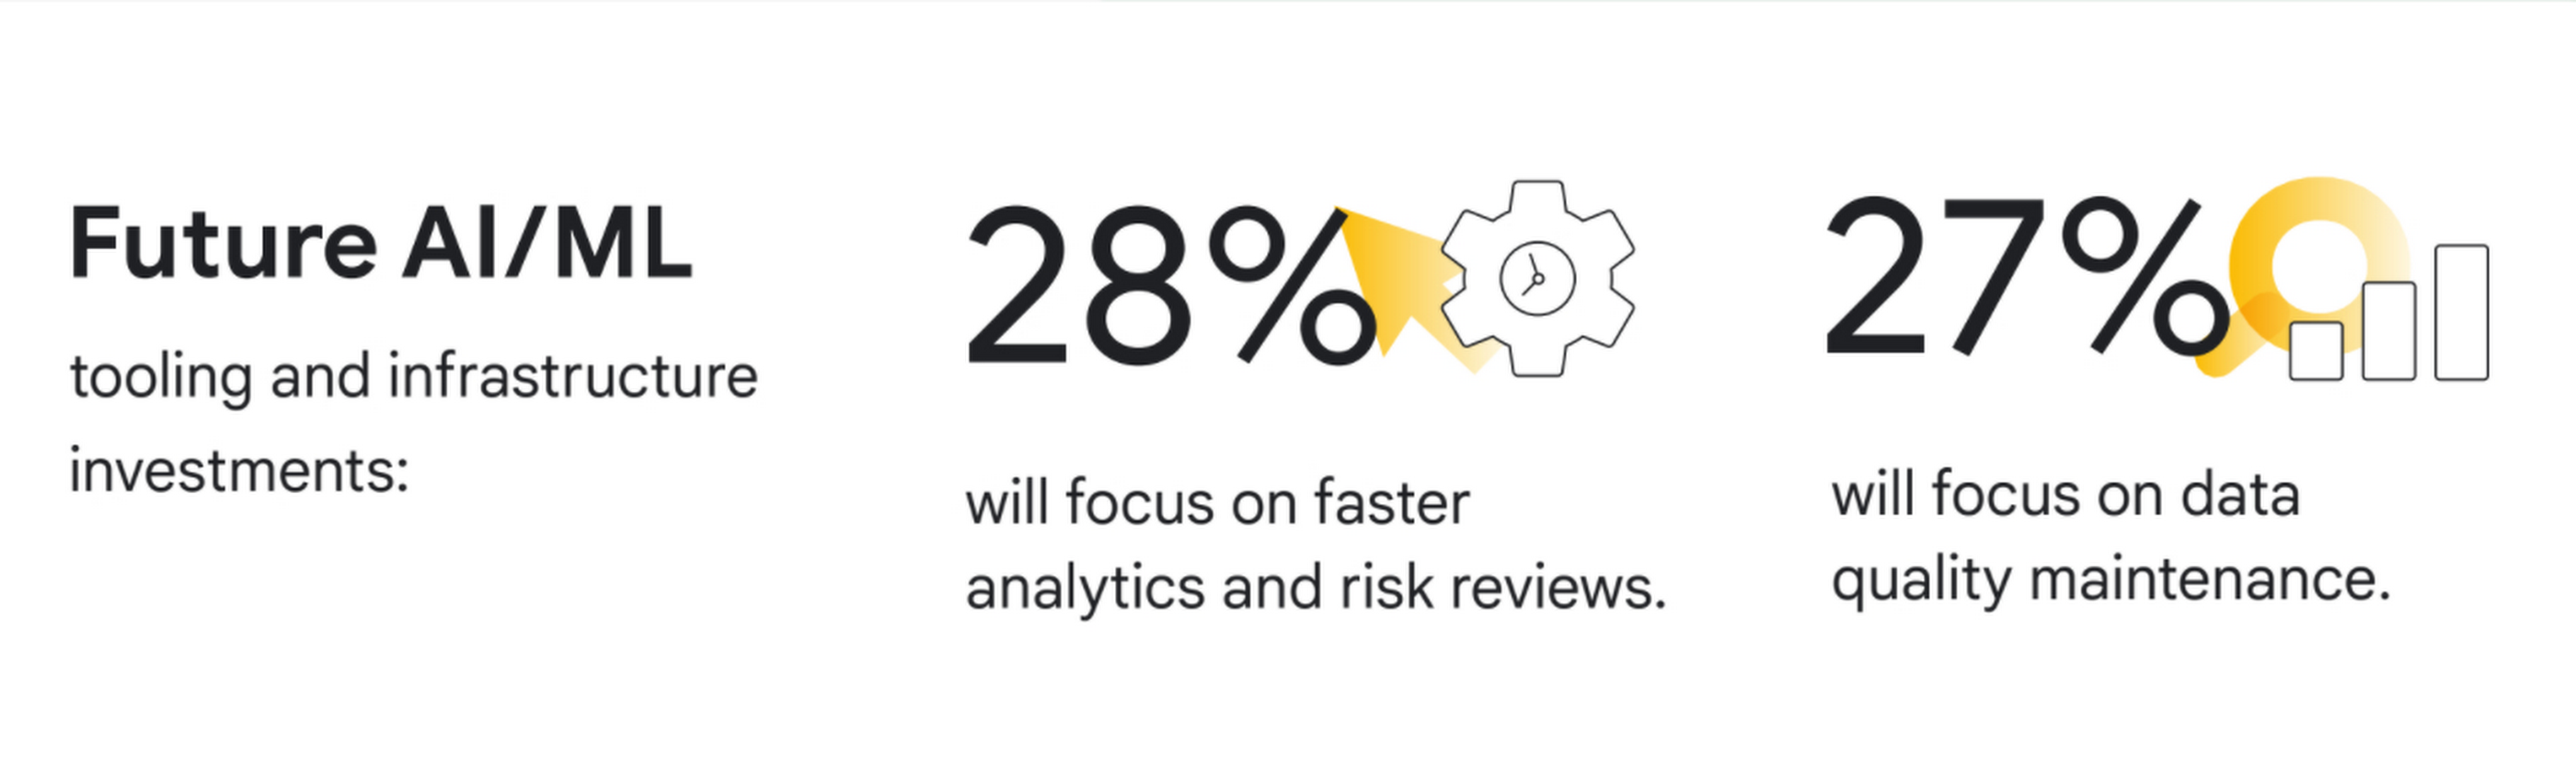
5. Exchanges, trading systems, and data providers are prioritizing public cloud for internal insights. 71% of these firms are using the public cloud, mostly for data transmission, processing, analysis, and long-term data storage. Over the next 12 months, 33% of new public cloud workloads will focus on data mining, data insights and advanced analytics, while 28% of new AI/ML tooling and infrastructure investments will focus on faster analytics and risk reviews, and 27% on data quality maintenance.
“We see new, dramatic shifts on the adoption of cloud across market data,” said David Easthope, Senior Analyst for Coalition Greenwich. “And we expect further proliferation of cloud-based services and greater consumption across the trading and investing lifecycle.”
Conclusions and future predictions
Based on the survey results, Coalition Greenwich predicts five following trends over the next 12 months:
- Exchanges and trading systems will continue to launch a wide array of new cloud-based and possibly cloud exclusive data services across derived data, end of day data, reference data and pricing data.
- Data providers will launch new data products such as pre-trade analytics powered by AI/ML in the cloud.
- Commercial and investment banks will offer additional connectivity, real-time data feeds, and trading applications delivered via the cloud.
- Buy-side firms will consume even more cloud-deployed data, including real-time market data, portfolio management data, and risk analytics.
- Exchanges, trading systems and data providers will explore proof-of-concepts around core systems on the cloud. Improvements to AI/ML tooling or infrastructure will ramp up as firms seek more rapid responses to risk initiatives.
To learn more about these findings, download our two full reports, The Future of market data: Distribution and consumption through cloud and AI and Exchanges and data providers: Prioritizing the cloud and AI for internal insights or our short infographic.
Research methodology
The survey was conducted online by Coalition Greenwich on behalf of Google Cloud from March 2021 to April 2021 among 102 executives in North America (n=82), EMEA (n=17) and other (n=3) who are employed full-time and who are participants or influencers in decisions around cloud and/or senior management with a role at a company which is an institutional asset manager, hedge fund, alternative investment manager, exchange and/or trading system, information provider, information aggregator, or other asset manager/asset owner. The survey included wide perspectives from a range of firm size and asset class focus, including equity, fixed income, FX, commodities, multi-asset, and other asset classes.
Foot Notes
1. We defined market data as direct feeds, consolidated feeds, terminal and desktop products, security and reference data, pricing data, historical data, alternative data, and index data.
End Security Risks with the Unattended Projects Recommender Feature

6131
Of your peers have already read this article.
3:00 Minutes
The most insightful time you'll spend today!
In fast-moving organizations, it’s not uncommon for cloud resources, including entire projects, to occasionally be forgotten about. Not only such unattended resources can be difficult to identify, but they also tend to create a lot of headaches for product teams down the road, including unnecessary waste and security risks.
To help you prune your idle cloud resources, we’re excited to introduce Unattended Project Recommender. It’s a new feature of Active Assist that provides you with a one-stop shop for discovering, reclaiming, and shutting down unattended projects. With actionable and automatic recommendations, you no longer have to worry about wasting money or mitigating security risks presented by your idle resources. Unattended Project Recommender uses machine learning to identify, with a high degree of confidence, projects that are likely abandoned based on API and networking activity, billing, usage of cloud services, and other signals. This feature is available via the Recommender API today, making it easy for you to integrate with your company’s existing workflow management and communication tools, or export results to a BigQuery table for custom analysis.
Thousands of projects can be unattended in large organizations, presenting major security risks
Your cloud projects can go abandoned or unattended for a number of reasons — ranging from a test environment that’s no longer needed, to project cancellation, to project owner switching jobs, and more. Not only can such projects contribute to your cloud bill (waste) but they may contain security issues such as open firewalls or privileged service account keys that attackers can exploit to get a hold of your cloud resources for cryptocurrency mining or, worse, compromise your company’s sensitive data. These security risks tend to grow over time because the latest best practices and patches are usually not applied to unattended projects.
We experience this issue here at Google, too… In fact, it has been on Google’s internal security team’s radar for some time now, so we joined forces and looked into this problem together, starting with our very own “google.com” organization cloud projects. We quickly found some projects that were unattended, but remediating this issue was easier said than done due to challenges in several areas:
- Detection: With lots of signals available to you via sources like Cloud Monitoring, what are the right ones you should look at (e.g. API, networking, user activity)? How can you tell the difference between an unattended project and a project that has a low level of activity by design (e.g. a “shell” project that holds an auth token)?
- Remediation: Once you have identified a project that seems abandoned, how do you go about ensuring that it’s indeed an unattended project? How do you reduce the risk of deleting something that might be essential to a production workload, causing irreversible data loss? How do you solve this at the scale of your entire organization, beyond a one-time cleanup?
Over the course of 2021 we built and tested a Google-internal prototype first, cleaning up many of our internal unattended projects, and then worked with a number of Google Cloud customers to build and tune this feature based on real-life data (thank you to all of our early adopters for working with us and your generous feedback that helped us shape this feature!) It was not uncommon for us to come across organizations with thousands of unattended projects, and we’re very excited to bring Unattended Project Recommender to all customers, in public preview.
Discovering and acting on unattended project recommendations
Unattended Project Recommender analyzes usage activity across all projects under your organization, including the following data:
- API activity (e.g. service accounts with authentication activity, API calls consumed)
- Networking activity (ingress and egress)
- Billing activity (e.g. services with billable usage)
- User activity (e.g. active project owners)
- Cloud services usage (e.g. number of active VMs, BigQuery jobs, storage requests)
Based on these signals, it can generate recommendations to clean up projects that have low usage activity (where “low usage” is defined using a machine learning model that ranks projects in your organization by level of usage), or recommendations to reclaim projects that have high usage activity but no active project owners. Here’s what an example post-processed summary list of recommendations can look like for the “foobar” organization that has 3 projects:
Project ID: demo-project-307815Recommendation: CLEANUP_PROJECTProject ID: new-projectRecommendation: N/AProject ID: bobs-playground-projectRecommendation: RECLAIM_PROJECT
In addition to the recommendations, you can also examine the underlying project activity insights that the recommendations are based upon. The insights provide additional information that can be useful for integration with your organization’s existing workflows and automation (e.g. send an auto-generated email or chat message to project owners based on the list provided by the owners field). Here’s an example insight payload:
content:activeAppengineInstanceDailyCount: 0activeCloudsqlInstanceDailyCount: 0activeGceInstanceDailyCount: 3activeServiceAccountDailyCount: 1apiClientDailyCount: 18922 // Daily average API calls producedbigqueryInflightJobDailyCount: 0bigqueryInflightQueryDailyCount: 0bigqueryStorageDailyBytes: 0bigqueryTableDailyCount: 0consumedApiDailyCount: 0 // Daily average API calls consumeddatastoreApiDailyCount: 0gcsObjectDailyCount: 11gcsRequestDailyCount: 0gcsStorageDailyBytes: 2663548hasActiveOauthTokens: false // OAuth tokens used in the last 180 dayshasBillingAccount: truenumActiveUserOwners: 1owners: // List of project owners- activeOnProject: falsemember: user:user1@example.com- activeOnProject: truemember: user:user2@example.comserviceWithBillableUsage:– Cloud Storage- Compute EnginevpcEgressDailyBytes: 264456938 // Daily average VPC egress bytesvpcIngressDailyBytes: 392435047 // Daily average VPC ingress bytesusagePercentile: 20 // Level of usage relative to other projects
GCP projects are used in many different ways and for many different purposes. In case you get a recommendation to delete a project that’s being used in a way that’s out of the scope for this feature, you can dismiss the recommendation and it will stop showing up for the given project.
Restoring deleted projects
When you choose to shut down a project using the projects.delete() method, it gets marked for deletion. After a project is marked for deletion, it becomes unusable, all resources within that project are shut down, and a 30-day wait period for the project and all of its data to get fully deleted begins.
In case a useful project is accidentally shut down, you have the option to restore the project within that 30-day wait period. Since restoring allows you to recover most but not necessarily all of your project data and resources, we recommend carefully examining the utilization insights associated with a project and considering any additional utilization signals that may not be captured by the Unattended Project Recommender before taking the cleanup action.
Early customer success stories
A number of enterprise customers are already using Unattended Project Recommender to keep their organizations clean of unattended projects and resources.
Decathlon, a French sporting goods retailer, is excited for the insight Unattended Project Recommender will bring to their environment, and are already deploying it as a part of their latest cloud security initiatives.
“After a thorough test of this feature and the validation of our CISO, we ended up deleting our first 775 projects, and no one complained! A great help to improve our security. The next step for us will be to operationalize it at scale, and implement a company wide policy for unattended resource management.” —Adeline Villette, Cloud Security Officer
For Veolia, one of the world’s largest water, waste and energy management companies, not only does this feature reduce security risks and waste, but also helps drive cultural shift and alignment with its ecological transformation strategy.
“This feature allows us to reduce our costs and security debt on assets that are no longer in use, and is also fully in line with Veolia’s philosophy of limiting its carbon footprint. After having tested Unattended Project Recommender on more than 3,000 projects throughout our organization, we are looking to bring it as proactive alerts to our project owners at scale.”—Thomas Meriadec, Product Manager
Box, a secure cloud content management provider, views it as a foundation for building a repeatable process to remediate unused resources.
“Unattended Project Recommender is a great fit for us. It gives us a unified view of project usage across our entire organization and enables us to address security risks of legacy projects in a systematic and organized manner, ensuring an even safer environment.” —Matt Bowes, Staff Security Engineer
Getting started with the Unattended Project Recommender
To help you get started, we’ve prepared a Cloud Shell tutorial (source code) that you can use to find unattended project recommendations within your own Projects/Folders/Organization. Click this button to clone the tutorial from GitHub and run in your Cloud Shell environment:

As you can see, listing recommendations for your projects only takes a few clicks with the tutorial (special thanks to Lanre Ogunmola, Security & Compliance Specialist, for making this look so easy)! For additional detail on using the gcloud CLI or API to discover unattended project recommendations, please refer to the documentation page.
You can also automatically export all recommendations from your Organization to BigQuery and then investigate the recommendations with DataStudio or Looker, or use Connected Sheets that let you use Google Workspace Sheets to interact with the data stored in BigQuery without having to write SQL queries.
As with any other Recommender, you can choose to opt out of data processing at any time by disabling the appropriate data groups in the Transparency & control tab under Privacy & Security settings.
We hope that you can leverage Unattended Project Recommender to improve your cloud security posture and reduce cost, and can’t wait to hear your feedback and thoughts about this feature! Please feel free to reach us at active-assist-feedback@google.com and we also invite you to sign up for our Active Assist Trusted Tester Group if you would like to get early access to the newest features as they are developed.
Google Cloud and Univision Partnership to Up the Ante in UX for Spanish-speaking Audience

6877
Of your peers have already read this article.
1:00 Minutes
The most insightful time you'll spend today!
The past year has given everyone lots to think about—about our priorities as people and as businesses. As the world retreated behind closed doors, we saw how shared interests and experiences can bring us together. As the world grappled with a common enemy, we witnessed just how differently individuals, communities and indeed entire countries can experience a situation. And as we faced seemingly unending obstacles to making it through the pandemic, we saw how making smart decisions based on data can drive meaningful solutions—fast.
That’s why we here at Google Cloud are so proud to partner Univision, the country’s leading Spanish-language content and media company. By partnering with Google Cloud, Univision will be able to accelerate growth across its portfolio of properties, deliver an enhanced user experience for Spanish-speaking audiences and provide the enterprise solutions needed to create the Spanish-language media company of the future.
According to Instituto Cervantes, there are over 580 million Spanish language speakers worldwide. Those viewers, like people everywhere, are avid consumers of streaming content. In Q4 of 2020 alone, viewing time for that content increased by 44%1, and in 2020, from 50%2 more sources. With that surge in demand, Univision needed a cloud provider whose infrastructure could reach Hispanic viewers around the world. With two-plus decades spent building out its network and data centers, as well as global content-delivery capabilities, Google Cloud has the infrastructure Univision needs to reach viewers across the Spanish-speaking world.
At the same time, with such a diverse audience for their content, Univision needs to target that content to viewers’ specific preferences. By applying Google Cloud’s artificial intelligence (AI) and machine learning (ML) technology across its content, Univision intends to personalize content based on shows users have previously watched, enhancing their engagement and viewing experience.
And as Univision transforms the user experience, it can use Google Cloud’s data and analytics suite to garner deeper insights into its audience and forge stronger relationships with them on an individual basis. With Looker and BigQuery, Univision employees will have access to real-time data to help them make business decisions about programming.
Univision will also migrate video distribution and production operations to Google Cloud, where we’ll help them streamline media workflows and develop innovative new capabilities. Meanwhile, Google Cloud’s tight business and technical integration with other Google services will help ensure Univision reaches viewers on the device of their choice, wherever they are in the world. For example, in the coming years, Univision will expand its global YouTube partnership and will integrate with entertainment features on Google Search that help people better discover TV shows and movies. The company will also use Google Ad Manager for global ad decisioning and Google’s Dynamic Ad Insertion for PrendeTV and future video-on-demand offerings. Finally, Univision will distribute its content and services on Google Play across Android phones and tablets, as well as Google TV and other Android TV OS devices.
We’re thrilled to partner with Univision to help them reach the Spanish-speaking world with their content. With our cloud portfolio, we can help them reach individual viewers around the world, with personalized content that they can consume however they see fit. Best of all, together, we can help them achieve this vision fast, leveraging established cloud, content delivery, and data analytics technologies. You can learn more about the partnership here.
More Relevant Stories for Your Company




Satellites Can Help Map Carbon Emissions By Looking at Images of Power Plants!
Did you know that Satellites can now help track power plants and determine if they are on or off? And did also know that compute processing that classifies over 59 trillion bytes of data from over 11,000 sensors from 300 satellites is done on on Google Cloud? Google Cloud's sustainability

Easy Access to Stream Analytics with Google Cloud
By 2025, more than a quarter of the data created in the global datasphere will be real-time in nature. “This is important because in the real-time world, “the window of opportunity diminishes and goes away really fast. You want to be able to respond to your customer needs, their asks,

An Out-of-the-box, End-to-end Solution for Contact Centers!
Providing best-in-class customer service is crucial for the success of your business. Contact centers are a critical touch point, as they have to balance between representing your brand and prioritizing customer care. When your customers seek help and support, they expect efficient service that is accessible through modern voice and
Technical deep dive on Looker: The enterprise BI solution for Google Cloud
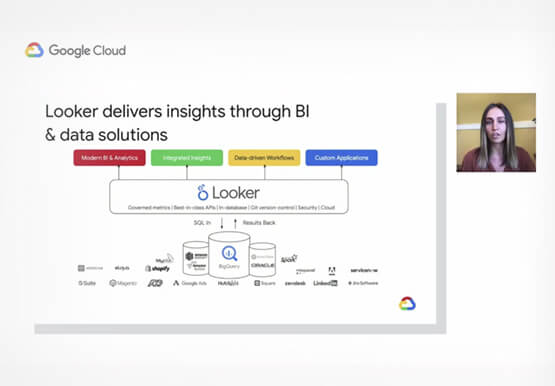
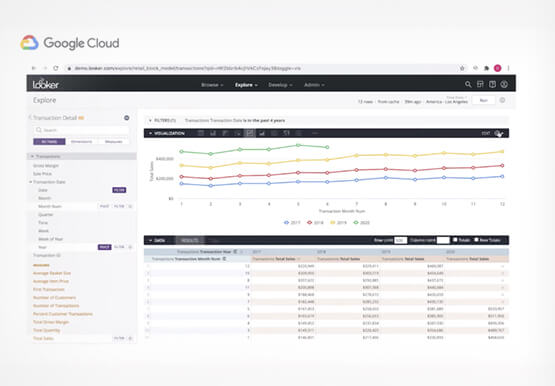
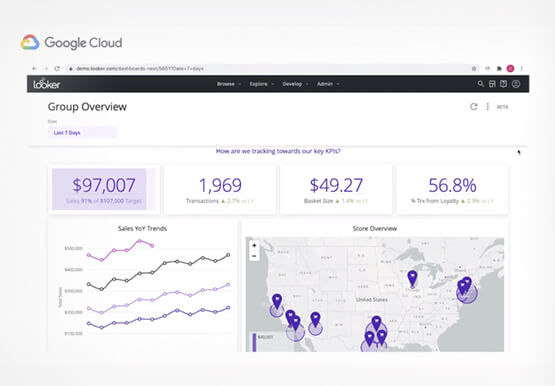
Thousands of users accessing petabytes of data on a daily basis: This is a challenging proposition for enterprises, without a doubt. But Looker makes it possible. Beyond just accessing data though, Looker’s platform transforms your company’s relationship with data. Go under the hood of Looker, with Olivia Morgan, Enterprise CE,
