





How Barilla Created a Social Media Style App to Improve Efficiency

5654
Of your peers have already read this article.
3:30 Minutes
The most insightful time you'll spend today!
Google Cloud Results
- Replaced conflicting, time-consuming paper logs with a near real-time, transparent app
- Scaled rapidly and easily to accommodate new teams thanks to Google App Engine
- Enables photographic and video communication to replace confusing text
- New factory solution rolled out in just 15 days
In 1877, Pietro Barilla set up a small bakery to make pasta and baked goods for the people of Parma, Italy. Today, Barilla applies its 140 years of baking knowledge on a global scale, with six major manufacturing sites in Italy and an international network employing over 8,000 people. As the world’s leading producer of pasta, Barilla knows that when it comes to making quality food, great communication is key. That’s why the company plans to become a completely digital, looking to technology to improve the way it works.
Teams at the Barilla factory in Cremona work along a production line more than one-kilometer long, staffed by three shifts of workers a day. When one shift handed over to the next or requested machine maintenance teams, they used paper notebooks and unofficial instant messaging to communicate. That meant there was no authoritative, real-time record of events, communication was messy, oversight was poor, and teams had to hold daily morning meetings to synchronise notes.
Barilla worked with the Google Cloud Partner Injenia to create a solution, beginning with a consultative process on the factory floor.
“We had the idea to to start from the bottom and work up,” says Cristiano Boscato at Injenia. “Barilla’s top staff were brilliant about letting us do it. Eight of us from Injenia spent months on the factory lines with Barilla workers, collecting ideas on Google Docs, making presentations with Slides and collecting feedback with Forms. The CollaborAction app we created is the result of an amazing partnership.”
Co-designing a team social network
“Everything at the Cremona plant was managed offline, with paper,” explains Alessandra Ardrizzoia, Digital Engagement Senior Manager at Barilla. “Workers on the line would track events in notebooks, the shift leader would have another notebook, and the leader of the maintenance team would have yet another notebook. Everybody wrote their own text description of events, so there would be mismatches in the information going around.”
To resolve this, teams would meet at 8:30am every day to reconstruct a consistent narrative. In addition, machine maintenance workers were already using instant messaging to communicate with the line. Barilla and Injenia looked for a solution that could deliver a searchable, single version of events, with the ease of use of a mobile messaging application.
After consulting factory workers for ideas, Injenia created CollaborAction, a custom-built app that brought G Suite collaboration tools together on an Google App Engine platform, using Google Cloud SQL to index files. Google+, Google Drive and Hangouts were not only highly available and easy-to-use, they also “helped with fast adoption, with interfaces that workers could already relate to.” Meanwhile Google App Engine enabled the Injenia team to deliver updates and new versions at speed, as part of a feedback process with workers who offered suggestions through a link to Forms embedded in the app.
Google+ provides an intuitive social media dashboard that workers felt comfortable with. Now teams use company tablets placed at intervals along the line to log in, report issues to other teams, photograph problems, schedule maintenance, give status updates through Hangouts chat, and have visibility on the whole process as it takes place.
“Everyone in the Cremona plant was really happy with the new social collaboration process. Because they were involved in designing the solution, they felt involved and really engaged with the process,” says Alessandra. “And now that everyone is aligned with CollaborAction, all the work in the plant is more effective. They are more agile and can use their time in more added-value activities.”
Optimization and a national roll-out
Created in Cremona, now CollaborAction connects over 1,000 users in six of Barilla’s factories in Italy. “The pilot at Cremona took one month, and adoption has been easier and faster in every plant we’ve taken it to,” says Cristiano. “We have another five or six plants more, and it takes no more than 15 days to introduce. That’s incredible.”
Because CollaborAction is a mobile app built on Google App Engine, scaling to meet new demand has been simple. Now maintenance teams use the app on smartphones, line workers use it on tablets, and shift leaders use it on laptops, so the entire team is aligned in close to real-time on a single version of events. And now teams communicate with video and photographs as well as text, there’s less room for confusion, as Alessandra explains. “It’s no problem understanding what’s happening in a video or picture, compared to a message that just says ‘something is going wrong.’ On a production line, where one part leads into the next, that speed makes a difference, and means we don’t have to throw as much food away when something breaks down.”
“Now we’re collecting feedback from all of the plants using CollaborAction and using it to create a standardised solution that we can apply across all of our plants,” says Alessandra. “We’re side-by-side with the workers in that sense, trying to address their needs with new features. It’s a way to make the workers feel like part of the solution, and that the app represents their needs and their voice.”
Solving a universal problem
By the end of 2018, Barilla and Injenia aim to have deployed CollaborAction to 2,700 employees at 18 factories worldwide. Barilla has already collected more than 50,000 posts with the app, including around 20,000 photographs and videos, and is now considering ways to apply Cloud Machine Learning Engine to create a maintenance chatbot or direct IoT connection with machinery.
“CollaborAction hasn’t just made our maintenance processes faster and more efficient, its also exponentially increased the knowledge and understanding employees have about their work,” says Alessandra. “It’s improving team spirit, too, such as when employees use CollaborAction to arrange to play soccer. It’s become the main communication tool for the entire plant.”
How to Build A Basic Image Search Utility for Natural Language Queries

4702
Of your peers have already read this article.
6:00 Minutes
The most insightful time you'll spend today!
This post shows how to build an image search utility using natural language queries. Our aim is to use different GCP services to demonstrate this. At the core of our project is OpenAI’s CLIP model. It makes use of two encoders – one for images and one for texts. Each encoder is trained to learn representations such that similar images and text embeddings are projected as close as possible.
We will first create a Flask-based REST API capable of handling natural language queries and matching them against relevant images. We will then demonstrate the use of the API through a Flutter-based web and mobile application. Figure 1 shows how our final application would look like:
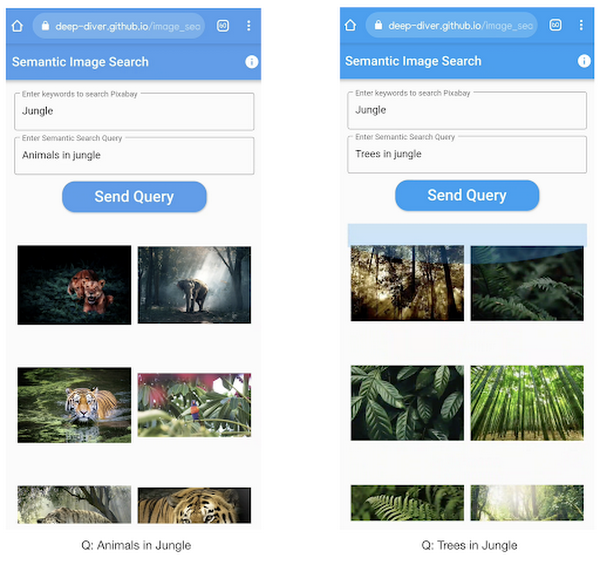
All the code shown in this post is available as a GitHub repository. Let’s dive in.
Application at a high-level
Our application will take two queries from the user:
- Tag or keyword query. This is needed in order to pull a set of images of interest from Pixabay. You can use any other image repositories for this purpose. But we found Pixabay’s API to be easier to work with. We will cache these images to optimize the user experience. Suppose we wanted to find images that are similar to this query: “horses amidst flowers”. For this, we’d first pull in a few “horse” images and then run another utility to find out the images that best match our query.
- Longer or semantic query that we will use to retrieve the images from the pool created in the step above. These images should be semantically similar to this query.
Note: Instead of two queries, we could have only taken a single long query and run named-entity extraction to determine the most likely important keywords to run the initial search with. For this post, we won’t be using this approach.
Figure 2 below depicts the architecture design of our application and the technical stack used for each of the components.
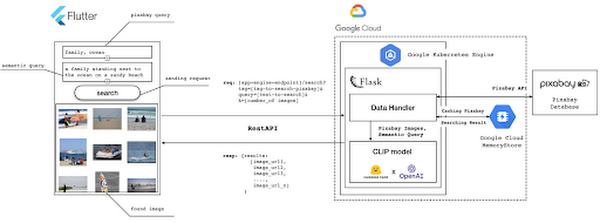
Figure 2 also presents the core logic of the API we will develop in bits and pieces in this post. We will deploy this API on a Kubernetes cluster using the Google Kubernetes Engine (GKE). The following presents a brief directory structure of our application code-base:
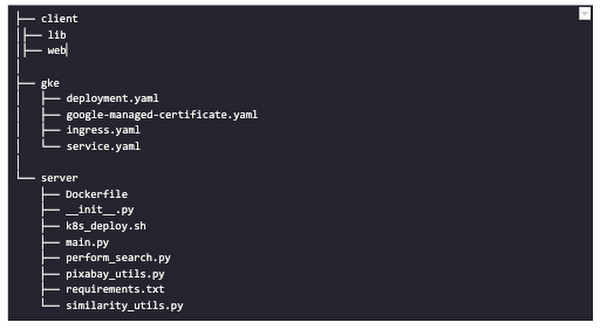
Next, we will walk through the code and other related components for building our image search API. For various machine learning-related utilities, we will be using PyTorch.
Building the backend API with Flask
First, we’d need to fetch a set of images with respect to user-provided tags/keywords before performing the natural language image search. The utility below from the pixabay_utils.py script can do this for us:
def fetch_images_tag(pixabay_search_keyword, num_images):"""Fetches images from Pixabay w.r.t a keyword.:param pixabay_search_keyword: Keyword to perform the search on Pixabay.:param num_images: Number of images to retrieve.:return: List of PIL images.:return: List of image URLs."""query = (PIXABAY_API+ "&q="+ pixabay_search_keyword.lower()+ "&image_type=photo&safesearch=true&per_page="+ str(num_images))response = requests.get(query)output = response.json()all_images = []all_image_urls = []for each in output["hits"]:imageurl = each["webformatURL"]response = requests.get(imageurl)image = Image.open(BytesIO(response.content)).convert("RGB")all_images.append(image)all_image_urls.append(imageurl)return (all_images, all_image_urls)
Note that all the API utilities are logging relevant information. But for brevity, we have omitted the lines of code responsible for that. Next, we will see how to invoke the CLIP model and select the images that would best match a given query semantically. For this, we’ll be using Hugging Face, an easy-to-use Python library offering state-of-the-art NLP capabilities. We’ll collate all the logic related to this search inside a SimilarityUtil class:
class SimilarityUtil:def __init__(self):self.model = CLIPModel.from_pretrained(CLIP_MODEL)self.processor = CLIPProcessor.from_pretrained(CLIP_PREPROCESSOR)self.device = "cuda" if torch.cuda.is_available() else "cpu"def perform_sim_search(self, images, query_phrase, top_k=3):"""Performs similarity search between the images and query.:param images: A list of PIL images initially retrieved withrespect to some entity e.g. Tiger.:param query_phrase: A list containing a single text query,e.g. "Tiger drinking water".:param top_k: Number of top images to return from `images`.:return: Top-k indices matching the query semantically andtheir similarity scores."""model = self.model.to(self.device)# Obtain the text-image similarity scoreswith torch.no_grad():inputs = self.processor(text=[query_phrase], images=images, return_tensors="pt", padding=True)inputs = inputs.to(self.device)outputs = model(**inputs)# Image-text similarity scoreslogits_per_image = outputs.logits_per_image.cpu()(top_indices, top_scores) = self.sort_scores(logits_per_image, top_k)return (top_indices, top_scores)def sort_scores(self, scores, top_k):"""Sorts the scores in a descending manner.:param scores: Scores to sort through.:param top_k: Number of top scores to return.:return: Top-k scores and their indices."""values, indices = scores.squeeze().topk(top_k)top_indices, top_scores = [], []for score, index in zip(values, indices):top_indices.append(int(index.numpy()))score = score.numpy().tolist()top_scores.append(round(score, 3))return (top_indices, top_scores)
CLIP_MODEL uses a ViT-base model to encode the images for generating meaningful embeddings with respect to the provided query. The text-based query is also encoded using A Transformers-based model for generating the embeddings. These two embeddings are matched with one another during inference. To know more about the particular methods we are using for the CLIP model please refer to this documentation from Hugging Face.
In the code above, we are first invoking the CLIP model with images and the natural language query. This gives us a vector (logits_per_image) that contains the similarity scores between each of the images and the query. We then sort the vector in a descending manner. Note that we are initializing the CLIP model while instantiating the SimilarityUtil to save us the model loading time. This is the meat of our application and we have tackled it already. If you want to interact with this utility in a live manner you can check out this Colab Notebook.
Now, we need to collate our utilities for fetching images from Pixabay and for performing the natural language image search inside a single script – perform_search.py. Following is the main class of that script:
class Searcher:def __init__(self):self.similarity_model = SimilarityUtil()def get_similar_images(self, keyword, semantic_query, pixabay_max, top_k):"""Finds semantically similar images.:param keyword: Keyword to search with on Pixabay.:param semantic_query: Query to find semantically similar images retrieved from Pixabay.:param pixabay_max: Number of maximum images to retrieve from Pixabay.:param top_k: Top-k images to return.:return: Tuple of top_k URLs and the similarity scores of the images present inside the URLs."""images_redis_key = keyword + "_images"urls_redis_key = keyword + "_urls"if redis_client.exists(images_redis_key) and redis_client.exists(urls_redis_key):keyword_images = redis_client.get(images_redis_key)keyword_image_urls = redis_client.get(urls_redis_key)else:(keyword_images, keyword_image_urls) = fetch_images_tag(keyword, pixabay_max)redis_client.set(images_redis_key, keyword_images)redis_client.set(urls_redis_key, keyword_image_urls)(top_indices, top_scores) = self.similarity_model.perform_sim_search(keyword_images, semantic_query, top_k)top_urls = [keyword_image_urls[index] for index in top_indices]return (top_urls, top_scores)
Here, we are just calling the utilities we had previously developed to return the URLs of the most similar images and their scores. What is even more important here is the caching capability. For that, we combined GCP’s MemoryStore and a Python library called direct-redis. More on setting up MemoryStore later.
MemoryStore provides a fully managed and low-cost platform for hosting Redis instances. Redis databases are in memory and light-weight making them an ideal candidate for caching. In the code above, we are caching the images fetched from Pixabay and their URLs. So, in the event of a cache hit, we won’t need to call the CLIP model and this will tremendously improve the response time of our API.
Other options for caching
We can cache other elements of our application. For example, the natural language query. When searching through the cached entries to determine if it’s a cache hit, we can compare two queries for semantic similarity and return results accordingly.
Consider that a user had entered the following natural language query: “mountains with dark skies”. After performing the search, we’d cache the embeddings of this query. Now, consider that another user entered another query: “mountains with gloomy ambiance”. We’d compute its embeddings and run a similarity search with the cached embeddings. We’d then compare the similarity scores with respect to a threshold and parse the most similar queries and their corresponding results. In case of a cache miss, we’d just call the image search utilities we developed above.
When working on real-time applications we often need to consider these different aspects and decide what enhances the user experience and maximizes business at the same time.
All that’s left now for the backend is our Flask application – main.py:
@app.route("/search", methods=["GET"])def get_images():tag = request.args.get("t").lower()query = request.args.get("s_query").lower()top_k = request.args.get("k")(top_urls, top_scores) = searcher.get_similar_images(tag, query, MAX_PIXABAY_SEARCH, int(top_k))return jsonify({"top_urls": top_urls, "top_scores": top_scores})
Here we are first parsing the query parameters from the request payload of our search API. We are then just calling the appropriate function from perform_search.py to handle the request. This Flask application is also capable of handling CORS. We do this via the flask_cors library:
cors = CORS(app,resources={r"/search/*": {"origin": "*"},r"/test/*": {"origin": "*"},},)
And this is it! Our API is now ready for deployment.
Deployment with Compute Engine and GKE
The reason why we wanted to deploy our API on Kubernetes is because of the flexibility Kubernetes offers for managing deployments. When operating at scale, auto scalability and load balancing are very important. With the comes the requirement of security — we’d not want to expose the utilities for interacting with any internal services such as databases. With Kubernetes, we can achieve all these easily and efficiently.
GKE provides secured and fully managed functionalities for operationalizing Kubernetes clusters. Here are the steps to deploy the API on GKE at a glance:
- We first build a Docker image for our API and then push it to the Google Container Registry (GCR).
- We then create a Kubernetes cluster on GKE and initialize a deployment.
- We then add scalability options.
- If any public exposure is needed for the API, we then tackle it.
We can assimilate all the above into a shell script – k8s_deploy.sh:
## Docker build and push ### We are inside the `server` directorydocker build -t gcr.io/${PROJECT_ID}/search_service .docker push gcr.io/${PROJECT_ID}/search_service## Deploy on a GKE cluster ### Configure the Docker command-line tool to authenticate to Container Registrygcloud auth configure-docker# Create a Kubernetes clustergcloud container clusters create image-search-nlp# Create a deploymentkubectl create deployment clip-search --image=gcr.io/${PROJECT_ID}/search_service# Number of worker replicaskubectl scale deployment clip-search --replicas=3# HorizontalPodAutoscaler resourcekubectl autoscale deployment clip-search --cpu-percent=80 --min=1 --max=5# Expose deploymentkubectl expose deployment clip-search --name=clip-search-service --type=LoadBalancer --port 80 --target-port 8080
These steps are well explained in this tutorial that you might want to refer to for more details. We can configure all the dependencies on our local machine and execute the shell script above. We can also use the GCP Console to execute it since a terminal on the GCP Console is pre-configured with the system-level dependencies we’d need. In reality, the Kubernetes cluster should only be created once and different deployment versions should be created under it.
After the above shell script is run successfully, we can run kubectl get service to know the external IP address of the service we just deployed:
NAME CLUSTER-IP EXTERNAL-IP PORT(S) AGEclip-search-service 10.3.251.122 203.0.113.0 80:30877/TCP 10s
We can now consume this API with the following base URI: http://203.0.113.0/. If we wanted to deal with only http-based API requests, then we are done here. But secured communication is often a requirement in order for applications to operate reliably. In the following section, we are to discuss how to configure the additional items to allow our Kubernetes cluster to allow https requests.
Configurations for handling https requests with GKE
A secure connection is almost often a must-have requirement in modern client/server applications. The front-end Flutter application would be hosted on GitHub Pages for this project, and it requires https-based connection as well. Even if configuring https connection particularly for a GKE-based cluster can be considered a chore, its setup might seem daunting at first.
There are six steps to configure https connection in the GKE environment:
- You need to have a domain name, and there are a lot of inexpensive options that you can buy. For instance, mlgde.com domain for this project is acquired via Gabia which is a Korean service provider.
- A reserved (static) external IP address has to be acquired via gcloud command or GCP console.
- You need to bind the domain name with the acquired external IP address. This is a platform-specific configuration that issued the domain name to you.
- There is a special ManagedCertificate resource which is specific to the GKE environment. ManagedCertificate resource specifies the domain that the SSL certificate will be created for, so you need this.
- An Ingress resource should be created by listing the static external IP address, ManagedCertificate resource, and the service name and port which the incoming traffic will be routed to. The Service resource could remain the same as in the above section with only changes from LoadBalancer to ClusterIP.
- Last but not least, you need to modify the existing Flask application and Deployment resource to support liveness and readiness probes which are used to check the health status of the Deployment. The Flask application side can be simply modified with the flask-healthz Python package, and you only need to add
livenessProbeandreadinessProbesections in the Deployment resource. In the code example below, thelivenessProbeandreadinessProbeare checked via/aliveand/readyendpoints respectively.
from flask_healthz import healthzfrom flask_healthz import HealthErrorapp = Flask(__name__)app.register_blueprint(healthz, url_prefix="/")def printok():print("Everything is fine")def liveness():try:printok()except Exception:raise HealthError("Can't connect to the file")def readiness():try:printok()except Exception:raise HealthError("Can't connect to the file")app.config.update(HEALTHZ = {"alive": "main.liveness","ready": "main.readiness",})
One thing to be careful of is the initialDelaySeconds attribute of the probes. It is uncommon to configure this attribute with a big number, but it could be bigger than 90 – 120 seconds depending on the size of the model to be used. For this project, it is configured in 90 seconds in order to wait until the CLIP model is fully loaded into memory (full YAML script here).
livenessProbe:httpGet:path: /aliveport: 8080initialDelaySeconds: 90periodSeconds: 10readinessProbe:httpGet:path: /readyport: 8080initialDelaySeconds: 90periodSeconds: 10
Again, these steps may seem daunting at first, but it will become clear when you have done it once. Here is the official document for Using Google-managed SSL certificates You can find all the GKE-related resources used in this project here.
Once every step is completed you should be able to see your server application running on the GKE environment. Please make sure to run kubectl apply command whenever you create Kubernetes resources such as Deployment, Service, Ingress, and ManagedCertificate, and it is important to wait for more than 10 minutes until the ManagedCertifcate provisioning is done.
You can run gcloud compute addresses list command to find out the static external IP address that you have configured.
NAME ADDRESS/RANGE TYPE PURPOSE NETWORK REGION SUBNET STATUSgde 34.149.231.34 EXTERNAL IN_USE
Then, the IP address has to be mapped to the domain. Figure 3 is a screenshot of a dashboard from where we got the mlgde.com domain. It clearly shows mlgde.com is mapped to the static external IP address configured in GCP.
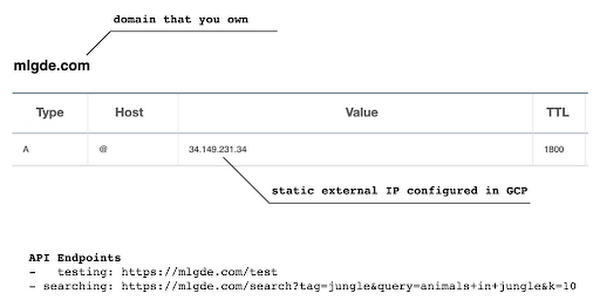
In case you’re wondering why we didn’t deploy this application on App Engine, well that is because of the compute needed to execute the CLIP model. App Engine instance won’t fit in that regime. We could have also incorporated compute-heavy capabilities via a VPC Connector. That is a design choice that you and your team would need to consider. In our experiments, we found the GKE deployment to be easier and suitable for our needs.
Infrastructure for the CLIP model
As mentioned earlier, at the core of our application is the CLIP model. It is computationally a bit more expensive than the regular deep learning models. This is why it makes sense to have the hardware infrastructure set up accordingly to execute it. We ran a small benchmark in order to see how a GPU-based environment could be beneficial here.
We ran the CLIP on a Tesla P100-based machine and also on a standard CPU-only machine 1000 times. The code snippet below is the meat of what we executed:
DEVICE = "cuda" if torch.cuda.is_available() else "cpu"start_time = time.time()for _ in range(1000):with torch.no_grad():model = model.to(DEVICE)inputs = processor(text=[semantic_search_phrase],images=all_images, return_tensors="pt", padding=True)inputs = inputs.to(DEVICE)outputs = model(**inputs)end_time = time.time() - start_timeprint(f"Total time: {end_time:.3f} seconds.")
As somewhat expected, with the GPU, the code took 13 minutes to complete execution. With no GPU, it took about 157 minutes.
It is uncommon to leverage GPUs for model prediction because of cost restrictions, but sometimes we have to access GPUs for deploying a big model like CLIP. We configured a GPU-based cluster on GKE and compared the performance differences with and without it. It took about 1 second to handle a request with GPU and MemoryStore cache while it took more than 4 seconds with MemoryStore only (without the GPUs).
For the purposes of this post, we used a CPU-based cluster on Kubernetes. But It is easy to configure GPU usage in a GKE cluster. This document shows you how to do so. For a short summary, there are two steps. First, a node should be configured with GPUs when creating a GKE cluster. Second, GPU drivers should be installed in GKE nodes. You don’t need to visit and manually install GPU drivers for each node by yourself. Rather you can simply apply the DaemonSet resource to GKE as described here.
Setting up MemoryStore
In this project, we first query the general concept of images to Pixabay, then we filter the images with a semantic query using CLIP. It means we can cache the initially retrieved images from Pixabay for the next specific semantic query. For instance, you may want to search with “gentleman wearing tie” at first, then you may want to retry searching for “gentleman wearing glass”. In this case, the base images remain all the same, so they could be stored in a cache server like Redis.
MemoryStore is a GCP service wrapping the Redis which is an in-memory data store, so you can simply use a standard Redis Python package for accessing it. The only thing to be careful about when provisioning a MemoryStore Redis instance is to make sure it is in the same region where your GKE cluster or Compute Engine instance is.
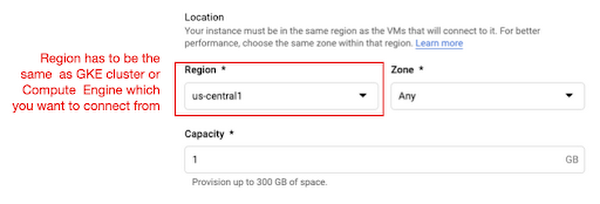
The code snippet below shows how to make a connection to the Redis instance in Python. Nothing specific to GCP, but you only need to be aware of the usage of the standard redis-py package.
# REDISHOST is the IP address to the MemoryStore instanceredis_host = os.environ.get("REDISHOST", "localhost")redis_port = int(os.environ.get("REDISPORT", 6379))redis_client = redis.StrictRedis(host=redis_host, port=redis_port)
After creating a connection, you can store and retrieve data from MemoryStore. There are more advanced use cases of Redis, but we only used exists, get, and set methods for the demonstration purpose. These methods should be very familiar if you know maps, dictionaries, or other similar data structures. For the code portion that uses Redis-related utilities, please refer to the Searcher Python class we discussed in an earlier section.
In the URLs below, you can find side-by-side comparisons of using MemoryStore:
- Without MemoryStore: https://youtu.be/7B88Eyrd-4s
- With MemoryStore (1st try): https://youtu.be/LE6xeEIRuMM
- With MemoryStore (2nd try): https://youtu.be/rRfK17sdk84
Putting everything together
All that’s left now is to collate the different components we developed in the sections above and deploy our application with a frontend. All the frontend-related code is present here.
- The front-end application is written in the Flutter development kit. The main screen contains two text fields for queries to Pixabay and CLIP model respectively. When you click the “Send Query” button, it will send out a RestAPI request to the server. After receiving the result back from the server, the retrieved images from the semantic query will be displayed at the bottom section of the screen.
- Please note that a Flutter application can be deployed to various environments including desktop, web, iOS, and Android. In order to keep as simple as possible, we chose to deploy the application to the GitHub Pages. Whenever there is any change to a client-side source directory, the GitHub Action will be triggered to build a web page and deploy the latest version to the GitHub Pages.
Our final application is deployed here and it looks like so:
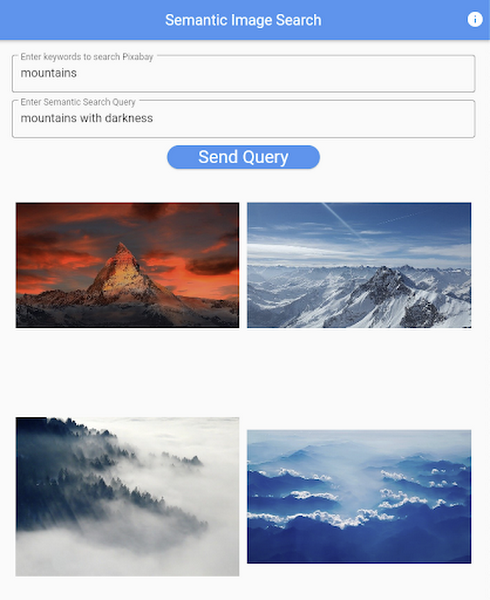
Note that due to constraints, the above-mentioned URL will only be live for one or two months.
It is also possible to redeploy the back-end application with a GitHub Action.
- The very first step is to craft a Dockerfile like below. Since Python is a scripting language, and there are lots of heavy packages that the application is dependent on, it is important to cache the steps. For instance, installing the dependencies should be separated from other commands.
FROM pytorch/pytorch:latestWORKDIR /app# install the dependenciesCOPY requirements.txt requirements.txtRUN pip install -r requirements.txtCOPY . .# set up environment variablesENV PIXABAY_API_KEY="..."ENV REDIS_IN_USE="true"ENV REDISHOST="..."# expose port that Flask app is listening onEXPOSE 8080# run the Flask appCMD [ "python3", "main.py" ]
- With the Dockerfile defined, we can use a GitHub Action like this for automatic deployment.
Edge cases
Since the CLIP model is pre-trained on a large corpus of image and text pairs it’s likely that it may not generalize well to every natural language query we throw at it. Also, because we are limiting the number of images on which the CLIP model can operate, this somehow restricts the expressivity of the model.
We may be able to improve the performance for the second situation by increasing the number of images to be pre-fetched and by indexing them into a low-cost and high-performance database like Datastore.
Costs
In this section, we wanted to provide the readers a breakdown of the costs they might incur in order to consume the various services used throughout the application.
- Frontend hosting
- The front-end application is hosted on GitHub Pages, so there is no expenditure for this.
- Compute Engine
- With an e2-standard-2 instance type without GPUs, the cost is around $48.92 per month. In case you want to add a GPU (NVIDIA K80), the cost goes up to $229.95 per month.
- MemoryStore
- The cost for MemoryStore depends on the size. With 1GB of space, the cost is around $35.77 per month, and whenever you add more GBs the cost will be doubled.
- Google Kubernetes Engine
- The monthly cost for a 3 node GKE cluster with n2-standard-2 (vCPUs: 2, RAM: 8GB without GPUs) is about $170.19. If you add one GPU (NVIDIA K80) to the cluster, the cost goes up to $835.48.
While you may think that is a lot cost-wise, it is good to know that Google gives away free $300 credits when you create a new GCP account. It is still not enough for leveraging GPUs, but it is enough to learn and experiment with GKE and MemoryStore usage.
Conclusion
In this post, we walked through the components needed to build a basic image search utility for natural language queries. We discussed how these different components are connected to each other. Our image search API is able to utilize caching and was deployed on a Kubernetes cluster using GKE. These elements are essential when building a similar service to cater to a much bigger workload. We hope this post will serve as a good starting point for that purpose. Below are some references on similar areas of work that you can explore:
- Building a real-time embeddings similarity matching system
- Detecting image similarity using Spark, LSH and TensorFlow
Acknowledgments: We are grateful to the Google Developers Experts program for supporting us with GCP credits. Thanks to Karl Weinmeister and Soonson Kwon of Google for reviewing the initial draft of this post.

3356
Of your peers have already downloaded this article
5:30 Minutes
The most insightful time you'll spend today!
A Guide to Anthos Hybrid Environment Reference Architecture
1278
Of your peers have already read this article.
1:30 Minutes
The most insightful time you'll spend today!
To help improve your security posture, improve the reliability of your applications, and reduce configuration drift in your environment, we’re excited to announce a new Anthos reference architecture.
Written in collaboration across our product, engineering, support, and field teams, this new reference architecture helps you plan, deploy, and configure the required components for Anthos hybrid environments.
Anthos hybrid environments give you the flexibility to deploy on-premises components that run container-based workloads and VMs using Anthos clusters on VMware and Anthos clusters on bare metal. You can continue to utilize existing investments in your on-premises infrastructure, and start to add components like Anthos Config Management. When you’re ready to bring everything together, you can add additional Google Cloud-based services like Artifact Registry, Cloud Monitoring, and Identity and Access Management (IAM).
The following sneak peek covers some of our best practices for architecting an Anthos hybrid environment. For more detailed guidance and planning information, see the full Anthos hybrid environment reference architecture.
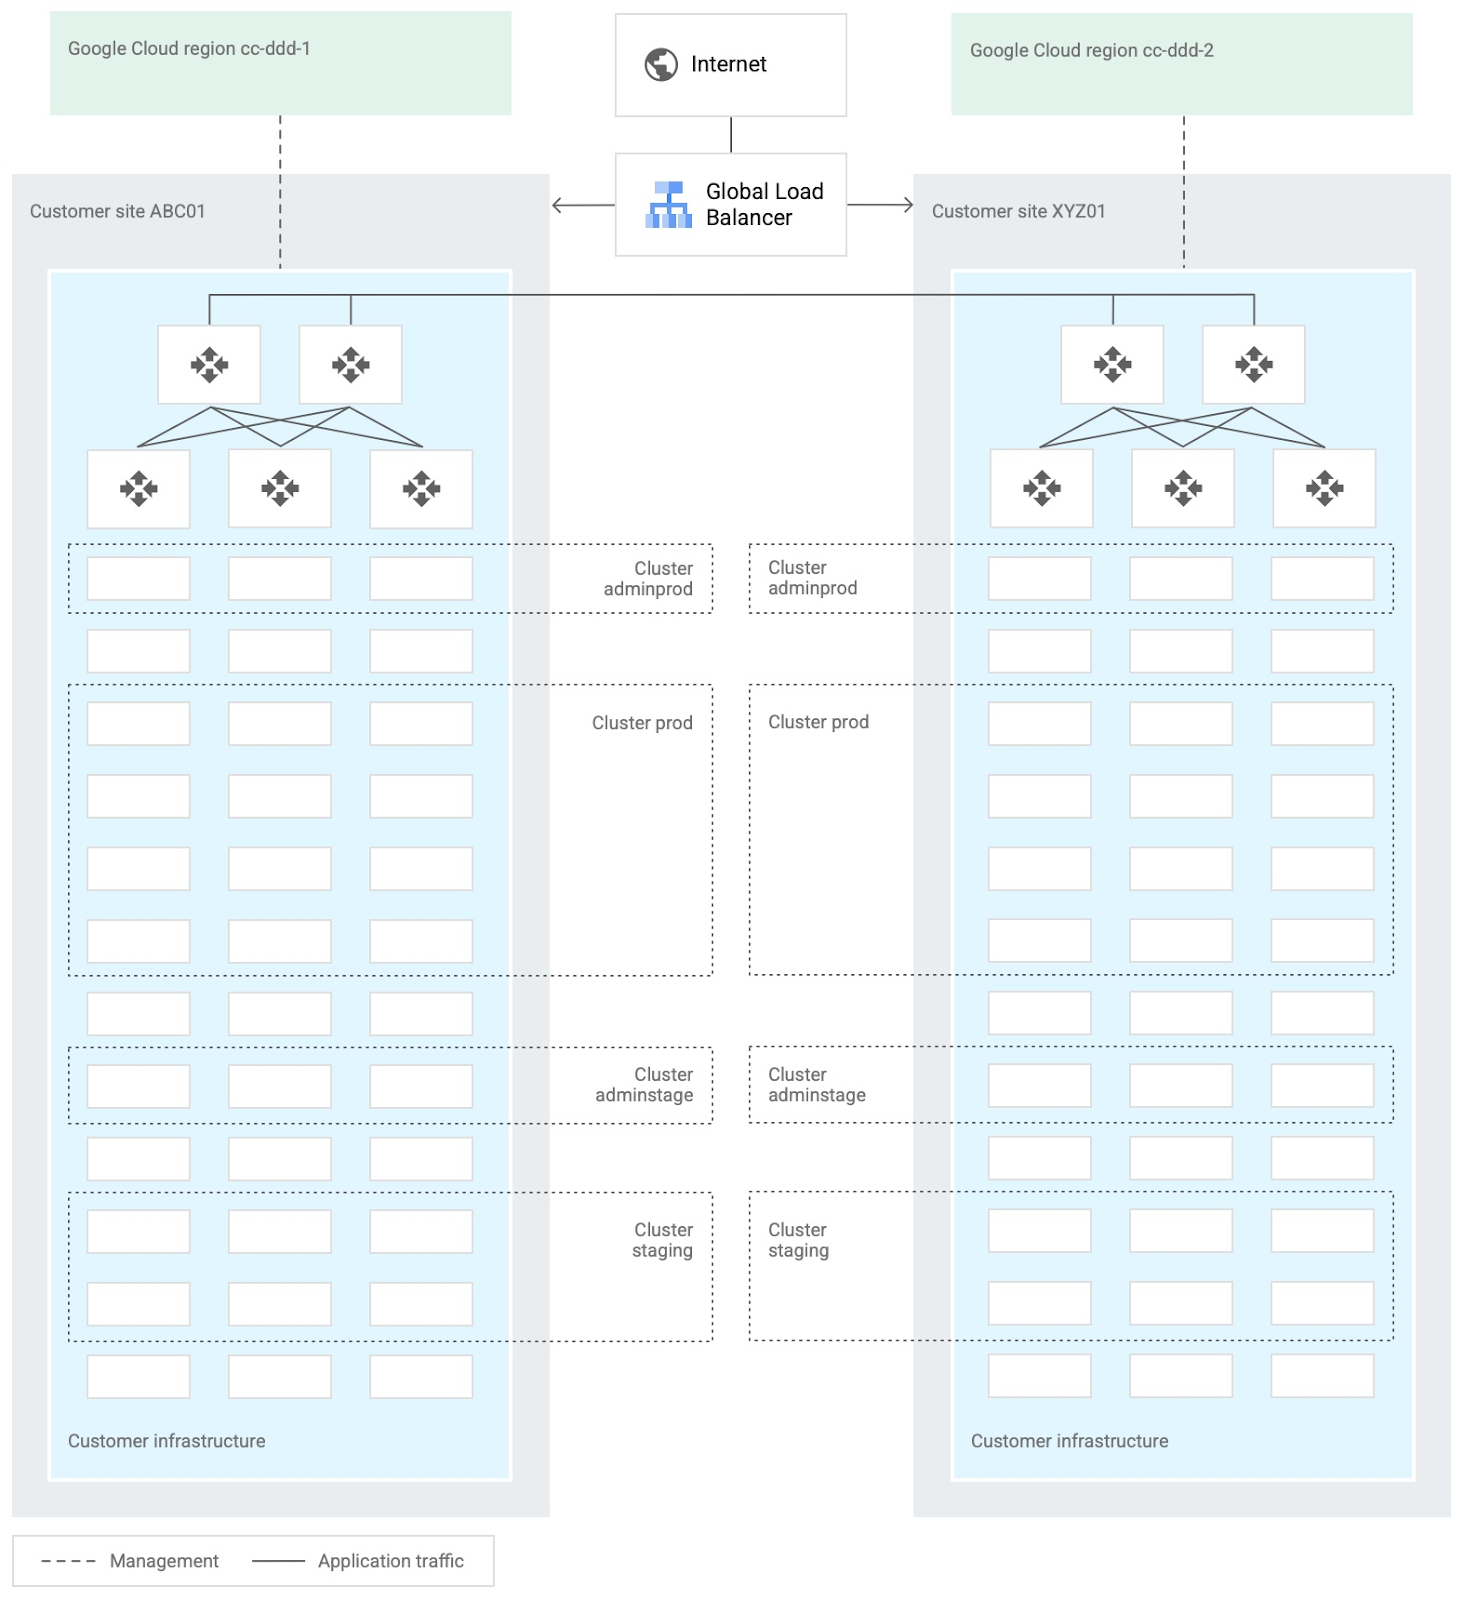
When you design and deploy an Anthos hybrid environment, we recommend that you use two or more on-premises computing customer sites and two or more Google Cloud regions. In your sites, run multiple clusters. This approach is recommended for several reasons, such as:
- Disaster recovery. If one cluster or site fails, you can continue to run workloads.
- Multiple environments, like production and staging, to test infrastructure changes.
- Different cluster types in each environment: admin clusters and user clusters. This approach separates administrative resources, which is a security best-practice.
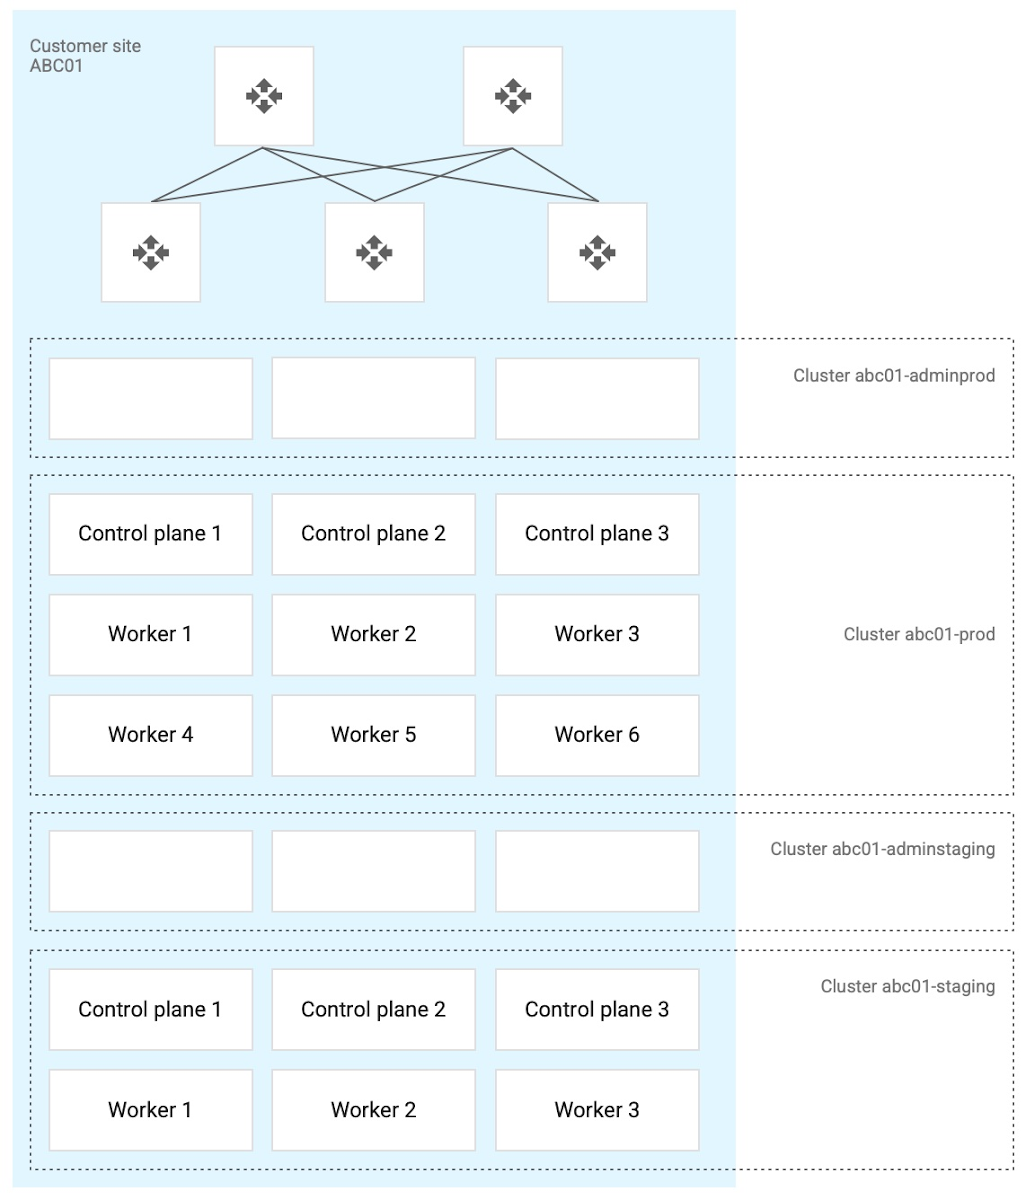
The following diagram shows an example of an Anthos hybrid environment that’s spread across customer sites and regions, with different clusters for admin and user workloads and for production and staging:
In each site, you can use Anthos clusters on VMware or Anthos clusters on bare metal. For both products, we recommend the following:
- Use a highly available (HA) control plane with three members for continued control plane availability concurrently with operating system upgrades, control plane software updates, or single-machine hardware or kernel failures.
- Deploy two admin clusters so that admin cluster configuration changes and updates can be tested in the staging environment first.
The following diagram shows an example of Anthos clusters on bare metal with control plane and worker nodes spread across physical machines. With Anthos clusters on VMware, the control plane and worker nodes are spread across VMware VMs:
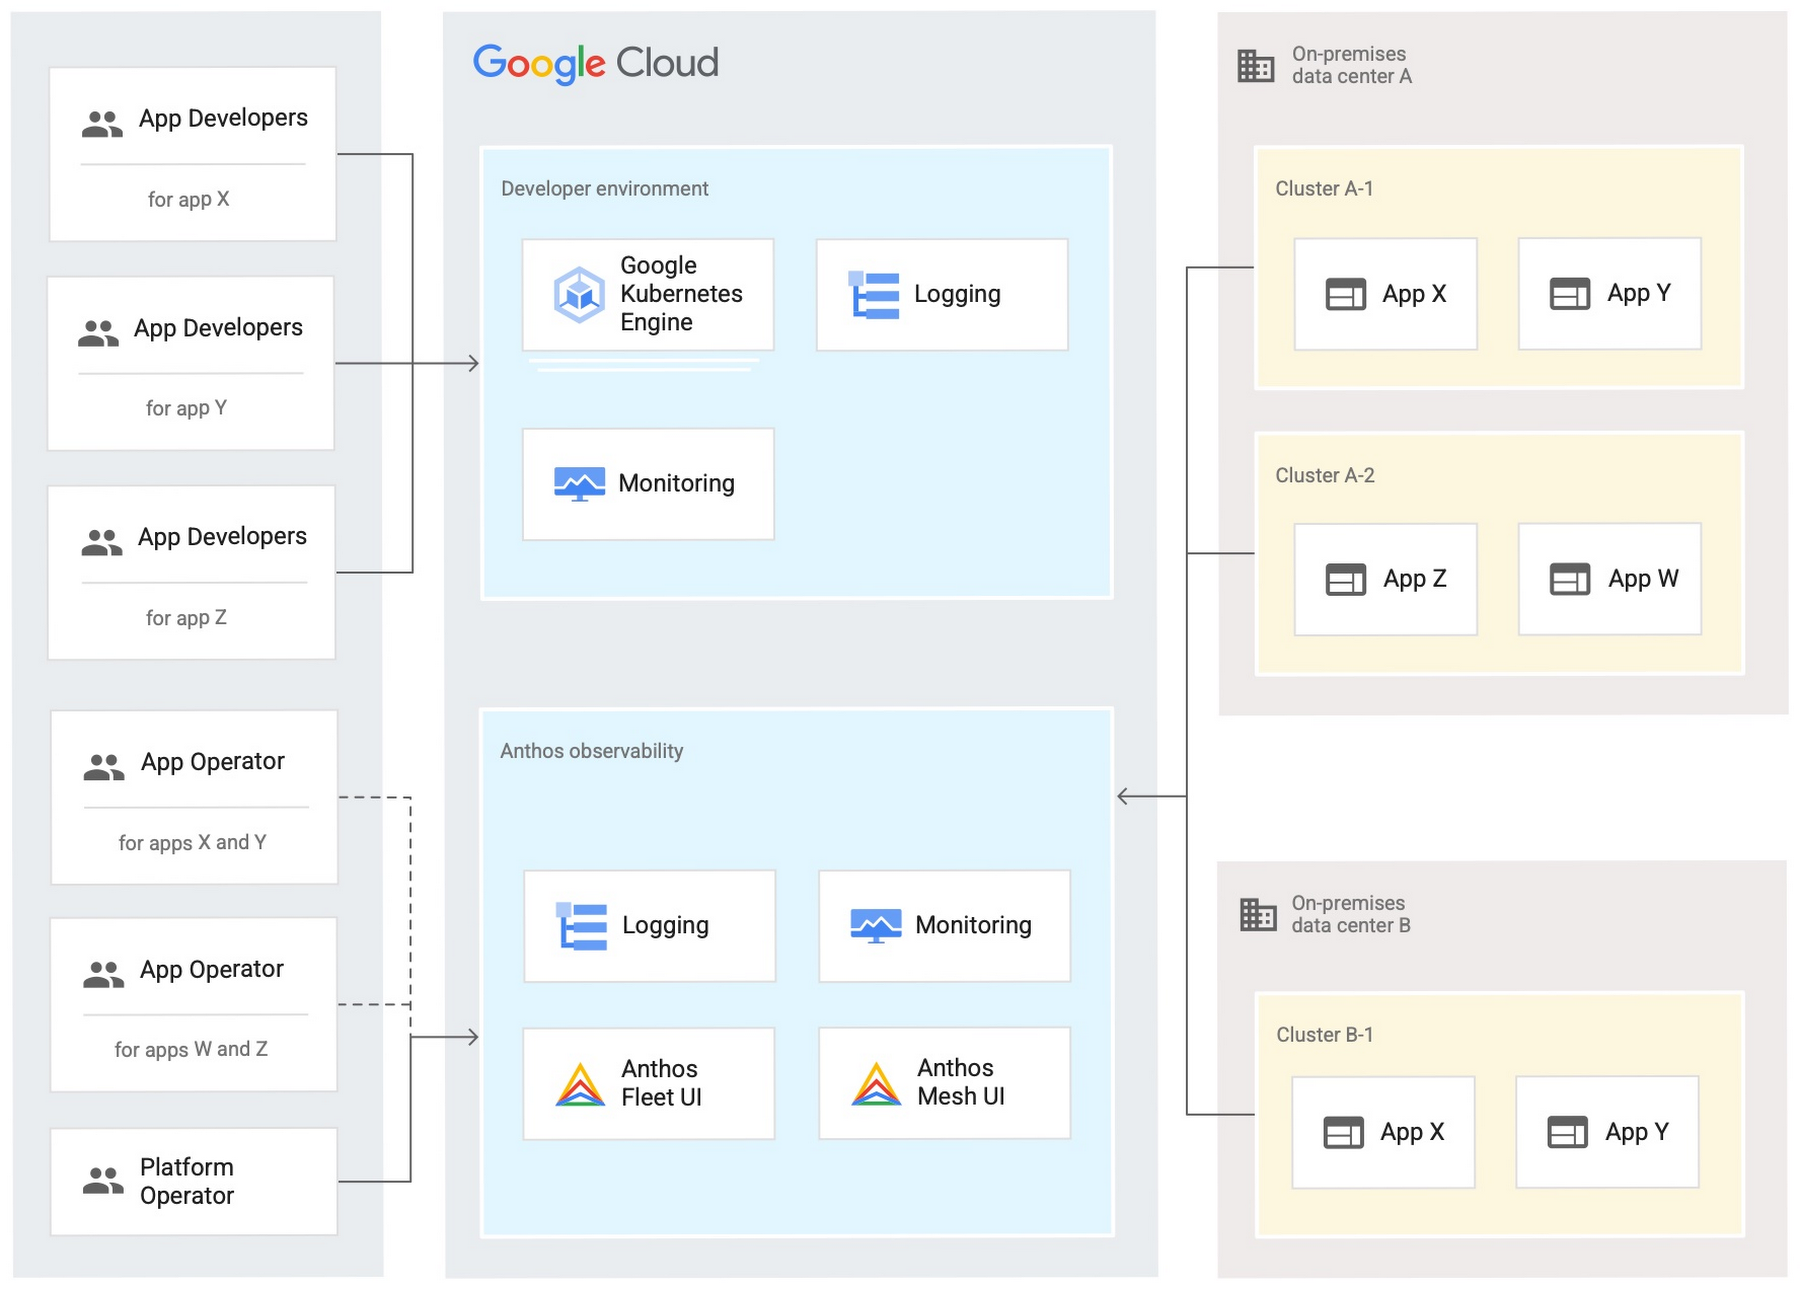
Configure your on-premises clusters and applications to send logging and monitoring data back to Google Cloud for analysis and review. Different personas should only be granted access to the environments they need. The following diagram shows how application developers and application or platform operators can then view logging and monitoring data in Google Cloud:
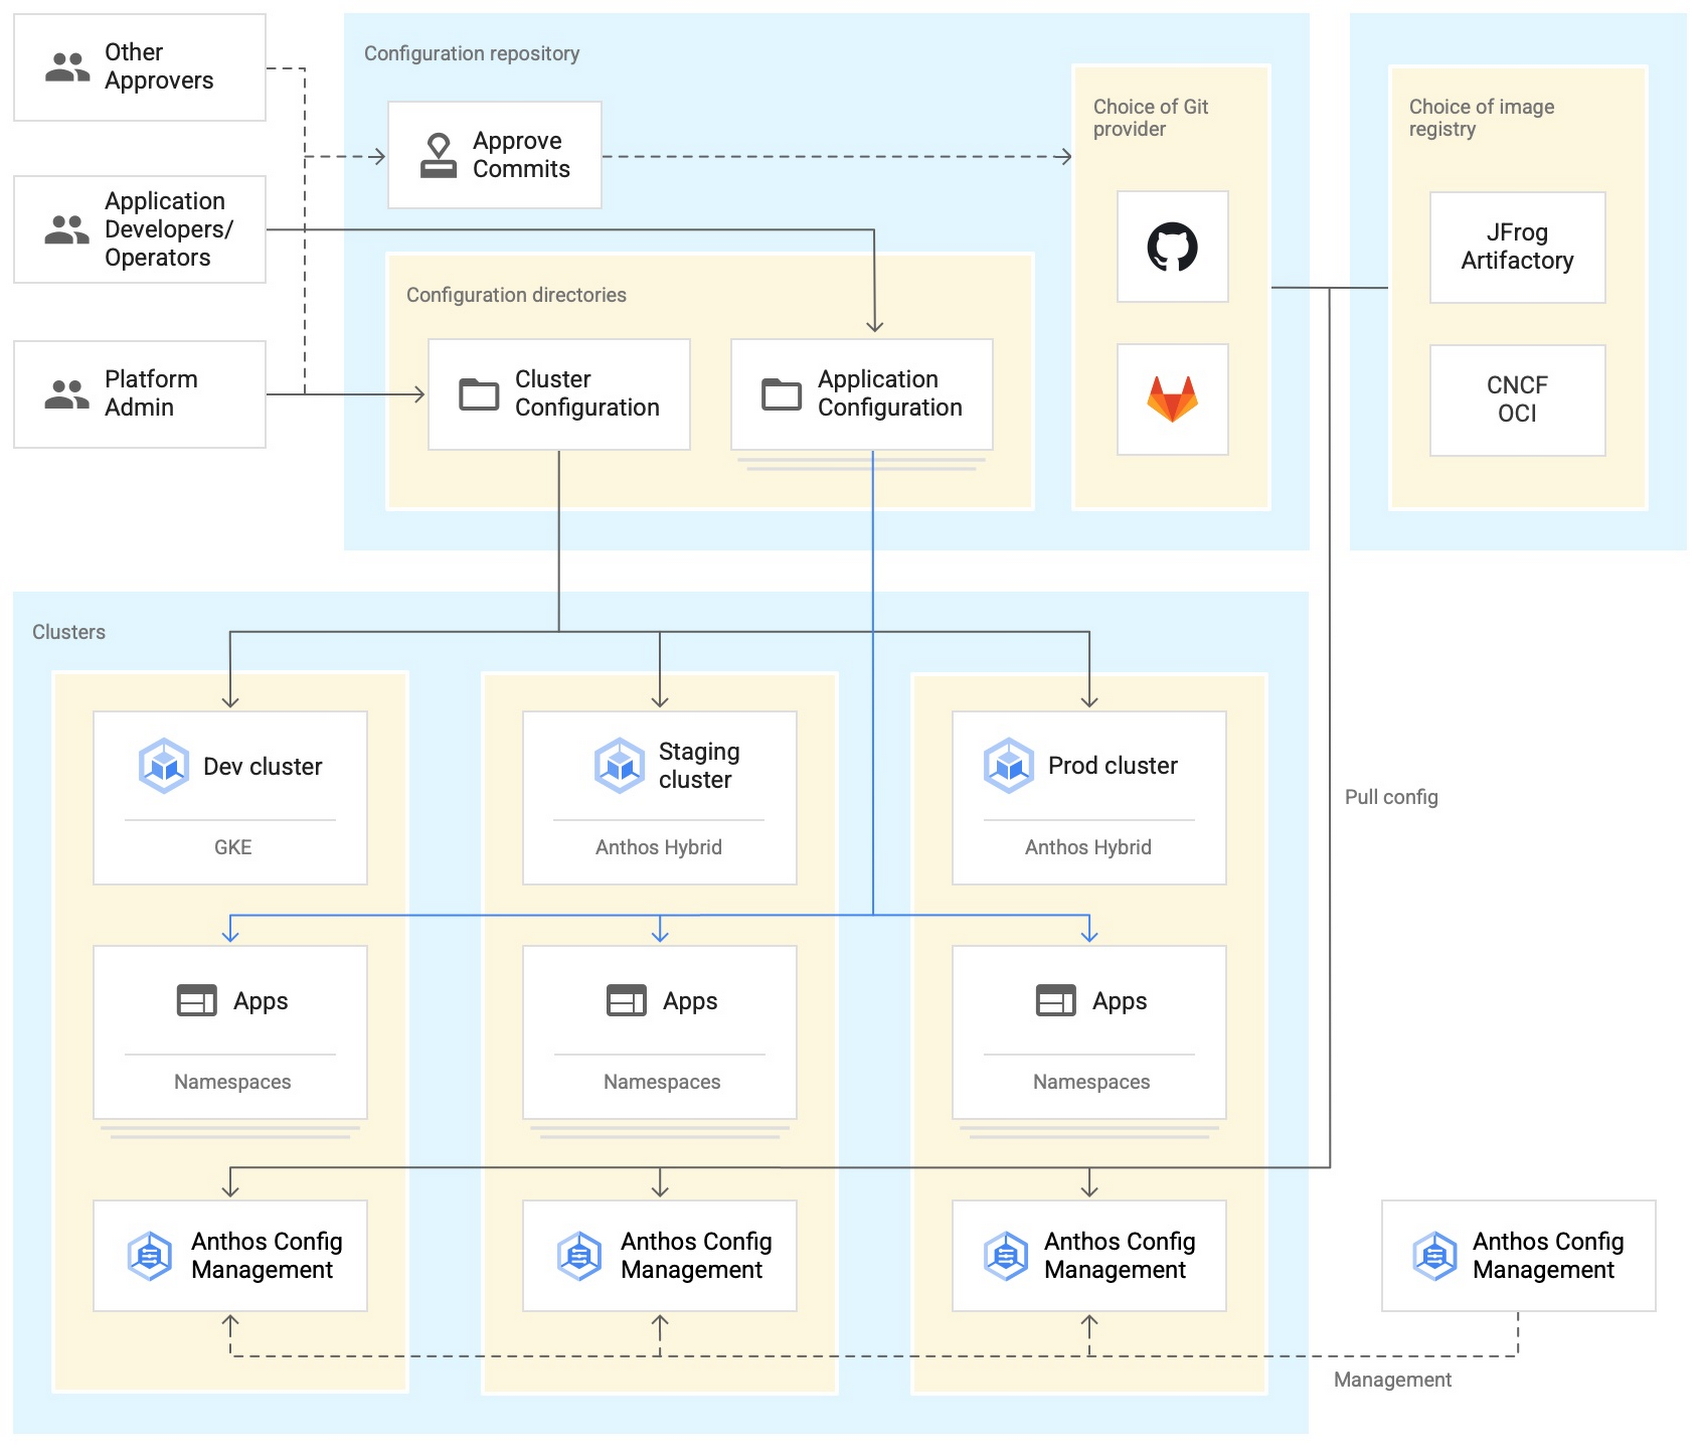
Use Anthos Config Management to manage Kubernetes objects in your clusters. Anthos Config Management is a GitOps-style tool that uses a Git repository or Open Container Initiative (OCI) as its storage mechanism and source of truth. Git provider workflows allow multiple stakeholders to participate in review of changes.
As shown in the following diagram, a common Anthos Config Management deployment uses one folder containing configuration for all clusters. Use separate additional folders to hold configuration data, one for application:
Plan and implement a way to secure the network traffic in your Anthos hybrid environment. The following services help with authentication, connectivity, and communication in a cluster:
- Anthos Identity Service connects clusters to on-site identity providers to authenticate local access.
- Connect gateway and workforce identity federation can provide secure cloud-mediated access to mobile workforce clusters without using a VPN.
- Workload Identity provides on-premises workloads with managed short-lifetime credentials for access to cloud resources.
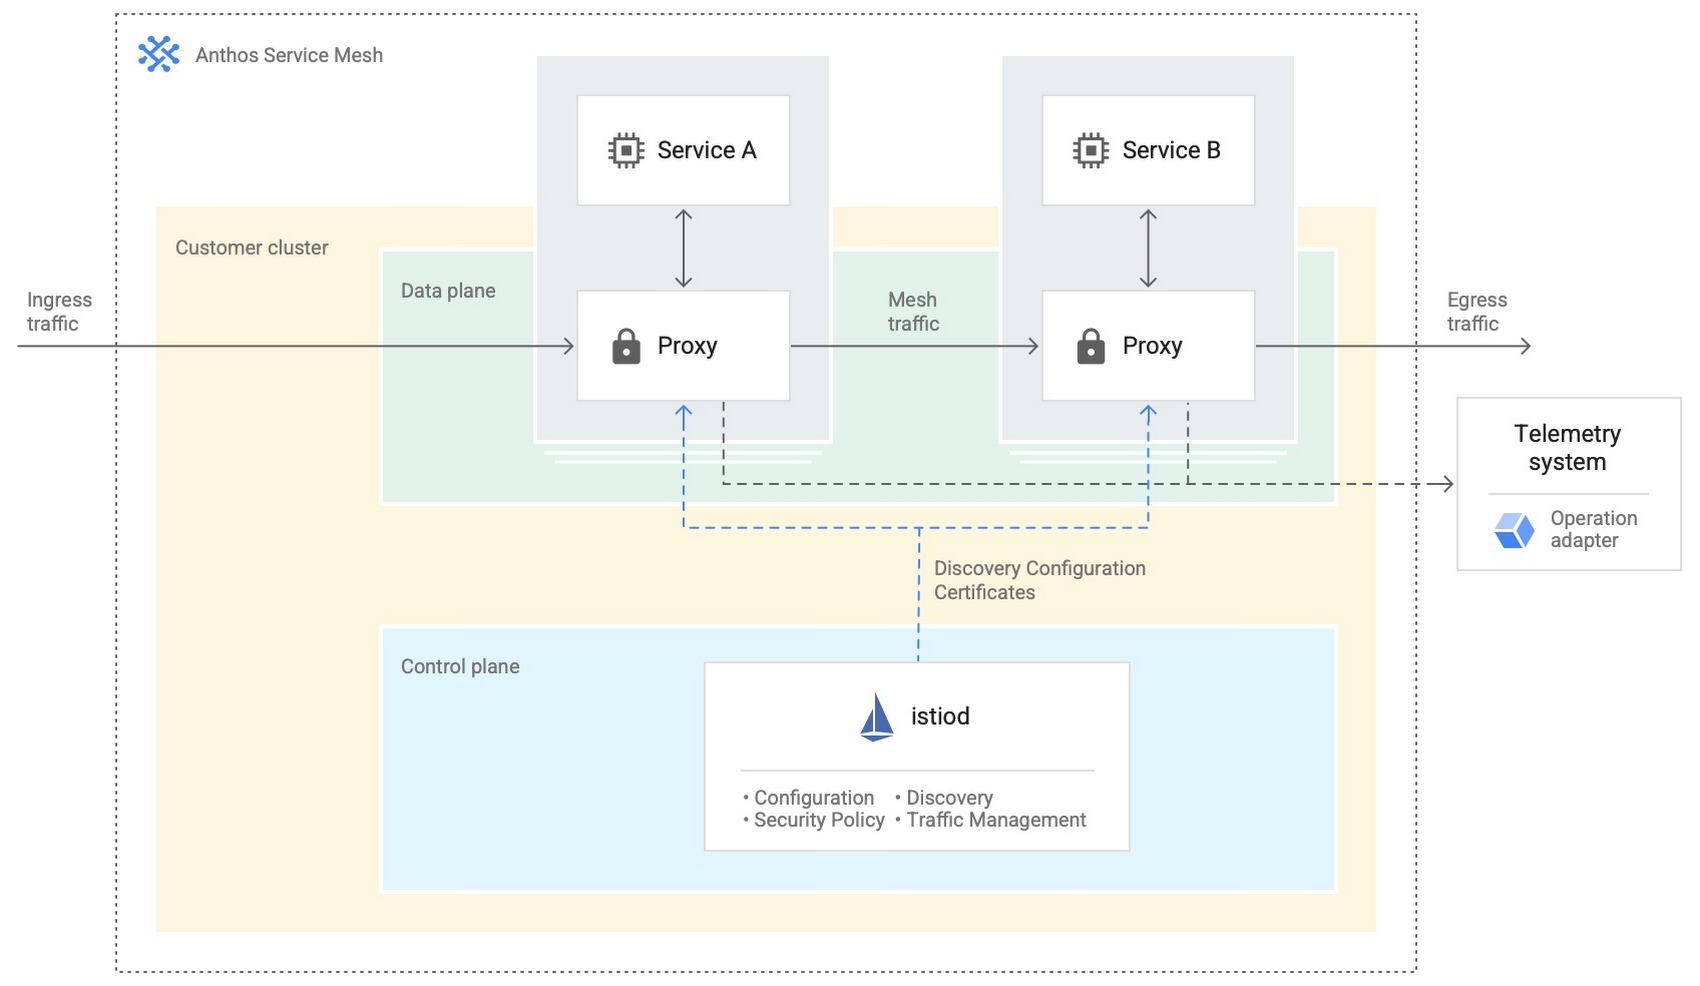
- Anthos Service Mesh encrypts and controls communication between services in the same cluster.
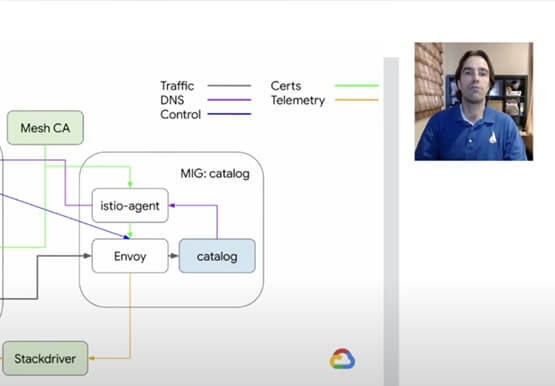
The following diagram shows how Anthos Service Mesh can control the flow of traffic between services within your clusters:
You don’t have to implement all these cloud-based services as part of your initial on-premises deployments. As you become more comfortable and want to expand your capabilities, you can add in some of these hybrid offerings. But, we hope that this blog post has given you some ideas to think about when you start to plan and design your own Anthos hybrid environments.
For more detailed guidance and planning information, see the full Anthos hybrid environment reference architecture. Let us know what you think!
How APIs Help National Bank of Pakistan Modernize the Banking Experience

3486
Of your peers have already read this article.
4:20 Minutes
The most insightful time you'll spend today!
NBP, Pakistan’s largest government-owned bank, serves private and commercial customers and also acts as the government treasury bank. This means that it handles all government transactions—including disbursements and cash collection. In the past, every government transaction had to be handled physically through the NBP branch network. But in a populous country like Pakistan, managing the huge volume of financial transactions is a big task, especially if a single bank is the only conduit. While we’re still in the early stages, here are a few ways that we’re actively working to find solutions that overcome these challenges.
Using APIs to increase access
Our digital banking implementation team, which includes product developers and a small in-house think tank, is responsible for developing new technology and out-of-the-box solutions tailored to the requirements of different areas of the bank. Our implementation partner Abacus played a key role in evaluating and implementing Apigee for NBP.
Recently, we developed a plan to open up the NBP government mandate to other banks and third-party fintech partners. Under this new model, instead of relying solely on our own channels, customers can now transact through fintech apps and other approved Pakistani banks. To be able to roll out a solution that would be reliable, scalable, and secure enough to meet our needs, we adopted Google Cloud’s Apigee API management platform. This platform allows us to accelerate our product development, so that we can compete in the fintech space. It also gives our customers access to a wide range of banking services through our own and partner channels.
As a government bank, NBP has to deal with a lot of procedural hurdles, which have slowed down our entry into the fintech market. Additionally, legacy systems required us to develop solutions for each particular channel and use case. APIs and API management increase the reusability of our services, while also bringing ease and speed of getting our services to market. In fact, we’ve seen the time it takes to offer a new solution reduced by 20%. Apigee not only helps us to achieve our go-to-market goals—it enhances our capacity to capture new and unique use cases across multiple channels. We appreciate the speed, agility, and security that Apigee brings us, along with its many out-of-the-box features.
Reducing barriers to consumer services
One example of how we’re using Apigee is our passport collection use case. In Pakistan, to obtain a passport, citizens have to visit an NBP branch. This can involve waiting in long lines to deposit the government-required passport insurance fee. The sheer volume of these transactions was overwhelming our local branch teams, and costs for this type of manual transaction were high. Furthermore, the government had problems reconciling the fee collection with the passport transactions.
To address these concerns, we developed an API that allows not only NBP branches, but also third-party banks and fintechs, to accept passport issuance fees.Customers can now visit the bank or fintech provider of their choice, reducing the load on NBP, while the government passport department inspectors can now easily reconcile these transactions.
We also developed a bill payment solution with Apigee that gives customers the possibility of paying utility bills online. Previously, the NBP process was inefficient. We had an in-person bill payment mechanism operating in our 1,500+ bank branches. Now, we’ve integrated the payment API with the branch channel so that bill payment is automated, whether it takes place in a branch or online.
Increasing the API footprint inside and outside the bank
Now that we’ve implemented the Apigee platform, our partner ecosystem is benefiting from it and growing, too. We’ve enrolled a wide range of fintechs that are developing products in the corporate payment space. We’re also planning to partner with several incubation centers to provide our APIs via sandbox environments, once our Apigee developer portal goes live. Other fintechs will be enrolled through the incubation centers as well. Finally, alternative third-party partners, such as fintechs and banks, will consume our APIs and/or partner with us for product development.
We’ve currently published 10 APIs and by the end of this year, we expect to have 25 to 30 live. We’re looking forward to implementing monetization, but not necessarily with revenue as the primary focus. As NBP is a government-owned bank, we have a responsibility to act as a catalyst for smaller players, and we see monetization expertise as an opportunity for fulfilling our mandate to help fintech startups grow and mature. In the long run, API revenues will certainly become more important, but the short-term goal is seeding innovation in the marketplace and providing the best possible retail banking experience for our customers, nationwide.
How APIs are Helping Malaysia’s Largest Investment Company Innovate Quickly

3614
Of your peers have already read this article.
3:30 Minutes
The most insightful time you'll spend today!
Permodalan Nasional Berhad (PNB) is one of Malaysia’s largest investment institutions with more than RM300 billion ($71 milion) in assets under management. Through our wholly-owned company, Amanah Saham Nasional Berhad (ASNB), we manage 14 funds with a total value of RM235.74 billion ($56.34 million) as of Dec. 31, 2018.
To expand the range of people who can invest and participate in the economy, our unit trust funds enable the public to invest as little as RM10 ($2.50) into any of our funds. With each investment, unit-holders (a unit-holder is an investor who holds securities of trust) are able to participate in the local and international investment activities managed by PNB and ASNB. They also gain dividends from their investment at the end of the financial year for the funds that they invest in.
Accelerating access to services with APIs
As chief technology officer for PNB, I lead the retail and asset management technology aspects of the business. My team and I manage the basic IT systems such as email and networks, but also the more exciting and complex IT infrastructures, including investment core systems and data analytics for the unit trust teams.
In January 2017 (prior to joining PNB), I observed unit holders waiting in a long line just to update their account balances following a dividend announcement. Unit-holders had limited options then: they were required to visit an ASNB branch or one of our agent banks to complete the transaction. When PNB hired me three months later, I was determined to create a self-service balance checker that would reduce our unit-holders’ waiting time. My team first built an application on an Android tablet that communicated to our backend via APIs. Then we constructed a kiosk around this and started our first self-service kiosk. We have built 120 kiosks across Malaysia in six months.
While we made progress in creating new solutions for our unit-holders, we were missing an API management framework to manage our APIs. After extensive market research, we decided on the Apigee API management platform as it was the most suitable platform to build our capabilities for developing and managing APIs. Apigee’s technical capabilities coupled with responsive support from Google Cloud were important factors. Being new to APIs, we value the quick and ready technical support made available to us. In addition, the secure and flexible system that Apigee offers is critical to us because as a financial institution, security is of paramount importance.
In July 2017, we migrated our retail core system from mainframe base to a modern, cloud-based infrastructure. In August of the same year, a newly developed web portal provided our unit-holders access to their accounts through their mobile devices for the first time. The customer response was very encouraging and uptake has been very high since then.
The portal uses APIs to enable our 14 million unit-holders to check balances, reinvest, edit their personal information, and access account statements. For now, the portal is only available to unit-holders who pre-register via an in-person onboarding process. We are currently awaiting regulatory direction on electronic Know Your Customer (eKYC) rules that will impact digital onboarding before we can enable access to new unit-holders via their mobile devices.
Creating new channels for financial inclusion
To date, our web portal and APIs have generated approximately RM2 billion (USD500 million) in annual investments. This equates to about five percent of our total yearly investments contributed via the digital platform. While this is encouraging progress, there is much more potential that we can tap into, including the collection and analysis of consumer behavior data. Moving forward, this valuable information will provide insights for us to improve customer experience and fine-tune our offerings.
A typical bank integration typically takes six months at a high cost. Excluding the governance and compliance approval period, our key APIs can be consumed in under three months, at minimal cost. Banks that use APIs will find ours easy to work with. This simplifies our agent onboarding process.
APIs enable us to innovate further by expanding our capabilities and reach. We are currently onboarding a few PNB agent banks and we look forward to the possibility to connect to fintech players in Malaysia, especially e-wallet solution providers. API simplify the communications between multiple systems and offer a world of possibilities for our business.
More Relevant Stories for Your Company

Pizza Hut India: Increasing Customer Coverage and Delivering Pizzas on Time
A subsidiary of United States-headquartered corporation Yum! Brands, Pizza Hut prides itself on serving more pizzas than any other pizza business. Founded in 1958, Pizza Hut operates 18,000 restaurants in over 100 countries. In the Indian subcontinent, Pizza Hut and franchise partners Devyani International and Sapphire Foods India operate more than 500



Unburden Your Operations and Development Teams with Anthos
VMs are used to run the majority of services in enterprises. Whether due to specific technical requirements, developer preferences, or simply time and budget constraints, many applications are not moving to containers and Kubernetes yet. Think services firstMicroservices architectures present numerous benefits but also introduce challenges like added complexity and

Smart Home Appliances Start-up Chooses Google Cloud to Wow European Customers
The internet of things is everywhere now. Almost everyone has at least one connected device at home, likely a virtual assistant and perhaps a smart programmable thermostat. Nearly all new televisions come preinstalled with streaming apps. Even electric vehicles send drivers communications when tire pressure is low or other problems



Indian Retailer Figures Optimizes Hyperlocal Delivery to Increase Customer Experience
Anyone who follows the Indian e-commerce scene knows that one of the largest challenges these companies face is hyperlocal delivery. That was a problem facing Wellness Forever, a retail chain of pharmacies with 150-plus stores across India. “Exactly a year ago, we started our journey of hyperlocal deliveries. This optimization
