





3193
Of your peers have already watched this video.
1:30 Minutes
The most insightful time you'll spend today!
Start Your Serverless Expeditions Now!
Google Cloud’s fully managed serverless platform like Cloud Run helps build and run highly scalable containerized applications. In traditional scenarios, over or under-provisioning enterprise applications can result in outages and cost hurdles. Severless Experts at the Google Cloud succinctly breakdown what serverless means for an organization and how Engineering Managers and CTO can rest assured with the predictability, developer productivity, automated release process and infrastructure abstraction.
Watch the video to unravel the serverless journey with Cloud Run!
How to Build A Basic Image Search Utility for Natural Language Queries

4703
Of your peers have already read this article.
6:00 Minutes
The most insightful time you'll spend today!
This post shows how to build an image search utility using natural language queries. Our aim is to use different GCP services to demonstrate this. At the core of our project is OpenAI’s CLIP model. It makes use of two encoders – one for images and one for texts. Each encoder is trained to learn representations such that similar images and text embeddings are projected as close as possible.
We will first create a Flask-based REST API capable of handling natural language queries and matching them against relevant images. We will then demonstrate the use of the API through a Flutter-based web and mobile application. Figure 1 shows how our final application would look like:
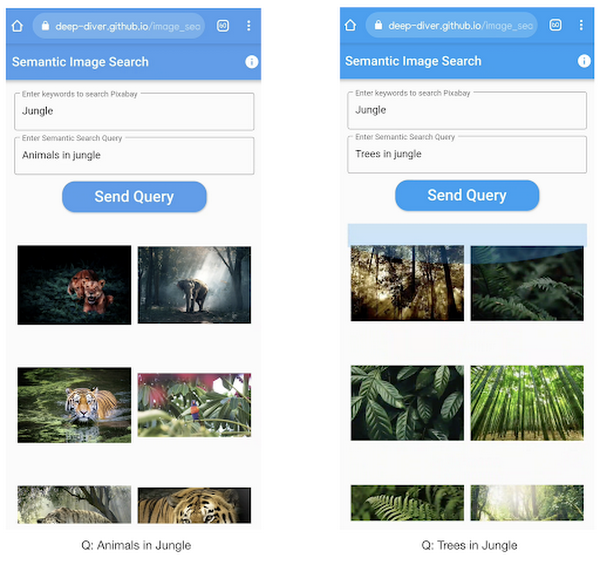
All the code shown in this post is available as a GitHub repository. Let’s dive in.
Application at a high-level
Our application will take two queries from the user:
- Tag or keyword query. This is needed in order to pull a set of images of interest from Pixabay. You can use any other image repositories for this purpose. But we found Pixabay’s API to be easier to work with. We will cache these images to optimize the user experience. Suppose we wanted to find images that are similar to this query: “horses amidst flowers”. For this, we’d first pull in a few “horse” images and then run another utility to find out the images that best match our query.
- Longer or semantic query that we will use to retrieve the images from the pool created in the step above. These images should be semantically similar to this query.
Note: Instead of two queries, we could have only taken a single long query and run named-entity extraction to determine the most likely important keywords to run the initial search with. For this post, we won’t be using this approach.
Figure 2 below depicts the architecture design of our application and the technical stack used for each of the components.
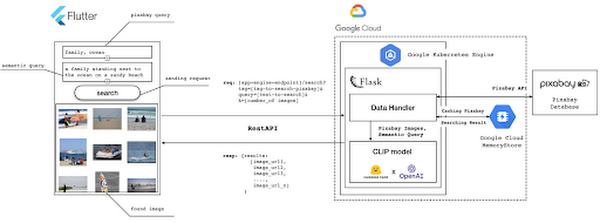
Figure 2 also presents the core logic of the API we will develop in bits and pieces in this post. We will deploy this API on a Kubernetes cluster using the Google Kubernetes Engine (GKE). The following presents a brief directory structure of our application code-base:
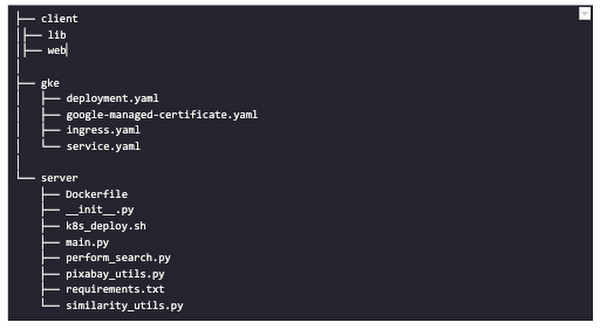
Next, we will walk through the code and other related components for building our image search API. For various machine learning-related utilities, we will be using PyTorch.
Building the backend API with Flask
First, we’d need to fetch a set of images with respect to user-provided tags/keywords before performing the natural language image search. The utility below from the pixabay_utils.py script can do this for us:
def fetch_images_tag(pixabay_search_keyword, num_images):"""Fetches images from Pixabay w.r.t a keyword.:param pixabay_search_keyword: Keyword to perform the search on Pixabay.:param num_images: Number of images to retrieve.:return: List of PIL images.:return: List of image URLs."""query = (PIXABAY_API+ "&q="+ pixabay_search_keyword.lower()+ "&image_type=photo&safesearch=true&per_page="+ str(num_images))response = requests.get(query)output = response.json()all_images = []all_image_urls = []for each in output["hits"]:imageurl = each["webformatURL"]response = requests.get(imageurl)image = Image.open(BytesIO(response.content)).convert("RGB")all_images.append(image)all_image_urls.append(imageurl)return (all_images, all_image_urls)
Note that all the API utilities are logging relevant information. But for brevity, we have omitted the lines of code responsible for that. Next, we will see how to invoke the CLIP model and select the images that would best match a given query semantically. For this, we’ll be using Hugging Face, an easy-to-use Python library offering state-of-the-art NLP capabilities. We’ll collate all the logic related to this search inside a SimilarityUtil class:
class SimilarityUtil:def __init__(self):self.model = CLIPModel.from_pretrained(CLIP_MODEL)self.processor = CLIPProcessor.from_pretrained(CLIP_PREPROCESSOR)self.device = "cuda" if torch.cuda.is_available() else "cpu"def perform_sim_search(self, images, query_phrase, top_k=3):"""Performs similarity search between the images and query.:param images: A list of PIL images initially retrieved withrespect to some entity e.g. Tiger.:param query_phrase: A list containing a single text query,e.g. "Tiger drinking water".:param top_k: Number of top images to return from `images`.:return: Top-k indices matching the query semantically andtheir similarity scores."""model = self.model.to(self.device)# Obtain the text-image similarity scoreswith torch.no_grad():inputs = self.processor(text=[query_phrase], images=images, return_tensors="pt", padding=True)inputs = inputs.to(self.device)outputs = model(**inputs)# Image-text similarity scoreslogits_per_image = outputs.logits_per_image.cpu()(top_indices, top_scores) = self.sort_scores(logits_per_image, top_k)return (top_indices, top_scores)def sort_scores(self, scores, top_k):"""Sorts the scores in a descending manner.:param scores: Scores to sort through.:param top_k: Number of top scores to return.:return: Top-k scores and their indices."""values, indices = scores.squeeze().topk(top_k)top_indices, top_scores = [], []for score, index in zip(values, indices):top_indices.append(int(index.numpy()))score = score.numpy().tolist()top_scores.append(round(score, 3))return (top_indices, top_scores)
CLIP_MODEL uses a ViT-base model to encode the images for generating meaningful embeddings with respect to the provided query. The text-based query is also encoded using A Transformers-based model for generating the embeddings. These two embeddings are matched with one another during inference. To know more about the particular methods we are using for the CLIP model please refer to this documentation from Hugging Face.
In the code above, we are first invoking the CLIP model with images and the natural language query. This gives us a vector (logits_per_image) that contains the similarity scores between each of the images and the query. We then sort the vector in a descending manner. Note that we are initializing the CLIP model while instantiating the SimilarityUtil to save us the model loading time. This is the meat of our application and we have tackled it already. If you want to interact with this utility in a live manner you can check out this Colab Notebook.
Now, we need to collate our utilities for fetching images from Pixabay and for performing the natural language image search inside a single script – perform_search.py. Following is the main class of that script:
class Searcher:def __init__(self):self.similarity_model = SimilarityUtil()def get_similar_images(self, keyword, semantic_query, pixabay_max, top_k):"""Finds semantically similar images.:param keyword: Keyword to search with on Pixabay.:param semantic_query: Query to find semantically similar images retrieved from Pixabay.:param pixabay_max: Number of maximum images to retrieve from Pixabay.:param top_k: Top-k images to return.:return: Tuple of top_k URLs and the similarity scores of the images present inside the URLs."""images_redis_key = keyword + "_images"urls_redis_key = keyword + "_urls"if redis_client.exists(images_redis_key) and redis_client.exists(urls_redis_key):keyword_images = redis_client.get(images_redis_key)keyword_image_urls = redis_client.get(urls_redis_key)else:(keyword_images, keyword_image_urls) = fetch_images_tag(keyword, pixabay_max)redis_client.set(images_redis_key, keyword_images)redis_client.set(urls_redis_key, keyword_image_urls)(top_indices, top_scores) = self.similarity_model.perform_sim_search(keyword_images, semantic_query, top_k)top_urls = [keyword_image_urls[index] for index in top_indices]return (top_urls, top_scores)
Here, we are just calling the utilities we had previously developed to return the URLs of the most similar images and their scores. What is even more important here is the caching capability. For that, we combined GCP’s MemoryStore and a Python library called direct-redis. More on setting up MemoryStore later.
MemoryStore provides a fully managed and low-cost platform for hosting Redis instances. Redis databases are in memory and light-weight making them an ideal candidate for caching. In the code above, we are caching the images fetched from Pixabay and their URLs. So, in the event of a cache hit, we won’t need to call the CLIP model and this will tremendously improve the response time of our API.
Other options for caching
We can cache other elements of our application. For example, the natural language query. When searching through the cached entries to determine if it’s a cache hit, we can compare two queries for semantic similarity and return results accordingly.
Consider that a user had entered the following natural language query: “mountains with dark skies”. After performing the search, we’d cache the embeddings of this query. Now, consider that another user entered another query: “mountains with gloomy ambiance”. We’d compute its embeddings and run a similarity search with the cached embeddings. We’d then compare the similarity scores with respect to a threshold and parse the most similar queries and their corresponding results. In case of a cache miss, we’d just call the image search utilities we developed above.
When working on real-time applications we often need to consider these different aspects and decide what enhances the user experience and maximizes business at the same time.
All that’s left now for the backend is our Flask application – main.py:
@app.route("/search", methods=["GET"])def get_images():tag = request.args.get("t").lower()query = request.args.get("s_query").lower()top_k = request.args.get("k")(top_urls, top_scores) = searcher.get_similar_images(tag, query, MAX_PIXABAY_SEARCH, int(top_k))return jsonify({"top_urls": top_urls, "top_scores": top_scores})
Here we are first parsing the query parameters from the request payload of our search API. We are then just calling the appropriate function from perform_search.py to handle the request. This Flask application is also capable of handling CORS. We do this via the flask_cors library:
cors = CORS(app,resources={r"/search/*": {"origin": "*"},r"/test/*": {"origin": "*"},},)
And this is it! Our API is now ready for deployment.
Deployment with Compute Engine and GKE
The reason why we wanted to deploy our API on Kubernetes is because of the flexibility Kubernetes offers for managing deployments. When operating at scale, auto scalability and load balancing are very important. With the comes the requirement of security — we’d not want to expose the utilities for interacting with any internal services such as databases. With Kubernetes, we can achieve all these easily and efficiently.
GKE provides secured and fully managed functionalities for operationalizing Kubernetes clusters. Here are the steps to deploy the API on GKE at a glance:
- We first build a Docker image for our API and then push it to the Google Container Registry (GCR).
- We then create a Kubernetes cluster on GKE and initialize a deployment.
- We then add scalability options.
- If any public exposure is needed for the API, we then tackle it.
We can assimilate all the above into a shell script – k8s_deploy.sh:
## Docker build and push ### We are inside the `server` directorydocker build -t gcr.io/${PROJECT_ID}/search_service .docker push gcr.io/${PROJECT_ID}/search_service## Deploy on a GKE cluster ### Configure the Docker command-line tool to authenticate to Container Registrygcloud auth configure-docker# Create a Kubernetes clustergcloud container clusters create image-search-nlp# Create a deploymentkubectl create deployment clip-search --image=gcr.io/${PROJECT_ID}/search_service# Number of worker replicaskubectl scale deployment clip-search --replicas=3# HorizontalPodAutoscaler resourcekubectl autoscale deployment clip-search --cpu-percent=80 --min=1 --max=5# Expose deploymentkubectl expose deployment clip-search --name=clip-search-service --type=LoadBalancer --port 80 --target-port 8080
These steps are well explained in this tutorial that you might want to refer to for more details. We can configure all the dependencies on our local machine and execute the shell script above. We can also use the GCP Console to execute it since a terminal on the GCP Console is pre-configured with the system-level dependencies we’d need. In reality, the Kubernetes cluster should only be created once and different deployment versions should be created under it.
After the above shell script is run successfully, we can run kubectl get service to know the external IP address of the service we just deployed:
NAME CLUSTER-IP EXTERNAL-IP PORT(S) AGEclip-search-service 10.3.251.122 203.0.113.0 80:30877/TCP 10s
We can now consume this API with the following base URI: http://203.0.113.0/. If we wanted to deal with only http-based API requests, then we are done here. But secured communication is often a requirement in order for applications to operate reliably. In the following section, we are to discuss how to configure the additional items to allow our Kubernetes cluster to allow https requests.
Configurations for handling https requests with GKE
A secure connection is almost often a must-have requirement in modern client/server applications. The front-end Flutter application would be hosted on GitHub Pages for this project, and it requires https-based connection as well. Even if configuring https connection particularly for a GKE-based cluster can be considered a chore, its setup might seem daunting at first.
There are six steps to configure https connection in the GKE environment:
- You need to have a domain name, and there are a lot of inexpensive options that you can buy. For instance, mlgde.com domain for this project is acquired via Gabia which is a Korean service provider.
- A reserved (static) external IP address has to be acquired via gcloud command or GCP console.
- You need to bind the domain name with the acquired external IP address. This is a platform-specific configuration that issued the domain name to you.
- There is a special ManagedCertificate resource which is specific to the GKE environment. ManagedCertificate resource specifies the domain that the SSL certificate will be created for, so you need this.
- An Ingress resource should be created by listing the static external IP address, ManagedCertificate resource, and the service name and port which the incoming traffic will be routed to. The Service resource could remain the same as in the above section with only changes from LoadBalancer to ClusterIP.
- Last but not least, you need to modify the existing Flask application and Deployment resource to support liveness and readiness probes which are used to check the health status of the Deployment. The Flask application side can be simply modified with the flask-healthz Python package, and you only need to add
livenessProbeandreadinessProbesections in the Deployment resource. In the code example below, thelivenessProbeandreadinessProbeare checked via/aliveand/readyendpoints respectively.
from flask_healthz import healthzfrom flask_healthz import HealthErrorapp = Flask(__name__)app.register_blueprint(healthz, url_prefix="/")def printok():print("Everything is fine")def liveness():try:printok()except Exception:raise HealthError("Can't connect to the file")def readiness():try:printok()except Exception:raise HealthError("Can't connect to the file")app.config.update(HEALTHZ = {"alive": "main.liveness","ready": "main.readiness",})
One thing to be careful of is the initialDelaySeconds attribute of the probes. It is uncommon to configure this attribute with a big number, but it could be bigger than 90 – 120 seconds depending on the size of the model to be used. For this project, it is configured in 90 seconds in order to wait until the CLIP model is fully loaded into memory (full YAML script here).
livenessProbe:httpGet:path: /aliveport: 8080initialDelaySeconds: 90periodSeconds: 10readinessProbe:httpGet:path: /readyport: 8080initialDelaySeconds: 90periodSeconds: 10
Again, these steps may seem daunting at first, but it will become clear when you have done it once. Here is the official document for Using Google-managed SSL certificates You can find all the GKE-related resources used in this project here.
Once every step is completed you should be able to see your server application running on the GKE environment. Please make sure to run kubectl apply command whenever you create Kubernetes resources such as Deployment, Service, Ingress, and ManagedCertificate, and it is important to wait for more than 10 minutes until the ManagedCertifcate provisioning is done.
You can run gcloud compute addresses list command to find out the static external IP address that you have configured.
NAME ADDRESS/RANGE TYPE PURPOSE NETWORK REGION SUBNET STATUSgde 34.149.231.34 EXTERNAL IN_USE
Then, the IP address has to be mapped to the domain. Figure 3 is a screenshot of a dashboard from where we got the mlgde.com domain. It clearly shows mlgde.com is mapped to the static external IP address configured in GCP.
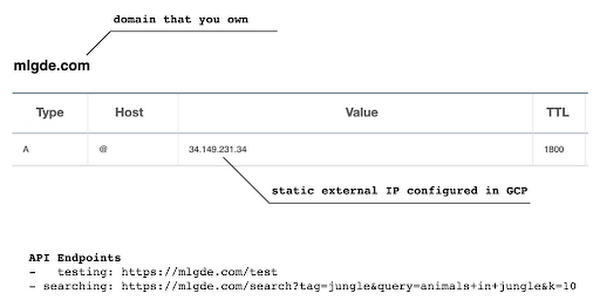
In case you’re wondering why we didn’t deploy this application on App Engine, well that is because of the compute needed to execute the CLIP model. App Engine instance won’t fit in that regime. We could have also incorporated compute-heavy capabilities via a VPC Connector. That is a design choice that you and your team would need to consider. In our experiments, we found the GKE deployment to be easier and suitable for our needs.
Infrastructure for the CLIP model
As mentioned earlier, at the core of our application is the CLIP model. It is computationally a bit more expensive than the regular deep learning models. This is why it makes sense to have the hardware infrastructure set up accordingly to execute it. We ran a small benchmark in order to see how a GPU-based environment could be beneficial here.
We ran the CLIP on a Tesla P100-based machine and also on a standard CPU-only machine 1000 times. The code snippet below is the meat of what we executed:
DEVICE = "cuda" if torch.cuda.is_available() else "cpu"start_time = time.time()for _ in range(1000):with torch.no_grad():model = model.to(DEVICE)inputs = processor(text=[semantic_search_phrase],images=all_images, return_tensors="pt", padding=True)inputs = inputs.to(DEVICE)outputs = model(**inputs)end_time = time.time() - start_timeprint(f"Total time: {end_time:.3f} seconds.")
As somewhat expected, with the GPU, the code took 13 minutes to complete execution. With no GPU, it took about 157 minutes.
It is uncommon to leverage GPUs for model prediction because of cost restrictions, but sometimes we have to access GPUs for deploying a big model like CLIP. We configured a GPU-based cluster on GKE and compared the performance differences with and without it. It took about 1 second to handle a request with GPU and MemoryStore cache while it took more than 4 seconds with MemoryStore only (without the GPUs).
For the purposes of this post, we used a CPU-based cluster on Kubernetes. But It is easy to configure GPU usage in a GKE cluster. This document shows you how to do so. For a short summary, there are two steps. First, a node should be configured with GPUs when creating a GKE cluster. Second, GPU drivers should be installed in GKE nodes. You don’t need to visit and manually install GPU drivers for each node by yourself. Rather you can simply apply the DaemonSet resource to GKE as described here.
Setting up MemoryStore
In this project, we first query the general concept of images to Pixabay, then we filter the images with a semantic query using CLIP. It means we can cache the initially retrieved images from Pixabay for the next specific semantic query. For instance, you may want to search with “gentleman wearing tie” at first, then you may want to retry searching for “gentleman wearing glass”. In this case, the base images remain all the same, so they could be stored in a cache server like Redis.
MemoryStore is a GCP service wrapping the Redis which is an in-memory data store, so you can simply use a standard Redis Python package for accessing it. The only thing to be careful about when provisioning a MemoryStore Redis instance is to make sure it is in the same region where your GKE cluster or Compute Engine instance is.
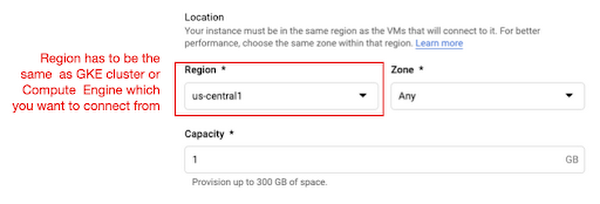
The code snippet below shows how to make a connection to the Redis instance in Python. Nothing specific to GCP, but you only need to be aware of the usage of the standard redis-py package.
# REDISHOST is the IP address to the MemoryStore instanceredis_host = os.environ.get("REDISHOST", "localhost")redis_port = int(os.environ.get("REDISPORT", 6379))redis_client = redis.StrictRedis(host=redis_host, port=redis_port)
After creating a connection, you can store and retrieve data from MemoryStore. There are more advanced use cases of Redis, but we only used exists, get, and set methods for the demonstration purpose. These methods should be very familiar if you know maps, dictionaries, or other similar data structures. For the code portion that uses Redis-related utilities, please refer to the Searcher Python class we discussed in an earlier section.
In the URLs below, you can find side-by-side comparisons of using MemoryStore:
- Without MemoryStore: https://youtu.be/7B88Eyrd-4s
- With MemoryStore (1st try): https://youtu.be/LE6xeEIRuMM
- With MemoryStore (2nd try): https://youtu.be/rRfK17sdk84
Putting everything together
All that’s left now is to collate the different components we developed in the sections above and deploy our application with a frontend. All the frontend-related code is present here.
- The front-end application is written in the Flutter development kit. The main screen contains two text fields for queries to Pixabay and CLIP model respectively. When you click the “Send Query” button, it will send out a RestAPI request to the server. After receiving the result back from the server, the retrieved images from the semantic query will be displayed at the bottom section of the screen.
- Please note that a Flutter application can be deployed to various environments including desktop, web, iOS, and Android. In order to keep as simple as possible, we chose to deploy the application to the GitHub Pages. Whenever there is any change to a client-side source directory, the GitHub Action will be triggered to build a web page and deploy the latest version to the GitHub Pages.
Our final application is deployed here and it looks like so:
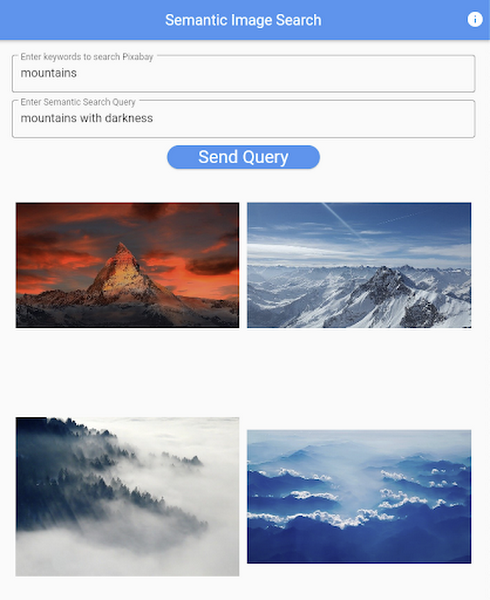
Note that due to constraints, the above-mentioned URL will only be live for one or two months.
It is also possible to redeploy the back-end application with a GitHub Action.
- The very first step is to craft a Dockerfile like below. Since Python is a scripting language, and there are lots of heavy packages that the application is dependent on, it is important to cache the steps. For instance, installing the dependencies should be separated from other commands.
FROM pytorch/pytorch:latestWORKDIR /app# install the dependenciesCOPY requirements.txt requirements.txtRUN pip install -r requirements.txtCOPY . .# set up environment variablesENV PIXABAY_API_KEY="..."ENV REDIS_IN_USE="true"ENV REDISHOST="..."# expose port that Flask app is listening onEXPOSE 8080# run the Flask appCMD [ "python3", "main.py" ]
- With the Dockerfile defined, we can use a GitHub Action like this for automatic deployment.
Edge cases
Since the CLIP model is pre-trained on a large corpus of image and text pairs it’s likely that it may not generalize well to every natural language query we throw at it. Also, because we are limiting the number of images on which the CLIP model can operate, this somehow restricts the expressivity of the model.
We may be able to improve the performance for the second situation by increasing the number of images to be pre-fetched and by indexing them into a low-cost and high-performance database like Datastore.
Costs
In this section, we wanted to provide the readers a breakdown of the costs they might incur in order to consume the various services used throughout the application.
- Frontend hosting
- The front-end application is hosted on GitHub Pages, so there is no expenditure for this.
- Compute Engine
- With an e2-standard-2 instance type without GPUs, the cost is around $48.92 per month. In case you want to add a GPU (NVIDIA K80), the cost goes up to $229.95 per month.
- MemoryStore
- The cost for MemoryStore depends on the size. With 1GB of space, the cost is around $35.77 per month, and whenever you add more GBs the cost will be doubled.
- Google Kubernetes Engine
- The monthly cost for a 3 node GKE cluster with n2-standard-2 (vCPUs: 2, RAM: 8GB without GPUs) is about $170.19. If you add one GPU (NVIDIA K80) to the cluster, the cost goes up to $835.48.
While you may think that is a lot cost-wise, it is good to know that Google gives away free $300 credits when you create a new GCP account. It is still not enough for leveraging GPUs, but it is enough to learn and experiment with GKE and MemoryStore usage.
Conclusion
In this post, we walked through the components needed to build a basic image search utility for natural language queries. We discussed how these different components are connected to each other. Our image search API is able to utilize caching and was deployed on a Kubernetes cluster using GKE. These elements are essential when building a similar service to cater to a much bigger workload. We hope this post will serve as a good starting point for that purpose. Below are some references on similar areas of work that you can explore:
- Building a real-time embeddings similarity matching system
- Detecting image similarity using Spark, LSH and TensorFlow
Acknowledgments: We are grateful to the Google Developers Experts program for supporting us with GCP credits. Thanks to Karl Weinmeister and Soonson Kwon of Google for reviewing the initial draft of this post.
Reactive Programming on Google Maps Platform: Watch Video to Learn

5318
Of your peers have already read this article.
1:30 Minutes
The most insightful time you'll spend today!
The Google Maps Platform Android SDK supports extensions for reactive programming, which helps you write code to handle asynchronous operations.
Write reactive and responsive mapping applications with Google Maps Platform
In mobile apps, asynchronous events can happen at any point in time: user touch events, waiting for network calls to complete, or receiving push notifications, to name a few. As an app developer, accounting for these events and composing them with other asynchronous events can be challenging. Reactive programming is an alternative to passing callbacks for different events and helps simplify the process of working with asynchronous events. In reactive programming, events are modeled as a stream, emitting items over time.
https://youtube.com/watch?v=1TmJvOZfBVQ%3Fenablejsapi%3D1%26
There are two libraries you can use to write reactive code: Kotlin Flows and RxJava. The next two videos show you how to use each one.
Writing reactive and responsive mapping applications using Kotlin
If you’re a Kotlin developer looking to use Coroutines and Flows, the KTX library allows you to use Kotlin Flows to receive events. The Maps KTX library includes extension functions that return Kotlin Flow objects, so you can listen to events in a reactive manner. Unlike suspending functions, which return a single value, Kotlin Flows can return several values over time. For example, you can use a Flow to receive camera event changes over time. To get started using Kotlin Flows in your app, include the Maps KTX library in the dependencies section in your build.gradle file.
https://youtube.com/watch?v=Cotx1ZmEYg8%3Fenablejsapi%3D1%26
Creating reactive maps on Android with RxJava
Integrate Google Maps Platform SDKs with popular Android library RxJava. RxJava is the Java implementation of Reactive Extensions, which is a library for composing asynchronous and event-based programs using observable sequences. One thing RxJava does is allows you to convert callback-based asynchronous code into a chain of transformations. Learn how this works and the other ways you can use RxJava in the third video in this series.
https://youtube.com/watch?v=AgGE7fAMrdA%3Fenablejsapi%3D1%26
We hope you learn more about reactive programming concepts to help you build responsive and reactive mobile apps in this three-part YouTube series. Have ideas for helpful videos you’d like to see on our channel? Leave a comment on any of our videos. And don’t forget to subscribe to our YouTube channel for the latest updates, tutorials, customer stories, and more.
For more information on Google Maps Platform, visit our website.

3598
Of your peers have already downloaded this article
1:10 Minutes
The most insightful time you'll spend today!
According to the new Accelerate: State of DevOps 2018: Strategies for a New Economy report, elite DevOps performers have more frequent code deployments, faster lead times, lower change failure rates, and far quicker incident recovery times. And that’s just the beginning.
This year’s report reflects a fundamental industry change in how software and technology are viewed: What we referred to as IT performance in earlier research is now referred to as software delivery performance to differentiate this work from IT helpdesk and other support functions.
The ability to leverage this high-value performance is a key differentiator for organizations. Those that develop and deliver quickly are better able to experiment with ways to increase customer adoption and satisfaction, pivot when necessary, and keep up with compliance and regulatory demands.
This report highlights that any team in any industry, whether subject to a high degree of regulatory compliance or not—across all industry verticals—has the ability to achieve a high degree of software delivery performance. We classify teams into high, medium, and low performers and find that they exist in all organization types and industry verticals. You’ll find these classifications referenced throughout the report.
Download the report to find out what nearly 1,900 professionals said about the role of DevOps in their business, what sets top-performing DevOps teams apart, and how this gives them a competitive edge.

4768
Of your peers have already downloaded this article
8:30 Minutes
The most insightful time you'll spend today!
Anthos is a modern app management platform from Google Cloud that aims to deliver a consistent development, operations, and security experience across cloud environments.
Anthos is designed for enterprise organizations that want to accelerate the development and deployment of dynamic apps and who value service automation, cost governance, and security controls.
Anthos enables you to build apps once and run anywhere. With Anthos, as an enterprise organization you can modernize apps in place, automate at scale, and manage consistently across hybrid- and multi-cloud environments.
With Anthos, you can modernize your approach to app security. As much as possible, Anthos aims to provide security by default and can help you automate the following security operations:
• Enforcing consistent policy across environments.
• Isolating workloads with different risk profiles.
• Deploying only trusted workloads.
Download Anthos: An Opportunity to Modernize Application Security
Google Maps’ Cloud-based Styling Features Betters UX, Control and Flexibility

3368
Of your peers have already read this article.
2:00 Minutes
The most insightful time you'll spend today!
This year at Google I/O, we announced the general availability of Cloud-based maps styling for the Maps JavaScript API. In an effort to provide you with more options and more control to help create the best experience for your users, today we’re releasing new features to Cloud-based maps styling. You may already be familiar with these features from the consumer Google Maps web and mobile apps—Landmarks and Building Footprints. We’re also releasing updates to our industry optimized map styles to provide even more map details while providing the flexibility to craft the best experience for your users. Let’s take a look.
Help users quickly scan and orient themselves with Landmarks
You may have noticed some enhancements for prominent places in the consumer Google Maps web and mobile apps, these landmarks help show your users points of interest that help them orient and navigate cities they are exploring or visiting.

You now have the ability to bring this same experience to your users by creating maps using Cloud-based maps styling. This feature is available in 100 cities globally including New York, Dubai, Paris, Mumbai, and Singapore. To enable landmarks for your map, log into the Cloud console and in our style editor navigate to the Points of interest feature type and select ‘Illustrated’ under Marker Style.
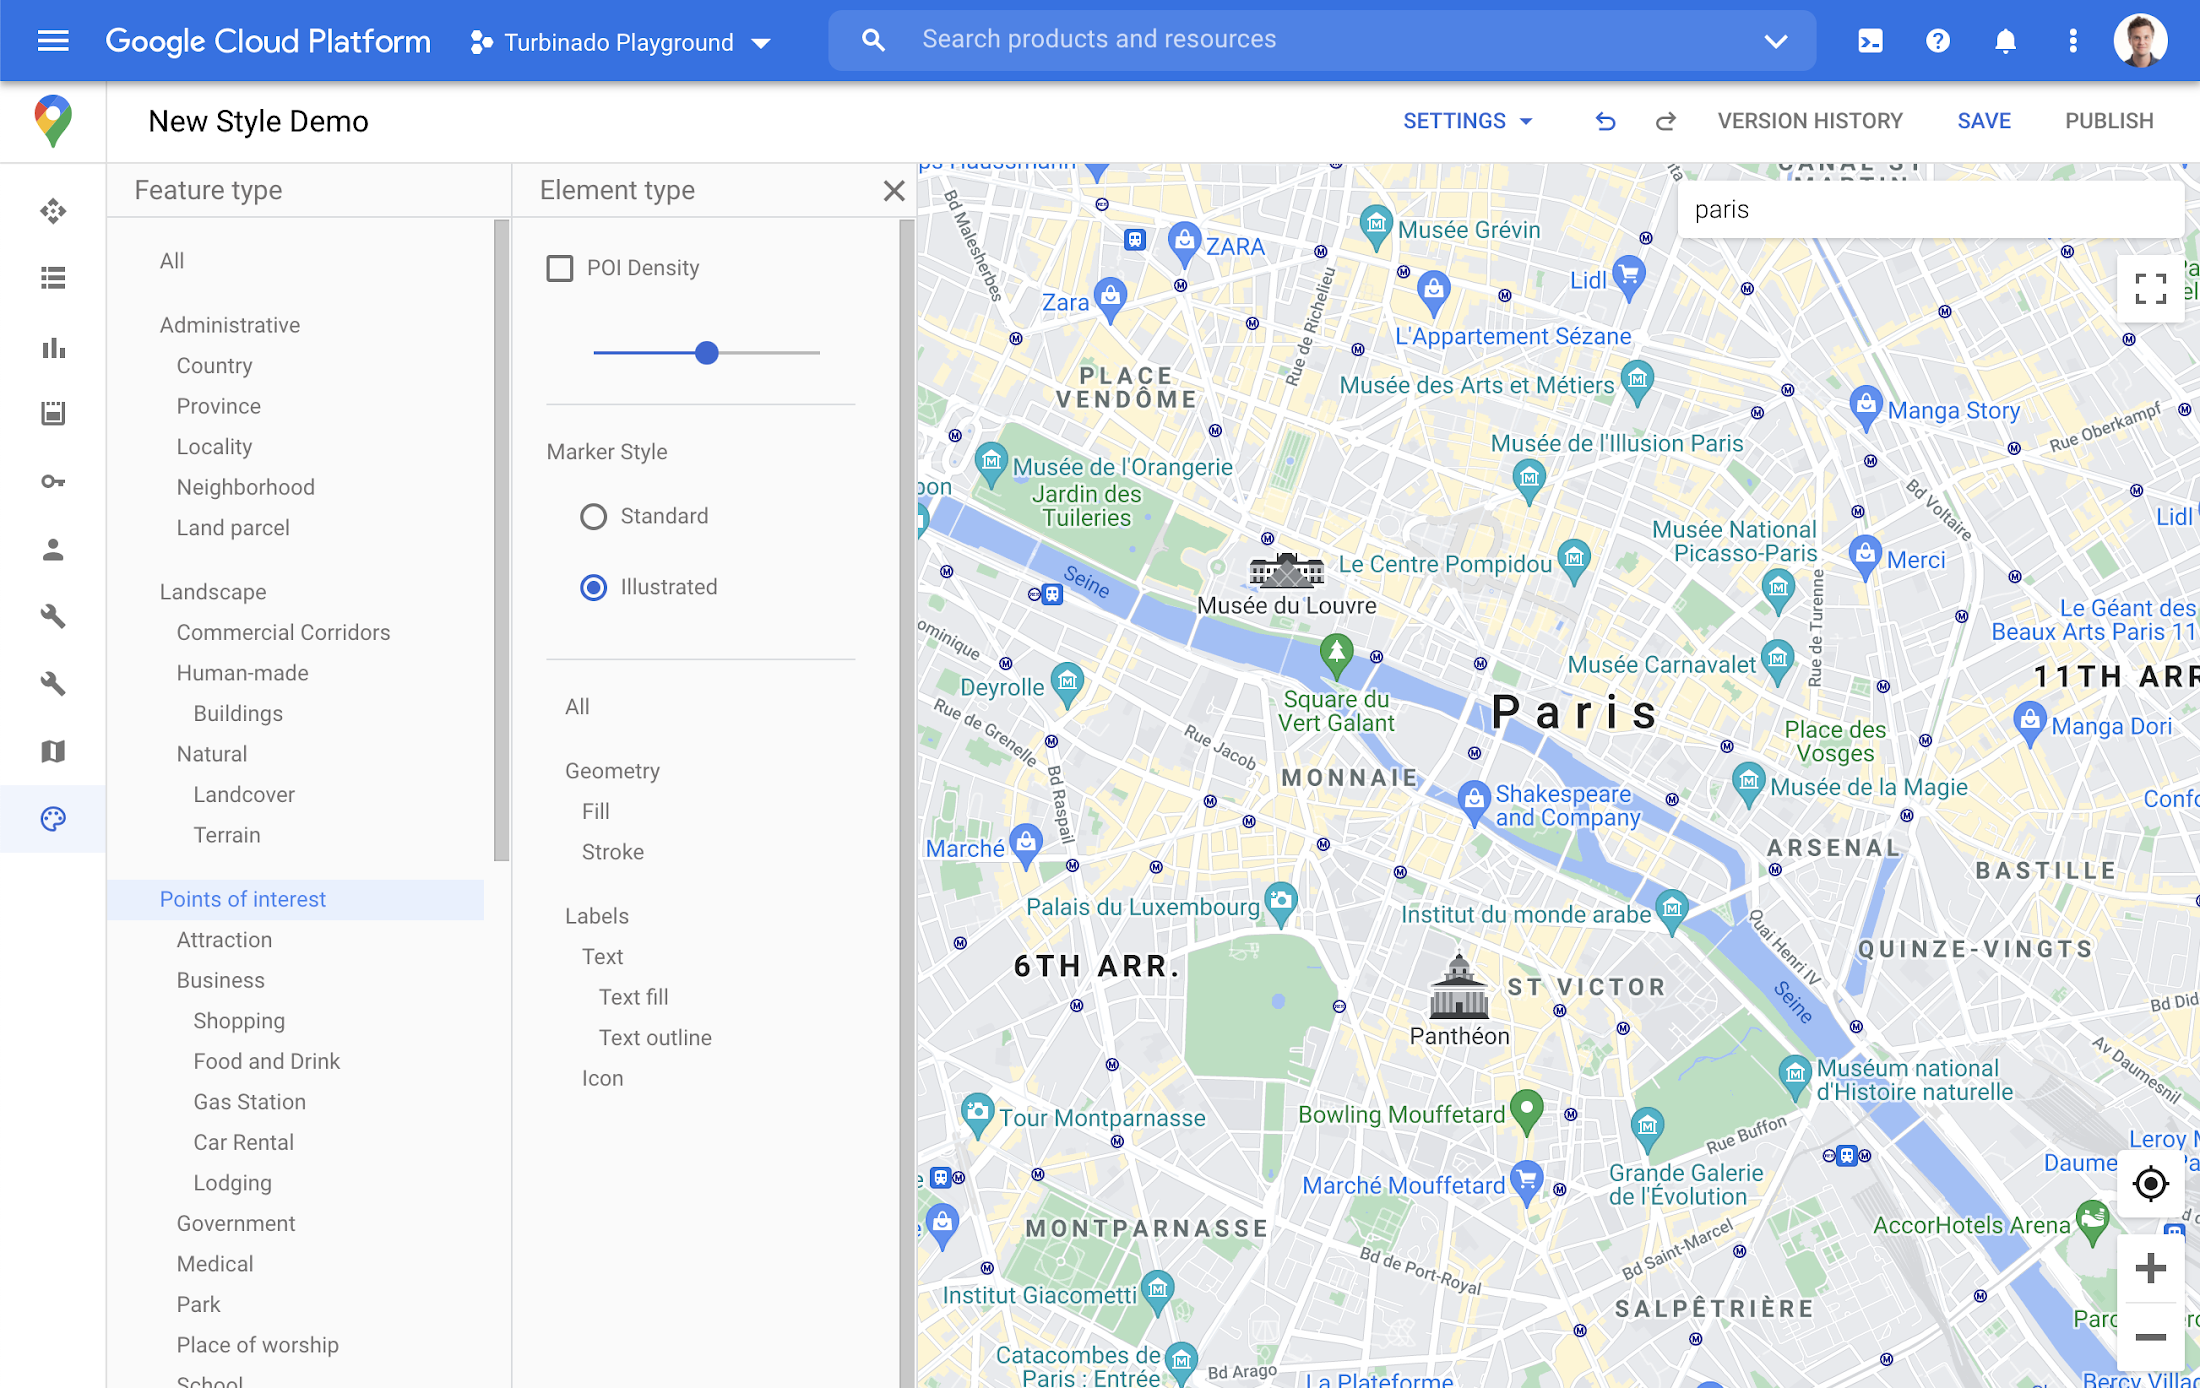
Simplify maps features by switching to Building Footprints
Sometimes less is more. In dense, highly vertical cities, showing 3D building heights can add cognitive load for users. Now, in addition to 3D buildings, we offer building footprints as an option in the style editor. Building footprints can provide a strikingly different basemap balance and composition to better support use cases that may not benefit from the added complexity that 3D buildings can present.

Fill and stroke geometries can also be styled independently to support various color themes. To enable Building Footprints, log into the Cloud console and in our style editor navigate to Buildings and choose ‘Footprints’ under building style.
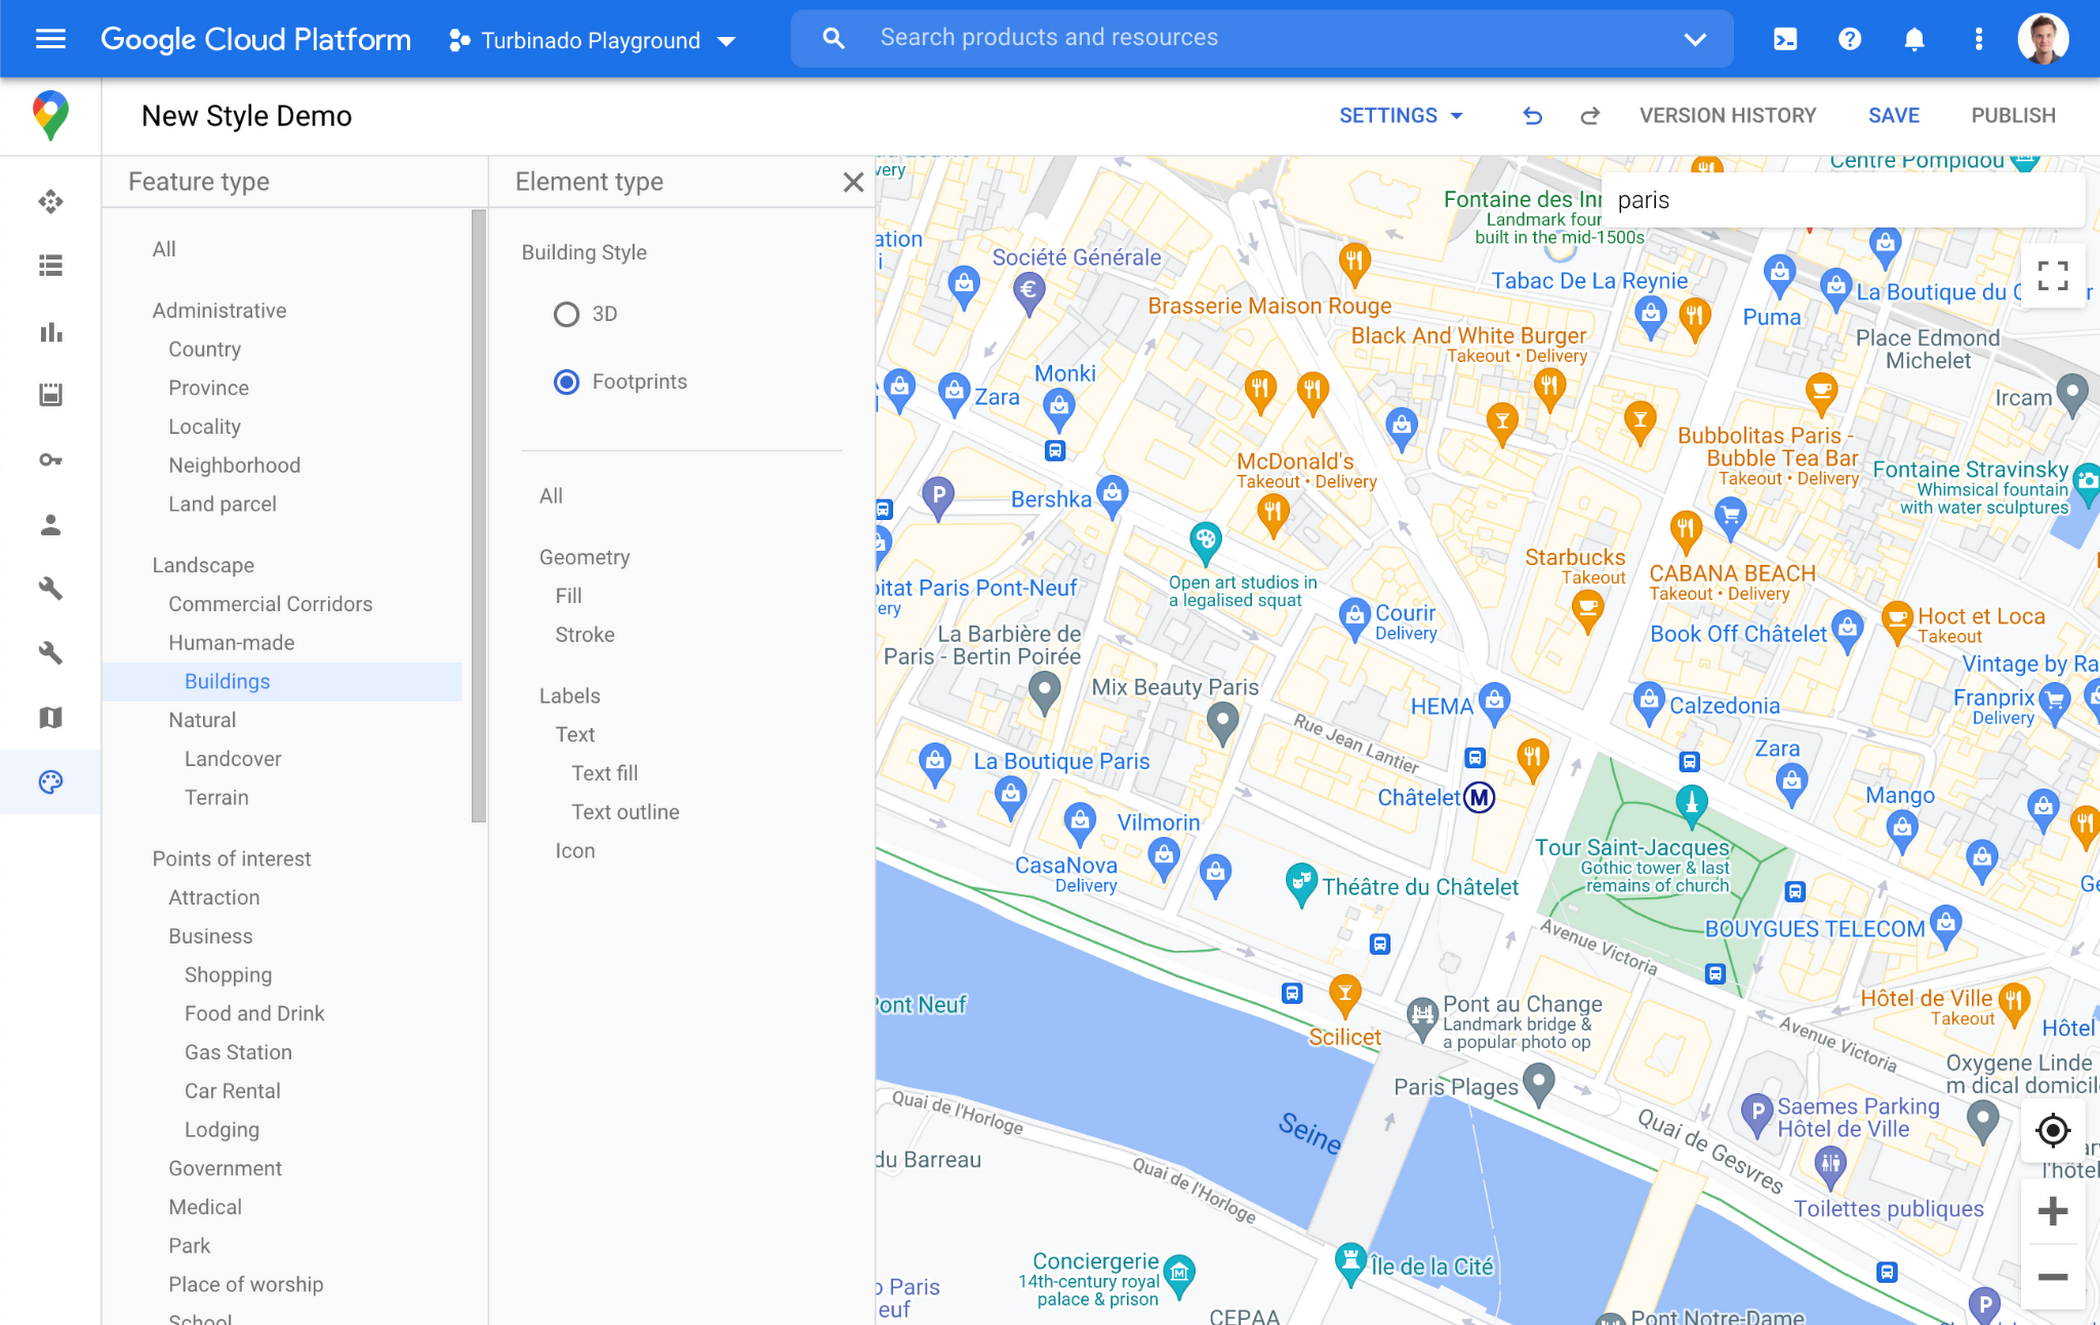
Industry Optimized Map Styles now include Landmarks and Building Footprints, plus Detailed Street Maps
In January of this year we launched Industry Optimized Map Styles for the travel, real estate, retail, and logistics industries, providing customers with pre-styled map configurations, available via Cloud-based maps styling. Landmarks are now included in all of our Industry Optimized Map Styles and we have turned on Building Footprints in the travel style map. If you are already an Industry Optimized Map Styles user, these new features will be applied to your map with no action needed from you. If you would like to disable these changes, you can use the style editor to turn off these features.
For Industry Optimized Map Styles only, we are also excited to enable Detailed Street Maps. You may have seen these features in our consumer products at Google I/O, released back in August of 2020 for the consumer Google Maps web and mobile apps. Detailed Street Maps are available in San Francisco, New York, London, and Tokyo, and we are targeting expansion to 50 new cities by the end of 2021.
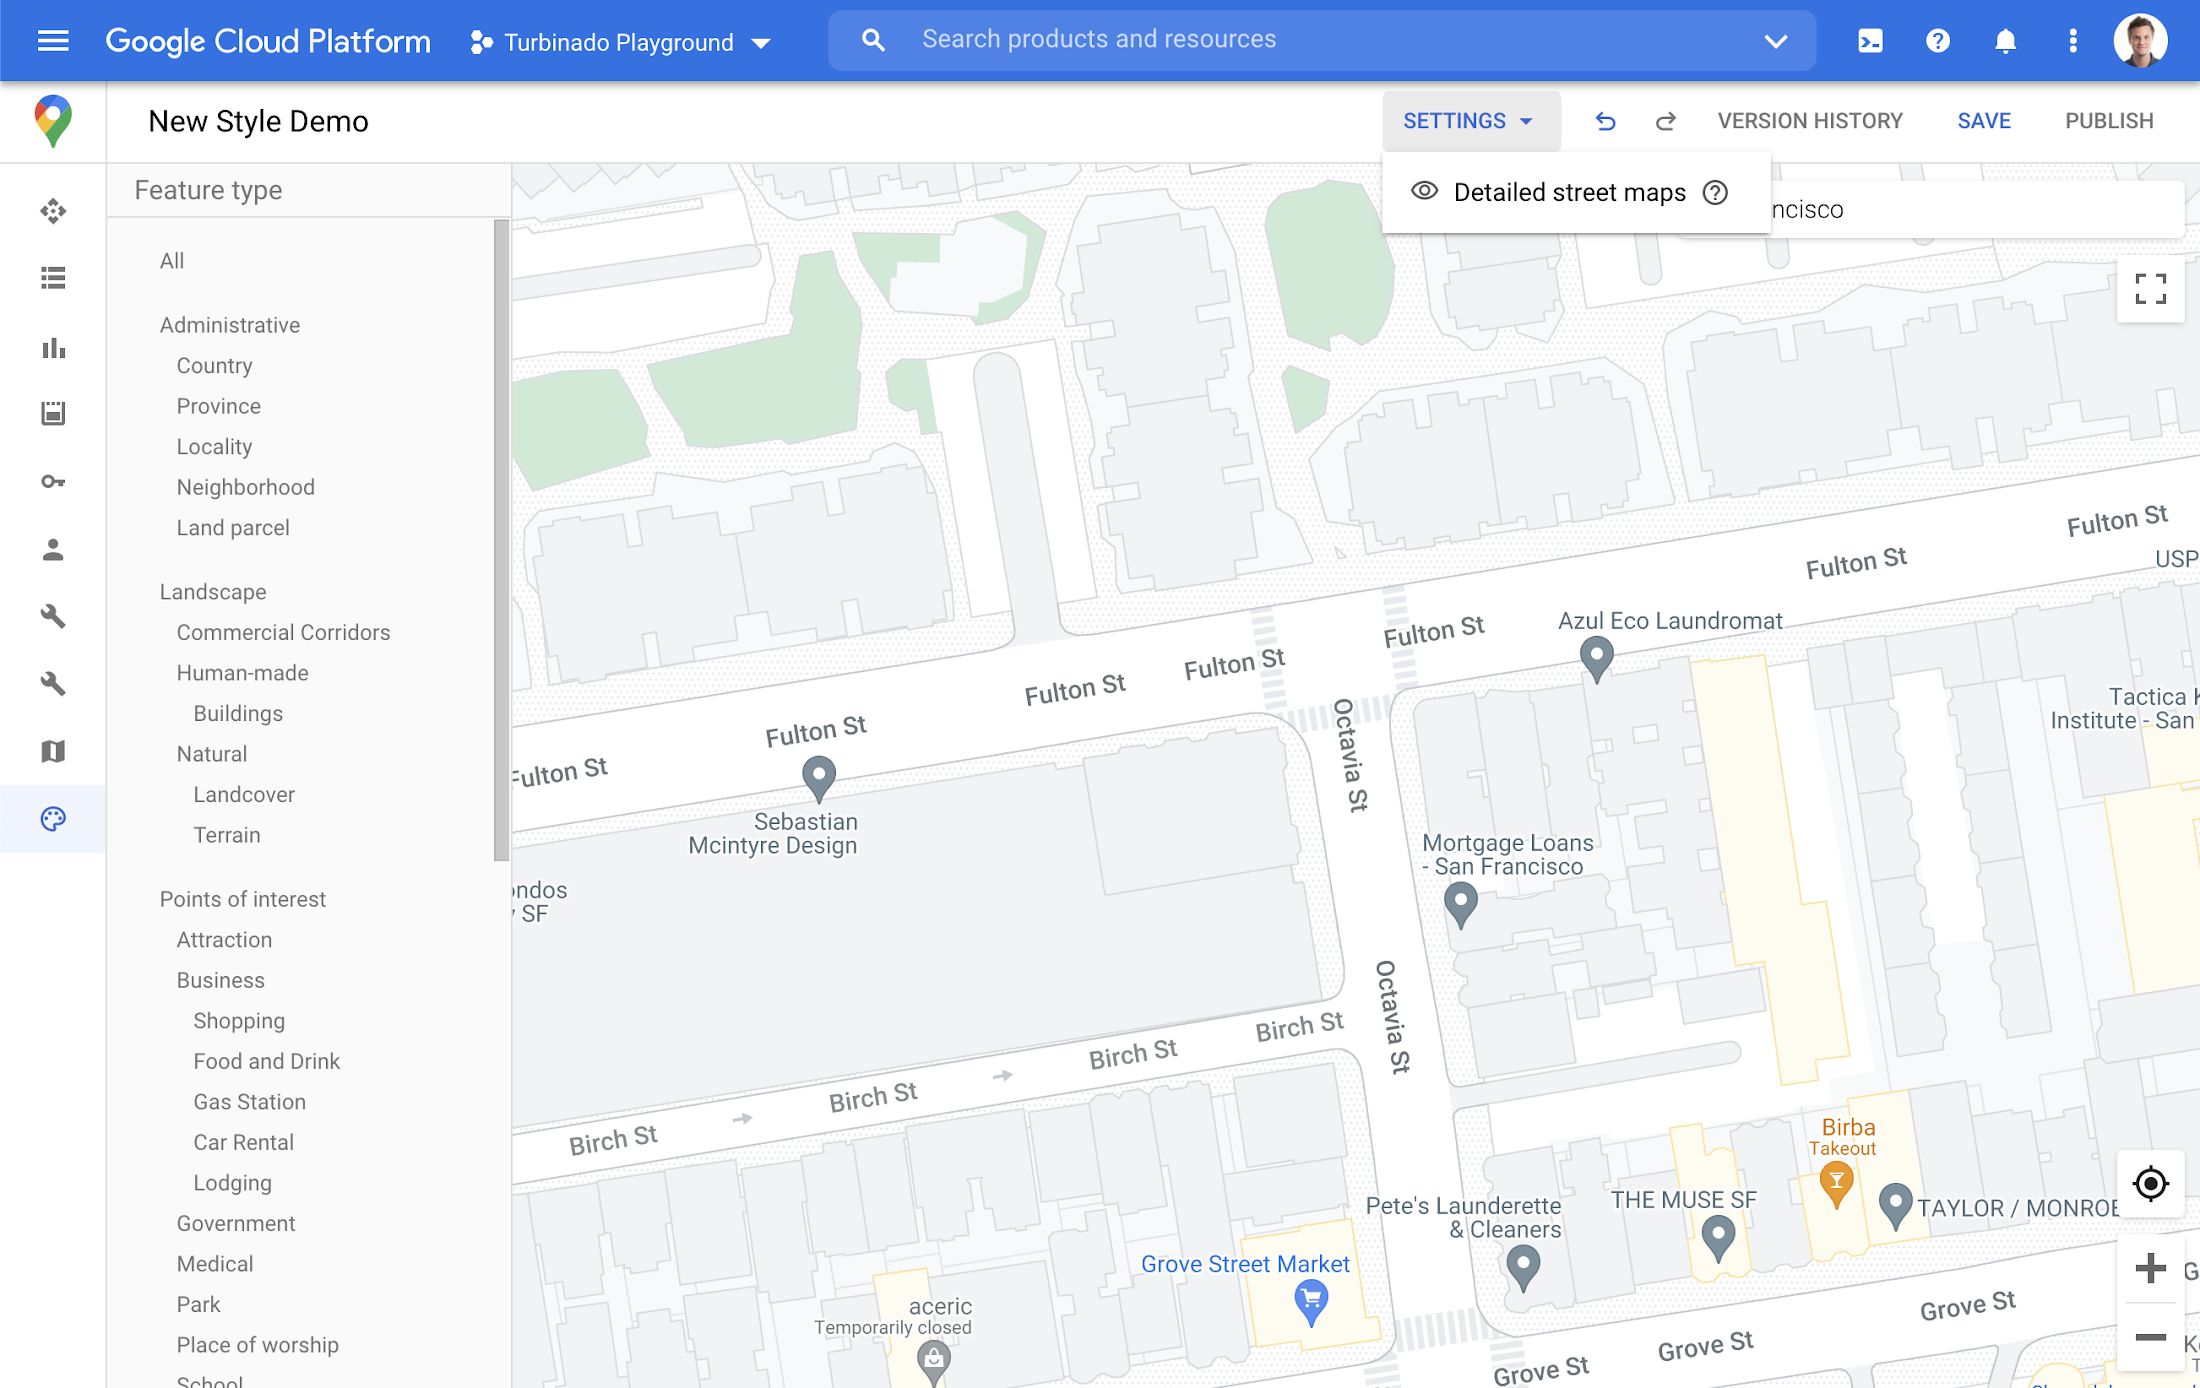
Detailed Street Maps are on by default for all Industry Optimized Map Styles and we created a new settings menu to change the visibility, as needed. We are working on bringing the full styling capability for Detailed Street Maps features to all Cloud-based maps styles in the future.
Landmarks and Building Footprints as well as the updates to Industry Optimized Map Styles are only available via Cloud-based map styling in the Google Cloud Console and are included in Google Maps Platform pricing. Learn more about how to use Landmarks and Building Footprints and Industry Optimized Map Styles. To get started with Cloud-based map styling, check out our documentation for JavaScript.
For more information on Google Maps Platform, visit our website.
More Relevant Stories for Your Company

Microservices Done Right: How Indian Businesses Can Build a Highly Scalable Business
Microservices represent a new form of API-based application architecture that enables enterprises to leverage continuous iteration/continuous deployment (CI/CD) tools and processes within containerized architectures and PaaS. Nearly 70% of organizations are either using or investigating microservices, and nearly one-third are using them in production. These are powerful techniques popularized by

Artifact Registry: An Extension Capabilities of Container Registry
Enterprise application teams need to manage more than just containers in their software supply chain. That’s why we created Artifact Registry, a fully-managed service with support for both container images and non-container artifacts. Artifact Registry improves and extends upon the existing capabilities of Container Registry, such as customer-managed encryption keys, VPC-SC support,

BigQuery Helps Insurance Firms Leverage Previous Storm Data for Better Pricing Insights
It may be surprising to know that U.S. natural catastrophe economic losses totaled $119 billion in 2020, and 75% (or $89.4B) of those economic losses were caused by severe storms and cyclones. In the insurance industry, data is everything. Insurers use data to influence underwriting, rating, pricing, forms, marketing, and

Bigbasket: Delivering Groceries Across 25 Cities in India
When Bigbasket was founded in December 2011, it guaranteed to deliver goods within a one-hour delivery slot of its customers' choosing or it would refund them 10 percent of their orders. The company also introduced an express service, delivering groceries within 90 minutes of an order being placed. Bigbasket needed
