





Unlocking the Power of Computer Vision: Vision AI Made Easy with Spring Boot and Java

1189
Of your peers have already read this article.
1:30 Minutes
The most insightful time you'll spend today!
In today’s era of data-driven applications, leveraging advanced machine learning and artificial intelligence services like computer vision has become increasingly important. One such service is the Vision API, which provides powerful image analysis capabilities. In this blog, we will explore how to create a Computer Vision application using Spring Boot and Java, enabling you to unlock the potential of image recognition and analysis in your projects. The application UI will accept as input, public URLs of images that contain written or printed text, extract the text, detect the language and if it is one of the supported languages, it will generate the English translation of that text.
Spring Boot and Google Cloud
Spring Boot is a powerful open-source framework for creating Spring-based applications. It simplifies development by providing auto-configuration, starter dependencies, and embedded servers. It also offers production-ready features like metrics and health checks. With Spring Boot, you can focus on writing code and deploying efficient applications without worrying about complex configuration or dependencies. Apart from the well-known features that make it an ideal choice for enterprise apps, a new exciting development is the official support for Native Image Builder using GraalVM, enabling the creation of native standalone executables without the need for a Java Runtime and are leaner and offer a super fast startup experience. Try Spring Native on Google Cloud.
The Spring Cloud GCP library makes it easy for Spring Boot applications to use Google Cloud services. It provides Spring Boot APIs for over a dozen Google Cloud services. This means you can take advantage of the benefits of Google Cloud services without having to learn separate Google Cloud client libraries. It is very easy to migrate or create a new Spring Boot application in Google Cloud. With just one command, you can bootstrap your production-ready Spring Boot project structure and start making code changes for your requirement. Refer to the documentation for a full list of features.
Prerequisites
Before diving into the development process, make sure you have the following prerequisites in place:
- A Google Cloud account with a project created and billing enabled
- Vision API, Translation, Cloud Run, and Artifact Registry APIs enabled
- Cloud Shell activated
- Cloud Storage API enabled with a bucket created and images with text or handwriting in local supported languages uploaded (or you can use the sample image links provided in this blog)
Refer to the documentation for steps on how to enable Google Cloud APIs.
Bootstrapping a Spring Boot project
To get started, create a new Spring Boot project using your preferred IDE or Spring Initializr. Include the necessary dependencies, such as Spring Web, Spring Cloud GCP, and Vision AI, in your project’s configuration. Alternatively, you can use Spring Initializr from Cloud Shell using the below steps to bootstrap your Spring Boot application easily:
1. Open a Cloud Shell terminal and make sure it is pointing to the correct project and that you are authorized (if not you can use the command below to set the right project):
gcloud config set project <PROJECT_ID>
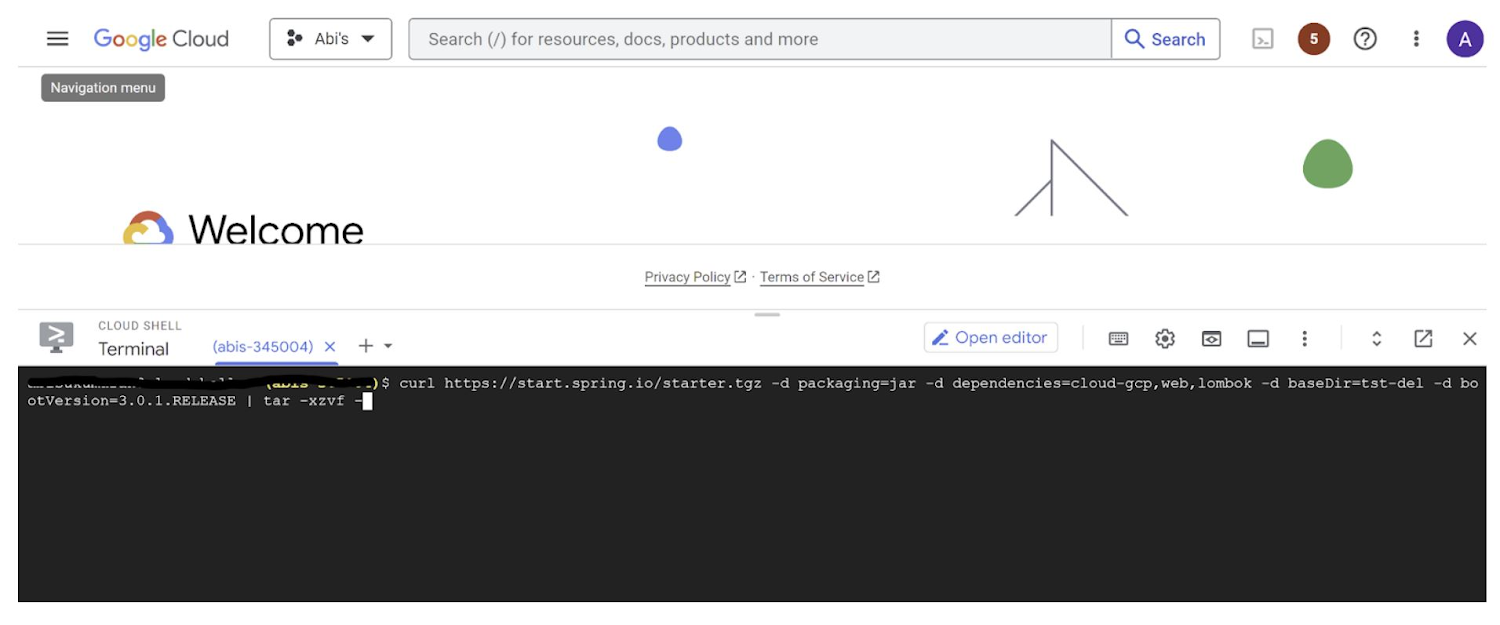
2. Run the following command to create your Spring Boot project:
curl https://start.spring.io/starter.tgz -d packaging=jar -d dependencies=cloud-gcp,web,lombok -d baseDir=spring-vision -d type=maven-project -d bootVersion=3.0.1.RELEASE | tar -xzvf -spring-vision is the name of your project, change it per your requirement.
bootVersion is the version of Spring Boot, make sure to update it if required at the time of your implementation.
type is the version of project build tool type, you can change it to gradle if preferred.
This creates a project structure under “spring-vision” as below:
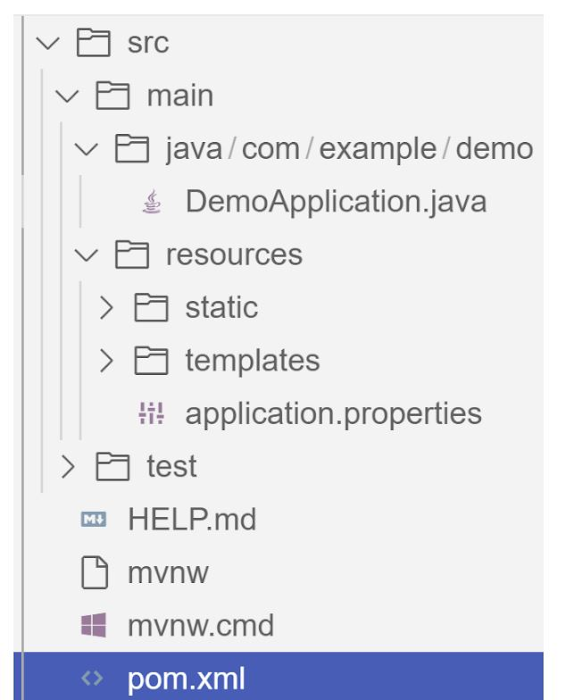
pom.xml contains all the dependencies for the project (dependencies you configured using this command are already added in your pom.xml).src/main/java/com/example/demo has the source classes .java files.resources contain the images, XML, text files and the static content the project uses that are maintained independently.application.properties enable you to maintain the admin features to define profile specific properties of the application.
Configuring the Vision API
Once you have the Vision API enabled, you have the option to configure the API credentials in your application. You can optionally use Application Default Credentials for setting up authentication. In this demo implementation however I have not implemented the use of credentials.
Implementing the vision and translation services
Create a service class that interacts with the Vision API. Inject the necessary dependencies and use the Vision API client to send image analysis requests. You can implement methods to perform tasks like image labeling, face detection, recognition, and more, based on your application’s requirements. In this demo, we will use handwriting extraction and translation methods. For this make sure you include the following dependencies in pom.xml
<dependency>
      <groupId>org.springframework.cloud</groupId>
      <artifactId>spring-cloud-gcp-starter-vision</artifactId>
</dependency>
<dependency>
<groupId>com.google.cloud</groupId>
<artifactId>google-cloud-translate</artifactId>
</dependency>Clone / Replace the following files from the repo and add them to the respective folders / path in the project structure:
Application.java(/src/main/java/com/example/demo)TranslateText.java(/src/main/java/com/example/demo)VisionController.java(/src/main/java/com/example/demo)index.html(/src/main/resources/static)result.html(/src/main/resources/templates)pom.xml
The method extractTextFromImage in the service org.springframework.cloud.gcp.vision.CloudVisionTemplate lets you extract text from your image input. The method getTranslatedText from the service com.google.cloud.translate.v3 lets you pass the extracted text from your image and get the translated text in the desired target language as response (if the source is in one of the supported languages list).
Building the REST API
Design and implement the REST endpoints that will expose the Vision API functionalities. Create controllers that handle incoming requests and utilize the Vision API service to process the images and return the analysis results.
In this demo, our VisionController class implements the endpoint, handles the incoming request, invokes the Vision API and Cloud Translation services and returns the result to the view layer. Implementation of the GET method for the REST endpoint is as follows:
@GetMapping("/extractText")
  public String extractText(String imageUrl) throws IOException {
    String textFromImage =
   this.cloudVisionTemplate.extractTextFromImage(this.resourceLoader.getResource(imageUrl));


    TranslateText translateText = new TranslateText();
    String result = translateText.translateText(textFromImage);
    return "Text from image translated: " + result;
  }
The TranslateText class in the above implementation has the method that invokes the Cloud Translation service:
String targetLanguage = "en";
 TranslateTextRequest request =
         TranslateTextRequest.newBuilder()
             .setParent(parent.toString())
             .setMimeType("text/plain")
             .setTargetLanguageCode(targetLanguage)
             .addContents(text)
             .build();
     TranslateTextResponse response = client.translateText(request);
     // Display the translation for each input text provided
     for (Translation translation : response.getTranslationsList()) {
       res = res + " ::: " + translation.getTranslatedText();
        System.out.printf("Translated text : %s\n", res);
     }
With the VisionController class, we have the GET method for the REST implemented.
Integrating Thymeleaf for frontend development
When building an application with Spring Boot, one popular choice for frontend development is to leverage the power of Thymeleaf. Thymeleaf is a server-side Java template engine that allows you to seamlessly integrate dynamic content into your HTML pages. Thymeleaf provides a smooth development experience by allowing you to create HTML templates with embedded server-side expressions. These expressions can be used to dynamically render data from your Spring Boot backend, making it easier to display the results of image analysis performed by the Vision API service.
To get started, ensure that you have the necessary dependencies for Thymeleaf in your Spring Boot project. You can include the Thymeleaf Starter dependency in your pom.xml:
<dependency>
<groupId>org.springframework.boot</groupId>
<artifactId>spring-boot-starter-thymeleaf</artifactId>
</dependency>
In your controller method, retrieve the analysis result from the Vision API service and add it to the model. The model represents the data that will be used by Thymeleaf to render the HTML template. Once the model is populated, return the name of the Thymeleaf template that you want to render. Thymeleaf will take care of processing the template, substituting the server-side expressions with the actual data, and generating the final HTML that will be sent to the client’s browser. Example:
return new ModelAndView("result", <<YOUR RESULT>>);In the case of the extractText method in VisionController, we have returned the result as a String to and not added to the model. But we have invoked the GET method extractText method on the index.html on page submit.
<form action="/extractText">

        Web URL of image to analyze:

        <input type="text"

               name="imageUrl"

               value=""

        <input type="submit" value="Read and Translate" />

</form>
With Thymeleaf, you can create a seamless user experience, where users can upload images, trigger Vision API analyses, and view the results in real-time. Unlock the full potential of your Vision AI application by harnessing the power of Thymeleaf for frontend development.
Deploying your Spring Boot application with Cloud Run
Write unit tests for your service and controller classes to ensure proper functionality under the /src/test/java/com/example folder. Once you’re confident in its stability, package it into a deployable artifact, such as a JAR file, and deploy it to Cloud Run, a serverless compute platform on Google Cloud. In this step, we will focus on deploying your containerized Spring Boot application using Cloud Run.
a. Package your application by executing the following steps from Cloud Shell(make sure the terminal is prompting at the project root folder)
Build:
./mvnw package
Once the build is successful, run locally to test:
./mvnw spring-boot:run
b. Containerize your Spring Boot Application with Jib:
Instead of manually creating a Dockerfile and building the container image, you can use the Jib utility to simplify the containerization process. Jib is a plugin that integrates directly with your build tool (such as Maven or Gradle) and allows you to build optimized container images without writing a Dockerfile. Before proceeding, you need to enable the Artifact Registry API (Use of Artifact Registry is encouraged over container registry). Then Run Jib to build a Docker image and publish to the Registry:
$ ./mvnw com.google.cloud.tools:jib-maven-plugin:3.1.1:build -Dimage=gcr.io/$GOOGLE_CLOUD_PROJECT/vision-jib
Note: In this experiment, we did not configure the Jib Maven plugin in pom.xml, but for advanced usage, it is possible to add it in pom.xml with more configuration options
c. Deploy the container (that we pushed to Artifact Registry in the previous step) to Cloud Run. This is again a one-command step:
gcloud run deploy vision-app --image gcr.io/$GOOGLE_CLOUD_PROJECT/vision-jib --platform managed --region us-central1 --allow-unauthenticated --update-env-vars
You can alternatively do this from the UI as well. Navigate to the Google Cloud Console and locate the Cloud Run service. Click on “Create Service” and follow the on-screen instructions. Specify the container image you previously pushed to the registry, configure the desired deployment settings (such as CPU allocation and autoscaling), and choose the appropriate region for deployment. You can set environment variables specific to your application. These variables can include authentication credentials (API keys etc.), database connection strings, or any other configuration needed for your Vision AI application to function correctly. When the deployment is completed successfully, you should get an endpoint to your application.
For our demo, the endpoint Cloud Run created for us is: https://vision-app-********-uc.a.run.app
Playing with your Vision AI app
For demo purposes, you can use the image URL below for your app to read and translate:
https://storage.googleapis.com/img_public_test/tamilwriting1.jfif

Conclusion
Congratulations! You have successfully created a Vision AI application using Spring Boot and Java. With the power of Vision AI, your application can now perform sophisticated image analysis, including labeling, face detection, and more. The integration of Spring Boot provides a solid foundation for building scalable and robust Google Cloud Native applications. Continue exploring the vast capabilities of Vision AI, Cloud Run, Cloud Translation and more to enhance your application with additional features and functionalities. To learn more, check out the Vision API, Cloud Translation, and GCP Spring docs. Try out the same experiment with the Spring Native option!! Also as a sneak-peak to Gen-AI world, checkout how this API shows up in Model Garden.
Time-series Model on Google Cloud Allows Better Transparency on Fishing and Marine Activities

4388
Of your peers have already read this article.
3:30 Minutes
The most insightful time you'll spend today!
Who would have known that today technology would enable us with the ability to use machine learning to track vessel activity, and make pattern inferences to help address IUU (illegal, unreported, and unregulated) fishing activities. What’s even more noteworthy is that we now have the computing power to share this information publicly in order to enable fair and sustainable use of our ocean.
An amazing group of humans at the nonprofit Global Fishing Watch took on this massive big data challenge and succeeded. You can immediately access their dynamic map on their website globalfishingwatch.org/map that is bringing greater transparency to fishing activity and supporting the creation and management of marine protected areas throughout the world.
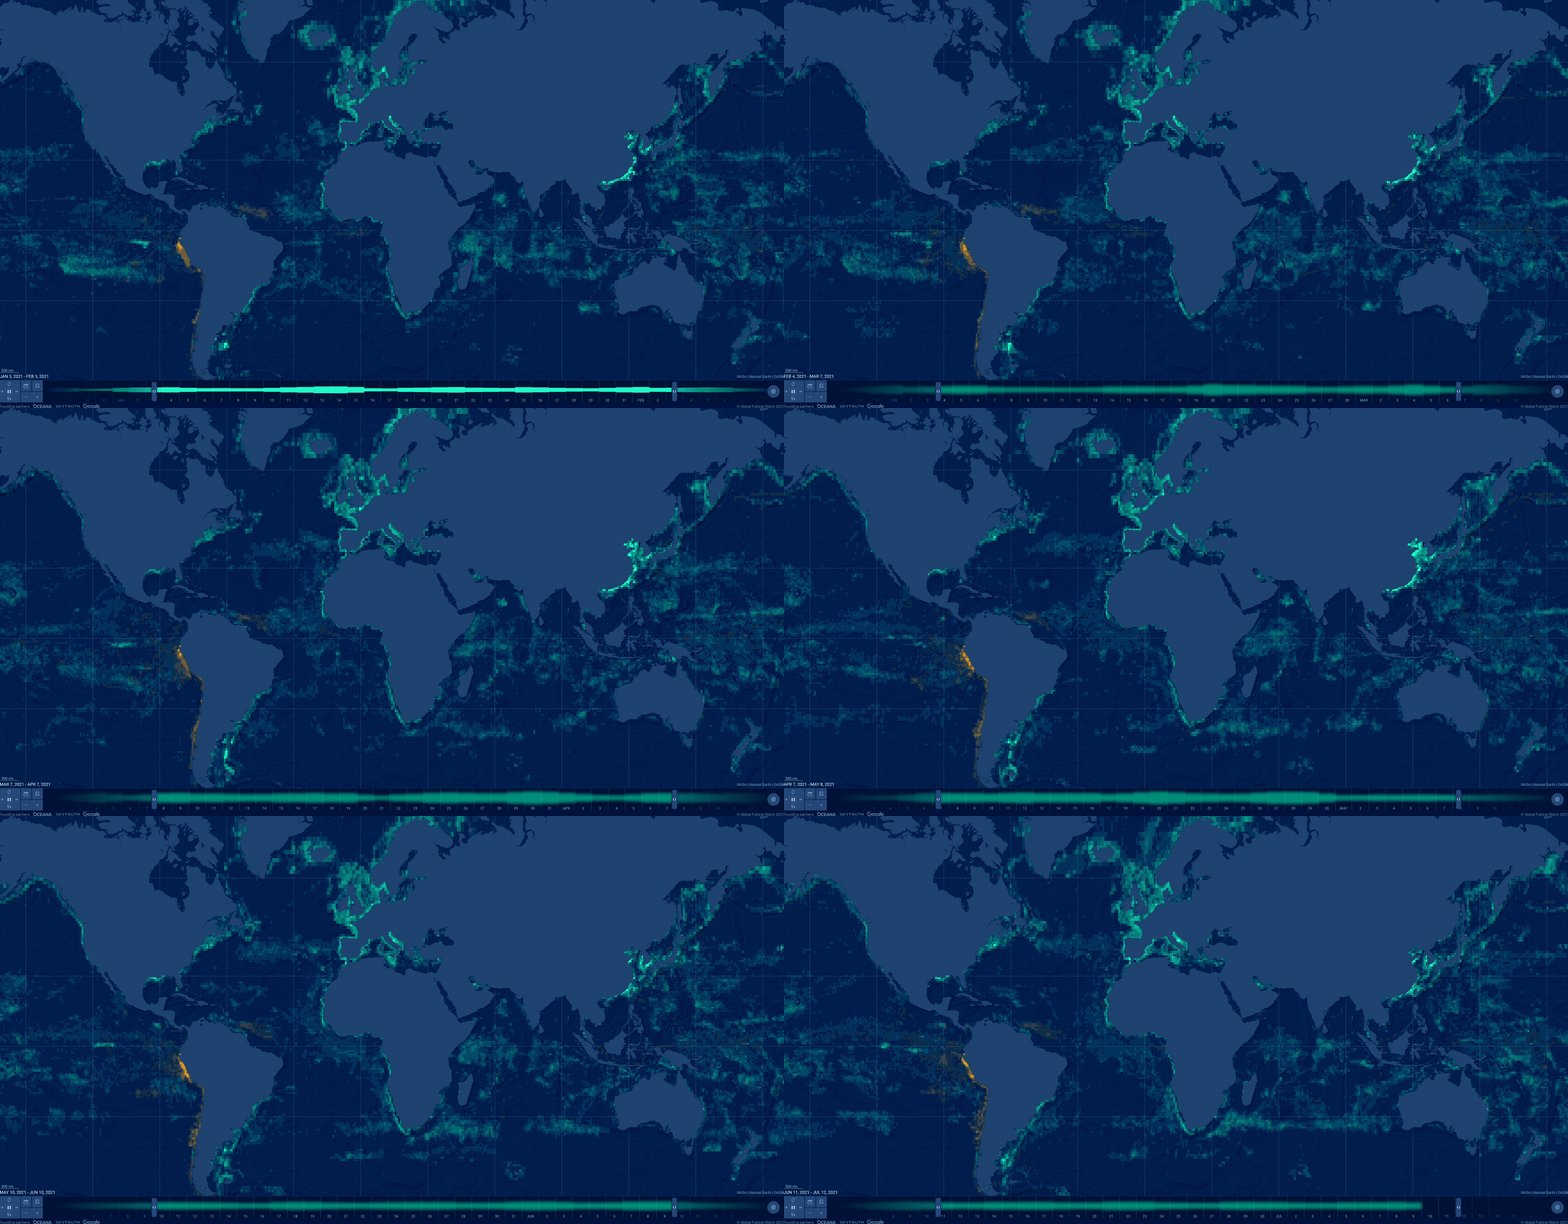
In our second episode of our People and Planet AI series we were inspired by their ML solution to this challenge, and we built a short video and sample with all the relevant code you need to get started with building a basic time-series classification model in Google Cloud, and visualize it in an interactive map.
Architecture
These are the components used to build a model for this sample:
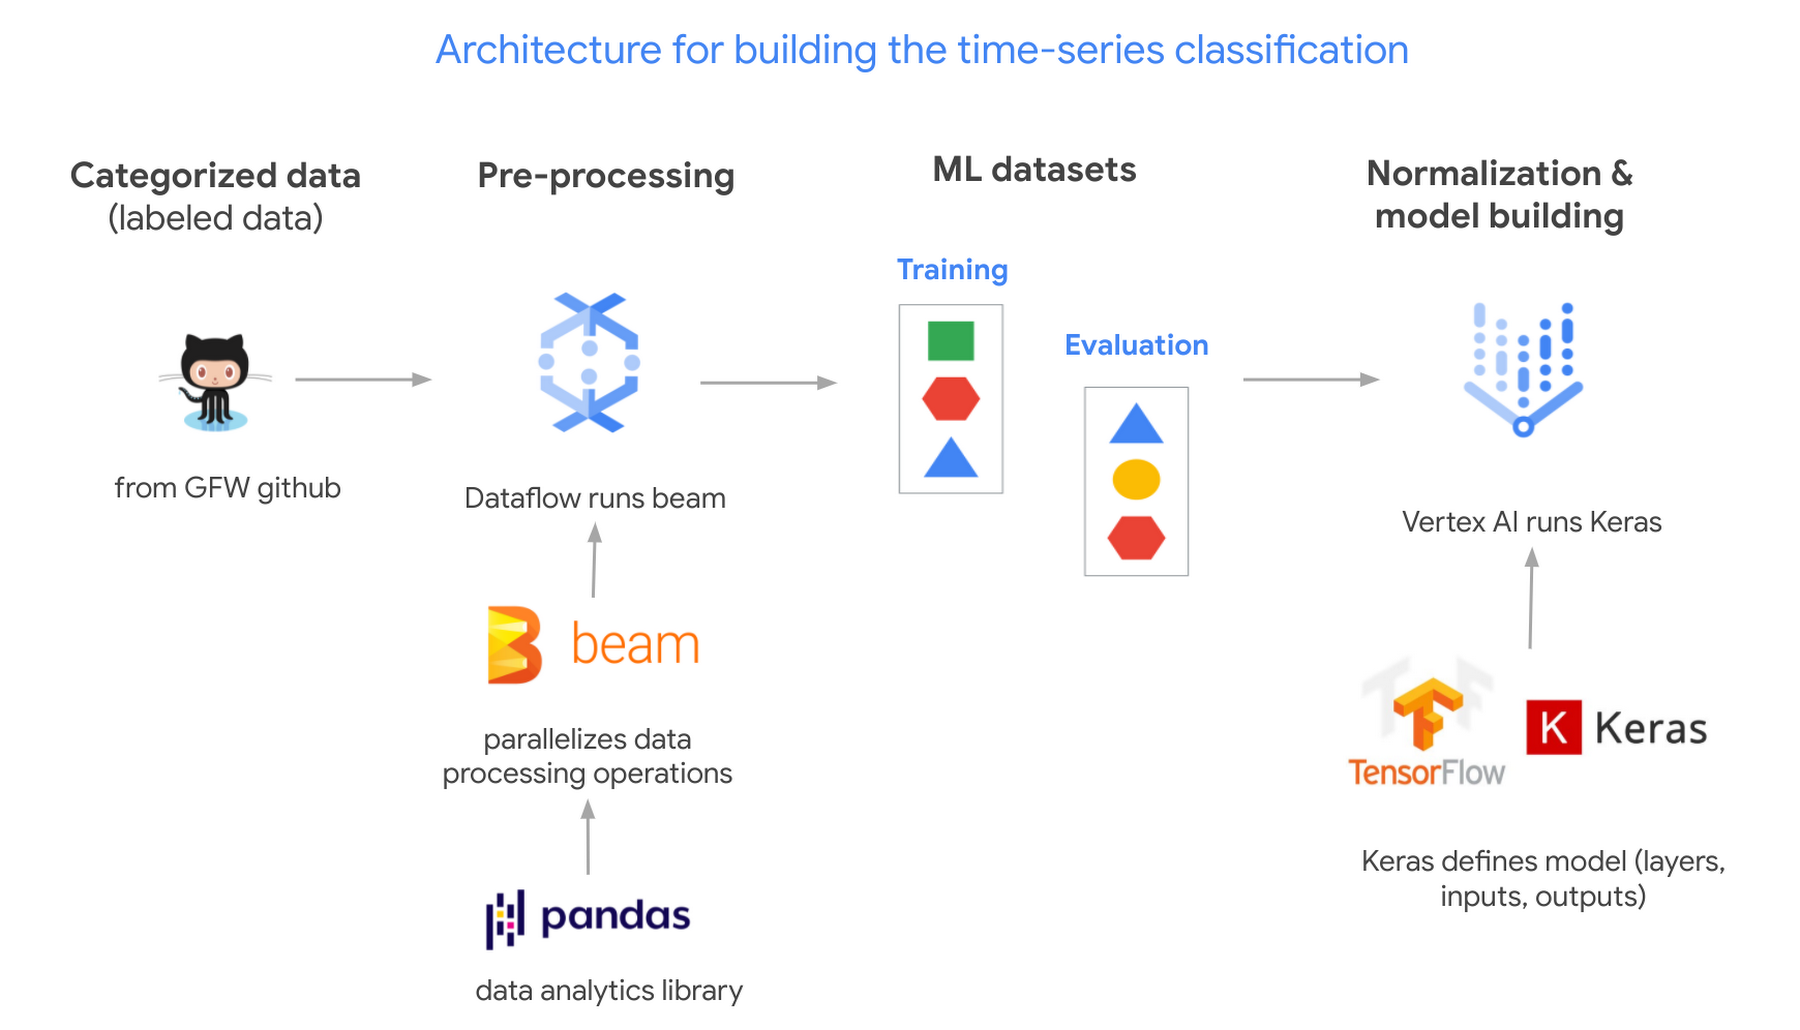
- Global Fishing Watch GitHub: where we got the data
- Apache Beam: (open source library) runs on Dataflow.
- Dataflow: (Google’s data processing service) creates 2 datasets; 1 for training a model and the other to evaluate its results.
- TensorflowKeras: (high level API library) used to define a machine learning model, which we then train in Vertex AI.
- Vertex AI: (a platform to build, deploy, and scale ML models) we train and output the model.
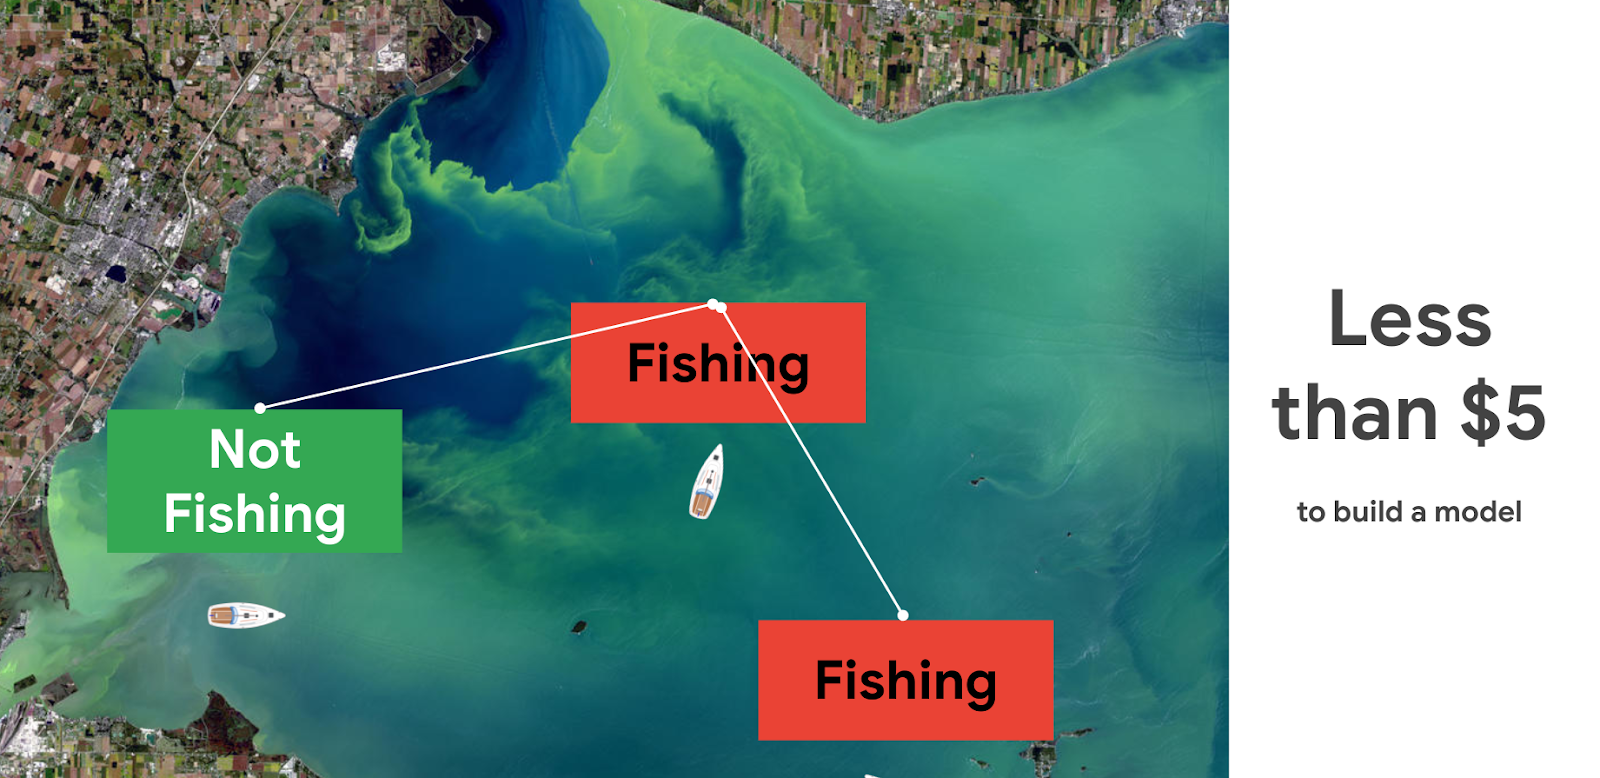
Pricing and steps
The total cost to run this solution was less than $5.
There are seven steps we went through with their approximate time and cost:
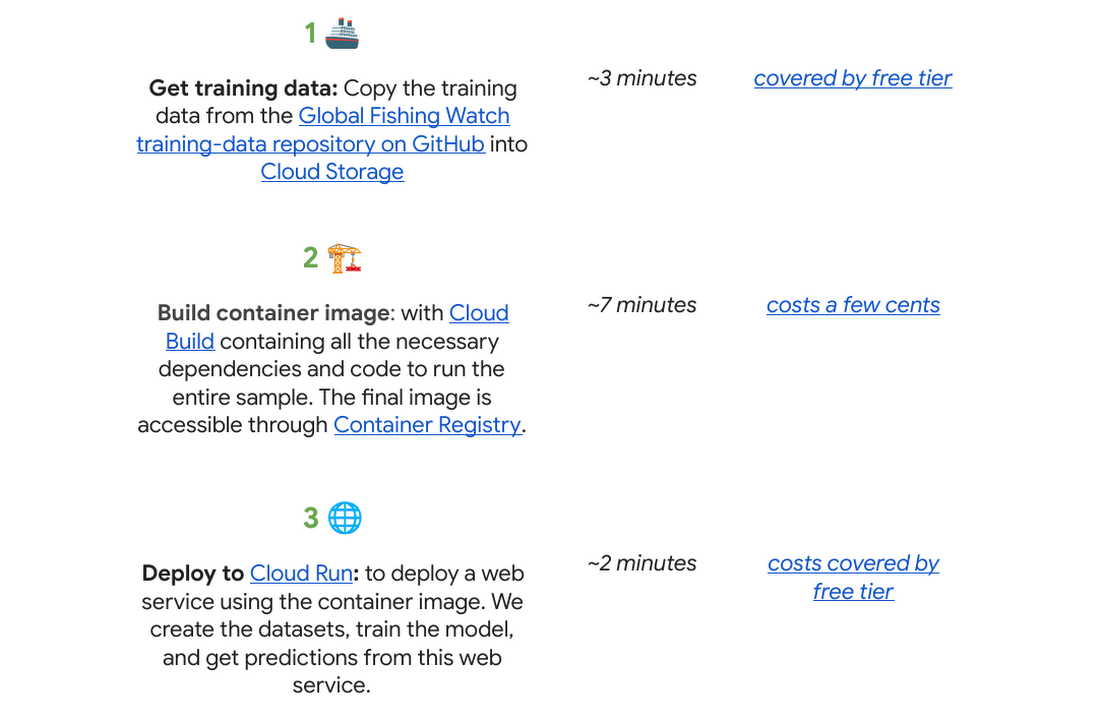
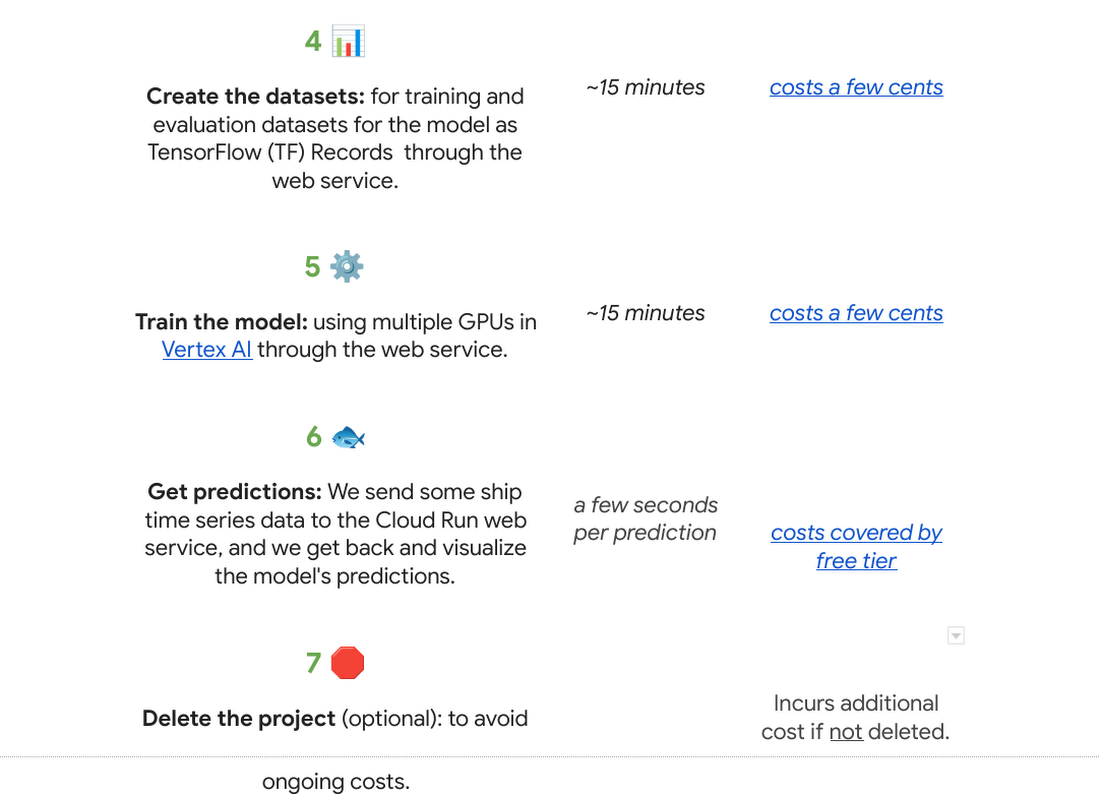
Why do we use a time series classification model?
Vessels in the ocean are constantly moving, which creates distinctive patterns from a satellite view.
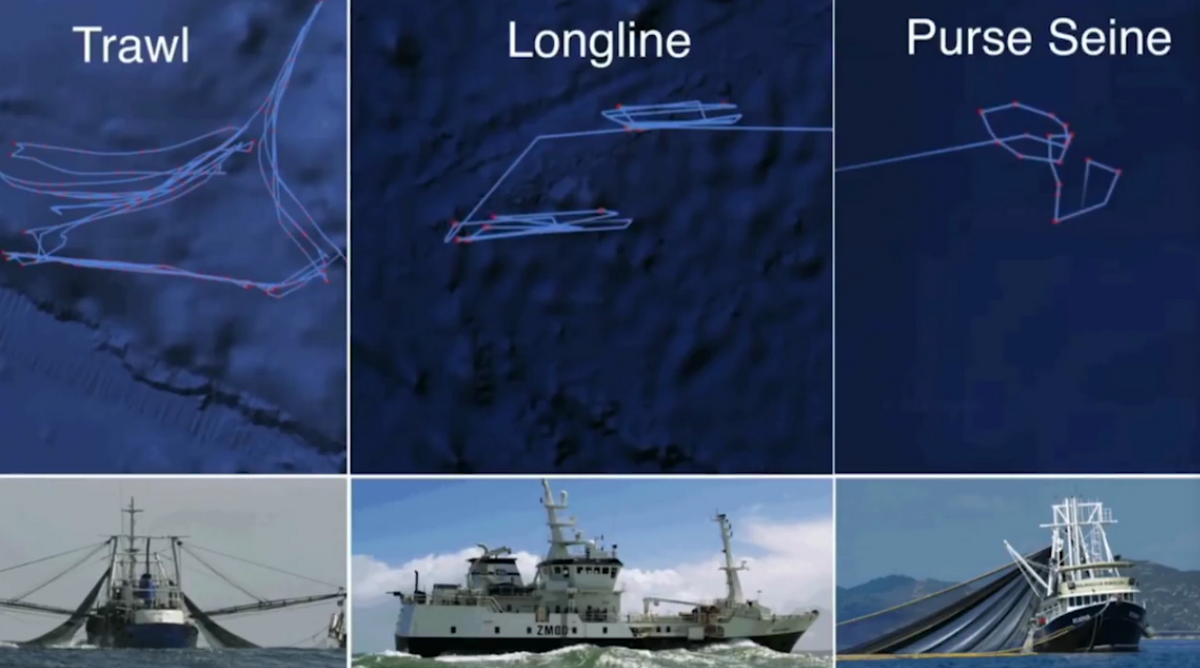
We can train a model to recognize the shapes of a vessel’s trajectory. Large vessels are required to use the automatic identification system, or AIS. The GPS-like transponders regularly broadcast a vessel’s maritime mobile service identity, or MMSI, and other critical information to nearby ships, as well as to terrestrial and satellite receivers. While AIS is designed to prevent collisions and boost overall safety at sea, it has turned out to be an invaluable system for monitoring vessels and detecting suspicious fishing behavior globally.

One tricky part is that the MMSI data location signal (which includes a timestamp, latitude, longitude, distance from port, and more) is not emitted at regular intervals. AIS broadcast frequency changes with vessel speed (faster at higher speeds), and not all AIS messages that are broadcast are received – terrestrial receivers require line-of-sight, satellites must be overhead, and high vessel density can cause signal interference. For example, AIS messages might be received frequently as a vessel leaves the docks and operates near shore, then less frequently as they move further offshore until satellite reception improves. This is challenging for a machine learning model to interpret. There are too many gaps in the data, which makes it hard to predict.
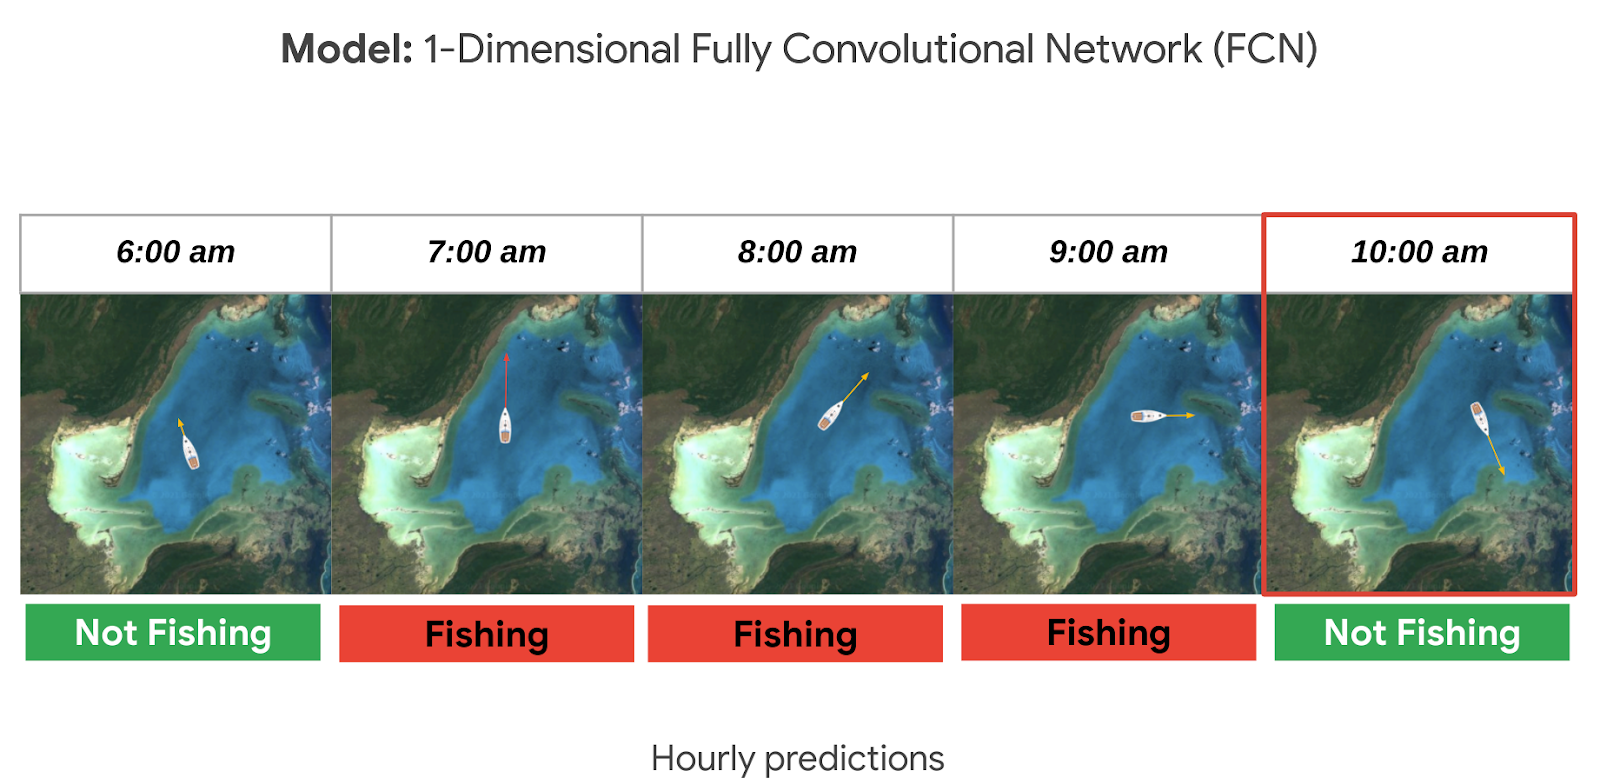
A way to solve this is to normalize the data and generate fixed-sized hourly windows. Then the model can predict if the vessel is fishing or not fishing for each hour.

It could be hard to know if a ship is fishing or not by just looking at its current position, speed, and direction. So we look at the data from the past as well, looking at the future could also be an option if we don’t need to do real time predictions. For this sample, it seemed reasonable to look 24 hours into the past to make a prediction. This means we need at least 25 hours of data to make a prediction for a single hour (24 hours in the past + 1 current hour). But we could predict longer time sequences as well. In general, to get hourly predictions, we need (n+24) hours of data.
Options to deploy and access the model
For this sample specifically we used Cloud Run to host the model as a web app so that other apps can call it to make predictions on an ongoing basis; this is our favorite in terms of pricing if you need to access your model from the internet over an extended period of time (charged per prediction request). You can also host it directly from Vertex AI where you trained and built the model, just note there is an hourly cost for using those VMs even if they are idle. If you do not need to access the model over the internet, you can make predictions locally or download the model onto a microcontroller if you have an IoT sensor strategy.

Want to go deeper?
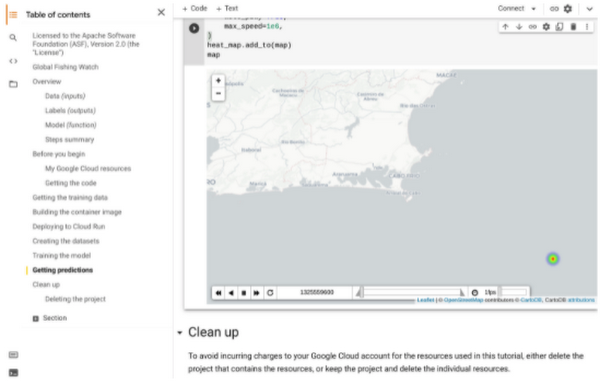
If you found this project interesting and would like to dive deeper either into the specifics of the thought process behind each step of this solution or even run through the code in your own project (or test project); we invite you to check out our interactive sample hosted on Colab, which is a free Jupyter notebook. It serves as a guide with all the steps to run the sample, including visualizing the predictions on a dynamically moving map using an open source Python library called Folium.
There’s no prior experience required! Just click “open in Colab” which is linked at the bottom of GitHub.
You will need a Google Cloud Platform project. If you do not have a Google Cloud project you can create one with the free $300 Google Cloud credit, you just need to ensure you set up billing, and later delete the project after testing the desired sample.
🌏🌎🌍 We hope to inspire you to build other beautiful climate-related solutions.

5830
Of your peers have already downloaded this article
4:23 Minutes
The most insightful time you'll spend today!
As a customer experience platform, Genesys helps clients nurture great relationships with customers, and creates seamless user journeys across all channels and devices. Its technologies are used by more than 10,000 companies in over 100 countries, making Genesys the top provider of its kind for 25 years in a row.
To improve data efficiency and communication across the company, Genesys turned to Analytics Pros, a digital analytics agency. Together, they used the power of Google Data Studio to transform the way teams across Genesys accessed and used data.
Communicating With Data
The marketing and product teams at Genesys had always been passionate about using data to optimize their user experience and marketing channels. But the problem was showing the data. The different offices and executives around the world had trouble logging in to view the data—and once they did, the reports were intimidating and confusing.
After learning more about the capabilities of Data Studio, Genesys decided to run a pilot project. Analytics Pros helped the company combine multiple data sets into self-service, fully-customizable dashboards on Data Studio. And it was a huge success. Regional teams were thrilled to have meaningful dashboards, and even executives started using and sharing reports.
Vector Search: The Tech Powering Billions of Search Results for Google Users

4540
Of your peers have already read this article.
1:30 Minutes
The most insightful time you'll spend today!
Recently, Google Cloud partner Groovenauts, Inc. published a live demo of MatchIt Fast. As the demo shows, you can find images and text similar to a selected sample from a collection of millions in a matter of milliseconds:
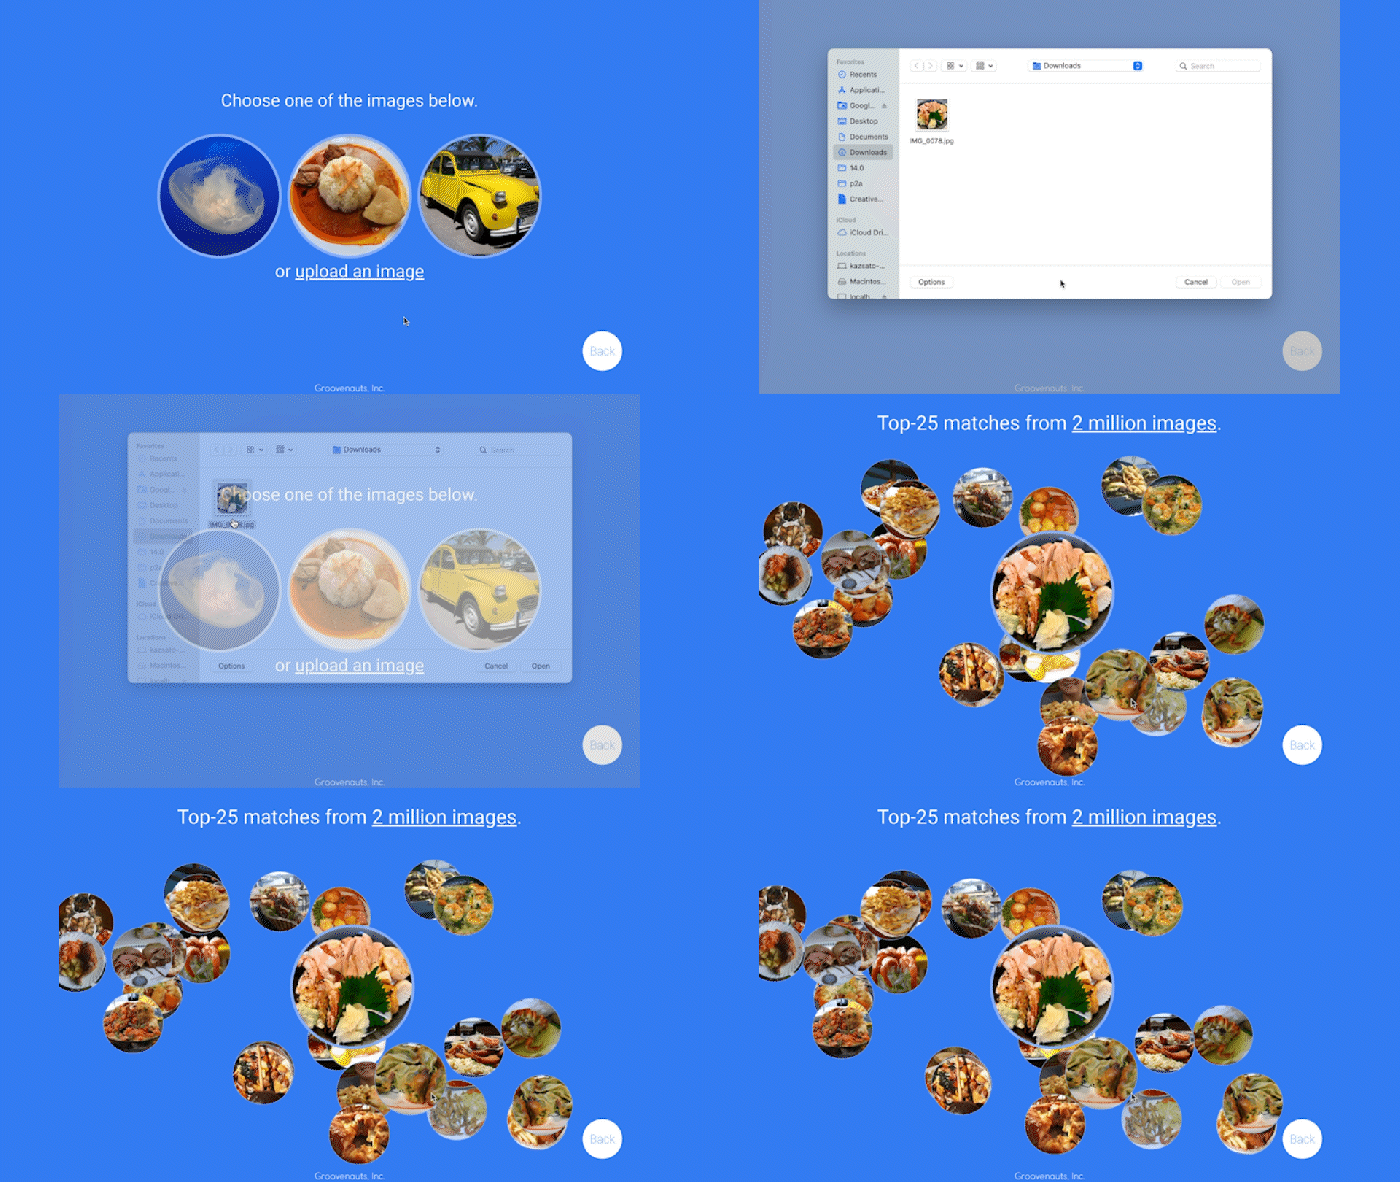
Give it a try — and either select a preset image or upload one of your own. Once you make your choice, you will get the top 25 similar images from two million images on Wikimedia images in an instant, as you can see in the video above. No caching involved.
The demo also lets you perform the similarity search with news articles. Just copy and paste some paragraphs from any news article, and get similar articles from 2.7 million articles on the GDELT project within a second.
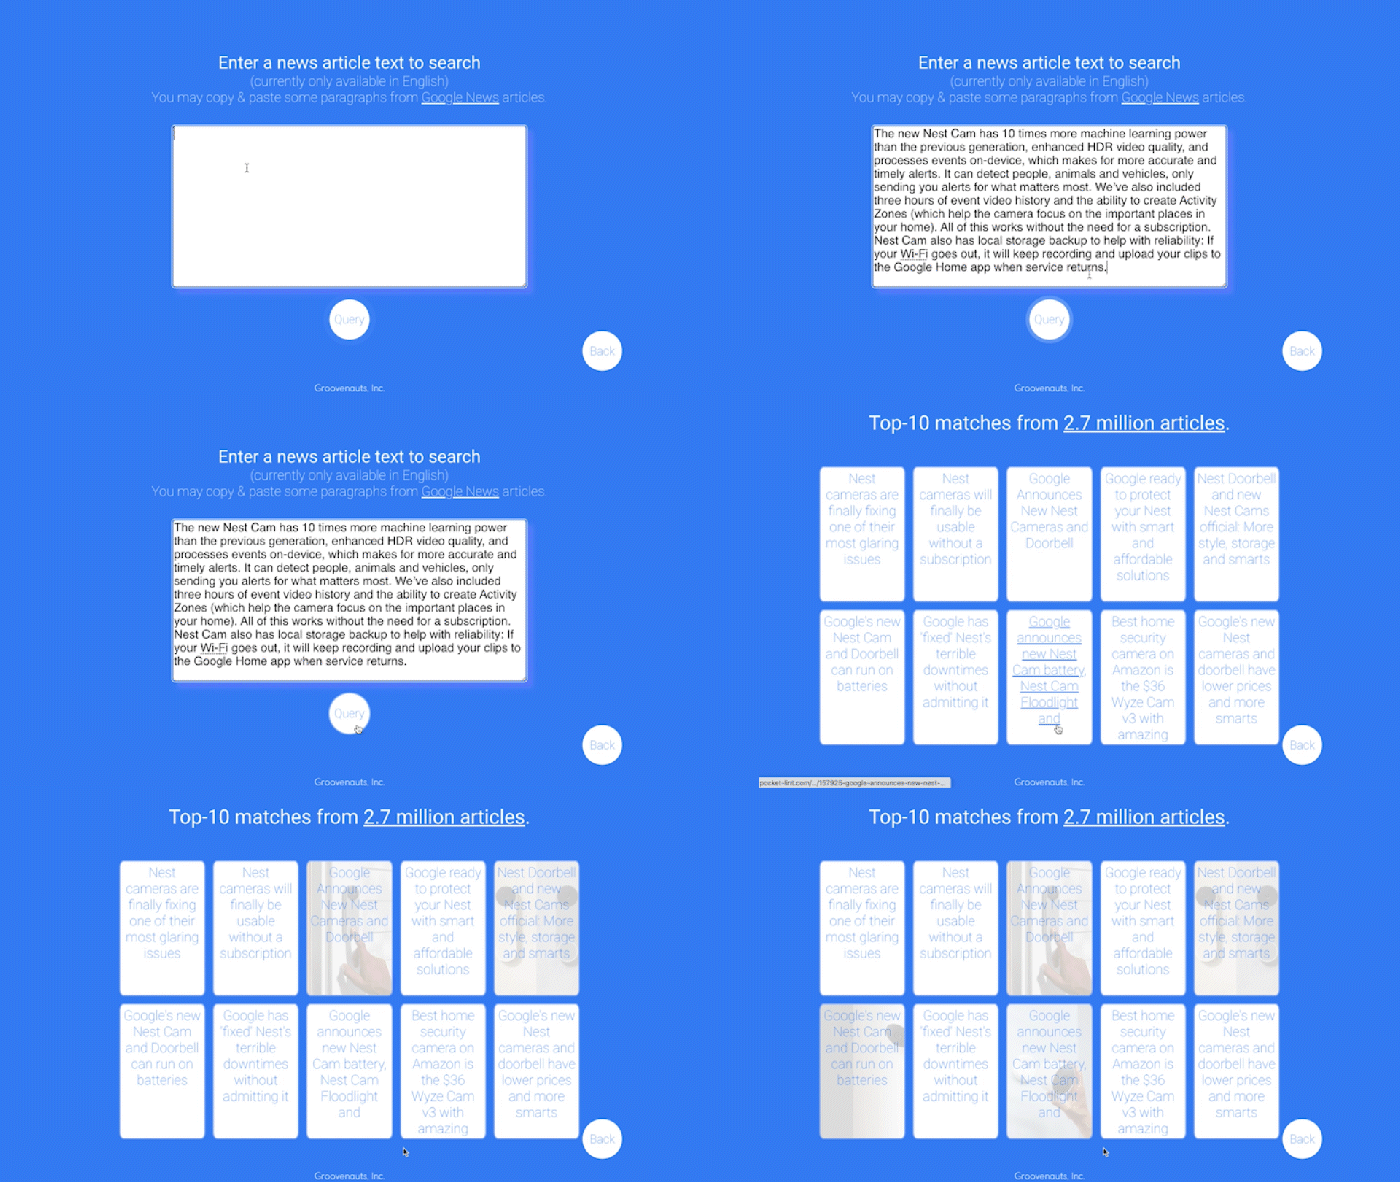
Vector Search: the technology behind Google Search, YouTube, Play, and more
How can it find matches that fast? The trick is that the MatchIt Fast demo uses the vector similarity search (or nearest neighbor search or simply vector search) capabilities of the Vertex AI Matching Engine, which shares the same backend as Google Image Search, YouTube, Google Play, and more, for billions of recommendations and information retrievals for Google users worldwide. The technology is one of the most important components of Google’s core services, and not just for Google: it is becoming a vital component of many popular web services that rely on content search and information retrieval accelerated by the power of deep neural networks.
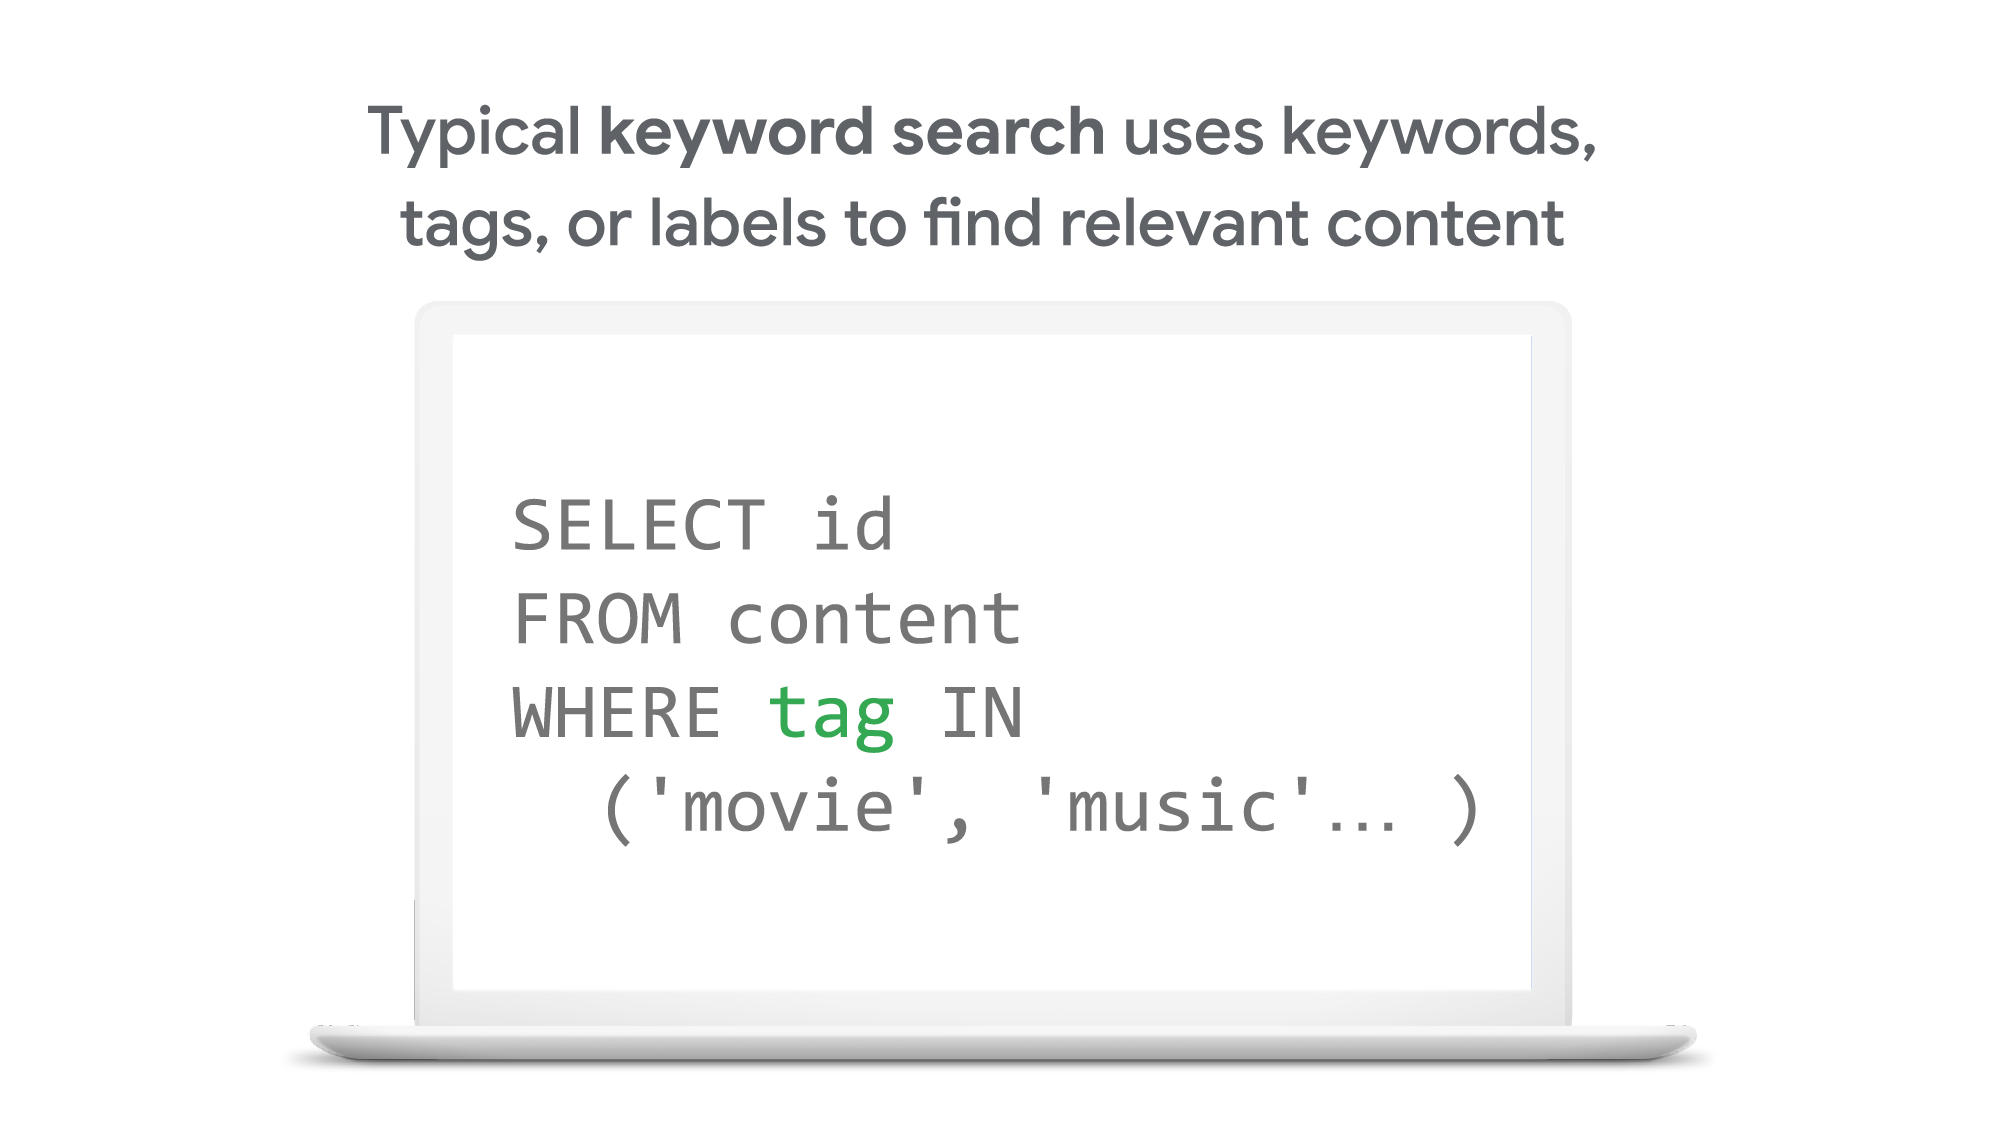
So what’s the difference between traditional keyword-based search and vector similarity search? For many years, relational databases and full-text search engines have been the foundation of information retrieval in modern IT systems. For example, you would add tags or category keywords such as “movie”, “music”, or “actor” to each piece of content (image or text) or each entity (a product, user, IoT device, or anything really). You’d then add those records to a database, so you could perform searches with those tags or keywords.
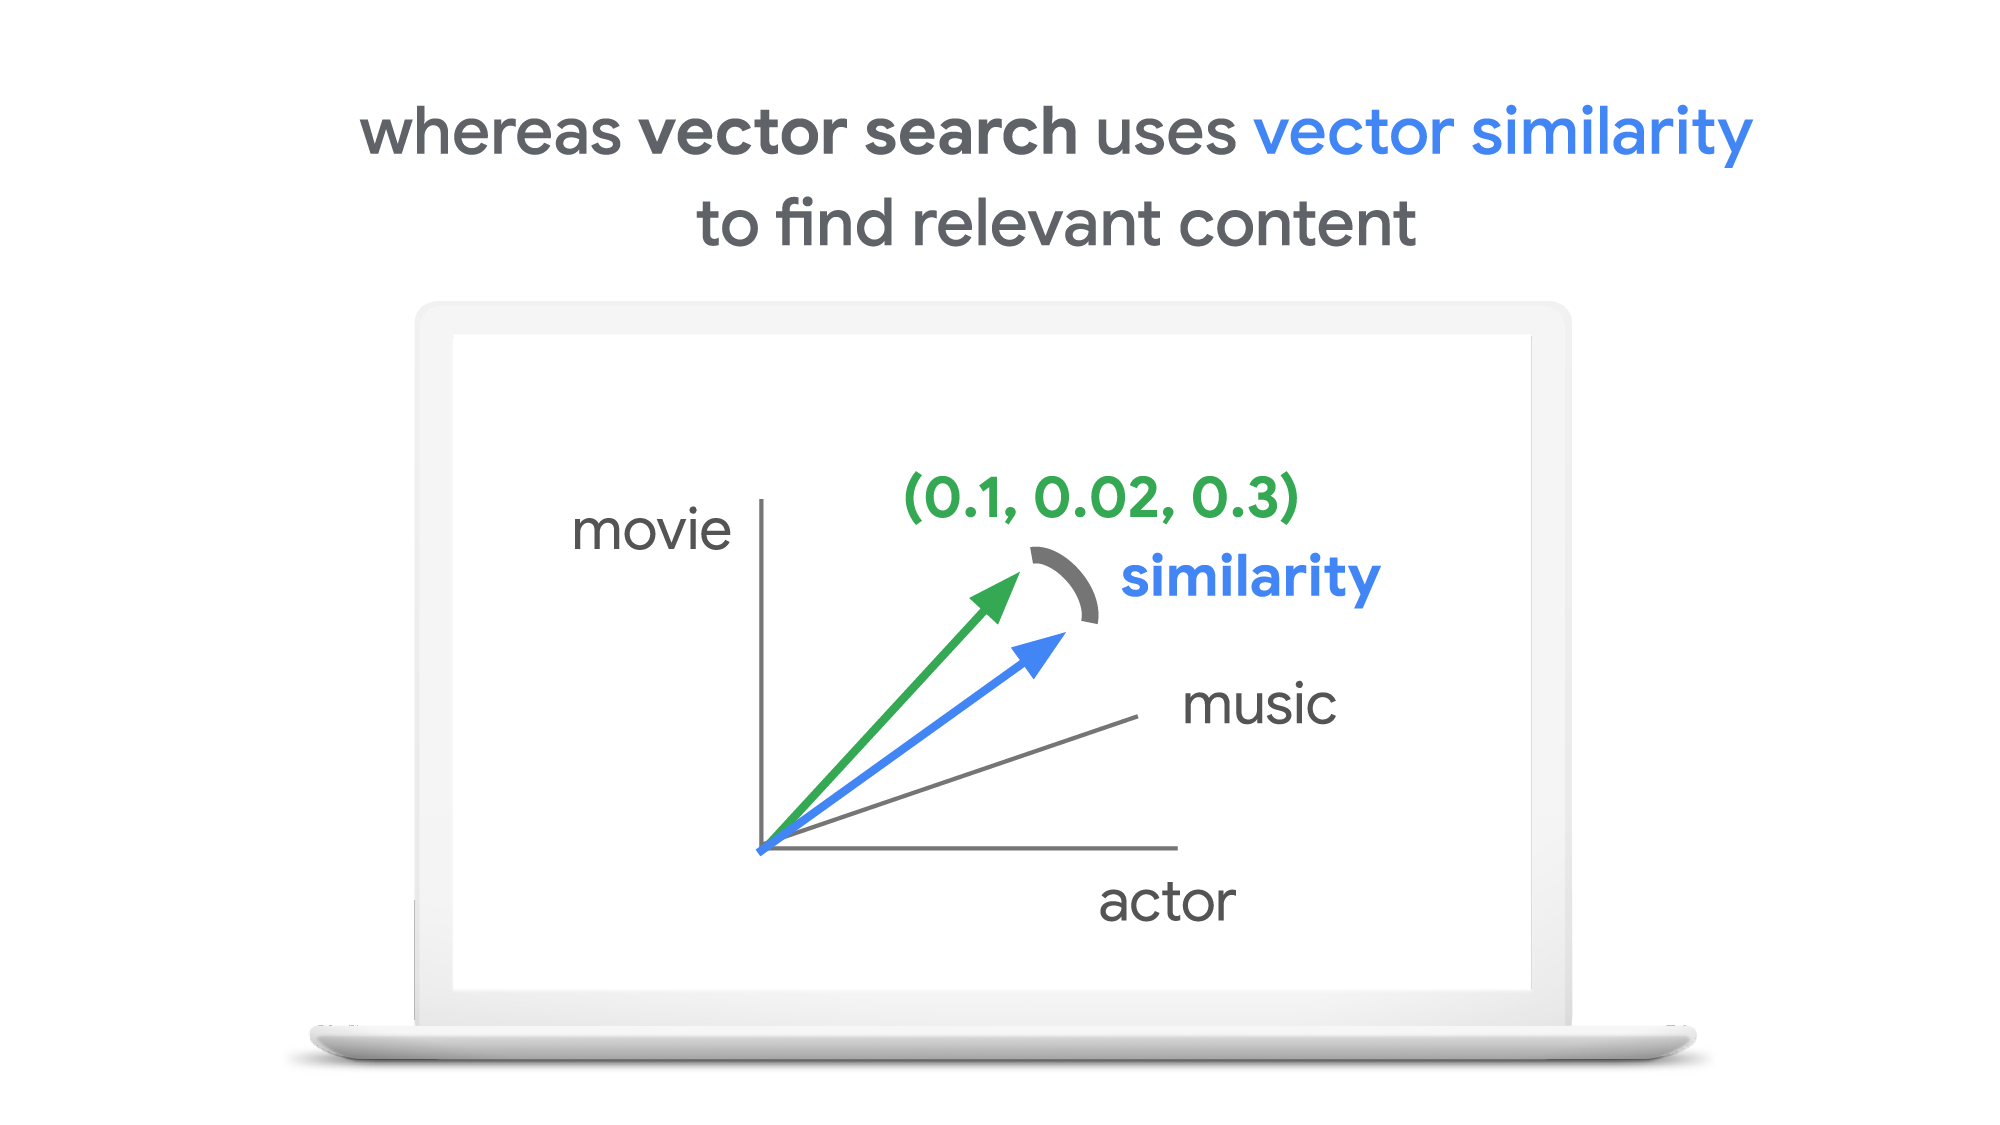
In contrast, vector search uses vectors (where each vector is a list of numbers) for representing and searching content. The combination of the numbers defines similarity to specific topics. For example, if an image (or any content) includes 10% of “movie”, 2% of “music”, and 30% of “actor”-related content, then you could define a vector [0.1, 0.02, 0.3] to represent it. (Note: this is an overly simplified explanation of the concept; the actual vectors have much more complex vector spaces). You can find similar content by comparing the distances and similarities between vectors. This is how Google services find valuable content for a wide variety of users worldwide in milliseconds.
With keyword search, you can only specify a binary choice as an attribute of each piece of content; it’s either about a movie or not, either music or not, and so on. Also, you cannot express the actual “meaning” of the content to search. If you specify a keyword “films”, for example, you would not see any content related to “movies” unless there was a synonyms dictionary that explicitly linked these two terms in the database or search engine.
Vector search provides a much more refined way to find content, with subtle nuances and meanings. Vectors can represent a subset of content that contains “much about actors, some about movies, and a little about music”. Vectors can represent the meaning of content where “films”, “movies”, and “cinema” are all collected together. Also, vectors have the flexibility to represent categories previously unknown to or undefined by service providers. For example, emerging categories of content primarily attractive to kids, such as ASMR or slime, are really hard for adults or marketing professionals to predict beforehand, and going back through vast databases to manually update content with these new labels would be all but impossible to do quickly. But vectors can capture and represent never-before-seen categories instantly.
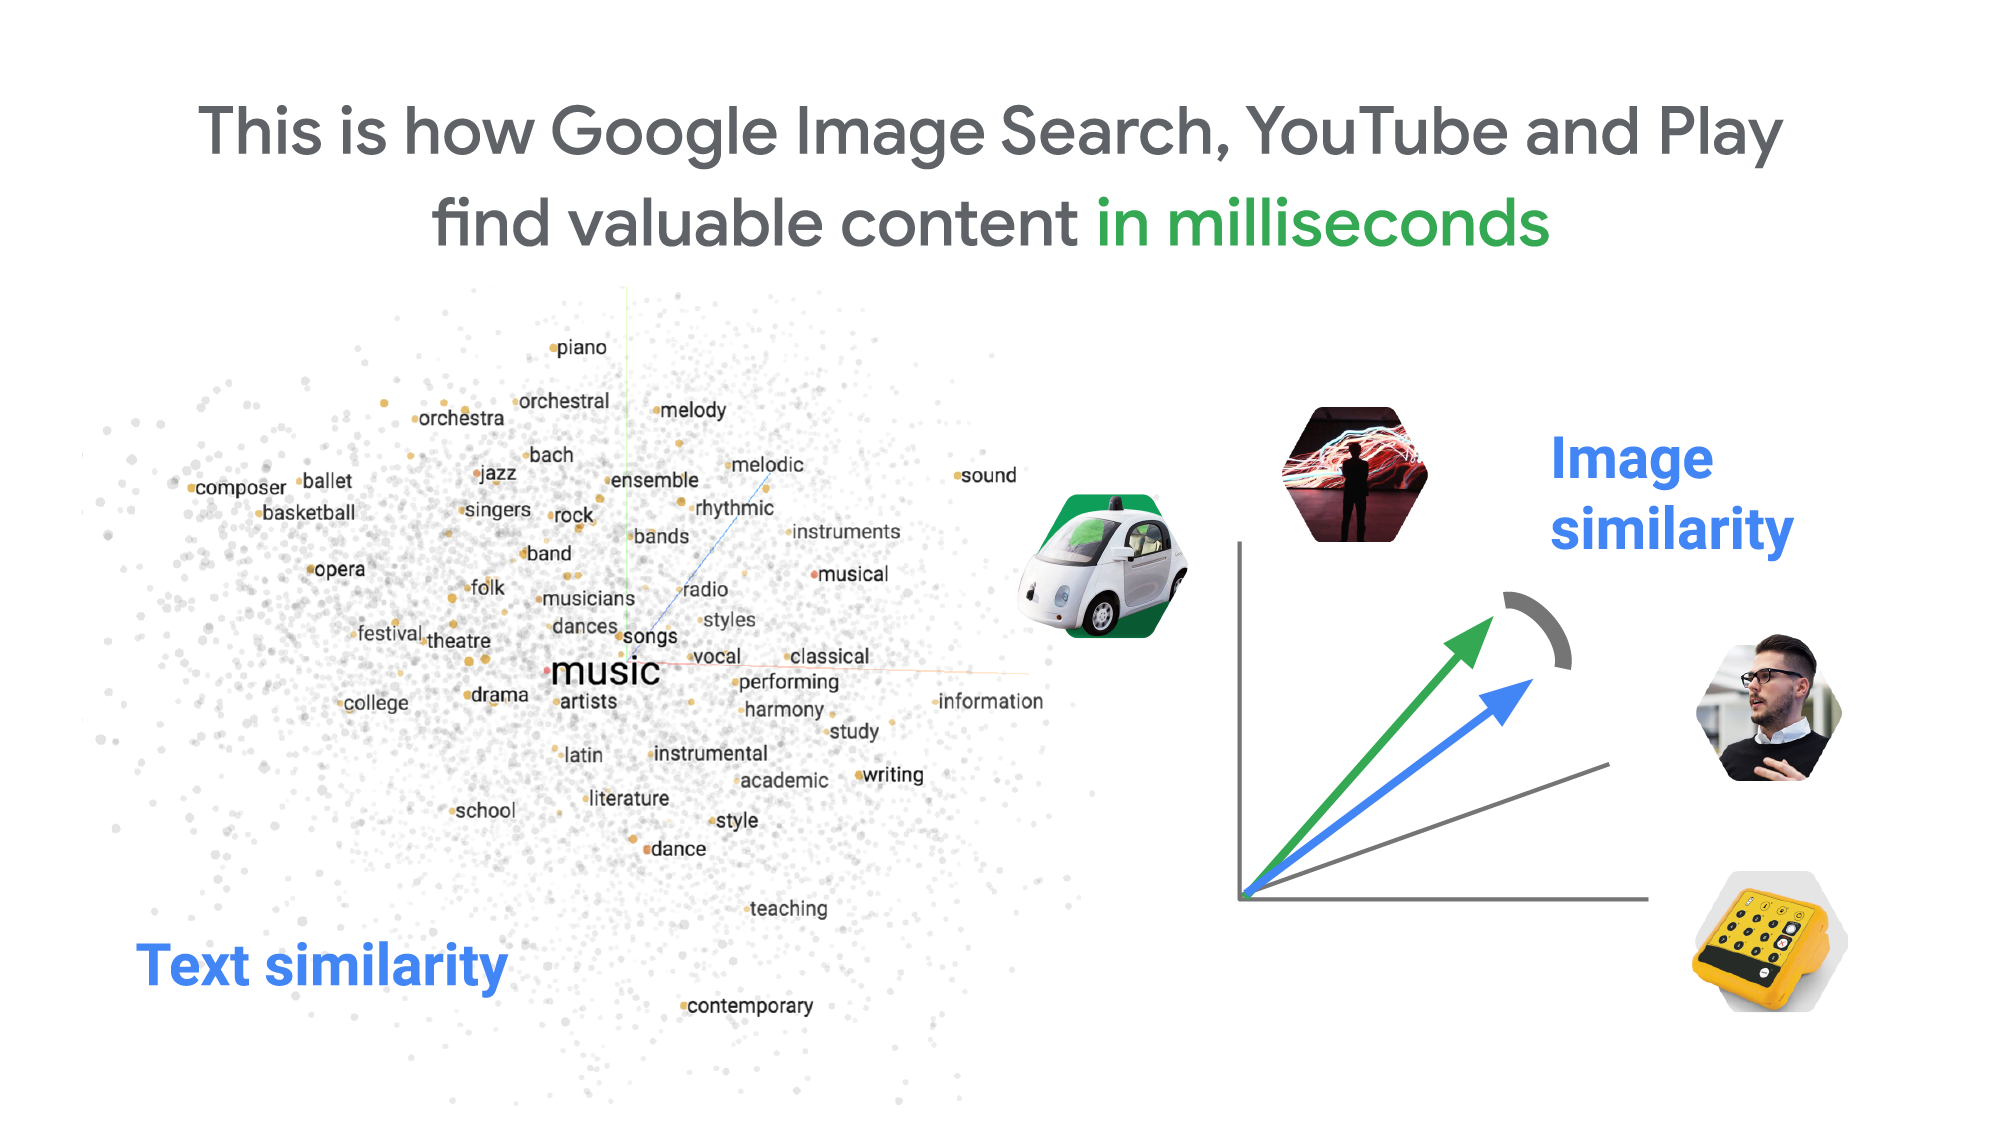
Vector search changes business
Vector search is not only applicable to image and text content. It can also be used for information retrieval for anything you have in your business when you can define a vector to represent each thing. Here are a few examples:
- Finding similar users: If you define a vector to represent each user in your business by combining the user’s activities, past purchase history, and other user attributes, then you can find all users similar to a specified user. You can then see, for example, users who are purchasing similar products, users that are likely bots, or users who are potential premium customers and who should be targeted with digital marketing.
- Finding similar products or items: With a vector generated from product features such as description, price, sales location, and so on, you can find similar products to answer any number of questions; for example, “What other products do we have that are similar to this one and may work for the same use case?” or “What products sold in the last 24 hours in this area?” (based on time and proximity)
- Finding defective IoT devices: With a vector that captures the features of defective devices from their signals, vector search enables you to instantly find potentially defective devices for proactive maintenance.
- Finding ads: Well-defined vectors let you find the most relevant or appropriate ads for viewers in milliseconds at high throughput.
- Finding security threats: You can identify security threats by vectorizing the signatures of computer virus binaries or malicious attack behaviors against web services or network equipment.
- …and many more: Thousands of different applications of vector search in all industries will likely emerge in the next few years, making the technology as important as relational databases.
OK, vector search sounds cool. But what are the major challenges to applying the technology to real business use cases? Actually there are two:
- Creating vectors that are meaningful for business use cases
- Building a fast and scalable vector search service
Embeddings: meaningful vectors for business use cases
The first challenge is creating vectors for representing various entities that are meaningful and useful for business use cases. This is where deep learning technology can really shine. In the case of the MatchIt Fast demo, the application simply uses a pre-trained MobileNet v2 model for extracting vectors from images, and the Universal Sentence Encoder (USE) for text. By applying such models to raw data, you can extract “embeddings” – vectors that map each row of data in a space of their “meanings”. MobileNet puts images that have similar patterns and textures closer to one another in the embedding space, and USE puts texts that have similar topics closer.
For example, a carefully designed and trained machine learning model could map movies into an embedding space like the following:
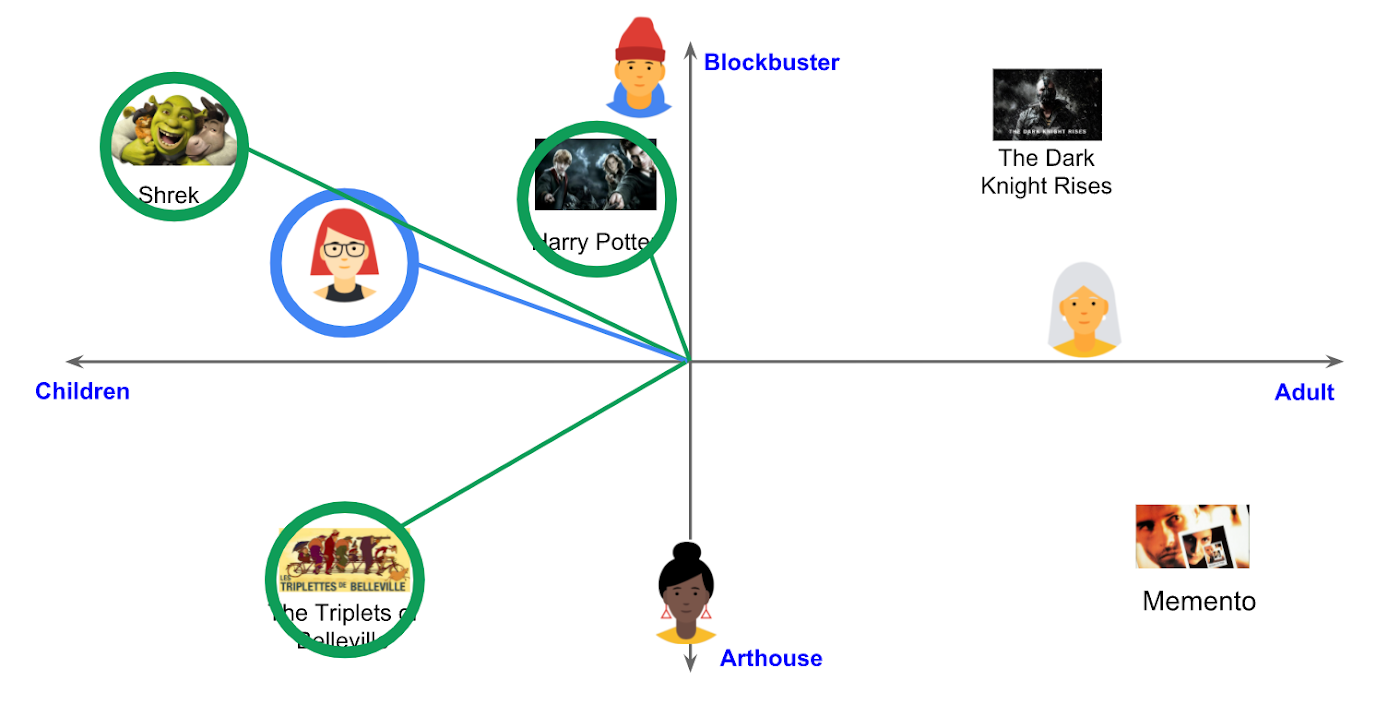
With the embedding space shown here, users could find recommended movies based on the two dimensions: is the movie for children or adults, and is it a blockbuster or arthouse movie? This is a very simple example, of course, but with an embedding space like this that fits your business requirements, you can deliver a better user experience on recommendation and information retrieval services with insights extracted from the model.
For more about creating embeddings, the Machine Learning Crash Course on Recommendation Systems is a great way to get started. We will also discuss how to extract better embeddings from business data later in this post.
Building a fast and scalable vector search service
Suppose that you have successfully extracted useful vectors (embeddings) from your business data. Now the only thing you have to do is search for similar vectors. That sounds simple, but in practice it is not. Let’s see how the vector search works when you implement it with BigQuery in a naive way:https://www.youtube.com/embed/wHNJspvxj2w?enablejsapi=1&
It takes about 20 seconds to find similar items (fish images in this case) from a pool of one million items. That level of performance is not so impressive, especially when compared to the MatchIt Fast demo. BigQuery is one of the fastest data warehouse services in the industry, so why does the vector search take so long?
This illustrates the second challenge: building a fast and scalable vector search engine isn’t an easy task. The most widely used metrics for calculating the similarity between vectors are L2 distance (Euclidean distance), cosine similarity, and inner product (dot product).
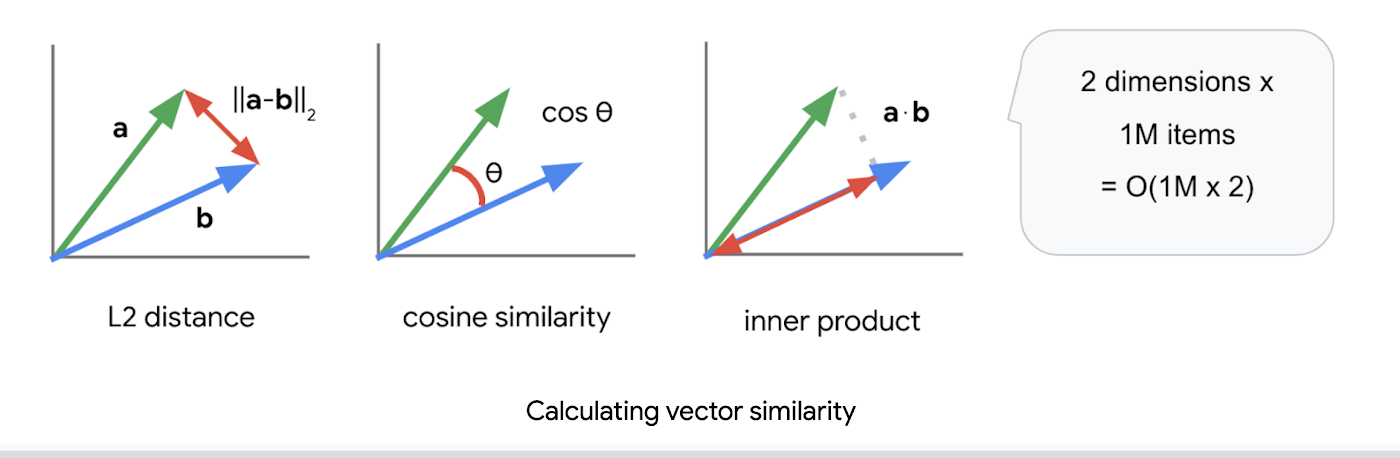
But all require calculations proportional to the number of vectors multiplied by the number of dimensions if you implement them in a naive way. For example, if you compare a vector with 1024 elements to 1M vectors, the number of calculations will be proportional to 1024 x 1M = 1.02B. This is the computation required to look through all the entities for a single search, and the reason why the BigQuery demo above takes so long.
Instead of comparing vectors one by one, you could use the approximate nearest neighbor (ANN) approach to improve search times. Many ANN algorithms use vector quantization (VQ), in which you split the vector space into multiple groups, define “codewords” to represent each group, and search only for those codewords. This VQ technique dramatically enhances query speeds and is the essential part of many ANN algorithms, just like indexing is the essential part of relational databases and full-text search engines.
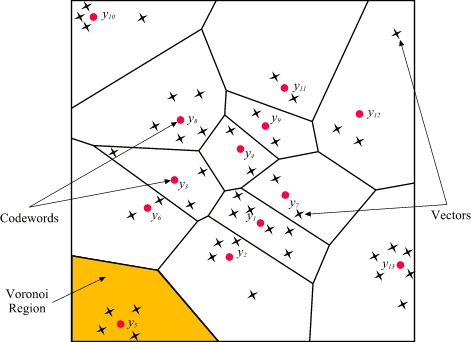
As you may be able to conclude from the diagram above, as the number of groups in the space increases the speed of the search decreases and the accuracy increases. Managing this trade-off — getting higher accuracy at shorter latency — has been a key challenge with ANN algorithms.
Last year, Google Research announced ScaNN, a new solution that provides state-of-the-art results for this challenge. With ScaNN, they introduced a new VQ algorithm called anisotropic vector quantization:
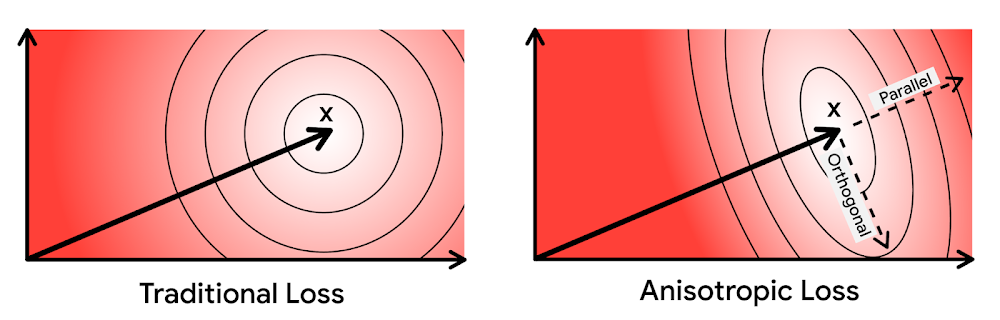
Anisotropic vector quantization uses a new loss function to train a model for VQ for an optimal grouping to capture farther data points (i.e. higher inner product) in a single group. With this idea, the new algorithm gives you higher accuracy at lower latency, as you can see in the benchmark result below (the violet line):
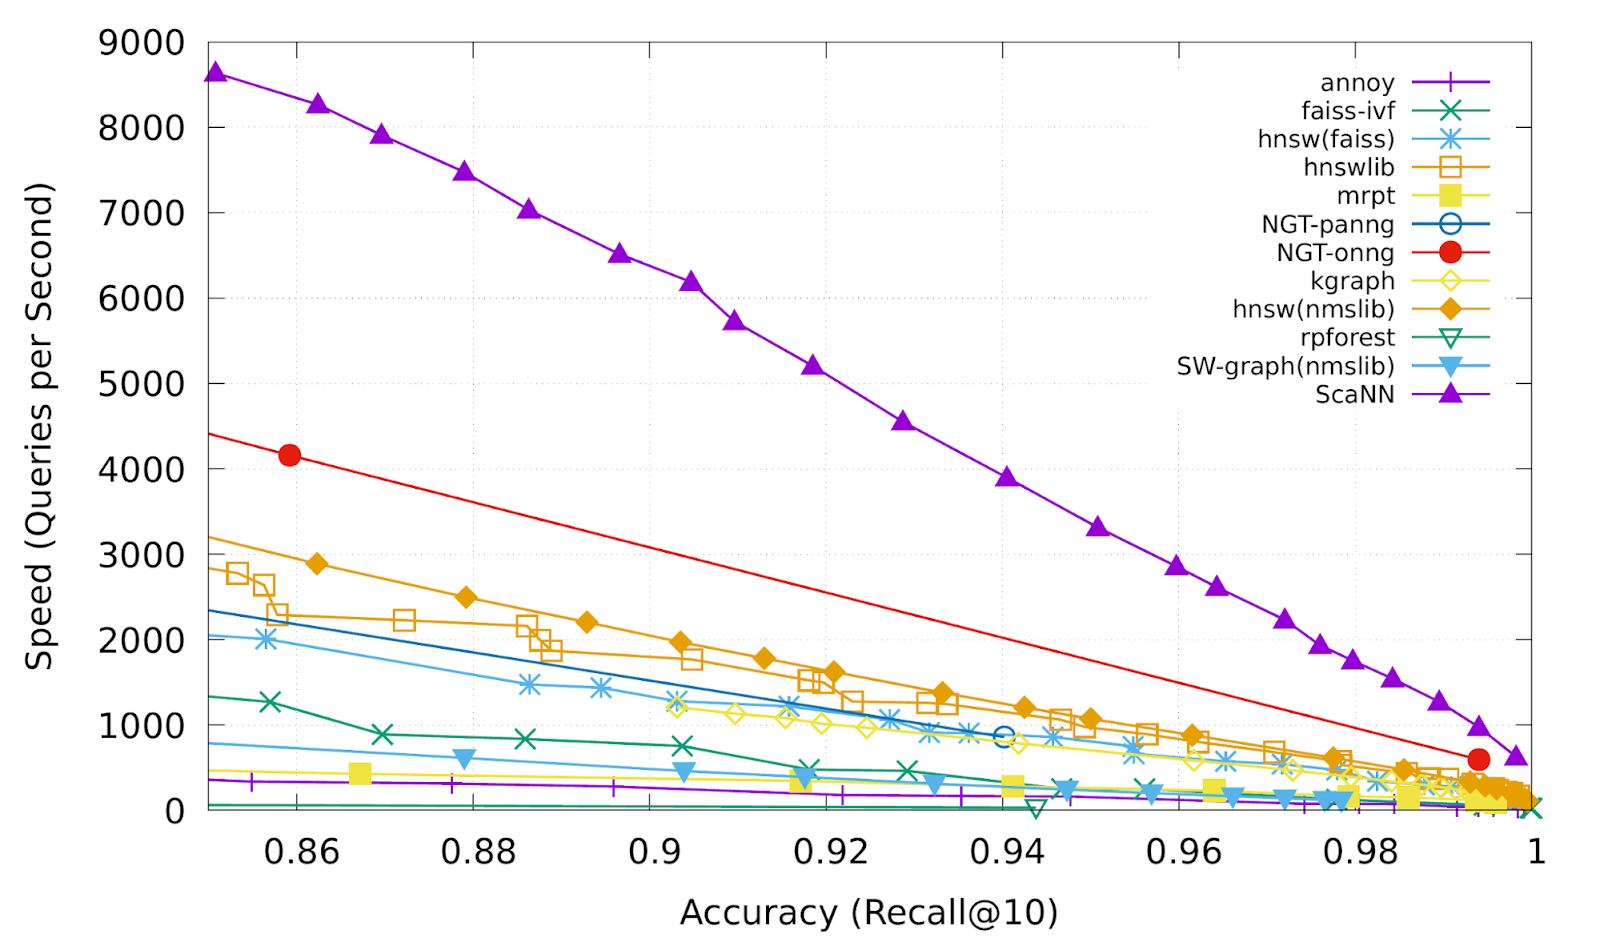
This is the magic ingredient in the user experience you feel when you are using Google Image Search, YouTube, Google Play, and many other services that rely on recommendations and search. In short, Google’s ANN technology enables users to find valuable information in milliseconds, in the vast sea of web content.
How to use Vertex AI Matching Engine
Now you can use the same search technology that powers Google services with your own business data. Vertex AI Matching Engine is the product that shares the same ScaNN based backend with Google services for fast and scalable vector search, and recently it became GA and ready for production use. In addition to ScaNN, Matching Engine gives you additional features as a commercial product, including:
- Scalability and availability: The open source version of ScaNN is a good choice for evaluation purposes, but as with most new and advanced technologies, you can expect challenges when putting it into production on your own. For example, how do you operate it on multiple nodes with high scalability, availability, and maintainability? Matching Engine uses Google’s production backend for ScaNN, which provides auto-scaling and auto-failover with a large worker pool. It is capable of handling tens of thousands of requests per second, and returns search results in less than 10 ms for the 90th percentile with a recall rate of 95 – 98%.
- Fully managed: You don’t have to worry about building and maintaining the search service. Just create or update an index with your vectors, and you will have a production-ready ANN service deployed. No need to think about rebuilding and optimizing indexes, or other maintenance tasks.
- Filtering: Matching Engine provides filtering functionality that enables you to filter search results based on tags you specify on each vector. For example, you can assign “country” and “stocked” tags to each fashion item vector, and specify filters like “(US OR Canada) AND stocked” or “not Japan AND stocked” on your searches.
Let’s see how to use Matching Engine with code examples from the MatchIt Fast demo.
Generating embeddings
Before starting the search, you need to generate embeddings for each item like this one:
{"Id":"b5c65fea9b0b8a57bfa574ea","Embedding": [0.16329009830951691,0.92436742782592773,0.00095699273515492678,0.011479727923870087,0.0089491046965122223,0.019959751516580582,0.031516745686531067,0.0066015380434691906,0.46404418349266052,...
This is an embedding with 1280 dimensions for a single image, generated with a MobileNet v2 model. The MatchIt Fast demo generates embeddings for two million images with the following code:
class Vectorizer:def __init__(self):self._model = tf.keras.Sequential([hub.KerasLayer("https://tfhub.dev/google/imagenet/mobilenet_v2_100_224/feature_vector/5", trainable=False)])self._model.build([None, 224, 224, 3]) # Batch input shape.def vectorize(self, jpeg_file):...snip...embedding = self._model.predict({"inputs": input_tensor})[0].tolist()return embedding
After you generate the embeddings, you store them in a Google Cloud Storage bucket.
Configuring an index
Then, define a JSON file for the index configuration:
{"contentsDeltaUri": "gs://match-it-fast-us-central1/wikimedia_images/index-1","config": {"dimensions": 1280,"approximateNeighborsCount": 150,"distanceMeasureType": "SQUARED_L2_DISTANCE","algorithm_config": {"treeAhConfig": {"leafNodeEmbeddingCount": 1000,"leafNodesToSearchPercent": 5}}}}
You can find a detailed description for each field in the documentation, but here are some important fields:
contentsDeltaUri: the place where you have stored the embeddingsdimensions: how many dimensions in the embeddingsapproximateNeighborsCount: the default number of neighbors to find via approximate searchdistanceMeasureType: how the similarity between embeddings should be measured, either L1, L2, cosine or dot product (this page explains which one to choose for different embeddings)
To create an index on the Matching Engine, run the following gcloud command where the metadata-file option takes the JSON file name defined above.
gcloud --project=gn-match-it-fast beta ai indexes create \--display-name=wikimedia-images \--description="Wikimedia Image Demo" \--metadata-file=metadata/wikimedia_images_index_metadata.json \--region=us-central1
Run the search
Now the Matching Engine is ready to run. The demo processes each search request in the following order:
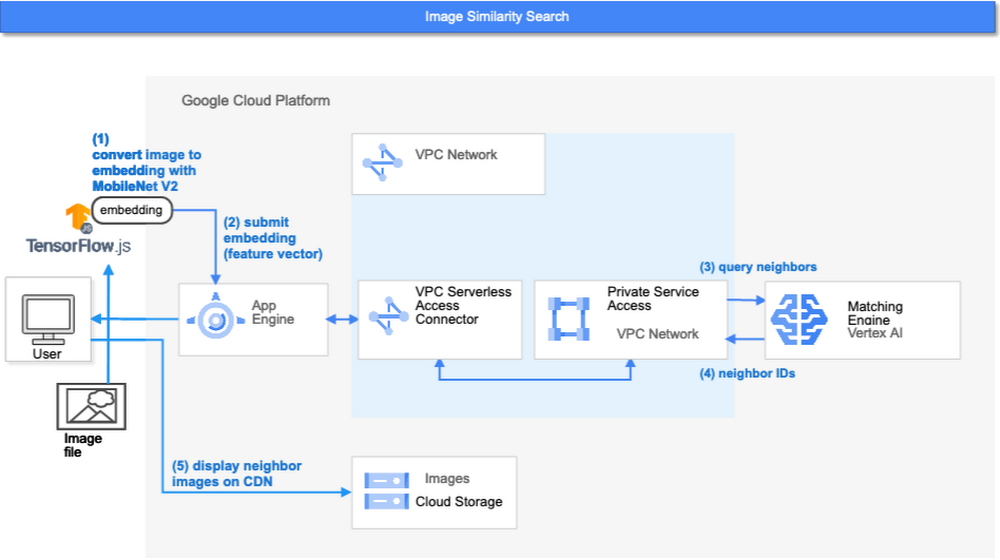
- First, the web UI takes an image (the one chosen or uploaded by the user) and encodes it into an embedding using the TensorFlow.js MobileNet v2 model running inside the browser. Note: this “client-side encoding” is an interesting option for reducing network traffic when you can run the encoding at the client. In many other cases, you would encode contents to embeddings with a server-side prediction service such as Vertex AI Prediction, or just retrieve pre-generated embeddings from a repository like Vertex AI Feature Store.
- The App Engine frontend receives the embedding and submits a query to the Matching Engine. Note that you can also use any other compute services in Google Cloud for submitting queries to Matching Engine, such as Cloud Run, Compute Engine, or Kubernetes Engine, or whatever is most suitable for your applications.
- Matching Engine executes its search. The connection between App Engine and Matching Engine is provided via a VPC private network for optimal latency.
- Matching Engine returns the IDs of similar vectors in its index.
Step 3 is implemented with the following code:
class MatchingQueryClient:...snip...def query_embedding(self, embedding, num_neighbors=30):request = match_service_pb2.MatchRequest()request.deployed_index_id = self._deployed_index_idfor v in embedding:request.float_val.append(v)request.num_neighbors = num_neighborsresponse = self._stub.Match(request)return response
The request to the Matching Engine is sent via gRPC as you can see in the code above. After it gets the request object, it specifies the index id, appends elements of the embedding, specifies the number of neighbors (similar embeddings) to retrieve, and calls the Match function to send the request. The response is received within milliseconds.
Next steps: Making changes for various use cases and better search quality
As we noted earlier, the major challenges in applying vector search on production use cases are:
- Creating vectors that are meaningful for business use cases
- Building a fast and scalable vector search service
From the example above, you can see that Vertex AI Matching Engine solves the second challenge. What about the first one? Matching Engine is a vector search service; it doesn’t include the creating vectors part.
The MatchIt Fast demo uses a simple way of extracting embeddings from images and contents; specifically it uses an existing pre-trained model (either MobileNet v2 or Universal Sentence Encoder). While those are easy to get started with, you may want to explore other options to generate embeddings for other use cases and better search quality, based on your business and user experience requirements.
For example, how do you generate embeddings for product recommendations? The Recommendation Systems section of the Machine Learning Crash Course is a great resource for learning how to use collaborative filtering and DNN models (the two-tower model) to generate embeddings for recommendation. Also, TensorFlow Recommenders provides useful guides and tutorials for the topic, especially on the two-tower model and advanced topics. For integration with Matching Engine, you may also want to check out the Train embeddings by using the two-tower built-in algorithm page.
Another interesting solution is the Swivel model. Swivel is a method for generating item embeddings from an item co-occurrence matrix. For structured data, such as purchase orders, the co-occurrence matrix of items can be computed by counting the number of purchase orders that contain both product A and product B, for all products you want to generate embeddings for. To learn more, take a look at this tutorial on how to use the model with Matching Engine.
If you are looking for more ways to achieve better search quality, consider metric learning, which enables you to train a model for discrimination between entities in the embedding space, not only classification:
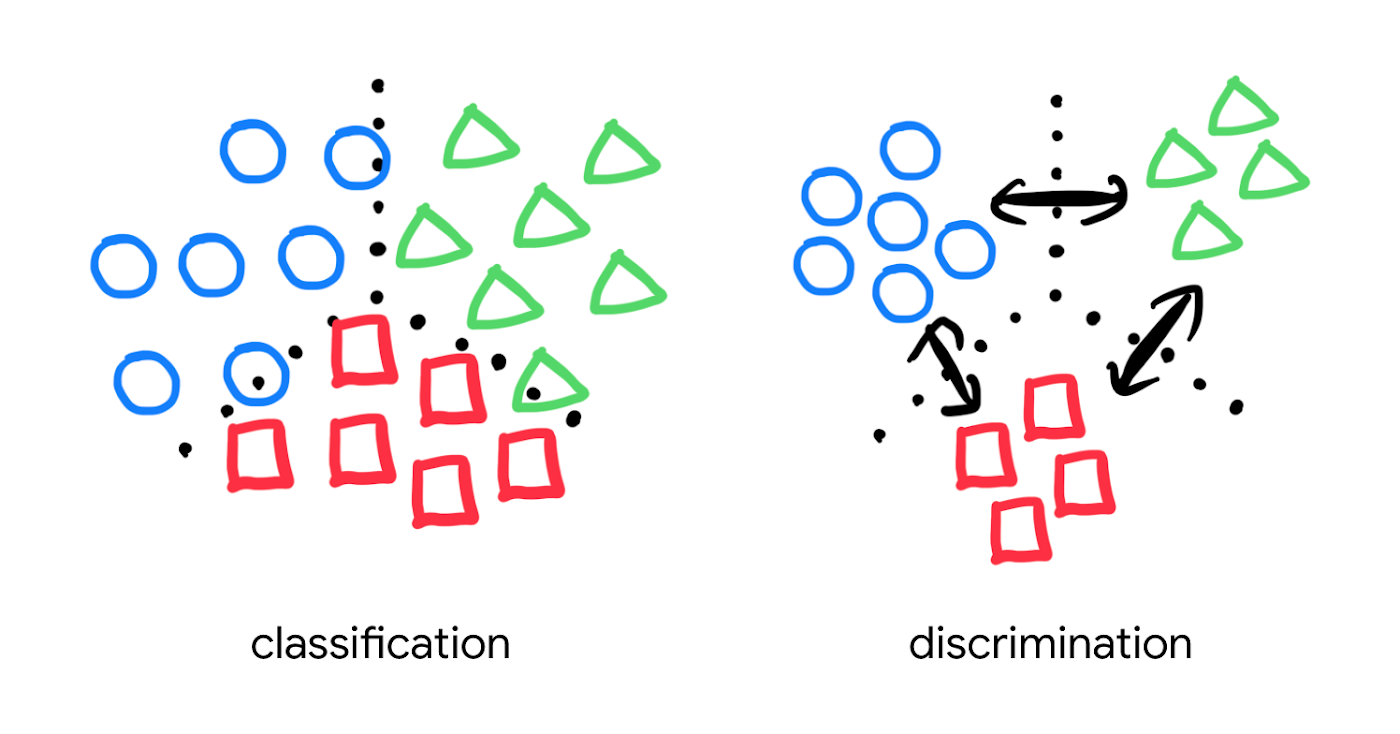
Popular pre-trained models such as the MobileNet v2 can classify each object in an image, but they are not explicitly trained to discriminate the objects from each other with a defined distance metric. With metric learning, you can expect better search quality by designing the embedding space optimized for various business use cases. TensorFlow Similarity could be an option for integrating metric learning with Matching Engine.
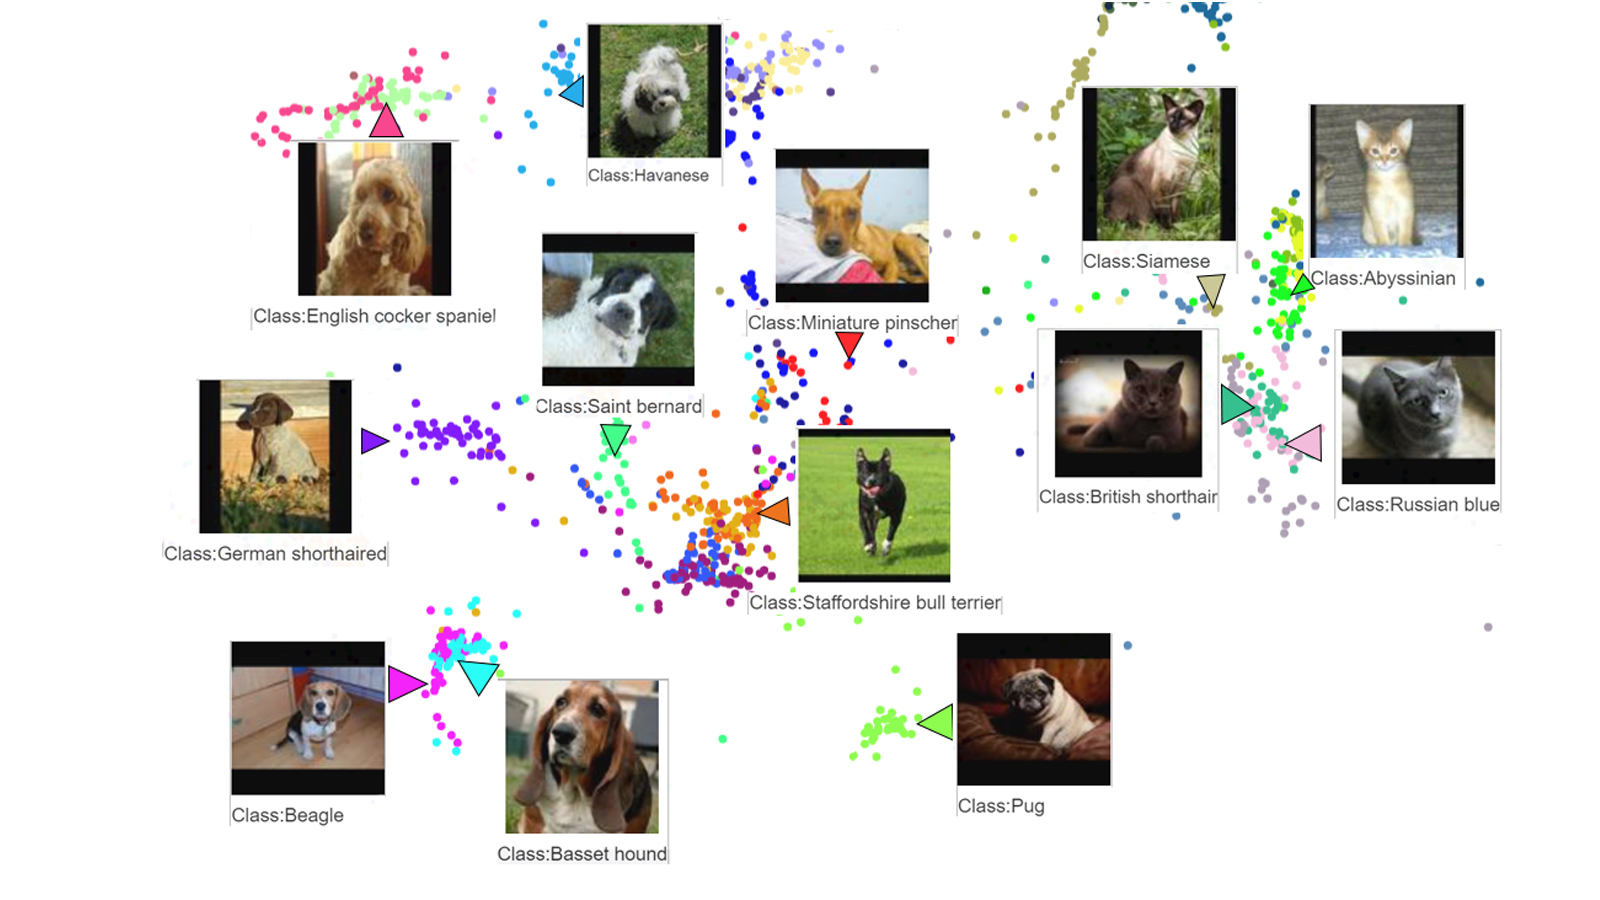
Interested? Today, we’re just beginning the migration from traditional search technology to new vector search. Over the next 5 to 10 years, many more best practices and tools will be developed in the industry and community. These tools and best practices will help answer many questions, like… How do you design your own embedding space for a specific business use case? How do you measure search quality? How do you debug and troubleshoot the vector search? How do you build a hybrid setup with existing search engines for meeting sophisticated requirements? There are many new challenges and opportunities ahead for introducing the technology to production. Now’s the time to get started delivering better user experiences and seizing new business opportunities with Matching Engine powered by vector search.
Acknowledgements
We would like to thank Anand Iyer, Phillip Sun, and Jeremy Wortz for their invaluable feedback to this post.
Google Cloud and Univision Partnership to Up the Ante in UX for Spanish-speaking Audience

6861
Of your peers have already read this article.
1:00 Minutes
The most insightful time you'll spend today!
The past year has given everyone lots to think about—about our priorities as people and as businesses. As the world retreated behind closed doors, we saw how shared interests and experiences can bring us together. As the world grappled with a common enemy, we witnessed just how differently individuals, communities and indeed entire countries can experience a situation. And as we faced seemingly unending obstacles to making it through the pandemic, we saw how making smart decisions based on data can drive meaningful solutions—fast.
That’s why we here at Google Cloud are so proud to partner Univision, the country’s leading Spanish-language content and media company. By partnering with Google Cloud, Univision will be able to accelerate growth across its portfolio of properties, deliver an enhanced user experience for Spanish-speaking audiences and provide the enterprise solutions needed to create the Spanish-language media company of the future.
According to Instituto Cervantes, there are over 580 million Spanish language speakers worldwide. Those viewers, like people everywhere, are avid consumers of streaming content. In Q4 of 2020 alone, viewing time for that content increased by 44%1, and in 2020, from 50%2 more sources. With that surge in demand, Univision needed a cloud provider whose infrastructure could reach Hispanic viewers around the world. With two-plus decades spent building out its network and data centers, as well as global content-delivery capabilities, Google Cloud has the infrastructure Univision needs to reach viewers across the Spanish-speaking world.
At the same time, with such a diverse audience for their content, Univision needs to target that content to viewers’ specific preferences. By applying Google Cloud’s artificial intelligence (AI) and machine learning (ML) technology across its content, Univision intends to personalize content based on shows users have previously watched, enhancing their engagement and viewing experience.
And as Univision transforms the user experience, it can use Google Cloud’s data and analytics suite to garner deeper insights into its audience and forge stronger relationships with them on an individual basis. With Looker and BigQuery, Univision employees will have access to real-time data to help them make business decisions about programming.
Univision will also migrate video distribution and production operations to Google Cloud, where we’ll help them streamline media workflows and develop innovative new capabilities. Meanwhile, Google Cloud’s tight business and technical integration with other Google services will help ensure Univision reaches viewers on the device of their choice, wherever they are in the world. For example, in the coming years, Univision will expand its global YouTube partnership and will integrate with entertainment features on Google Search that help people better discover TV shows and movies. The company will also use Google Ad Manager for global ad decisioning and Google’s Dynamic Ad Insertion for PrendeTV and future video-on-demand offerings. Finally, Univision will distribute its content and services on Google Play across Android phones and tablets, as well as Google TV and other Android TV OS devices.
We’re thrilled to partner with Univision to help them reach the Spanish-speaking world with their content. With our cloud portfolio, we can help them reach individual viewers around the world, with personalized content that they can consume however they see fit. Best of all, together, we can help them achieve this vision fast, leveraging established cloud, content delivery, and data analytics technologies. You can learn more about the partnership here.
Global Communication Made Easy with Translation Hub

2496
Of your peers have already read this article.
3:30 Minutes
The most insightful time you'll spend today!
Hello! ¡Hola! 你好! नमस्ते! Bonjour! Being greeted in your own language can instantly put a smile on your face, and organizations around the world recognize that messages become more inclusive and powerful when translated into many languages.
As the Head of Product Management for Translation AI at Google Cloud, I am always looking to make our user’s lives easier when it comes to language tools—like Google Cloud’s Document Translation API, which has been used to translate over 2.5 billion documents across Google Translate and our Cloud customers.
But during my time working on translation products, I have seen enterprise users making compromises, like sacrificing cost and speed of translation for quality, or paying much more for high-quality translations and making peace with the slow turnaround times and high costs. That’s why we are excited to see momentum building behind Translation Hub, which launched earlier this year. Built to address organizations’ localization and translation challenges and delight users with an incredibly intuitive and administratively simple offering, Translation Hub makes it easy to translate content at scale—users just need to select the files to be translated, choose the output languages, and then they’re off and running.
In this article, we’ll take a closer look at Translation Hub’s powerful features, and the ways it is helping customers do more with their content.
Enterprise translation, reimagined: fast, lean, and intuitive
Translation Hub is a fully-managed, self-serve translation offering, powered by Google AI and built for the enterprise. With Translation Hub, businesses can instantaneously translate content into 135 languages with a single click, via an intuitive interface that integrates human reviews (i.e., a “human in the loop”) where required.
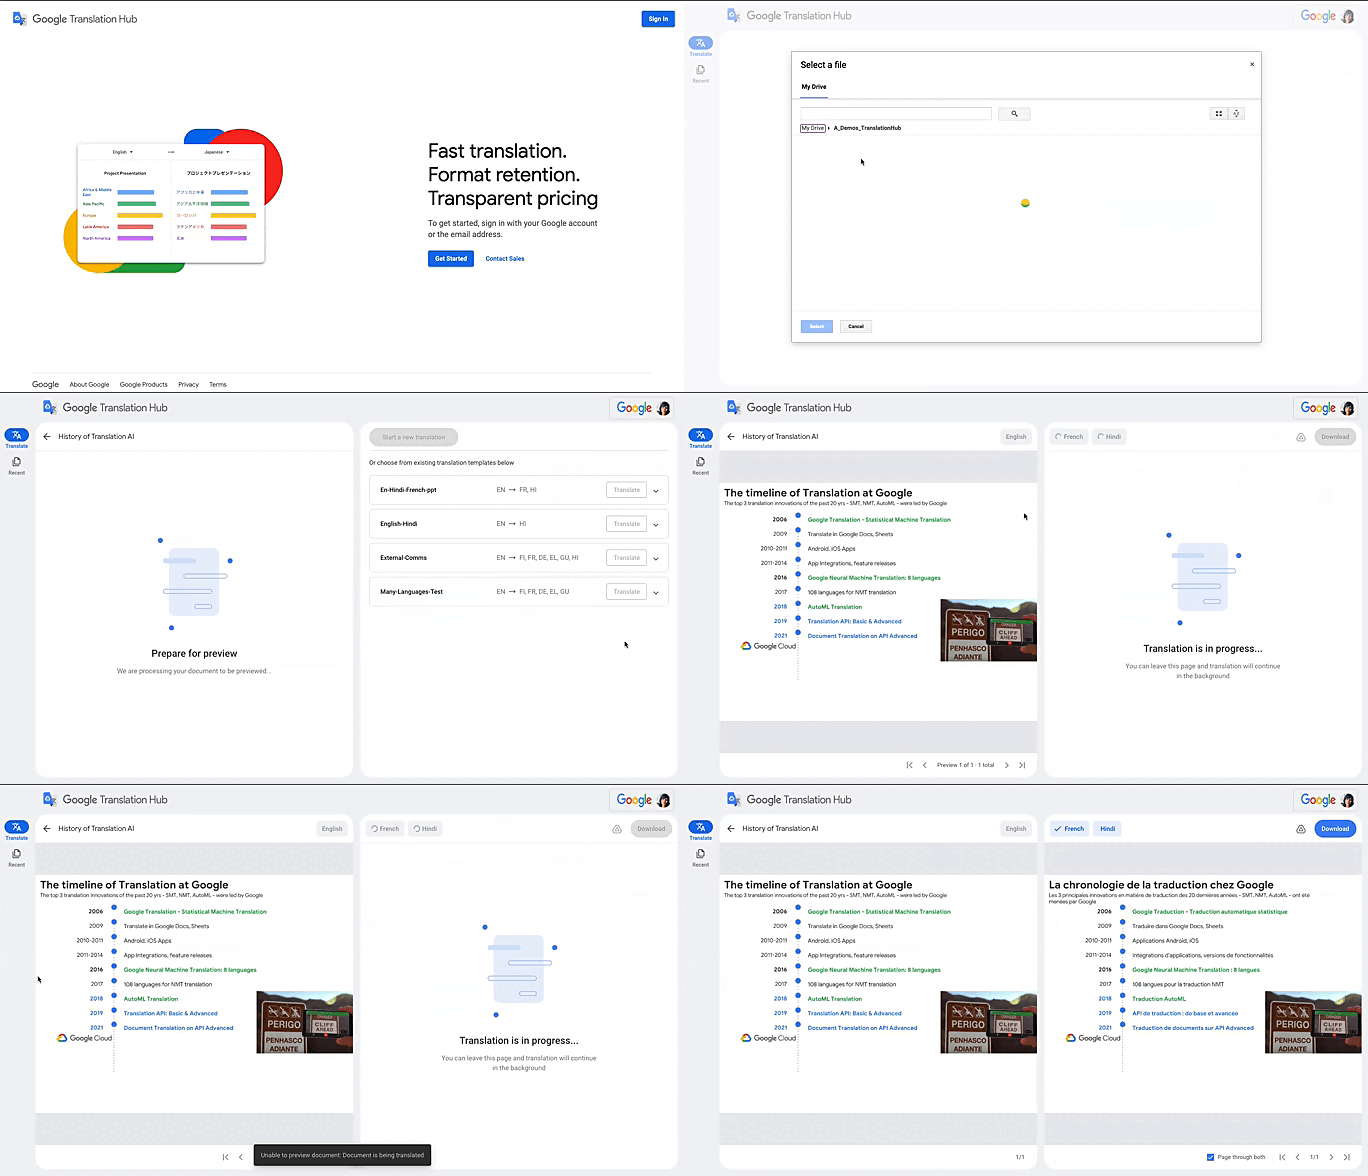
Translation Hub is designed to be both easy to manage and use. Each organization’s Translation Hub administrator uses the Google Cloud console to onboard and manage business users, typically by adding their email, which triggers an invite to the business user. Once a business user is added, they can sign in and start requesting translations and post-editing reviews.
With advanced features like “Glossary” and “Custom Translation Models (AutoML Translation),” Translation Hub makes it easy for enterprises to control the terminology and inject domain-specific context to meet their unique needs. Furthermore, Translation Hub ensures that organizations own their Translation Memory, for use in future translations or to leverage as a rich, human-validated source of training data for custom translation models (e.g., AutoML Translation). For example, when a user edits a phrase or segment through Translation Hub, this is immediately captured and used in the next translation for all future users who initiate translation where the same content or segment appears.
One of my favorite features is that Translation Hub preserves the layout and format of documents, saving both time and money. And while Translation Hub works with Google Drive (you can ingest and export documents to Drive) and is compatible with all our Google Workspace content sources (e.g., Slides, Docs etc.), it also supports many of the most commonly used formats, like documents and presentations created in Microsoft Office, and scanned and native PDFs.
Organizations need to be able to share the output of AI-powered translation with localization teams or agencies, for review. They need to save time by leveraging glossaries or customer machine learning (ML) models. They need these capabilities in one cohesive platform—and they need all of this to be user-friendly for all kinds of business users. It’s the difference between being able to automate translations in a few scenarios and being able to translate at scale. Google Cloud’s mission is to accelerate every organization’s ability to digitally transform, and with Translation Hub, our customers can leverage the best of AI for their content translations without sacrificing speed, quality or cost.
All of Google’s Translation Innovations within a single product
Translation Hub uses Google Cloud’s Translation API, AutoML Translation, and innovations in Neural Machine Translation Quality Prediction and Translation Memory—all technologies we’ve put to good use inside Google. For example, our localization teams have realized more than $80 million in cost avoidance and savings since 2021, using Google Cloud AutoML Translation and localization expertise.
“In just three months of using Translation Hub and AutoML translation models, we saw our translated page count go up by 700% and translation cost reduced by 90%,” said Murali Nathan, digital innovation and employee experience lead, at materials science company Avery Dennison. “Beyond numbers, Google’s enterprise translation technology is driving a feeling of inclusion among our employees. Every Avery Dennison employee has access to on-demand, general purpose, and company-specific translations. English language fluency is no longer a barrier, and our employees are beginning to broadly express themselves right in their native language.”
To get started with Translation Hub, visit our solution page, and for a deep dive, check out this Google Next ‘22 session, including more details about Avery Dennison’s use case.
More Relevant Stories for Your Company

Transcend from Prototype to Production: Train Your ML models with Vertex AI
You’re working on a new machine learning problem, and the first environment you use is a notebook. Your data is stored on your local machine, and you try out different model architectures and configurations, executing the cells of your notebook manually each time. This workflow is great for experimentation, but

Can Your Company Use Video AI? You’d Be Surprised at the Answer
Video AI is a powerful way to enable content discovery and engaging video experiences. Here, try it out right now! Google Cloud's easy-to-access video AI solutions can accomplish a bunch of things. Here are a few: Precise video analysis: Video Intelligence API automatically recognizes more than 20,000 objects, places, and

How Digital Simulation of Physical Stores Helped e-Commerce Companies Replenish Stocks and Fulfil Online Orders at Scale in 2020
Editor’s note: We’re inviting partners from across our retail ecosystem to share stories, best practices, and tips and tricks on how they are helping retailers transform during a time that has seen tremendous change. The original version of this blog was published by Trax Retail in October 2021. Please enjoy this updated

Want to Code for the Cloud? Get Started with the Native App Development Track
Earlier this year, we launched the Google Cloud skills challenge, which provides 30 days of free access to training to build your cloud knowledge and an opportunity to earn skill badges that showcase your Google Cloud competencies. Today, we’re adding a Native App Development track to the skills challenge, joining the Getting Started,
